3D Photography for Products: Tools and Techniques (2026 Guide)
.webp)
Last updated: February 2026
What You Will Learn
What 3D product photography is (and what it is not)
How to choose the right 3D output for your store
Tools and techniques: turntable, photogrammetry, and hybrid setups
3D photography equipment that actually moves the needle
3D photography packshot software and the production workflow
Where 3D photography AI fits (and where it does not)
Quality control and e-commerce deployment
You are trying to launch a new product line. Your team needs images for the PDP, Meta ads, Amazon, email, and maybe a retail pitch deck. Then someone says, “We should do 3D.” Suddenly you are pricing turntables, wondering if photogrammetry is a weekend project, and realizing a single SKU could turn into hundreds of files.
Here’s the thing: 3D photography can be worth it, but only if you pick a workflow that matches your margins, your catalog size, and how shoppers actually buy. Some products need a true 360 spin. Others need one solid hero image plus a few angles. And sometimes the fastest path is capturing a clean “digital master” once, then generating variations for campaigns later.
This guide breaks down the practical options, from turntable capture to photogrammetry to AI-assisted workflows. You will learn what equipment matters, what “packshot software” really does, and how to plan 3D assets so they drive conversion, not just production headaches. If you want a broader foundation first, start with our guide to product photos.
1) What 3D product photography is (and what it is not)
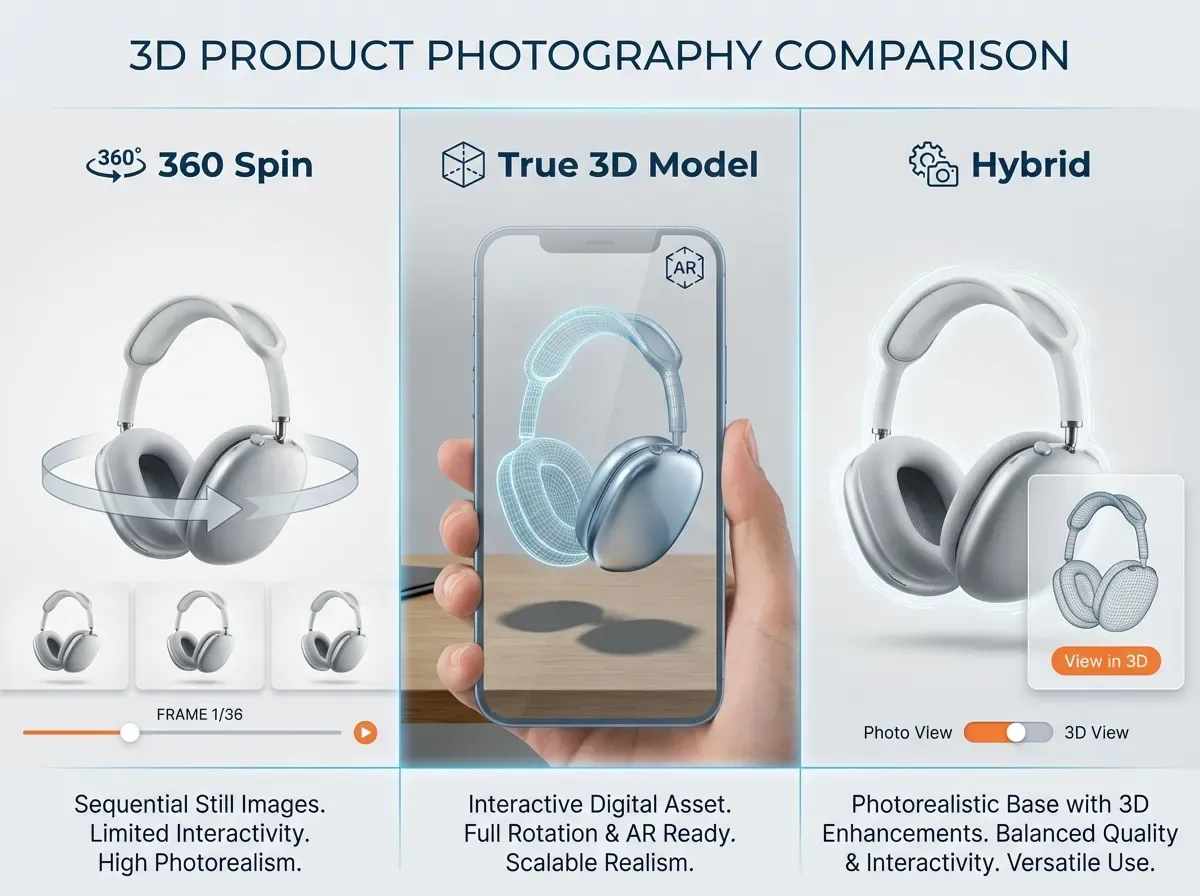
In e-commerce, “3D photography” usually means one of two things: a 360-degree product spin made from many photos, or a true 3D model created from photos and then rendered interactively.
A 360 spin is essentially a sequence of images shot around the product (or the product rotated on a turntable). The viewer feels like they are rotating the item, but technically they are watching a set of frames.
A true 3D model is different. It is geometry plus texture, which can be used in AR, configurators, and interactive viewers. If you are deciding between these approaches, it is worth reading product photography vs 3d rendering, because the cost, speed, and flexibility are not the same.
Why it matters for conversion
3D assets reduce uncertainty. That tends to help in categories where shoppers care about fit, finish, and details: footwear, bags, electronics, home goods, and premium packaging. The reality is that 3D only pays back when the asset is easy to load, easy to understand, and consistent across your catalog.
2) Choose the right 3D output for your store
From a practical standpoint, the “right” 3D output is the one that matches the buying decision. You can overbuild this fast.
A quick decision framework
360 spin: Best when shoppers want to inspect surfaces and edges and you need a familiar experience that works on most PDPs.
True 3D model (GLB/USDZ): Best when you want AR, product configuration, or consistent renders for endless viewpoints.
Hybrid: Capture once, then use that master to generate stills, close-ups, and campaign variations.
Consider this: if you sell 500 SKUs and each requires a 72-frame spin, that is 36,000 images before retouching. Your first “3D test” should be 3 to 5 representative products, not the full catalog.
If your main goal is web engagement and richer PDPs, look at 3d ecommerce strategies to understand where 3D actually lifts performance (and where it just adds page weight).
3) Tools and techniques: turntable, photogrammetry, and hybrid setups
There are three common production approaches. Each can work, but they have different failure modes.
Technique A: Turntable 360 capture
This is the classic packshot route: product on a motorized turntable, camera fixed, lighting fixed, capture a frame every few degrees. It is predictable and scalable.
Where teams struggle is consistency. If your product is not centered, your spin “wobbles.” If reflections change across frames, it looks cheap. If exposure shifts, the sequence flickers.
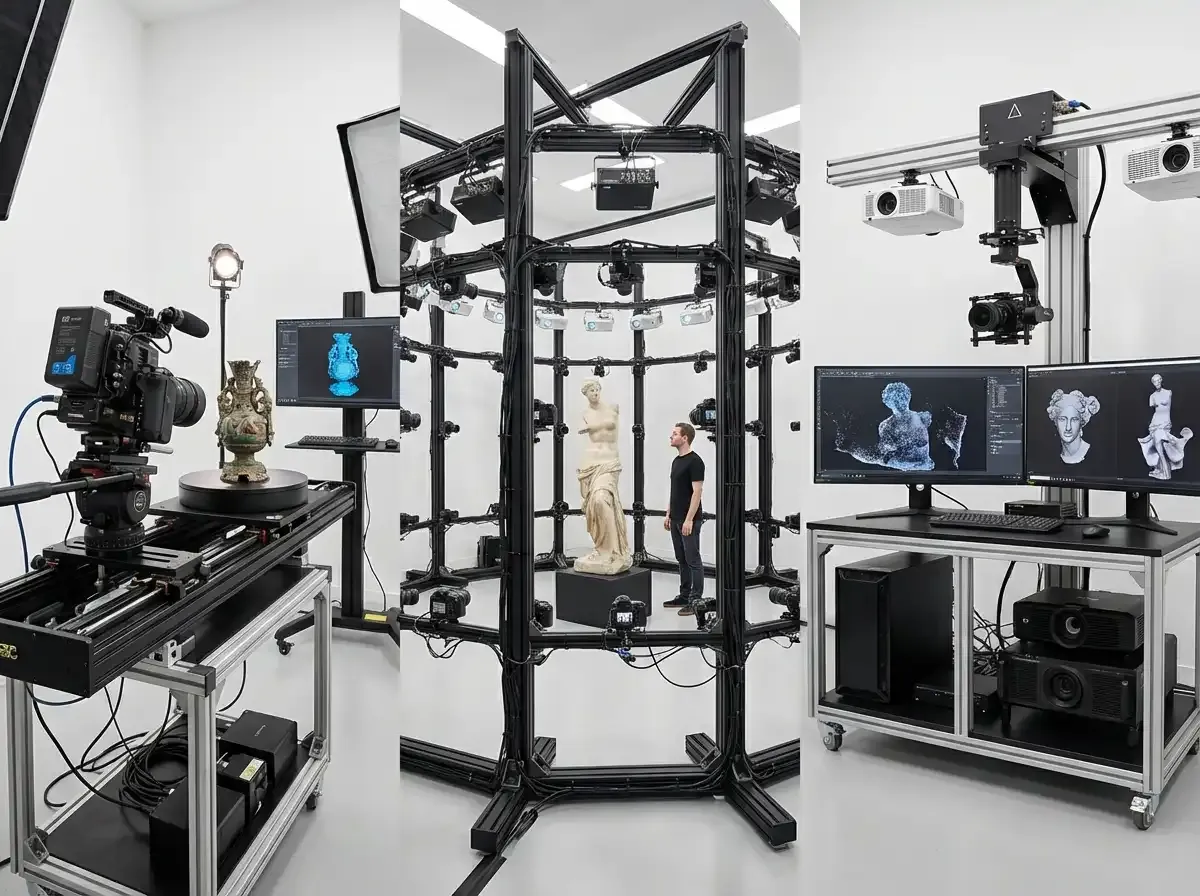
Technique B: Photogrammetry (true 3D from photos)
Photogrammetry uses many overlapping photos from different angles to reconstruct a 3D model. It can be great for organic shapes, but it is unforgiving with reflective, transparent, or very uniform surfaces.
In practice, this means you need control: matte spray for shiny objects (where appropriate), consistent lighting, and careful capture coverage. If you are aiming for a “digital twin” workflow, compare it with 3d virtual photography so you understand what you can generate vs what you must physically capture.
Technique C: Hybrid, with AI-assisted image production
Hybrid means you capture a clean base set (often stills or a partial spin) and then use software to speed up the “last mile”: background standardization, resolution upscaling, and producing consistent marketplace-ready images.
One example is using ProductAI to generate clean outputs from consistent inputs, so you can create variations without rebooking a studio. For instance, the Free White Background Generator can help standardize packshots after you have done the hard work of consistent capture.
4) 3D photography equipment that actually moves the needle
You can build a 3D workflow with surprisingly modest gear, but a few items matter a lot more than the rest.
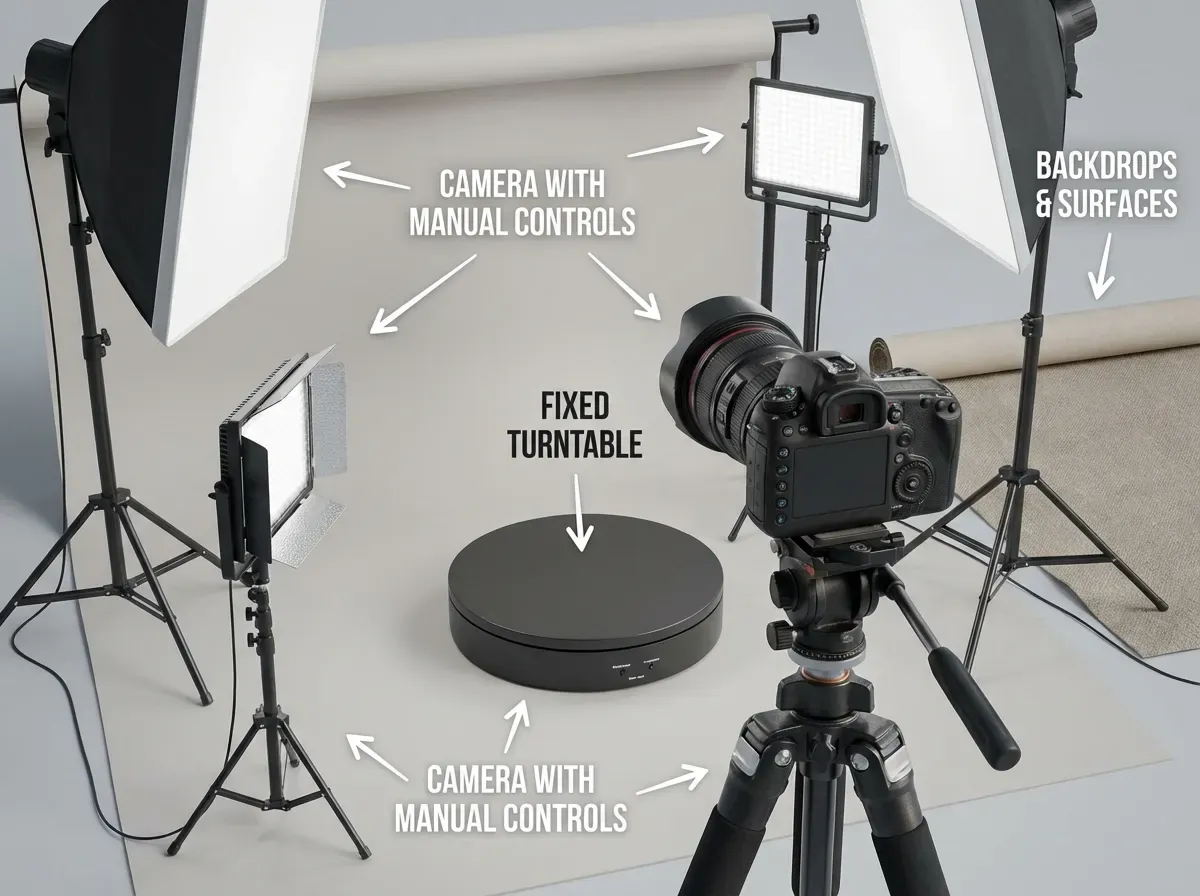
Core 3D photography equipment (minimum viable setup)
Camera with manual control: You need locked exposure, locked white balance, and consistent focus.
Tripod and fixed framing: Stability beats fancy. Your “camera move” should be repeatable.
Controlled lighting: Two to three lights with modifiers are usually enough. Consistency matters more than power.
Turntable (for 360): Choose one rated for your product weight, with speed and step control.
Backdrop and surface: A sweep or acrylic surface can reduce edge cleanup later.
What many businesses overlook is color management. If your lights are inconsistent or you are mixing color temperatures, your textures and frames will never match. That increases retouch time, and retouch time is where 3D budgets quietly blow up.
Optional upgrades that help at scale
Once you are doing this weekly, you will care about faster tethering, consistent positioning rigs, and templates that make every SKU look like it came from the same factory line. Those upgrades are not glamorous, but they are what make 3D profitable.
5) 3D photography packshot software and the production workflow
“3D photography packshot software” is a broad label, but it usually covers four jobs: capture control, batch processing, background cleanup, and viewer publishing.
Think of it this way: your capture is only half the project. Your customer never sees your RAW files, they see a fast-loading viewer and crisp frames that match your brand.
A workflow that holds up in e-commerce
Plan the output: Decide frame count (36, 72, 120), zoom level, and whether you need top and bottom angles.
Lock a lighting recipe: Record distances, angles, and power settings so you can reproduce them.
Capture with consistency: Manual exposure and white balance, center the product, keep the horizon level.
Batch process: Normalize exposure and color, then crop to consistent framing.
Background and edge cleanup: Remove dust, fix edges, standardize to white or brand color.
Publish and test: Check load speed on mobile, and validate the viewer does not block add-to-cart.
If your bottleneck is cleanup, you can speed up background workflows with disciplined capture plus tools and guides. This walkthrough on How to Remove Background from Image: Complete Guide is useful if you are trying to reduce manual masking time without sacrificing edge quality.
6) Where 3D photography AI fits (and where it does not)
.webp)
Now, when it comes to “3d photography ai,” you should separate marketing hype from practical wins. AI can help you move faster, but it does not remove the need for a clean, consistent source capture.
Where AI helps most
AI is great at the repetitive production tasks that follow capture: standardizing backgrounds, creating on-brand scene variations for ads, and improving resolution when you need to crop in.
For example, if your 3D workflow produces frames that are slightly smaller than ideal for marketplace requirements, Increase Image Resolution can help you upscale without re-shooting. You still need to QA for halos, texture artifacts, and over-sharpening.
Where AI still struggles
AI can struggle with tricky materials: transparent plastics, glass, mirrored metals, and products with fine repeating patterns. It can also introduce “almost right” details, which is dangerous for regulated products or anything where shoppers expect exactness.
If you are evaluating AI for still images alongside 3D, this overview of ai photography will help you set expectations, especially around consistency and brand control.
One practical approach is to treat AI as a post-production accelerator, not as a replacement for a reliable capture setup. That mindset avoids most expensive mistakes.
If you want guidance on prompting and QA for AI-generated outputs, Tips for Professional AI-Generated Product Photos has a few solid checks to keep you honest.
7) Quality control and e-commerce deployment
The best 3D asset in the world is useless if it slows your PDP or looks inconsistent across SKUs.
QA checklist before you publish
Consistency: No flicker across frames, no rotation wobble, no shifting shadows.
Color accuracy: Textures match your standard still photography and your brand color profiles.
Load performance: Test on mobile data, not just your office Wi-Fi.
UX: Viewer controls are obvious and do not interfere with add-to-cart.
Fallbacks: Provide standard images for platforms that do not support interactive 3D.
The reality is that 3D is not just a creative decision. It is a merchandising decision. If it makes pages slower or harder to buy from, it can hurt conversion even if it looks impressive.
To keep 3D aligned with your overall visual system, map how your 3D assets support the rest of your product photos set: hero, detail, scale, and lifestyle. The goal is a cohesive buying experience, not a tech demo.
Frequently Asked Questions
What is 3D photography for products?
For e-commerce, 3D photography usually means either a 360-degree spin (a sequence of photos rotated around the product) or a true 3D model built from images and textures. A 360 spin is simpler to produce and easier to deploy on most PDPs. A true 3D model can support AR and configuration, but it is more demanding to capture, process, and publish. Your choice should follow your use case: inspection and trust (360) vs interaction and reuse (true 3D).
Is a 360 product view the same as a 3D model?
No. A 360 view is typically a set of 24 to 120 2D frames shown in sequence. It looks like rotation, but it is not geometry. A 3D model contains actual 3D shape data plus textures, so it can be lit, rotated freely, and used in AR formats like GLB or USDZ. If you are unsure which is right, compare production and flexibility in product photography vs 3d rendering.
What 3d photography equipment do I need to start?
Start with a camera that supports manual exposure and white balance, a sturdy tripod, controlled lighting, and a clean backdrop or sweep. If you are doing 360 spins, add a turntable that can rotate in consistent steps. The biggest “hidden” requirement is repeatability: if you cannot keep framing and lighting stable across frames, you will spend more time fixing issues than capturing products. Build a simple setup, then upgrade only when you hit a throughput bottleneck.
How many frames should a 360 spin have?
Common frame counts are 24, 36, 72, and 120. More frames look smoother but increase capture time, storage, background cleanup, and load weight. For many products, 36 frames is a good balance. For small items with fine details (like jewelry), 72 can be worth it if your site performance can handle it. The right answer is the one that still loads fast on mobile while giving shoppers enough detail to feel confident.
What is 3d photography packshot software used for?
Packshot software typically helps you control capture (tethering and turntable steps), batch process images (cropping, exposure normalization), clean backgrounds, and publish the final spin or viewer package. In a scaled workflow, software matters as much as the camera because it creates consistency across SKUs. If you are producing lots of frames, anything that reduces manual masking or rework can save real money. A good workflow is boring, repeatable, and easy to train.
Does 3d photography AI replace studio capture?
Not reliably. AI can accelerate parts of the workflow, especially background standardization, creating campaign variations, and improving resolution for specific placements. But it still depends on strong inputs, and it can struggle with transparent or highly reflective products. If you treat AI as a production assistant rather than a full replacement, you get better outcomes. For a broader view of where AI fits across your image pipeline, see ai photography.
When should I choose 3D over standard product photos?
Choose 3D when inspection reduces returns or increases confidence: products with important details, premium finishes, or confusing form factors. Also choose 3D when you can reuse assets across channels like PDP, ads, and retail tools. Skip it when your catalog is huge and margins are thin, or when page speed and simplicity matter more than interactivity. A smart compromise is a small 3D test on your top sellers while keeping the rest of the catalog on standard stills.
How do I keep 3D assets consistent across a catalog?
Document everything: camera height, focal length, product distance, lighting positions, and turntable step count. Use templates for cropping and framing, and run QA for wobble, flicker, and color shifts before you publish. Consistency is mostly process, not gear. Many teams also standardize final outputs to match the rest of their product photos so the PDP feels cohesive. If it looks like different vendors shot each SKU, shoppers notice.
Will 3D improve conversion rates?
It can, but it is not automatic. 3D tends to help when it answers a real buying question: “What does the side look like?”, “How thick is it?”, “What is the finish?”, “How do the details wrap around?” If the viewer slows the page or distracts from the purchase path, it can hurt conversion. The best approach is testing: roll out 3D to a subset of SKUs, measure engagement and add-to-cart, then expand only if the business case holds up.
What are the biggest mistakes teams make with 3D product photography?
The most common mistakes are starting with too many SKUs, underestimating retouch time, and ignoring deployment constraints like page speed and mobile UX. Another big one is inconsistent capture, which leads to wobble and flicker that makes the product feel low quality. Finally, teams sometimes chase “true 3D” when a simpler 360 spin would do the job. If you are exploring more virtual approaches, compare expectations with 3d virtual photography.
Key Takeaways
Pick the output first: 360 spins for inspection, true 3D models for AR and configurators.
Consistency beats complexity: stable lighting, locked settings, and repeatable positioning reduce rework.
Your real cost is post-production: plan for batch processing, cleanup, and performance testing.
AI can speed up the last mile (backgrounds, upscaling), but it cannot fix weak capture fundamentals.
Start with a small test set, measure impact on PDP engagement and conversion, then scale.
Conclusion
3D photography is one of those e-commerce upgrades that looks exciting, but lives or dies on operational details. If you match the technique to the job, it can improve shopper confidence and reduce back-and-forth questions that slow purchases. If you pick the wrong output, or publish heavy assets without testing, you can end up with a beautiful feature that quietly hurts performance.
Start by deciding what “3D” means for your product: a smooth 360 spin, a true 3D model, or a hybrid approach. Build a repeatable capture setup, run a small pilot on a few SKUs, then tighten your post-production workflow. Where it makes sense, use AI tools to standardize and speed up production, especially for backgrounds and resizing.
If you want to see how AI can support your image pipeline, explore ProductAI free tools on a few test frames first.
Last updated: February 2026
About the Author
Giles Thomas, Ecommerce & AI Product Photography Expert – Founder, AcquireConvert.
Giles helps e-commerce teams plan scalable product imaging workflows that balance quality, speed, and on-site performance. He focuses on practical capture systems (360 and photogrammetry) and how to integrate AI-assisted post-production to ship consistent 3D-ready assets across a catalog.

Hi, I'm Giles Thomas.
Founder of AcquireConvert, the place where ecommerce entrepreneurs & marketers go to learn growth. I'm also the founder of Shopify agency Whole Design Studios.