How to Create 3D Product Images (2026 Guide)
.webp)
Last updated: February 2026
What You Will Learn
What 3D product images actually are (and what they are not)
How to choose the right 3D approach for your catalog
Workflows: 360 spins vs 3D models vs renders
How to capture and prep assets so 3D looks premium
Where AI helps (and where it still struggles)
How to publish, measure, and optimize performance
Virtual product photography: when renders replace the photoshoot
A “core image set” that keeps 3D, 360, and standard photos consistent
File sizing and texture optimization basics (so 3D does not wreck page speed)
You have a solid product, a clean theme, and you are paying for traffic. Then you look at your PDP and realize the photos are doing too much heavy lifting. Shoppers want to understand shape, scale, texture, and details, but a handful of flat angles can only tell part of the story.
That is where 3d product images come in. A good 3D view can reduce uncertainty, cut down basic “what does it look like from the side?” questions, and help customers feel confident hitting Buy. The catch is that “3D” can mean a few different things, and the best approach depends on your catalog size, margins, and how fast you need new creatives.
This guide breaks down the main ways to create 3D product images for your store, from true 3D models to 360-degree spins to AI-assisted workflows. You will get practical decision rules, production tips, and the mistakes that make 3D assets expensive without moving conversion.
1) What 3D product images actually are (and what they are not)
.webp)
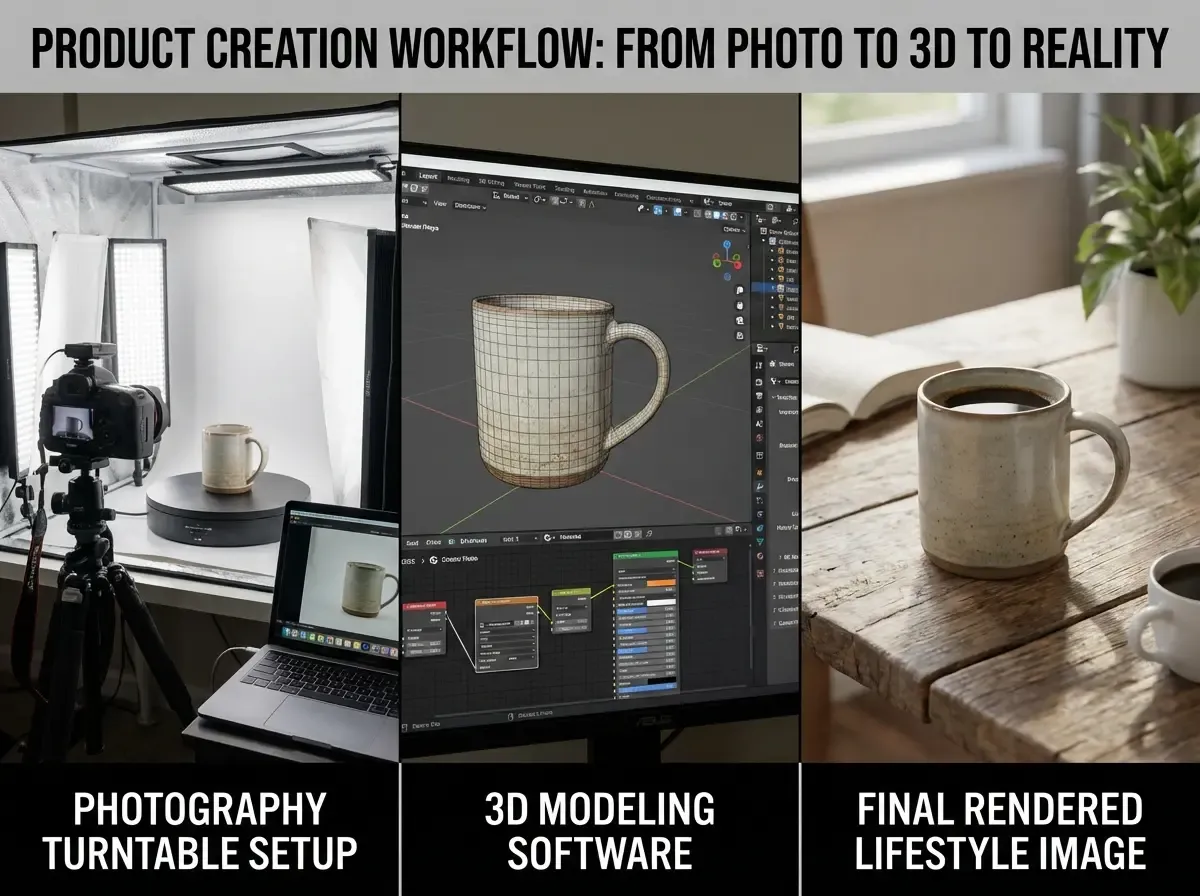
When a store says it has 3d product images, it usually falls into one of three buckets. Each creates a different shopper experience and a different production workload.
Option A: A true 3D model (interactive)
This is a real 3D asset (often GLB or USDZ) that shoppers can rotate and zoom. It is the closest thing to “holding the product” online. It is also the most demanding to produce well because geometry, materials, and lighting all matter.
If you plan to add an embedded viewer to your PDP, you are thinking about a 3d product viewer. That choice impacts file formats, performance, and how you will maintain assets over time.
Option B: 360-degree product images (a spin set)
This is a sequence of photos shot around the product and stitched into a spin interaction. It looks “3D” to the shopper, but it is still photography frames. For many brands, this is the sweet spot for realism because you are literally photographing the real item.
If you want the specifics on capturing and presenting spins, see 360 product images.
Option C: 3D product rendering (CG images)
This is where you create still images or animations from a 3D model. It is common for furniture, consumer electronics, packaging, and products with lots of variants. It also helps when the physical product is not ready yet, like preorders and launch campaigns.
For a deeper look at the rendering pipeline and decisions that affect realism, read 3d product rendering.
Here is the thing: shoppers do not care which bucket you used. They care whether they can quickly answer, “Is this the right product for me?” Your goal is clarity, not novelty.
2) How to choose the right 3D approach for your catalog
Most teams pick 3D because it looks impressive. Better teams pick it because it removes friction for specific products.
Start with product complexity and “risk”
3D tends to perform best when the product has shape-dependent value: footwear, bags, furniture, home decor, and items with important details on multiple sides. It can also help where returns are driven by “not what I expected,” like scale confusion or finish and material misunderstandings.
Consider your SKU count and variant strategy
If you have 20 hero SKUs, investing in high-quality models or 360 spins can pay off. If you have 2,000 SKUs, you will probably need a tiered approach: hero products get true 3D or 360, long-tail products get strong standard ecommerce product images plus selective enhancements.
Decide what you will reuse across channels
True 3D models can be reused for renders, ads, and even AR. 360 spins are usually PDP-focused. Render workflows can output everything from packshots to lifestyle scenes, but only if your materials and lighting are set up correctly.
From a practical standpoint, if your team is small, you should favor workflows that reduce coordination. A 3D initiative fails most often when it becomes “one more thing” on top of launches, email, ads, and listings.
3) Workflows: 360 spins vs 3D models vs renders
Let’s get specific about what you actually do to create 3d product images. The workflow you pick determines cost, speed, and how consistent the output looks across your catalog.
Workflow 1: Create 360-degree product images (photo-based)
This is the most straightforward “3D-like” experience because you shoot the real product from a fixed angle while rotating it on a turntable.
Capture: consistent camera settings, fixed focal length, stable lighting, turntable increments (usually 24, 36, or 72 frames).
Post: color correction, dust removal, background cleanup, export frames.
Publish: use a 360 viewer that loads fast and works on mobile.
It works great for reflective products too, but you will spend more time controlling glare and cleaning up imperfections in post.
Workflow 2: Build a true 3D model (for interactive use)
You can build a model from CAD, from scratch, or via photogrammetry (turning many photos into a 3D mesh). CAD-to-visual is common in manufacturing-heavy categories. Photogrammetry is common for organic shapes, but it can struggle with shiny, transparent, or uniform surfaces.
The key steps are modeling, UV mapping, texturing, and lighting. You then optimize the model so it loads quickly without looking like a video game asset.
Workflow 3: Generate 3D product renders (CG stills and variations)
Rendering is where 3D can scale. Once you have a clean model, you can create new angles, lighting setups, and colorways without reshooting. This is especially useful when you need more “product images for website” variants for seasonal campaigns or marketplaces.
What many businesses overlook is that the “last 10 percent” of realism costs the most time. If you are rendering, set a realism target that matches your brand. Premium brands need perfect materials, shadows, and reflections. Value brands can often win with clear, consistent visuals and fast iteration.
4) How to capture and prep assets so 3D looks premium
Whether you are shooting a spin set, feeding photogrammetry, or preparing reference images for a 3D artist, the input quality decides the output quality.
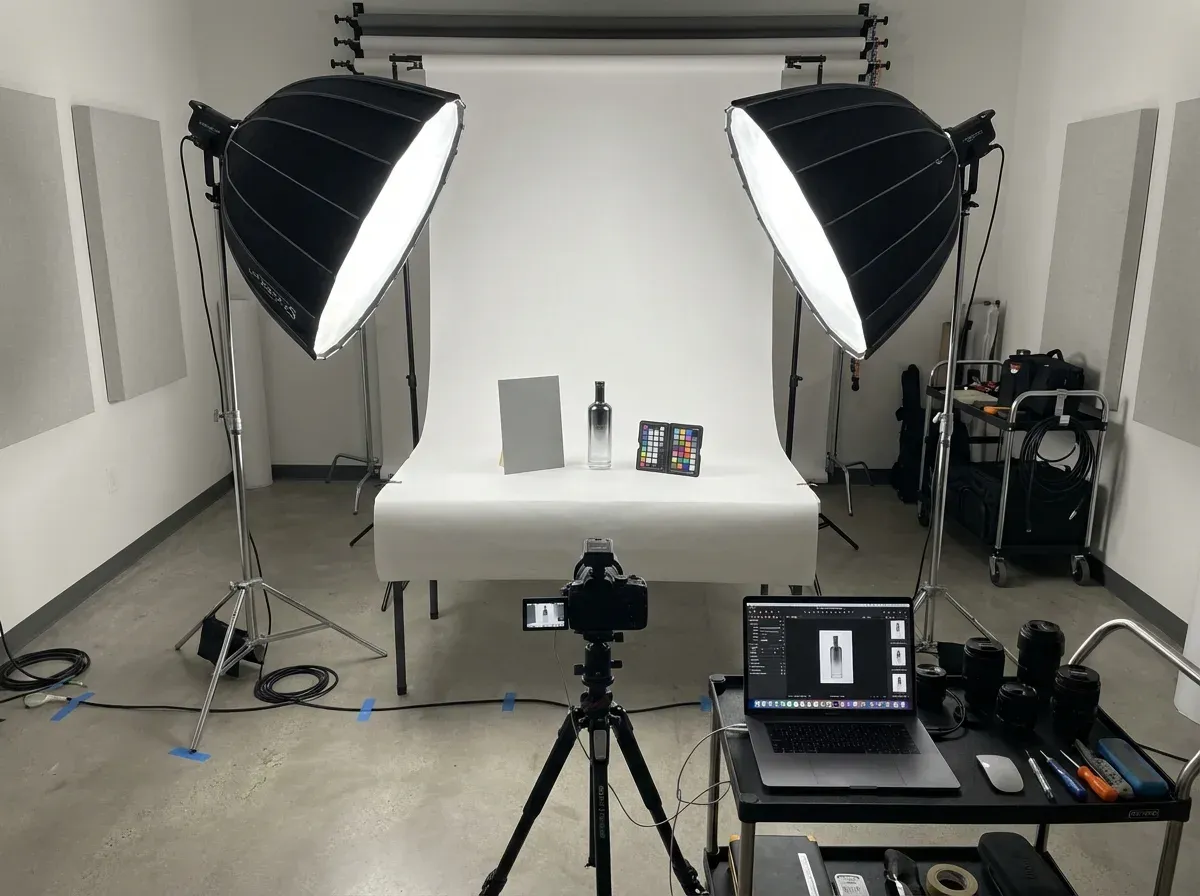
Lighting and consistency matter more than gear
If you are learning how to take product images, a common trap is changing lighting between angles. For 360 and photogrammetry, keep lighting stable and avoid hard directional shadows that “move” across frames. Soft, even light makes stitching and cleanup easier, and it looks more premium on the PDP.
Color and scale need a reference
Include a color checker or at least a consistent gray card in your setup, especially if you sell products where “shade” drives returns. For scale, build a repeatable camera distance and lens choice so products do not feel like they change size from SKU to SKU.
Editing product images for 3D workflows
Your editing checklist looks a bit different when the end goal is 3D:
Remove dust and scratches consistently across frames so the spin does not “sparkle” as it rotates.
Keep exposure and white balance locked so frames do not flicker.
Export in the right resolution for zoom without crushing performance on mobile.
Now, when it comes to making these assets usable across channels, you often still need clean packshots. One example is using Increase Image Resolution to upscale key frames for zoom or marketplace requirements without reshooting: Increase Image Resolution.
5) Where AI helps with 3D product images (and where it still struggles)
.webp)
AI is not a magic “make 3D” button for most products yet. But it is extremely good at removing bottlenecks around your 3D workflow.
What AI is great at right now
AI tools can speed up supporting tasks that slow teams down: generating background variations for renders, creating consistent lifestyle scenes for launches, and producing more “online shopping product images” to test in ads. Think of it as increasing your creative throughput without increasing shoot days.
For example, AI Background Generator can help you produce multiple scene concepts for the same hero angle, which is useful when you need more creative options around a 3D render or a 360 frame set: AI Background Generator.
Where AI still struggles
AI can introduce geometry mistakes, inconsistent branding details, or “almost right” materials. If you are selling regulated products, or anything where precise claims matter, you need a tighter review process.
The reality is: AI can help you create product images with AI for marketing and iteration, but you should still anchor your PDP visuals in truth. That is especially important when you are deciding between product photography vs 3d images, because trust is part of conversion.
A practical hybrid approach
Many teams do this:
Use real photography or a true 3D model for the “truth set” on the PDP.
Use AI to generate supporting scenes for ads, email banners, and social testing.
Feed winners back into your core creative direction.
If you want to tighten up your AI photo workflow and avoid the usual realism mistakes, this guide is worth bookmarking: Tips for Professional AI-Generated Product Photos.
6) How to publish, measure, and optimize 3D on your PDP

Creating 3d product images is only half the job. You need them to load fast, work on mobile, and actually improve conversion.
Make performance a requirement, not a nice-to-have
3D assets can slow down your PDP if you are not careful. Set constraints early: max file size, lazy loading, and a fallback image for browsers or devices that struggle. Your goal is a better shopping experience, not a heavier one.
Test where 3D sits in the image stack
Placement matters. For some products, the first image should stay a classic hero packshot, with 3D or 360 as the second slot. For other products, leading with an interactive view can increase engagement.
Do not guess. Run an experiment. This is exactly where a b testing product images becomes your best friend, because the “cool factor” is not the KPI. Revenue is.
Watch the right metrics
Consider this: 3D might increase time on page but not conversion if it distracts from the buying decision. Track add-to-cart rate, conversion rate, return rate, and support tickets. If you can segment by traffic source, even better. Paid social shoppers often need more reassurance than repeat customers.
Keep the basics strong
Even with 3D, your store still needs clean, consistent photography fundamentals. If your packshots are messy, 3D will not save you. If you need a refresher on building a dependable baseline, start with the product photos pillar.
One more practical note: if you are cleaning up frames or hero images before they go live, background work matters a lot. This walkthrough covers a reliable process: How to Remove Background from Image: Complete Guide.
6A) Virtual product photography: when renders replace the photoshoot
You will hear a lot of teams call this “virtual photography.” In practice, it usually means you are using a 3D model to produce photo-like images: packshots, angle shots, detail crops, and lifestyle scenes, without a physical set.
Now, when it comes to deciding if this is worth it, the real question is not “can we render something realistic?” It is “can we build a repeatable system that beats a photoshoot on speed, consistency, and iteration?”
Virtual product photography tends to make sense when one or more of these are true:
You sell products with lots of variants (colors, materials, sizes) and reshooting every change is painful.
You need images before inventory arrives, like preorders, seasonal drops, or wholesale line sheets.
Your products are hard to shoot consistently (high gloss, complex lighting, or large items like furniture).
You need the same product visual in multiple contexts, like white background, lifestyle, and ad creatives, and you want them to match.
Here is the tradeoff: you shift effort from “shoot day logistics” to “3D setup and standards.” If you treat renders like a one-off creative project, costs creep. If you treat renders like a production line with defined outputs, you can move fast and keep your catalog clean.
6B) A “core image set” that keeps 3D, 360, and standard photos consistent
One of the biggest reasons 3D projects disappoint is inconsistency. Not just within a single SKU, but across the category. The shopper clicks from Product A to Product B and suddenly the camera height changes, shadows shift, and the product feels like it came from a different store.
A simple fix is defining a core image set before you produce anything. Think of it as your non-negotiable checklist for what every SKU gets, regardless of whether the source is photography, 360, or renders.
A practical core image set often includes:
Hero packshot: consistent angle and crop that works in grids and search results.
Secondary angle: the “most informative” view for the category, like a 3/4 angle for footwear or a side profile for furniture.
Detail close-up: one shot that proves material and build quality.
Scale cue: a consistent way to show size, either through framing rules or a specific reference shot.
3D or 360 slot: if you use it, decide if it replaces a secondary angle or sits after the core photos.
From a production standpoint, this makes planning easier too. Your photographer knows what to capture, your 3D artist knows what cameras to match, and your merch team knows what to expect when a new SKU is added.
6C) File sizing and texture optimization basics (so 3D does not wreck page speed)
If you publish interactive models, the asset can quietly become the heaviest thing on your PDP. The shopper experience is unforgiving here. If the model takes too long to load, many people will not wait, and you will have paid for a feature that hurts conversion.
You do not need to be a 3D engineer to enforce the basics. You just need standards that prevent the usual failure modes:
Keep polygon counts sane for web. Product edges should look smooth where it matters, but tiny unseen details do not need dense geometry.
Use texture resolution intentionally. Huge textures make files heavy fast, and most shoppers will never zoom far enough to justify it.
Compress and reuse materials. If five parts share the same black plastic, they should not each have their own oversized texture set.
Test on mobile data. Office Wi-Fi hides problems that show up immediately on real traffic.
Consider this: optimization is not just technical. It is a merchandising decision. The goal is for shoppers to get clarity quickly, not for you to ship the most complex model possible.
Frequently Asked Questions
What are 3d product images for an online store?
3d product images usually mean one of three things: an interactive 3D model you can rotate, a 360-degree spin made from photos, or still renders created from a 3D model. Stores often use “3D” as a catch-all because each option helps shoppers understand shape and details better than a single hero image. The right choice depends on your product category, budget, and how quickly you need new visuals for launches and campaigns.
How do I create 3d product images without a 3D designer?
Your easiest path is usually 360-degree product images. You can shoot a spin set with a turntable, consistent lighting, and basic editing. It gives customers a strong “I can see all sides” experience without building a full model. If you need true 3D assets, you can start by sourcing CAD files from your manufacturer or hiring a specialist for your top SKUs only. For the rest of the catalog, prioritize consistent standard photos.
Are 360 degree product images the same as a 3D model?
No. A 360 spin is a sequence of photographs, so it is highly realistic but limited to the angles you captured. A true 3D model is geometry and materials rendered in real time, so shoppers can rotate freely and zoom in ways a spin cannot always support. Spins are typically faster and cheaper to produce for many physical products. True 3D models are more reusable across renders, AR, and future marketing needs, but require more specialized production.
What file types do I need for interactive 3D on a product page?
Common web-friendly formats include GLB (glTF binary), which is widely supported by 3D viewers, and USDZ for some Apple AR use cases. What matters most is not just the format, but optimization: polygon count, texture size, and compression. If the model is heavy, it can slow your PDP and hurt conversion. Always plan for a fallback image and test performance on mobile data, not just on your office Wi-Fi.
How do I keep 3D assets consistent across a large catalog?
Consistency comes from standards. Define camera height, lighting style, background color, and zoom behavior. For 360 spins, lock exposure and white balance so frames do not flicker. For 3D renders, build a standard scene with consistent lighting, shadows, and camera angles. Treat it like a production line, not an art project. The goal is that customers can compare products quickly, which is especially important in categories with lots of similar SKUs.
Can I create product images with AI and still be accurate?
Yes, but you need guardrails. AI can help you generate backgrounds, lifestyle scenes, and creative variations quickly. The risk is that AI can invent details: textures, labels, accessories, or proportions. A good approach is to keep your PDP “truth images” grounded in real photography or verified 3D renders, then use AI for supporting marketing creative where the goal is concept testing. Always review for brand and product accuracy before publishing.
How do I know if 3D improves conversion?
Measure it like any other change to your PDP. Run an A/B test where the only meaningful difference is the presence or placement of the 3D or 360 experience. Track add-to-cart rate, conversion rate, and return rate. Also look at support inquiries and on-page engagement. If 3D increases interaction but not revenue, it may be placed poorly, loading too slowly, or not answering the questions shoppers actually have about the product.
What products benefit most from 3d product images?
Products with shape-dependent value tend to benefit most: furniture, footwear, bags, home decor, collectibles, and products with important side or back details. Items where shoppers worry about scale, fit, or finish can also see gains. Commodity products with low margins often do better with faster improvements to standard photography: sharper packshots, consistent angles, better lighting, and clearer close-ups. Start with your highest-impact SKUs, not your entire catalog.
Is 3D better than product photography?
It is not a simple “better.” Product photography is fast, trusted, and straightforward for most catalogs. 3D is powerful when you need interactivity, lots of variants, or pre-launch visuals before inventory arrives. Many brands end up using both: photography for authenticity and speed, 3D for flexibility and richer presentation on hero products. The winning setup is the one that improves shopper confidence while keeping your workflow sustainable for launches and seasonal campaigns.
How do I generate product mockups with AI images?
Start with a clean product cutout or a high-quality hero photo, then generate context around it: backgrounds, props, and lighting that match your brand. Keep prompts specific about camera angle and shadows so the product feels grounded. Review outputs carefully for invented details and inconsistent branding. For teams moving fast, tools like ProductAI are one example that can help generate multiple background variations quickly so you can test more creative concepts without scheduling a full reshoot.
What is virtual product photography?
Virtual product photography is when you use a 3D model to create photo-like product images instead of shooting the physical item in a studio. That can include white background packshots, angle shots, detail crops, and lifestyle scenes. It is especially useful for products with lots of variants or for launches where you need visuals before inventory arrives, but it only works well when you set quality and consistency standards upfront.
How many frames should a 360 product spin have?
Common setups are 24, 36, or 72 frames, depending on how smooth you want the rotation and how quickly you need it to load. The right number is a tradeoff: more frames can look smoother, but it increases capture time and file weight. For most catalogs, a smaller frame count with crisp images and stable lighting beats a heavy spin that loads slowly on mobile.
Do I need a 3D model if I only want more product images for my website?
Not always. If your main goal is more angles and more clarity, 360-degree product images can get you there without building a full 3D asset. A 3D model becomes more attractive when you need lots of variants, pre-launch images before samples exist, or you want to reuse the asset for renders, interactive viewing, and future formats like AR.
Key Takeaways
“3D product images” can mean true 3D models, 360 photo spins, or 3D renders. Pick the format that matches your product and workflow.
Start with hero SKUs and high-return categories. Prove impact before you scale production across the catalog.
Performance matters: optimize files, prioritize mobile load speed, and use fallbacks so 3D does not hurt conversion.
AI is best used to speed up supporting creative work, like background variations and marketing assets, not to replace accuracy on PDP truth images.
Measure outcomes with A/B testing and revenue metrics, not just engagement.
Conclusion
3D can be a real advantage, but only when it solves a real shopper problem. If customers struggle to understand shape, finish, or key details, 3d product images can remove doubt and improve confidence. The smart move is choosing the right production method for your catalog: 360 spins for realism and speed, true 3D models for interactivity and reuse, and renders when you need infinite variations or pre-launch visuals.
In practice, this means setting standards early, protecting page speed, and testing placement and impact like you would any other PDP change. If you pair solid baseline photography with a focused 3D strategy, you get the best of both worlds: trust and clarity, plus richer product understanding.
If you want to explore AI-assisted creative iteration, try a few free tools and see what fits your workflow.
Last updated: February 2026
About the Author
Giles Thomas, Ecommerce & AI Product Photography Expert – Founder, AcquireConvert.
Giles helps e-commerce teams improve conversion through better product presentation and scalable creative workflows. His work focuses on practical ways to use 360 spins, 3D rendering, and AI-assisted production to launch faster while keeping PDP visuals accurate and performance-friendly.

Hi, I'm Giles Thomas.
Founder of AcquireConvert, the place where ecommerce entrepreneurs & marketers go to learn growth. I'm also the founder of Shopify agency Whole Design Studios.