3D Product Photography Setup From Scratch (2026 Guide)
.webp)
Last updated: February 2026
What You Will Learn
What 3D product photography actually is (and what it is not)
Choose your approach: 3D spin vs 3D model rendering
Your from-scratch 3D product photography setup (gear checklist)
Lighting and “white on white” without the pain
Capture workflow: from turntable to clean frames
Planning your 3D capture like a production line (naming, storage, QC)
Software and post-production: stitching, retouching, exporting
How to publish 3D on ecommerce without slowing your store
Ecommerce technical specs: image sizes, formats, and viewer considerations
Cost and ROI: what a from-scratch 3D setup really saves
Where AI helps in a 3D workflow (and where it does not)
You finally have a product that deserves premium visuals. Then you start pricing 3D spins, comparing studios, and realizing the real cost is not just money. It is time, revisions, and the headache of keeping your catalog consistent across Shopify, Amazon, and ads.
That is where a proper 3d product photography setup pays for itself. Not because it is “fancy,” but because it gives you a repeatable system: capture once, publish everywhere, and reuse the same 3D assets for launches, seasonal campaigns, and A/B tests.
This guide walks you through building a 3D workflow from scratch, with practical gear choices, lighting that actually works, software options, and the steps that reduce reshoots. I will also be honest about what 3D does well, where it is overkill, and how to combine 3D with AI image variations when you need more creative faster.
What 3D product photography actually is (and what it is not)
.webp)
When most people say “3D product photography,” they usually mean one of two things: a 360-degree spin made from a sequence of real photos, or a fully synthetic 3D model rendered into images.
A 360 spin is still photography. You are capturing the physical product from many angles and playing it back as an interactive viewer. This is what most teams mean by 3d spin product photography, and it is ideal when you need absolute accuracy in materials, labels, finishes, and small details.
A rendered 3D model is different. You build (or buy) a 3D asset, then generate stills or animations from it. That falls closer to product rendering, and it shines when you have many variants, configurable products, or items that are hard to photograph consistently.
If you want the broader visual foundation for your store first, start with product photos and then add 3D where it lifts conversion or reduces returns.
What 3D is great for
Reducing “unknowns” for shoppers (scale, depth, edge details)
Higher confidence purchases on mid to high ticket items
Lower returns where “it looked different online” is a common complaint
Reusing one capture for PDPs, marketplaces, and sales decks
Where 3D is usually not worth it
Fast-moving catalogs where products change weekly
Low AOV items where the lift will not cover production time
Products that do not benefit from depth (flat prints, simple cards)
Choose your approach: 3D spin vs 3D model rendering
Here is the thing: the “right” 3D setup depends less on your taste and more on your SKU reality. How many products, how many variants, and how often you refresh images for campaigns.
Most ecommerce teams land on one of these tracks, or a hybrid.
Option A: Turntable-based 360 spins (photo sequence)
This is the classic 3d product photography turntable workflow. You shoot 24 to 120 frames as the product rotates, then stitch those frames into a viewer that lets customers drag to rotate.
Consider this when you sell items where surface accuracy matters: cosmetics packaging, jewelry, electronics, premium home goods, or anything with fine text.
Option B: 3D model and renders (CG workflow)
If your SKU has 50 colorways, or you customize materials, a 3D model can reduce your marginal cost per variant. You still need reference photography, but you are no longer reshooting every change.
This is where the “what should we choose?” question gets real, and it is why comparing product photography vs 3d rendering is so useful before you buy gear.
A practical hybrid that works well
Many businesses do one hero 360 capture for the flagship product, then use renders or lifestyle stills for the wider catalog. In practice, this means you invest in 3D where it reduces buyer friction most, without turning your whole studio into a VFX pipeline.
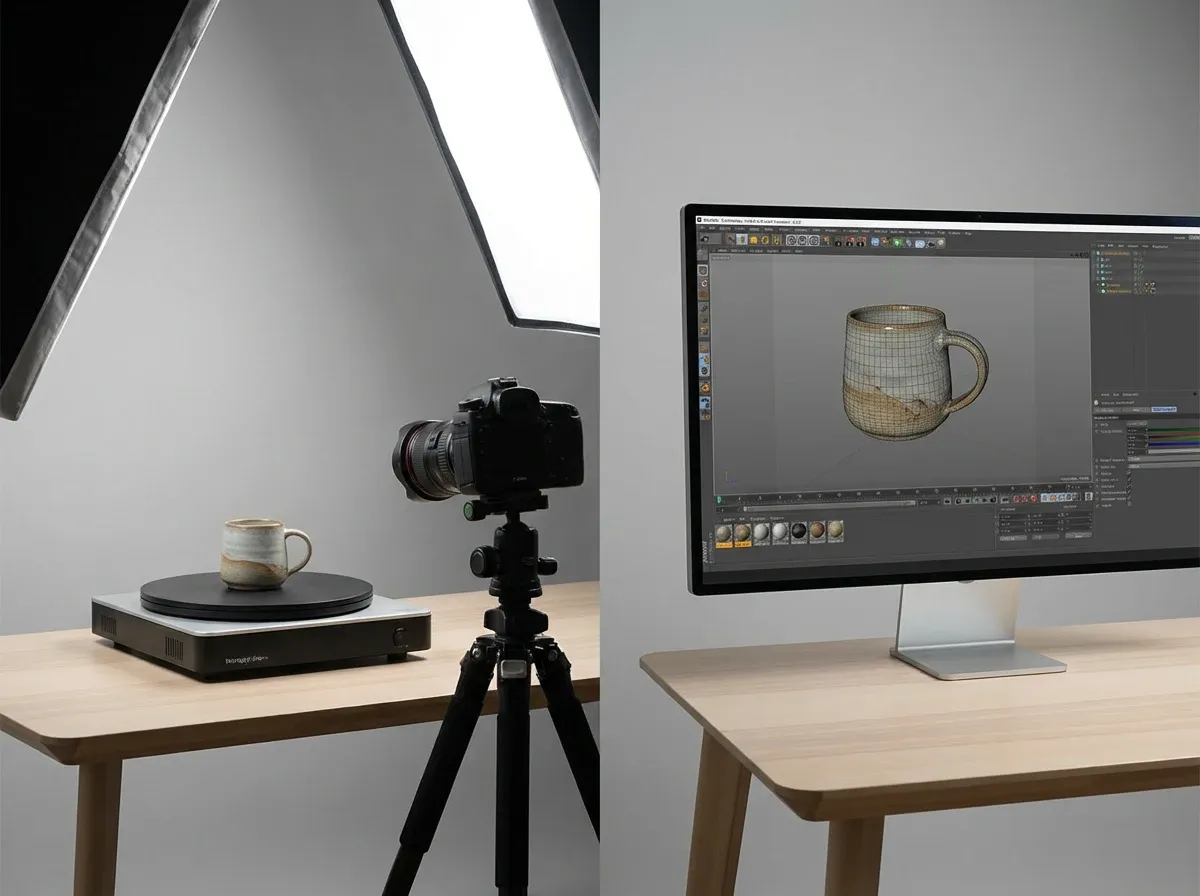
Your from-scratch 3D product photography setup (gear checklist)
A clean 3D workflow is about repeatability. You are building a mini production line, not chasing the perfect “one-off” photo.
1) Camera and lens: prioritize consistency over fancy specs
You can shoot 360s with a modern phone, but a mirrorless or DSLR makes life easier because manual settings stay locked. That matters when your frames need to match.
Use a lens that avoids distortion. For many product categories, a standard prime or short telephoto works well. The goal is minimal warping across the spin, so your stitching software does not fight you.
2) Tripod and a fixed shooting position
Lock the camera down and do not touch it between frames. Your product should rotate, not your camera. A sturdy tripod and a marked floor position save hours later.
3) Turntable: what to look for
Your turntable is your clock. If it wobbles, your final spin will look cheap. Look for stable rotation, consistent step angles, and enough load capacity for your products.
Manual turntables: cheapest, slower, more human error
Motorized with step control: best balance for most teams
Integrated capture systems: fastest, usually higher upfront cost
4) Lighting: big, soft, and controlled
Now, when it comes to 3D, your lighting must stay consistent through every angle. Big soft sources reduce harsh specular highlights that “dance” as the object rotates.
Two soft lights plus fill is often enough. Add flags (black cards) to control reflections on glossy products.
5) Background and surface
Pick a background that matches your output goal. If you are aiming for a marketplace-friendly catalog look, build your workflow around clean white and consistent shadows. If you plan to cut out the product, prioritize separation and clean edges.
Lighting and “white on white” without the pain
White on white product photography sounds simple until you try it. White products disappear into white backgrounds. Edges get muddy. And once you add 360 spins, every tiny inconsistency becomes obvious.
Use separation lighting, not “more brightness”
The fix is usually separation. Add a rim or back light to define edges, and control spill so your product keeps shape. If you only blast the scene with brighter light, you flatten everything.
Control reflections for glossy items
Glossy packaging and metal surfaces reflect your whole room. That is why flags matter. Place black cards just out of frame to create clean reflection lines and add definition as the product rotates.
Keep your white consistent for marketplaces
If you sell on marketplaces that prefer true white backgrounds, set a target (near 255 white, without clipping product highlights) and stick to it. Consistency across the catalog beats “perfect” on one SKU.
Capture workflow: from turntable to clean frames
A reliable capture workflow is what makes 3D scalable. Think of it like packing orders: the checklist matters because the volume increases fast.
Step-by-step capture process
Clean the product: dust and fingerprints multiply across 72 frames
Level the turntable and center the product precisely
Lock camera settings: manual exposure, manual focus, fixed white balance
Decide frame count: 24 for basic, 36 to 72 for smoother spins, 100+ for premium
Shoot tethered if possible for faster review and fewer mistakes
Review frames at 100% zoom before breaking the setup
Common mistakes that cause reshoots
What many businesses overlook is that 360 is brutal about small errors. If your product drifts off-center, the spin “jumps.” If exposure changes, it flickers. If focus drifts, the whole viewer feels low quality.
Build a habit of checking three points in the rotation: front, 45 degrees, and side. If those are clean, the rest usually is too.
How many angles should you shoot?
From a practical standpoint, choose your frame count based on how customers interact. On mobile, users tend to drag quickly and stop at a few angles. For a simple product, 36 frames can be enough. For intricate products, 72 frames often feels smoother and more “premium” without becoming a huge file size burden.
Planning your 3D capture like a production line (naming, storage, QC)
Most 3D workflows fall apart in the unglamorous parts: file naming, storage, and quality control. The capture can be perfect, but if your team cannot find the right frame set three weeks later, you will reshoot anyway.
Think of it this way: you are not producing “a 360,” you are producing a reusable asset that will get exported, compressed, uploaded, updated, and reused for ads.
File naming that prevents mistakes
Use a naming convention that survives handoffs. A simple format is SKU, color, angle count, and version. Keep it boring and consistent. Your stitching tool and your dev team both benefit.
Storage and version control
Save three things every time: the original captures, the cleaned and retouched frame set, and the final exported package you actually publish. When a label changes or you swap packaging, you want to know exactly which step needs updating.
A fast QC checklist before you break the set
Check center alignment: does the product “orbit” when you scrub frames?
Check flicker: do highlights and exposure stay stable across 10 to 12 frames?
Check focus: zoom in on the smallest text or texture detail
Check the problem angle: most products have one weak side, find it early
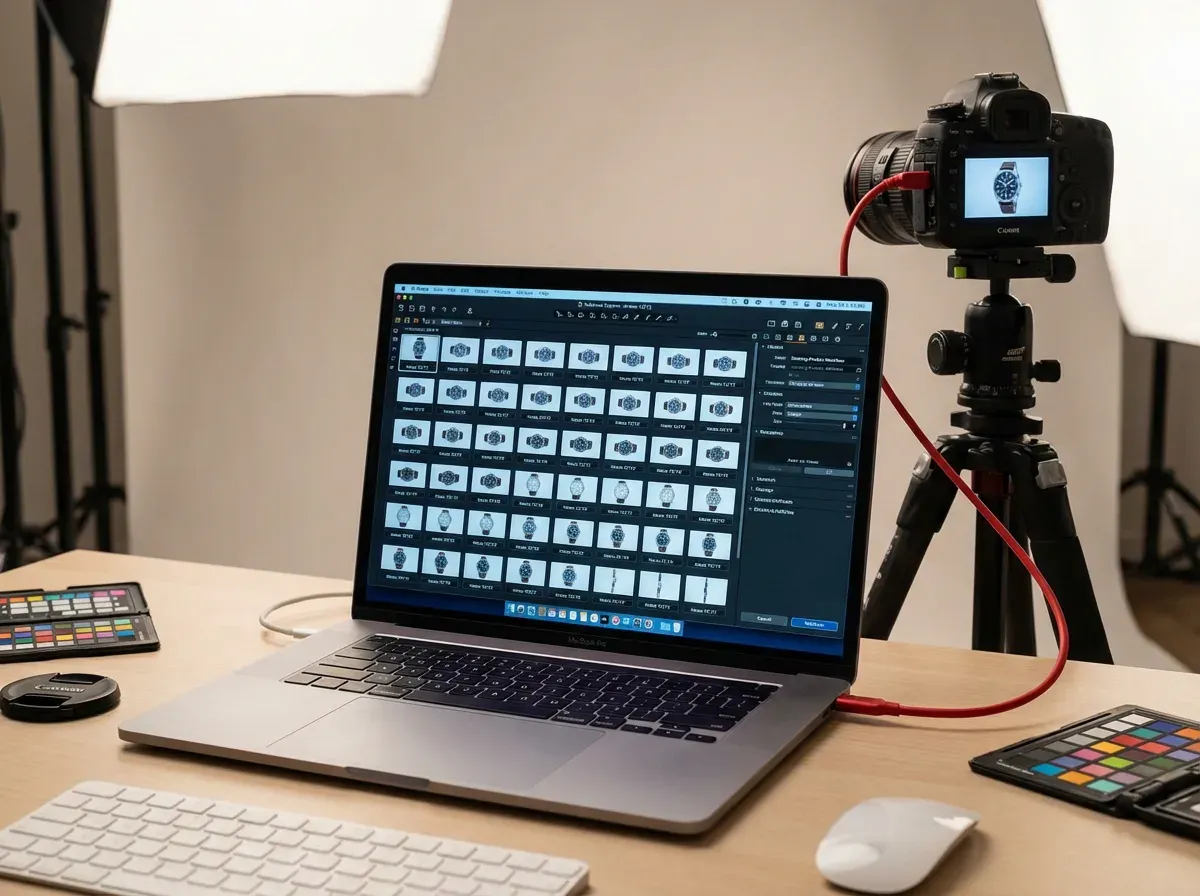
Software and post-production: stitching, retouching, exporting
This is where 3d product photography software matters. Your goal is a smooth, consistent spin that loads fast and looks sharp.
Image cleanup: color, dust, and edge consistency
Do your global corrections first. Match white balance, exposure, and contrast across the whole set. Then spot-retouch dust and scratches. If you retouch frame-by-frame without standardizing the base look, you will chase your tail.
Stitching into a 360 viewer
Most 360 tools take your numbered frame sequence and output a spin package (or connect to a web viewer). Keep filenames consistent and export to the exact pixel dimensions you need. Oversized frames slow everything down.
Export specs for ecommerce
Keep an eye on three things: pixel dimensions, file size, and sharpness. Compression artifacts are more noticeable in 360 because shoppers drag and pause. Test on a mid-range phone on cellular, not on your office Wi-Fi.
Where Blender fits (and where it does not)
If you are exploring 3d product photography blender, treat it as a modeling and rendering tool, not a shortcut to real-world accuracy. Blender can produce beautiful results, but it requires proper modeling, materials, and lighting. If your product changes often, the maintenance cost of the 3D asset can become your hidden tax.
How to publish 3D on ecommerce without slowing your store
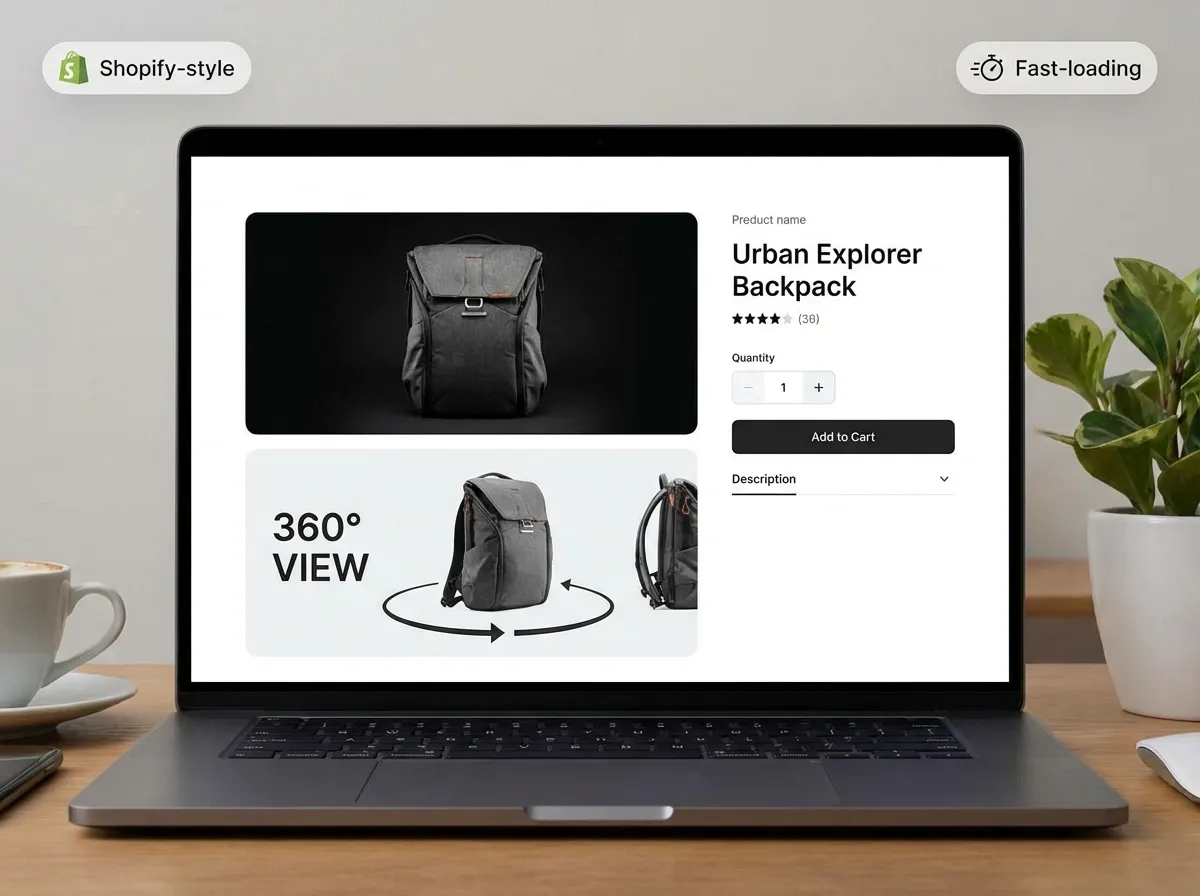
3D can lift conversion, but only if it does not tank page speed. A slow PDP loses sales before shoppers even see your fancy spin.
Use 3D as an enhancer, not the only image
Keep your standard image gallery. Put the 360 viewer after your hero images or behind a clear “View 360” interaction. That way, customers who want it can use it, and everyone else still gets fast-loading product photos.
Test impact like a marketer, not like a photographer
Run an A/B test on a small set of products. Track add-to-cart rate, conversion, return rate (if you have enough volume), and customer support tickets about “size” or “details.” If the lift is real, scale your setup.
Local expectations and vendor support
If you are sourcing production in specific markets (for example 3d product photography dubai, 3d product photography sydney, or 3d product photography nyc), ask vendors about their delivery formats and viewer compatibility, not just sample videos. You want something your dev team can implement without custom rebuilds.
If you are comparing service providers, it also helps to benchmark against traditional options in your region, like product photography uk, so you understand what you are paying for: capture, post, hosting, or ongoing updates.
Ecommerce technical specs: image sizes, formats, and viewer considerations
Most teams think 3D is a photography problem. It is also a delivery problem. Your goal is to give shoppers a smooth interaction without handing your storefront a heavy payload.
Pick a frame size that matches how people shop
If most of your traffic is mobile, you usually do not need massive frames. Choose a pixel size that looks sharp on a phone at typical zoom levels, then validate it on a few real devices. The best-looking 360 is the one that loads quickly enough to be used.
Know what you are exporting, and why
Different 360 systems package frames differently. Some expect a simple numbered image sequence, others output tiles or compressed assets for faster streaming. What matters is that your export can be cached and served efficiently, and that it does not create layout shifts on your PDP.
Do not let your 360 replace required marketplace images
Marketplaces often have specific requirements for main images. Treat your 360 as supplemental. Keep your hero stills compliant and fast, then add interactive viewing as an optional layer for shoppers who need more confidence.
Cost and ROI: what a from-scratch 3D setup really saves
The reason 3D feels expensive is that people compare it to a single product photo. That is the wrong comparison. You should compare it to the total cost of producing, revising, and maintaining consistent visuals across a catalog over time.
Where the savings usually show up
Fewer reshoots because your setup is standardized
Faster onboarding for new team members because the process is repeatable
Less back-and-forth on “can we see the other side?” because the 360 answers it
More reuse: the same capture can feed PDPs, ads, and sales assets
Where teams underestimate the cost
The hidden costs are usually labor: cleaning, centering, retouching, and packaging exports. If you do not plan for that, 3D becomes a bottleneck. If you do plan for it, it becomes predictable, and predictable is where ROI comes from.
A simple way to decide if 3D is worth building in-house
List your top 10 SKUs by revenue, then identify which ones get the most pre-purchase questions about details, dimensions, or finish. Those are your best candidates. If 3D reduces hesitation and support load on those SKUs, it often pays for itself faster than trying to blanket your entire catalog.
Where AI helps in a 3D workflow (and where it does not)
.webp)
AI does not replace the fundamentals of 360 capture. If your frames are inconsistent, AI cannot “fix” a wobbly turntable or flickering lighting without introducing artifacts.
But AI can be genuinely useful around the edges of a 3D workflow, especially when you need more creative variations without reshooting.
Fast background variations for ads and promos
Once you have a clean hero angle from your 360 set, you can create campaign variations quickly. One example is using AI Background Generator to test seasonal scenes or ad concepts without booking a new shoot: AI Background Generator.
Clean white outputs for marketplaces
If your use case is standardized catalog images, a tool like the Free White Background Generator can help you produce consistent whites for hero stills, which can complement your 360 viewer on the PDP: Free White Background Generator.
Set expectations with AI
The reality is AI is best when you give it clean inputs and a clear goal. It is great for generating more creative stills, but it is not a true replacement for interactive 360 experiences. If you are newer to this space, it is worth reading AI product photography to understand where AI workflows help most in ecommerce.
A practical resource if you are using AI day-to-day
If you want a checklist-style approach to quality, Tips for Professional AI-Generated Product Photos is a useful companion for keeping outputs consistent across campaigns.
Frequently Asked Questions
What is the difference between 3D product photography and 3D rendering?
3D product photography usually means photographing a real product across many angles and creating a 360 spin from the frames. 3D rendering means generating images from a digital 3D model. The big difference is source of truth: photos capture real labels, micro-texture, and imperfections; renders depend on how accurate your model and materials are. If you are deciding which is right, compare your SKU complexity and how often variants change. This breakdown of product photography vs 3d rendering helps frame that choice.
How many photos do I need for a 360 spin?
Most ecommerce teams start at 36 frames for a basic, smooth-enough rotation. If the product has lots of detail or your shoppers scrutinize materials, 72 frames often feels noticeably better. Going beyond 100 frames can look premium, but it increases capture time, retouching effort, and file size. A good rule: prioritize consistency over quantity. A perfectly consistent 36-frame set beats a flickery 120-frame set every time, especially on mobile where users drag quickly and only pause at a few angles.
Do I need a motorized 3D product photography turntable?
You can do 3D spins with a manual turntable, but motorized is usually the smarter business decision once you shoot more than a handful of SKUs per month. Motorized tables reduce human error in step size and speed, which reduces “jumping” in the final spin. They also speed up training because your team follows a repeatable process. If you are building a from-scratch workflow, invest where it protects consistency: stable rotation, leveling, and easy angle increments. Camera upgrades matter less than most people think.
How do I handle shiny or reflective products in 3D spins?
Reflective products are tough because reflections change as the product rotates, which can make a 360 feel distracting. Use large diffused lights to soften highlights, then add flags (black cards) to create clean, controlled reflection edges. Keep your environment simple because the product reflects everything. Do not “fix” reflections by cranking brightness. You usually lose shape and contrast. If you want more background ideas that still keep products readable, this is a good reference: Location Backgrounds for Product Photography.
What is “white on white product photography” and why is it tricky in 3D?
White on white is when a white (or near-white) product is shot on a white background. It is tricky because you need the background to look clean while still separating product edges. In 3D spins, small exposure shifts and weak edge definition become very obvious across frames. The fix is separation lighting: rim light, back light, or subtle shadow control so the product keeps shape. You also want consistent white balance and a stable setup. Treat it like a system, not a one-time photo.
Can I use Blender for 3D product photography?
You can use Blender for 3D product visuals, but it is not “photography” in the traditional sense. Blender is a 3D creation tool: modeling, UVs, materials, lighting, and rendering. If you already have strong 3D skills or you sell products that change in predictable ways (like colors or configurations), it can be a great path. If you want fast, accurate visuals of real packaging and materials, a photo-based 360 is often quicker. Many brands end up hybrid: real 360 for hero products, renders for configurable variants.
How do I keep 3D spins consistent across a whole catalog?
Standardize everything you can: camera height and distance, lens choice, lighting placement, turntable height, and frame count. Build a simple capture checklist and keep a reference “gold standard” product set to compare against. Also standardize your post workflow: global color correction first, retouch second, export last. If you are already investing in consistency, apply the same thinking to your wider 3d photography content so your PDPs feel like one brand, not a mix of vendors and eras.
Will 3D product photography improve conversion rates?
It can, but it depends on your category and execution. 3D tends to help when customers need reassurance about dimensions, fit, details, or craftsmanship. It can also reduce returns if the 3D viewer makes the product feel more “known” before purchase. The key is to test it like a marketer: run an A/B test on a subset of SKUs, measure add-to-cart and conversion, and watch support tickets. If 3D slows your PDP, it can hurt performance. Keep it optimized and optional, not a page-speed tax.
What is the best 3d product photography software for ecommerce teams?
The best software is the one that fits your workflow: capture, batch processing, viewer output, and ecommerce compatibility. Some teams want all-in-one capture systems; others want flexible stitching tools plus a separate viewer. Focus on batch automation, color consistency tools, and export options that keep file sizes reasonable. If your team also needs lots of still-image variations for ads, pairing your 3D workflow with AI tools can speed up creative testing. Just keep roles clear: 3D for interactive accuracy, AI for rapid campaign variations.
How does AI fit alongside 3D product photography?
AI is most useful when you treat your 3D capture as your “source of truth,” then generate more marketing assets from it. For example, you can pull a hero frame from your 360 set and generate seasonal backgrounds for ads using tools like AI Background Generator. You can also standardize marketplace-friendly stills with the Free White Background Generator. AI will not replace a true interactive spin, but it can reduce reshoots for creative variations.
What files should I keep from a 360 product shoot?
Keep three deliverables: the original captures, the cleaned and retouched frame sequence, and the final exported package you publish to your store. That way, if you need to update color, fix a label change, or adjust compression for speed, you are not starting from zero.
How do I stop my 360 viewer from hurting page speed?
Keep your standard PDP images as the default, and treat the 360 as optional. Choose sensible image dimensions, compress carefully to avoid mushy textures, and test on a mid-range phone on cellular. The goal is a 360 that loads when a shopper wants it, not a mandatory asset that slows every visitor.
Key Takeaways
Pick your 3D path first: photo-based 360 spins for accuracy, or 3D rendering for scalable variants.
Your biggest wins come from consistency: locked camera settings, stable turntable rotation, and repeatable lighting.
White on white is a lighting problem, not a “make it brighter” problem. Separation defines edges across frames.
Optimize for ecommerce: keep 3D optional, watch page speed, and test impact on conversion and returns.
Use AI to multiply campaign stills from your best angles, not to patch a broken capture workflow.
Conclusion
A solid 3d product photography setup is less about buying fancy gear and more about building a repeatable system. Once your camera is locked, your turntable rotation is stable, and your lighting is controlled, you can produce consistent 360 spins that actually help customers decide. That is when 3D becomes a business asset, not a creative science project.
Start small: choose 3 to 5 products where shoppers regularly ask questions about details, size, or finishes. Build your workflow, publish the 360 viewer, and measure impact on conversion and returns. If it works, scale it across your catalog and layer in faster creative testing with AI-based still variations.
If you want to explore AI variations alongside your 3D workflow, ProductAI offers free tools you can try before committing.
Last updated: February 2026
About the Author
Giles Thomas, Ecommerce & AI Product Photography Expert – Founder, AcquireConvert.
Giles helps ecommerce teams build repeatable product-imagery systems that scale, from studio workflows and lighting consistency to performance-minded asset delivery on Shopify and marketplaces. His work focuses on turning visual production into a measurable lever for conversion, returns reduction, and faster creative testing.

Hi, I'm Giles Thomas.
Founder of AcquireConvert, the place where ecommerce entrepreneurs & marketers go to learn growth. I'm also the founder of Shopify agency Whole Design Studios.