Automated Product Photography (2026 Guide)
.webp)
Last updated: February 2026
What You Will Learn
What “automated product photography” means in 2026
The 5 system types that scale (and when to use each)
A practical scaling workflow for e-commerce teams
Where ProductAI fits (and where it does not)
Buying guide: how to choose your system
Output standards that prevent rework (formats, naming, and channel specs)
Quality control for automated and AI-generated product images
Batch production: how to actually scale day-to-day
Pros and Cons (automation approach)
Automated product photography is no longer just a “nice to have” for big catalogs. If you sell on Shopify, Amazon, or wholesale and you are constantly launching SKUs, you need a system that produces consistent packshots, lifestyle images, and 360 spins without turning every shoot into a project. The tricky part is that “automation” can mean very different things: a physical booth and turntable setup, a studio workflow with templates, or an AI pipeline that transforms simple captures into on-brand creative at scale.
This guide breaks down the main system types, what they do well, where they fall short, and how to choose based on your volume, team, and channel mix. If you also want a quick refresher on what good inputs look like, start with our guide to product photos.
What “automated product photography” means in 2026
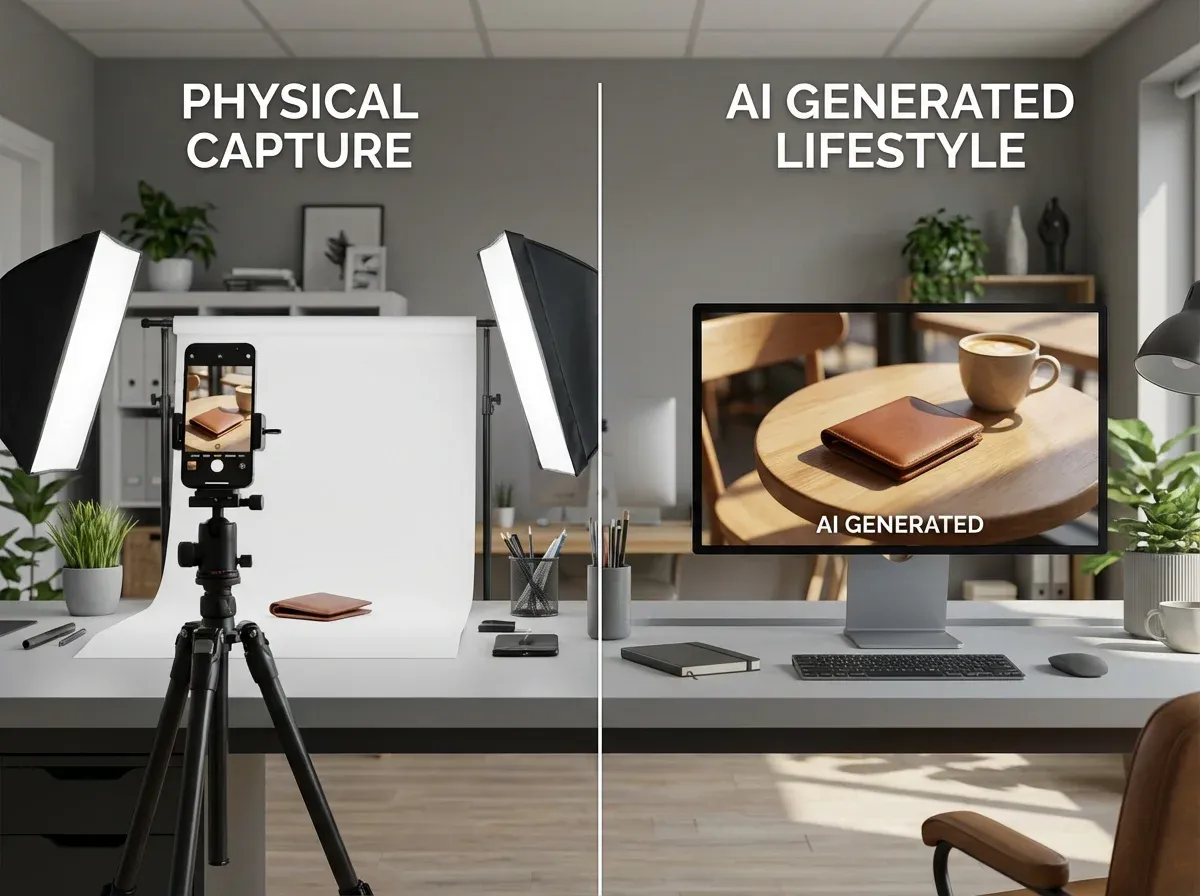
At a practical level, automated product photography is any setup that reduces manual labor per SKU while keeping your output consistent. That could be a booth that controls lighting so every shot matches, a turntable workflow that generates 360 frames fast, or AI that handles the repetitive edits (backgrounds, cleanup, variations) so your team can focus on merchandising and creative.
Most teams do best with a hybrid: a repeatable capture method (often iPhone product photography plus a simple lighting rig) paired with automation in post. This matters if you sell on marketplaces like Amazon, where packshot consistency impacts trust, but you also need lifestyle creative for ads and PDP testing.
If you are specifically comparing spins and rotation workflows, also read our breakdown of rotating product photography.
The 5 automated product photography systems that scale
1) Studio booth systems (hardware automation)
A product photography booth is the “classic” automation play: controlled light, fixed camera position, and repeatable settings. It shines for small to medium products, cosmetics, and packshot product photography where consistency matters more than creativity.
Best for: clean packshots, speed, standardized catalogs
Watch-outs: limited creative range, setup space, still requires retouching
2) Turntable + tethered capture (360 automation)
Turntables help you produce a consistent rotation sequence quickly. If you are doing automated 360 product photography, the time savings come from consistent increments, repeatable framing, and batch capture, not from “one click” magic. You still need to process frames, stitch spins, and publish them correctly.
If you are evaluating app-driven workflows, our guide to a 360 product photography app is the best next step.
3) Template-driven editing pipelines (process automation)
This approach is less about new tools and more about operational discipline: naming conventions, pre-set crops, export templates, and QA checklists. It is surprisingly effective when you have multiple contributors (in-house and freelance product photography) and need “good enough” consistency.
Best for: growing teams, predictable output, reduced rework
Watch-outs: still labor-heavy, difficult to scale creative variation
4) AI product photography generators (post-production automation)
AI tools are strongest when your baseline product image is “usable” but not “market ready.” Think: you have a decent iPhone capture, but you need variations for PDPs, ads, seasonal backgrounds, or channel requirements. AI can remove or replace backgrounds, create lifestyle scenes, and generate creative variants faster than a manual workflow.
This is often the fastest route to scaling, because you do not need to rebuild your physical studio setup to get meaningful gains.
5) 3D and virtual workflows (render automation)
3D virtual product photography can be extremely scalable once you have the underlying assets, especially for configurable products, highly reflective items, or teams that need many angles without reshoots. The trade-off is upfront cost and the need for specialized skills.
If you are deciding between shooting and rendering, use our comparison on product photography vs 3d rendering to avoid common budget mistakes.
A practical scaling workflow (capture once, automate variations)
.webp)
If you want a system that scales without breaking your team, build the workflow around a single idea: capture a consistent “base image” once per SKU, then automate the variations you need for each channel.
Step 1: Standardize capture inputs
Pick a consistent lens, distance, and angle set (front, 45-degree, back, detail).
Use controlled light where you can. A booth helps, but a simple lighting setup can work.
Document a quick checklist so freelance and in-house shots match.
Step 2: Automate packshots first
Most brands get the fastest ROI by automating white background compliance and consistent margins. This reduces listing rejections and keeps your catalog clean.
Step 3: Automate lifestyle and creative variants second
Once your packshots are stable, you can generate additional creative for ads, seasonal campaigns, and A/B tests. This is also where cosmetics and model product photography concepts can get expensive fast if you rely only on traditional shoots.
Step 4: Add 360 or 3D only when the business case is clear
360 and 3D are powerful, but they add production and publishing complexity. Prioritize them when they directly impact conversion for your category (for example, high-consideration products, premium items, or complex shapes).
Where ProductAI fits in an automated product photography stack
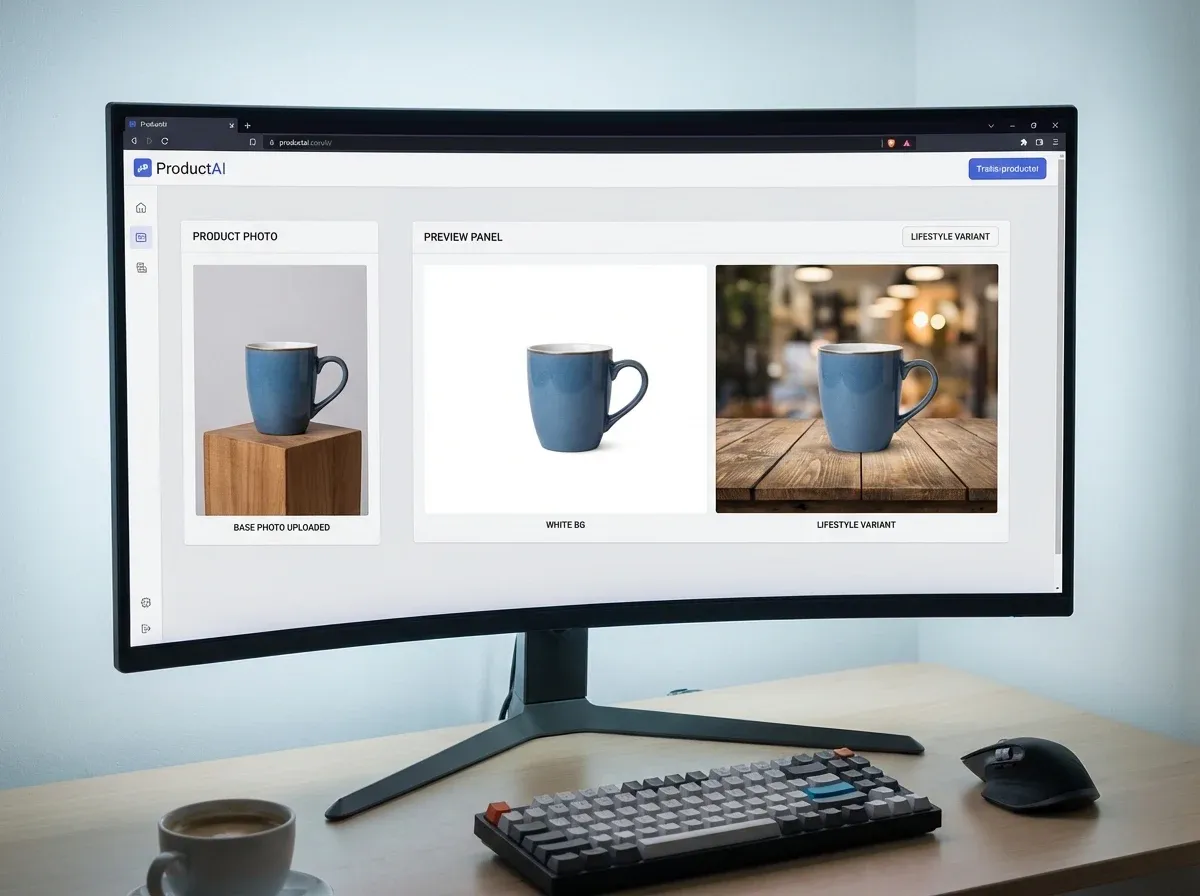
If your bottleneck is editing, variation creation, or “we need more images but cannot justify another shoot,” ProductAI can slot into your workflow as the post-production automation layer. You bring the base shot, then use AI to generate consistent packshots and additional creative quickly.
Three ProductAI entry points that map well to automation:
Free White Background Generator for fast packshot cleanup and marketplace-friendly listings.
AI Background Generator for lifestyle scenes and ad-ready variations without re-shooting.
Creator Studio if you want an end-to-end workspace for generating and editing product images.
It is also worth being clear about fit: AI is best when your input photo is already reasonably sharp and well-lit. If your product is extremely reflective, transparent, or you need pixel-perfect color matching for regulated packaging, you may still prefer controlled studio capture or 3D.
If you are exploring UGC-style creative as part of your system, you can also review ugc product photography as a faster way to generate human-style assets without organizing full shoots.
Buying guide: how to choose an automated product photography system
1) Start with your volume and SKU churn
If you add new products weekly, process automation and AI usually outperform hardware-first approaches because you are not constrained by studio capacity. If you have a stable catalog and high standards for packshot uniformity, a booth plus templates can be a solid foundation.
2) Decide what “scale” actually means for you
More SKUs: consistent packshots and fast exports matter most.
More channels: you need variations (square, vertical, different crops, different backgrounds).
More creative testing: you need speed and low cost per variant.
3) Match the system to your product category
Cosmetics and small goods do well with booths and AI. Apparel often needs on-body or model context, so expect more creative work. Highly reflective products are harder for both AI and traditional editing, so plan extra time for QA.
4) Evaluate workflow friction, not just output quality
A tool that produces great images but requires a specialist on every step will not scale. Look for batch workflows, repeatable settings, and a QA step your team can actually follow. If you outsource locally, compare your true costs against what you would pay for professional work in your market (for example, product photography chicago pricing can be very different from other cities).
5) Run a real pilot (not a demo)
Pick 20 products with different materials and shapes. Create: (1) a white background packshot, (2) one lifestyle variant, and (3) if relevant, a 360 sample. Measure time per SKU, revision rate, and whether the output matches your brand. That is the closest thing to a reliable ROI model.
For broader cost context, this breakdown of product photography pricing is helpful when you are comparing AI, in-house, and freelance.
Output standards that prevent rework (formats, naming, and channel specs)
Here’s the thing: most “automation” projects fail because teams automate editing before they standardize outputs. If different people export different sizes, crops, and filenames, you are still doing manual cleanup, it is just happening later in the process.
Set a small set of master templates
One master packshot template (usually square) with consistent margins.
One master lifestyle template (often square and vertical) for ads and social.
If you do 360, one master frame size and crop so the spin looks stable.
Choose formats based on where the image will live
JPG is usually best for speed and smaller file sizes on PDPs, especially for lifestyle.
PNG is useful when you need transparency or you are moving the product into multiple backgrounds, but file sizes can balloon quickly.
If your workflow uses layered outputs, keep a “working” version internally and export a flattened web version for the store.
Make naming conventions non-negotiable
A simple rule: make the filename tell you SKU, view, channel, and version. For example: SKU-123_front_packshot_v1, SKU-123_45deg_lifestyle_meta_v2. That one step makes handoffs, audits, and re-exports faster, especially when you are batching hundreds of images.
Quality control for automated and AI-generated product images
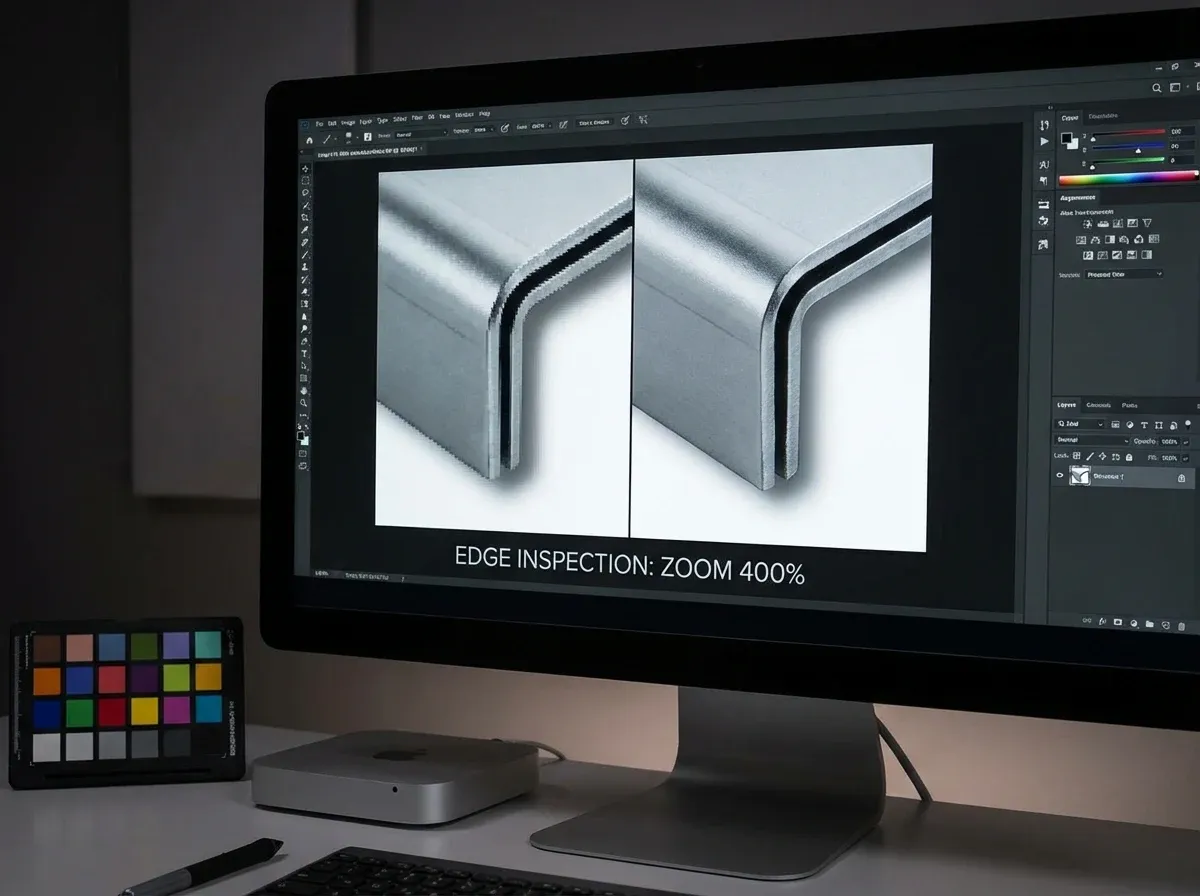
Automation is only profitable if your revision rate stays low. The reality is that AI and template pipelines can produce output that looks fine at a glance, but breaks when you zoom in or when it sits next to the rest of your catalog.
A practical QA checklist that catches most problems
Edges: look for halos, cutout chatter, and missing small parts (caps, thin straps, wires).
Shadows: avoid floating products and shadows that go in the wrong direction.
Reflections: check for warped reflections on glossy packaging and metallic items.
Labels and text: make sure ingredients, logos, and small typography stay readable and not distorted.
Color: compare against a known good reference from your best capture setup, not against a random monitor.
Consistency: the product should sit at the same size and position across the catalog, especially on white backgrounds.
Build QA into the workflow, not at the end
Consider this: if your process is “generate everything, then review,” you create a backlog of fixes. A better approach is to QA early on a small batch, lock the settings that work, then run the rest. That is true whether you are using a booth, a turntable, or an AI product photography generator.
Batch production: how to actually scale day-to-day
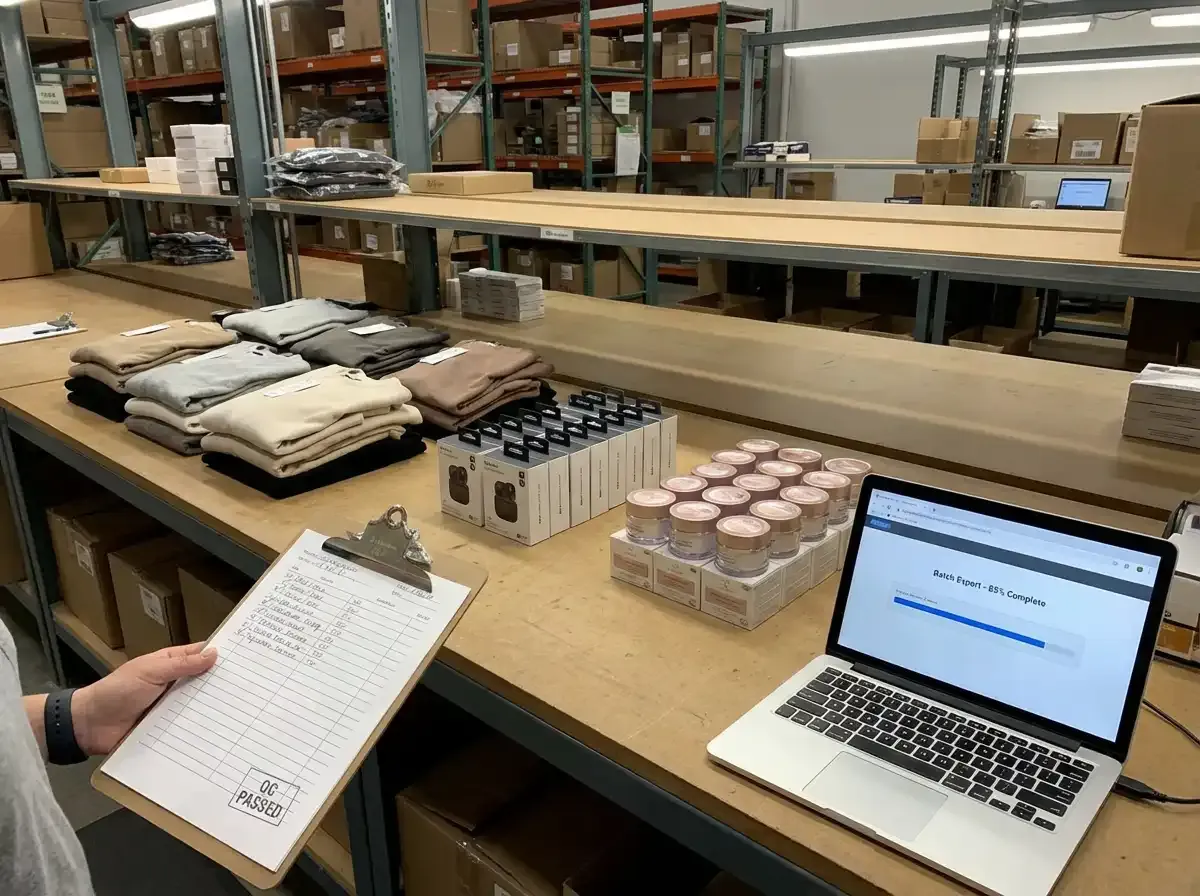
Most teams underestimate the operational side of automated product photography. The tools matter, but the day-to-day wins come from batching work so your team is not context switching for every single SKU.
Batch by similarity, not by arrival date
If you batch reflective products together, apparel together, and small cosmetics together, you can standardize lighting, prompts, and export rules. That reduces exception handling, which is where automation quietly loses its ROI.
Define handoffs and approvals in one sentence
Who is allowed to say “this is approved for Amazon,” and who signs off on lifestyle creative? If nobody owns approval, your process becomes a loop of edits and opinions. If one person owns approval but has no checklist, you get inconsistent decisions.
Use AI variation generation like a production line
From a practical standpoint, you will get more predictable results if you generate a small set of repeatable lifestyle concepts and reuse them across products, instead of trying to invent a new scene every time. If you want “seasonal” or “campaign” creative, pick one concept, run it across a category, and measure performance before expanding the concept library.
Pros and Cons
Strengths
Lower cost per image at scale: Once your workflow is set, automation reduces repeated labor and reshoot frequency.
More consistent catalogs: Booths, templates, and AI packshot workflows can enforce repeatable framing and backgrounds.
Faster creative testing: AI product photography generator workflows make it easier to produce multiple ad concepts and PDP variants.
Better cross-channel readiness: You can quickly create Amazon-friendly packshots plus lifestyle assets for social and ads.
Less dependence on specialists: Well-designed systems let non-designers produce acceptable outputs with QA guardrails.
Considerations
Automation still needs inputs: Poor capture quality leads to poor results. You may need a booth or lighting upgrade first.
360 and 3D add operational complexity: Capture is only one part. Publishing, hosting, and performance testing matter.
AI can require iteration: Lifestyle scenes and “cool product photography” concepts often need prompt tuning and brand QA.
Edge cases cost time: Reflective, transparent, or intricate products can trigger extra retouching or manual fixes.
Frequently Asked Questions
What is automated product photography?
Automated product photography is a set of tools and workflows that reduces manual work per SKU while keeping image output consistent. It can include a product photography booth, a product photography turntable for 360 capture, template-based editing, or AI that handles background removal and creative variations. The best setup depends on whether you need packshots, lifestyle creative, 360 spins, or all three.
Is an automated product photography turntable worth it?
It is worth it when 360 views measurably help shoppers evaluate your product and when you can reuse the workflow across many SKUs. A turntable speeds up consistent frame capture, but you still need a process for editing, stitching, and publishing spins. If you only have a handful of hero products, you may get better ROI from strong lifestyle images instead.
How does AI help with product photography on Amazon?
AI can help you produce consistent, clean packshots faster, especially white backgrounds and standardized crops. That can reduce listing friction and make your catalog look more trustworthy. The key is to keep inputs consistent and run a QA pass for edges, shadows, and color accuracy. For lifestyle images used in A+ content, AI can also generate variants without reshoots.
Can AI replace a product photography booth?
Sometimes, but not always. A booth solves the capture problem by controlling lighting and reflections, which AI cannot fully “fix” if the photo is blurry or poorly lit. AI is strongest as a post-production accelerator that creates variations and removes repetitive editing. Many teams combine a simple booth-style capture setup with AI to scale creative output.
What is the best system for product photography cosmetics?
Cosmetics usually benefit from consistency: clean packshots, controlled highlights, and brand-appropriate backgrounds. A booth or controlled lighting helps capture accurate shape and label detail. Then AI can generate additional lifestyle scenes for campaigns. The risk area is reflective packaging, which may need extra QA for edge quality and realistic reflections.
How does 3D virtual product photography compare to automated photography?
3D can scale extremely well once you have the assets, since you can render unlimited angles, colors, and scenes without reshoots. Automated photography scales through faster capture and faster editing, but you still depend on physical handling and studio time. If you have many configurations or need perfect consistency across variants, 3D may win. If you want speed with minimal setup, automation plus AI is often faster to deploy.
Can I do automated product photography with an iPhone?
Yes, as long as you standardize your capture setup. Use consistent lighting, a stable mount or tripod, and a repeatable distance and angle. Your “automation” then comes from templates and AI post-production, not from the phone itself. For large catalogs, the biggest improvement is documenting the capture checklist so every SKU starts with a clean, usable base image.
How do I decide between freelance product photography and automation?
If you need a small number of high-end hero images, a freelancer can be the best value. If you need hundreds of consistent images every month, automation usually reduces cost per SKU and speeds up iteration. Many brands use freelancers for hero shoots and rely on automated capture plus AI for the long tail of catalog images and variations.
What should I look for in an AI product photography generator?
Look for consistent background quality, realistic shadows, good edge handling, and a workflow that supports batch output. Also check how quickly your team can learn it and how predictable the results are for your product type. This guide on professional AI-generated product photos is a good checklist for evaluating outputs.
What is the biggest mistake when scaling product photography?
Trying to scale creativity before you scale consistency. If your base capture is inconsistent, every downstream step becomes expensive: more retouching, more revisions, and more confusion across channels. Get your capture standards, naming, and packshot pipeline stable first. Then add lifestyle variation, 360, or 3D once the core workflow is reliable and measured.
What file format is best for automated product photography, PNG or JPG?
For most e-commerce use cases, JPG is the default because it loads fast and keeps file sizes manageable, especially for lifestyle images. PNG is useful when you need transparency or when you plan to reuse the same cutout product across multiple backgrounds, but it can increase storage and slow down pages if you are not careful. A practical workflow is to keep a higher-quality internal working file, then export a web-optimized JPG for storefront use.
How do I keep colors consistent when using automation and AI?
Start with consistent capture lighting and lock your camera settings so you are not chasing exposure changes. Then set one “reference” packshot that your team uses as the standard for that product line. When you generate variations, QA color against the reference rather than trusting any single output, especially with glossy or reflective packaging. If color accuracy is business-critical, favor controlled capture for the base image and treat AI as a way to create variations, not as the place where color decisions are made.
What should a QC checklist include for automated product photography?
A good QC checklist is short enough that someone will actually use it. Include edge quality, shadow realism, label and text integrity, reflection realism on glossy items, and consistency of product size and placement across the catalog. If you sell across multiple channels, add a final “channel check” so you catch things like wrong crops or non-compliant backgrounds before upload.
Key Takeaways
Automated product photography can be hardware-based (booths, turntables) or software-based (templates, AI), and most brands benefit from a hybrid.
Start by standardizing capture inputs, then automate packshots, then scale lifestyle variations.
360 and 3D can increase conversion for the right categories, but they add publishing and QA complexity.
AI is strongest for background work and rapid creative variants, but it still needs good base photos and brand QA.
Pilot with 20 real products and track time per SKU and revision rate before committing.
Conclusion
The best automated product photography system is the one that reduces time per SKU while keeping your catalog consistent across Amazon, Shopify, ads, and social. For many teams, that means a simple, repeatable capture setup paired with automation in post production, especially AI-driven packshots and creative variations. If you are trying to scale output without scaling headcount, start with packshot consistency and background workflows, then build up to lifestyle and 360 once the core process is stable. If you want to test AI quickly, explore ProductAI’s Free White Background Generator and see how well it fits your product types and quality bar.
Last updated: February 2026
About the Author
Giles Thomas, Ecommerce & AI Product Photography Expert – Founder, AcquireConvert.
Giles helps e-commerce teams design scalable product photography workflows that balance capture consistency with automated post-production. His work focuses on using AI, templates, and QA systems to reduce rework while producing channel-ready images for Shopify, Amazon, and paid media.

Hi, I'm Giles Thomas.
Founder of AcquireConvert, the place where ecommerce entrepreneurs & marketers go to learn growth. I'm also the founder of Shopify agency Whole Design Studios.