How to Shoot 360 Product Photography (2026 Guide)
.webp)
Last updated: February 2026
What You Will Learn
Why 360 product photography is worth it
The simplest gear setup that works
How to set up, center, and light your product
How to shoot 360 product photography step by step
Stitching, editing, and exporting for the web
Platform and marketplace requirements to plan for (before you shoot)
Turntable and rig considerations for different product types
Web delivery basics: image sequences, hosting, and speed budgeting
Where AI and automation fit (and where they do not)
Troubleshooting quick fixes (flicker, banding, hotspots, and dust)
QA checklist before you publish
You finally get a product photo you like, then someone on your team asks, “Can we make it 360?” Suddenly you are thinking about turntables, reflections, frame counts, and whether your site will even load it fast enough.
Here’s the thing: 360 product photography is not hard because of the camera. It’s hard because consistency is brutally unforgiving. If your lighting shifts, your product drifts, or your exposure changes halfway around, the spin looks cheap. And in e-commerce, “cheap” shows up as lower trust, fewer add-to-carts, and more returns.
This guide walks you through how to shoot 360 product photography step by step, with practical setups for small teams. You will learn what gear you actually need, how to light for clean rotations, how many frames to capture, and how to export a web-ready 360 that does not tank page speed. I will also cover when AI can help you scale variations after the shoot, and when it cannot replace the fundamentals.
Why 360 product photography is worth it
If you sell anything where details matter, 360° product photography can reduce uncertainty. Customers cannot pick the item up, so you are giving them the next best thing: the ability to inspect the shape, finish, and edges.
From a practical standpoint, 360 is especially useful for products where a single hero image hides the “gotchas” that trigger returns: ports on electronics, seams on apparel, closures on bags, or scratches on refurbished items.
Where 360 helps most
Higher-consideration items: customers want proof before they commit.
Reflective or textured products: the surface changes as it rotates.
Products with functional details: buttons, zippers, labels, and connectors.
If you are building out your overall visual foundation, start with the basics in product photos, then add 360 where it changes buying confidence.
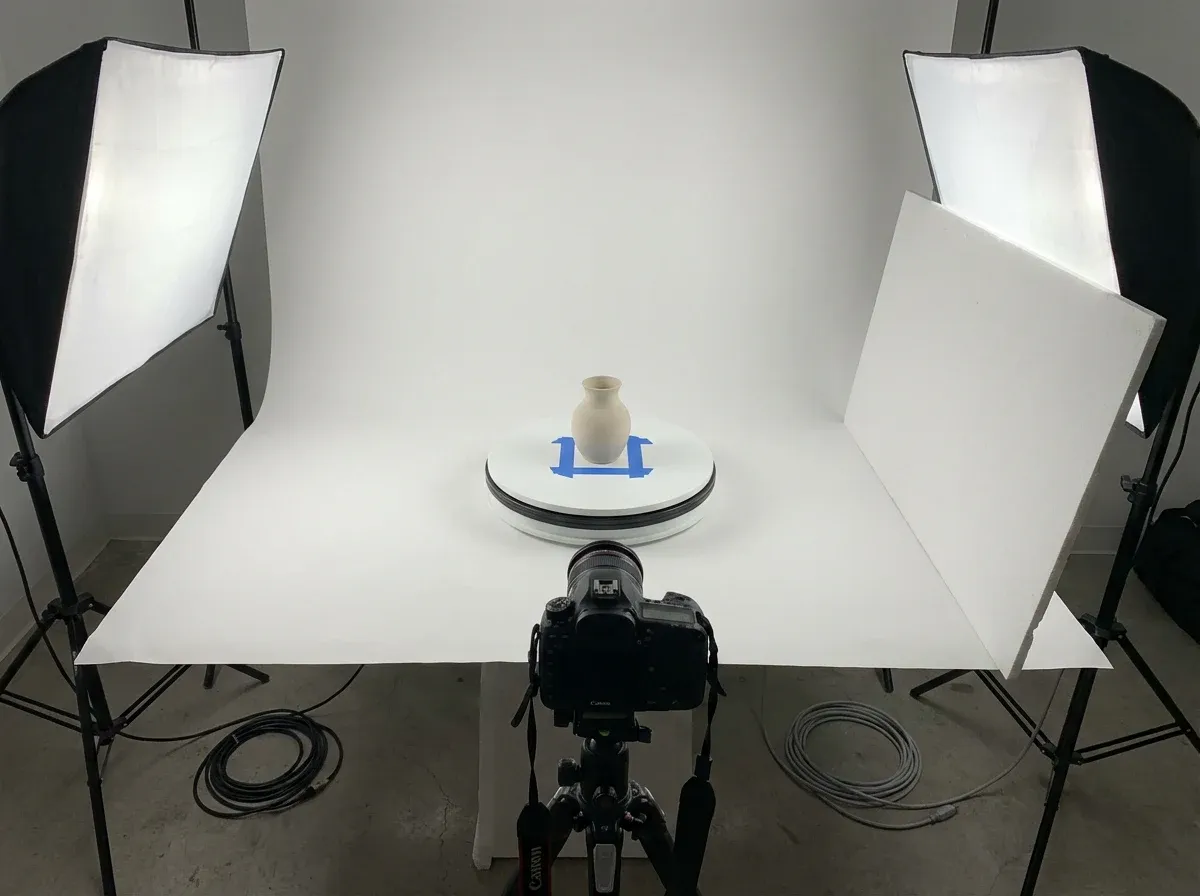
The simplest gear setup that works
You can shoot a 360 photography product set with a lot of fancy kit, but the best results usually come from controlling a few variables: stable camera position, consistent lighting, and a repeatable rotation.
Minimum viable setup
Camera: DSLR, mirrorless, or a modern phone with manual controls. Manual matters more than brand.
Tripod: stable, with a center column you can lock down.
Turntable: manual for small volumes, motorized for speed and consistency.
Lights: two soft sources (softboxes or diffused LED panels) plus optional top fill.
Backdrop: white sweep, acrylic, or seamless paper depending on your product.
Consider this: the turntable is not just a convenience. It is what keeps your frame-to-frame rotation consistent, which is what keeps your final spin from “jumping.” That jump is the #1 thing shoppers notice.
How to set up, center, and light your product
Before you worry about how to do product photography in a 360 workflow, get your physical setup repeatable. You want the product to rotate around its own center, not wobble around the frame.
Centering and leveling (the unglamorous win)
Mark the center of the turntable with a small piece of removable tape. Put your product on that mark, then rotate it slowly and watch one “reference point” on the product, like a logo or corner. If that point drifts left and right, your product is off-center. Fix this now, not in post.
Lighting for 360, not for a single hero shot
What many businesses overlook is that lighting that looks amazing from one angle can fall apart at 180 degrees. For 360 product photography, aim for symmetry and softness so the exposure stays consistent around the full rotation.
Place two diffused lights at roughly 45 degrees to the product, left and right.
Use a reflector or white foam board opposite the key light to lift shadows.
For shiny products, increase diffusion and use larger light sources, not brighter ones.
If you need a clean catalog look, this is where “how to shoot product photography white background” becomes a process, not a preference. The goal is a background that stays even as the product rotates, with no gradients that pulse frame to frame.
How to shoot 360 product photography step by step
This is the repeatable workflow I recommend for small e-commerce teams. It keeps quality high and makes reshoots rare.
Step 1: Lock your camera settings
Mode: Manual
White balance: Fixed (set Kelvin or use a custom WB)
ISO: As low as possible
Aperture: Usually f/8 to f/13 for products (depends on size and lens)
Shutter speed: Adjust for exposure, using a tripod
Focus: Manual focus after you set it once
The reality is that auto settings will “breathe” as the product rotates. That breathing becomes flicker in the final spin.
Step 2: Choose your frame count
Frame count is a tradeoff between smoothness and workload. Common starting points:
24 frames: good minimum for many products
36 frames: smoother, still manageable
72 frames: premium smooth, heavier files and more processing
Think of it this way: every extra frame increases production time and site weight. Match frame count to product value and how close shoppers need to inspect it.
Step 3: Rotate consistently
If you are using a manual turntable, add degree marks (or use a printed dial) and rotate the same increment every shot. If you are motorized, set a fixed step and a short pause to avoid motion blur.
Step 4: Shoot a full rotation, then a safety rotation
Do one complete pass. Then do a second faster pass as insurance. It sounds like extra work, but it is cheaper than discovering a focus slip or bump after the product is packed away.
Step 5: Keep naming and folders boring
Use a predictable naming system per SKU. When you shoot multiple variants (colorways, sizes, bundles), messy folders are how teams lose days.
If you want a broader view of the format choices and player options for publishing, see 360 product photography.
Stitching, editing, and exporting for the web
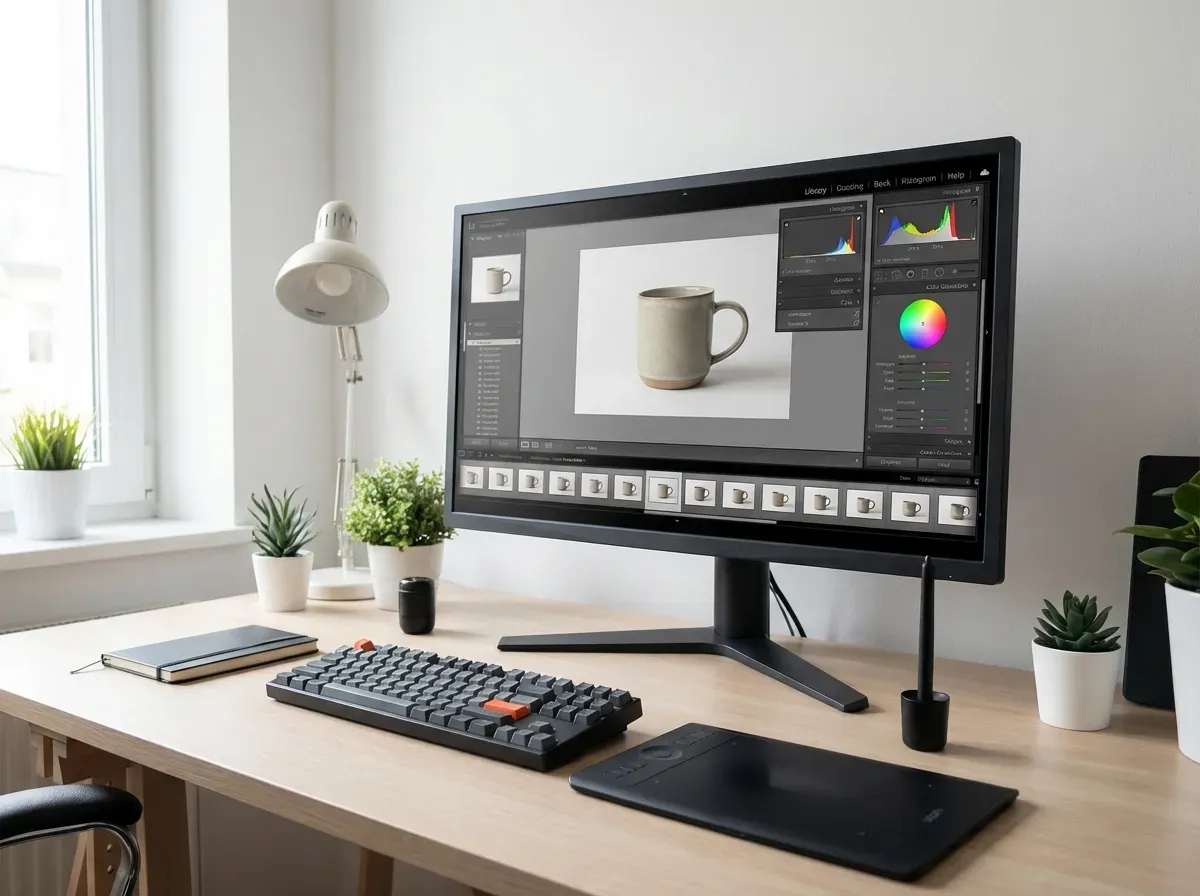
Your 360 is only as good as your post. The goal is a set of frames that match perfectly in exposure, color, and crop so the rotation feels like one continuous object.
Edit one frame, then sync the rest
In Lightroom or similar tools, edit your “hero” frame first: exposure, contrast, white balance, and minor color. Then sync those settings across all frames. This prevents the pulsing effect that screams “amateur.”
Crop and align for zero wobble
Keep the product the same size in every frame. If the product grows or shrinks because of inconsistent cropping, the spin looks like it is breathing. If it shifts left and right, it looks like it is orbiting. Both hurt trust.
Export settings that do not kill load time
Format: JPEG for most spins, WebP if your player supports it
Long edge: often 1200 to 2000 px depending on zoom needs
Compression: test visually, then measure page speed
Now, when it comes to publishing, many teams underestimate the implementation layer. Your 360 viewer matters as much as the images. If you are comparing options, 360 product photography app covers what to look for in software and integrations.
Platform and marketplace requirements to plan for (before you shoot)
One of the fastest ways to waste time in a 360 workflow is to shoot and edit first, then discover your channel cannot use the output the way you expected. From a practical standpoint, “requirements” are not just about pixel dimensions. They are about backgrounds, file types, viewer support, and what the channel considers a compliant product image.
Plan for two outputs: marketplace-ready and site-ready
Many marketplaces prioritize simple, compliant images, often a clean white background with minimal styling. Your own product detail page can support richer experiences like 360 spins, higher zoom, and more interactive viewers.
Consider this: you can shoot one consistent set of frames, then export two deliverables. A lighter set for speed and a sharper set for zoom and inspection. That decision should happen before you choose frame count and resolution.
Background consistency matters more on strict channels
If a channel expects a white background look, the goal is not “white-ish.” It is repeatable, even backgrounds that do not change as the product rotates. The moment your background tone pulses, it looks like a mistake, even if the product itself is fine.
From a workflow standpoint, this is where teams either succeed with a controlled sweep and even background lighting, or they spend hours trying to fix something that should have been solved during capture.
Decide how you will handle variants and bundles
Now, when it comes to variants, 360 can get expensive fast. If you sell multiple colors or bundles, decide upfront what gets a full 360 and what gets a simpler set of stills. A common approach is: full 360 for your best sellers and flagship color, then stills for secondary variants unless the variant changes the shape or core buying decision.
Turntable and rig considerations for different product types
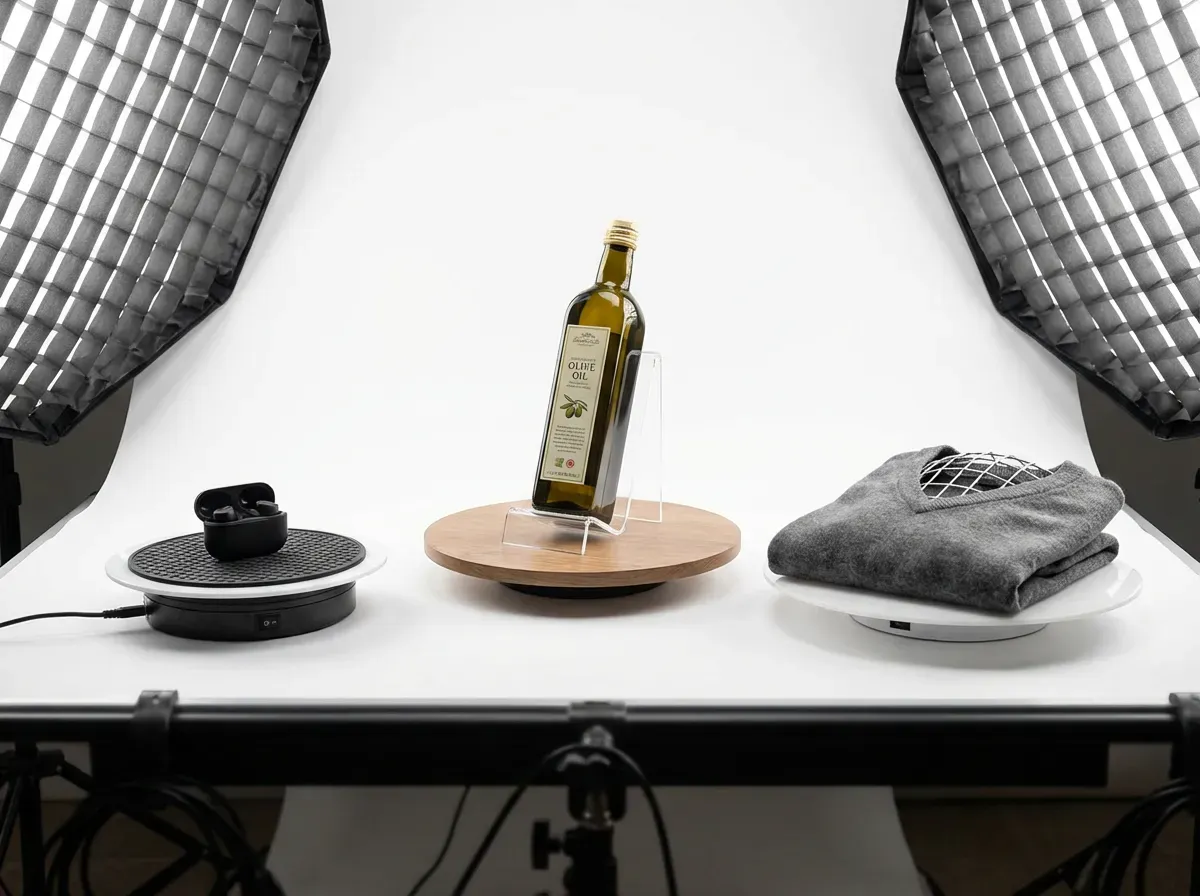
A turntable is not just a spinning plate. It is the foundation of repeatability. If the product is unstable, top-heavy, or soft, the spin will wobble no matter how good your camera is.
Light products and tall products need stabilization
Small items can slide as the turntable starts and stops, especially with motorized tables. Tall products can lean slightly between frames and it shows up as drift. The fix is usually simple: add grip under the product, reduce acceleration, and make sure the turntable is truly level. If the product has a narrow base, use a stable support that is hidden from the camera angle you plan to use.
Apparel and soft goods can “change shape” while rotating
Soft goods are tricky because they are not rigid. A sleeve can slump, fabric can sag, and the outline can change as you rotate it. That turns into a jittery spin even if the lighting is perfect. The solution is consistent stuffing, internal support, and a method of placing the product so gravity affects it the same way at every angle.
Clear and reflective products require environment control
For glass, glossy plastics, and polished metal, your “set” is everything the product reflects. Symmetry helps, but the bigger win is controlling what the product sees. Large diffusion and clean white boards create consistent reflections around the rotation. If you can see a doorway or dark corner in one frame, you will see it again and again in the spin.
Web delivery basics: image sequences, hosting, and speed budgeting
The capture and edit process is only half the job. A 360 that looks great in a folder can still fail in the real world if it is heavy, slow, or janky on mobile.
Most 360 viewers use an image sequence
In most e-commerce implementations, a 360 spin is a sequence of still frames that the viewer swaps quickly as the user drags. This is why consistency is so unforgiving, and why file size multiplies quickly. If you export 36 frames, you are not optimizing one image. You are optimizing 36 images.
Create a speed budget per SKU
What many businesses overlook is that “just 100 KB more” per frame becomes megabytes in a full rotation. Decide a rough weight target for your entire 360 set, then work backwards: number of frames, resolution, and compression.
From a practical standpoint, you can usually protect both speed and quality by doing two things: keep the long edge reasonable for the zoom you actually offer, and compress to the point where artifacts are not visible during a normal spin. A frame can look slightly compressed when paused and still feel premium when moving.
Test on real devices, not just a desktop preview
Desktop previews are flattering. Mobile is where spins succeed or fail. Test touch response, swipe behavior, and whether the first interaction is delayed because too many frames load at once. If you feel any lag, shoppers feel it too.
Where AI and automation fit (and where they do not)
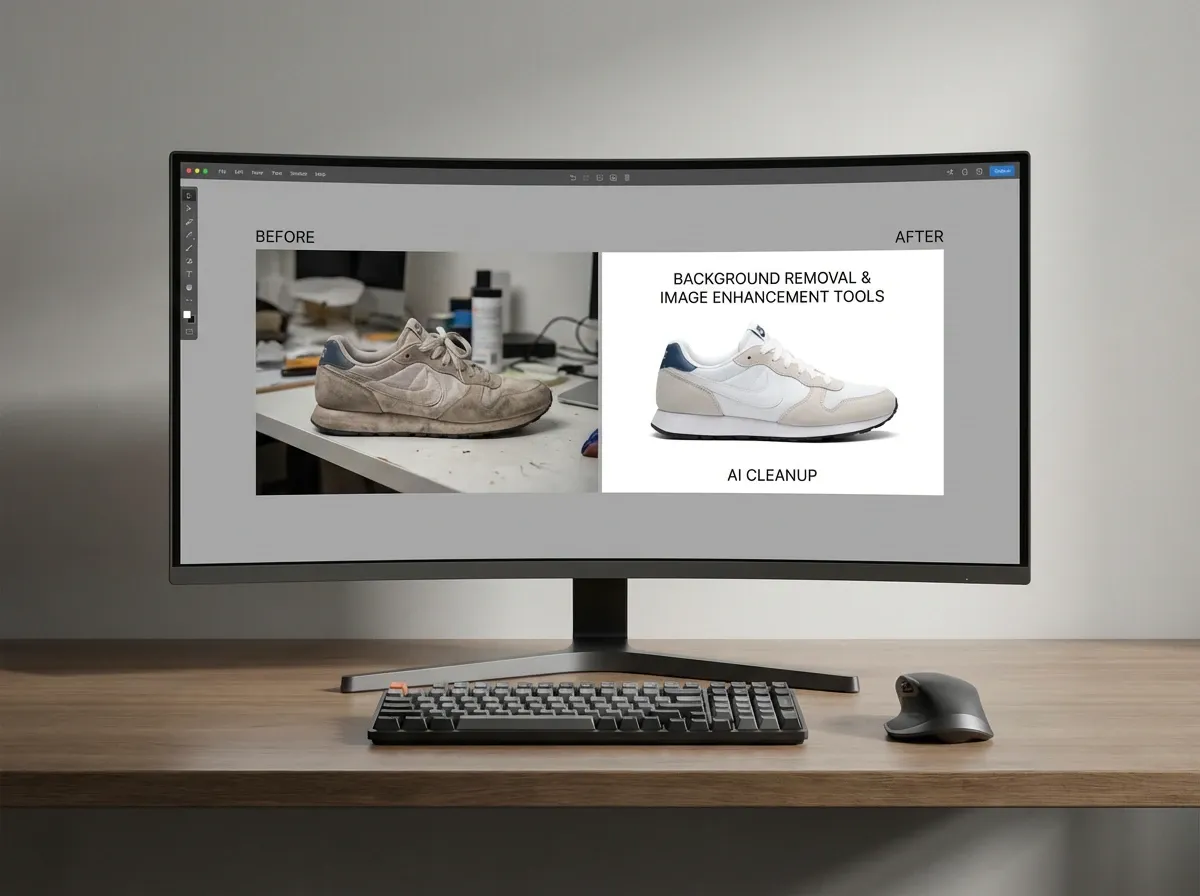
AI can help you scale the output of a 360 shoot, but it cannot fix a fundamentally sloppy capture. If your product is off-center or your frames flicker, AI edits often amplify the inconsistencies.
Good uses of AI after you capture the frames
Once you have a clean rotation, AI can help with the repetitive work: background cleanup, extending canvas, and creating lifestyle variants for ads. Tools like ProductAI are one example of how teams generate extra creative from a single asset set, without reshooting every concept.
Need background variations for seasonal campaigns? Try the AI Background Generator using your best angle as the base.
Need sharper frames for zoom on PDPs? Increase Image Resolution can help improve perceived detail, especially for older shoots.
What automation really changes in your workflow
Automating parts of post-production changes your throughput. In practice, this means you can test more angles, more variants, and more creatives per SKU. That makes 360 easier to justify because you are not doing one expensive asset that lives in isolation.
If you are thinking about scale, standardization, and repeatability, automated product photography is worth reading alongside this guide.
Troubleshooting quick fixes (flicker, banding, hotspots, and dust)
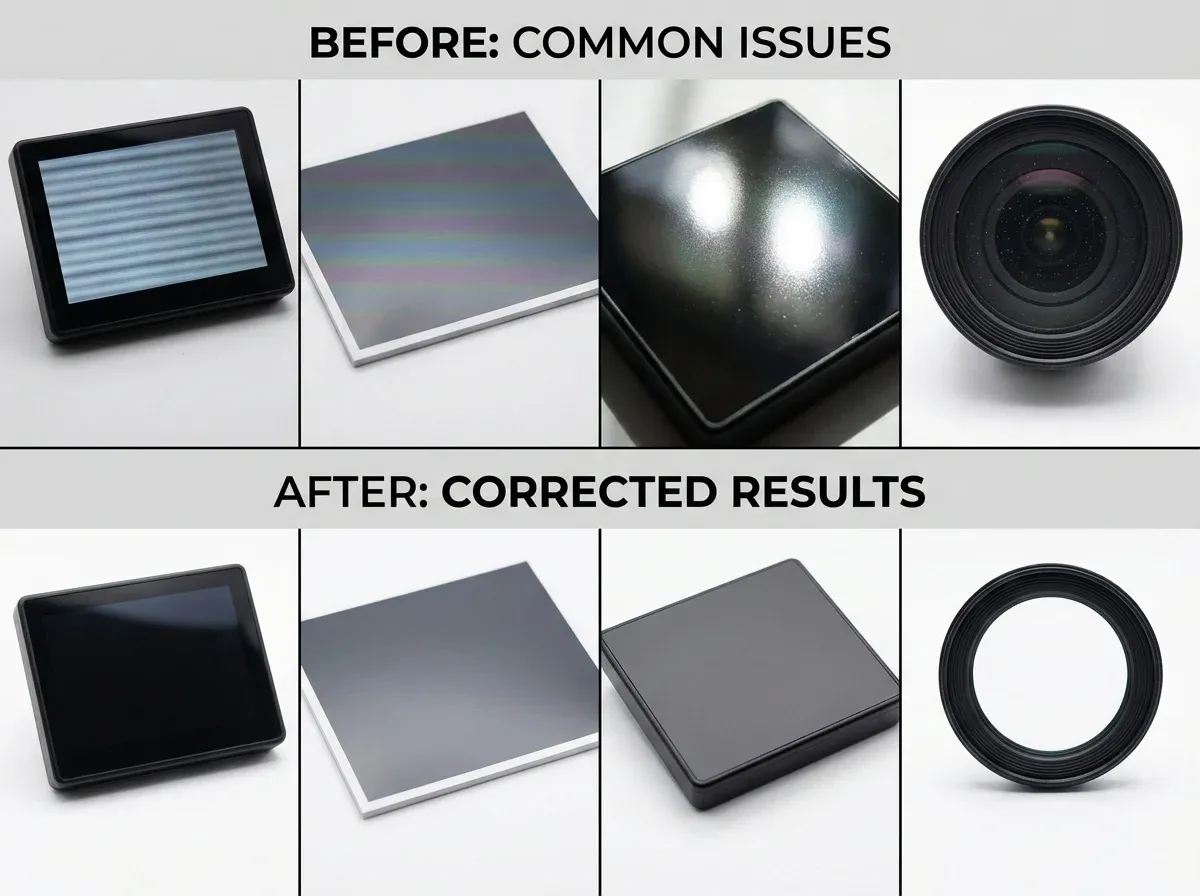
If your first 360 attempt looks “off,” it is usually one of a handful of issues. The good news is that most of them are preventable once you know what to look for.
Flicker that shows up as pulsing exposure
Flicker almost always comes from something changing frame to frame: auto exposure, auto white balance, or lights that are not stable. Start by confirming everything is locked in manual. If you are using LED lights and still see pulsing, try changing shutter speed and see if it improves. Some lights can create subtle banding depending on frequency and shutter timing.
Banding on the background
Banding can be caused by uneven background lighting, compression, or certain lighting and camera combinations. The simplest fix is to make the background brighter and more even during capture, then bring it down slightly in editing if needed. A background that is barely lit tends to show every imperfection.
Hotspots that jump around on glossy surfaces
If highlights appear and disappear as the product rotates, your light sources are too small or too close without diffusion. Increase diffusion and make the apparent light source larger. What you want is a smooth, stable reflection that stays consistent around the rotation.
Dust and small defects you did not notice until after export
This happens to everyone. The practical fix is to build a pre-shoot wipe down into your process and keep a clean brush and microfiber cloth next to the set. In post, spot removal works, but across dozens of frames it becomes a time sink. It is cheaper to prevent dust than to clone it out 36 times.
QA checklist before you publish
Do this quick QA pass before your 360 goes live. It saves you from shipping a spin that looks fine to your team but fails on real devices.
Check for flicker: watch the spin at normal speed and look at highlights and background tone.
Check for wobble: focus on the product base and see if it drifts.
Check for color shift: compare 0 degrees to 180 degrees.
Check mobile load: test on LTE, not office Wi-Fi.
Check zoom behavior: does detail hold up, or does it pixelate?
If you are outsourcing or benchmarking local studios, this can vary a lot by market. If you want a reference point for what a local provider might offer, see product photography Houston TX and compare deliverables to your 360 requirements.
Frequently Asked Questions
How many photos do I need for 360 product photography?
Most e-commerce teams start with 24 or 36 frames for a full rotation. Twenty-four is often “good enough” for small items, while 36 feels smoother for larger products or anything with fine detail. Seventy-two frames can look premium, but it increases shooting time, editing time, and page weight. If you are unsure, shoot 72 once, then export two versions (36 and 72) and test both on mobile for speed and smoothness.
What is the best camera setting approach for a 360 product shoot?
Use manual settings so nothing changes from frame to frame. Lock white balance, exposure, and focus. A common baseline is ISO 100, f/8 to f/13, and a shutter speed that gives you clean exposure on a tripod. Auto exposure tends to “correct” each frame as the product rotates, which creates flicker in the spin. The goal is consistency first, then style.
How do I avoid wobble in my 360° product photography?
Wobble usually comes from the product being off-center on the turntable or the camera moving. Mark the center point of the turntable, then rotate the product slowly and watch a fixed point like a logo edge. If it drifts, reposition the product until it stays in the same spot. Also, keep tripod height locked and avoid touching the camera between frames. If wobble persists, check that your turntable surface is level.
How do I light reflective products for 360 photography product spins?
For reflective products, bigger and softer light wins. Use large diffusers (softboxes or diffusion fabric) close to the product to create smooth gradients instead of harsh hotspots. Keep lighting as symmetrical as possible so highlights do not jump around during the rotation. If reflections show your room, add white “flags” (foam boards) to create clean reflections, and consider a light tent for smaller items like jewelry or cosmetics.
Can I shoot 360 product photography on a white background?
Yes, and it is often the right choice for catalog and marketplaces. The tricky part is keeping the background tone consistent across the full rotation. Use a sweep (not a flat sheet) to avoid horizon lines, and light the background evenly so it stays clean without blowing out product edges. If you see gray pulsing behind the product, your exposure or background lighting is changing. Fix the lighting and settings before you try to “edit it out.”
What file format is best for exporting 360 product images for a website?
JPEG is still the most common because it is widely supported and easy to optimize. WebP can reduce file size significantly, but your 360 viewer needs to support it across browsers. Start by exporting JPEG at a sensible resolution, then measure performance. If you have a lot of SKUs, small gains per frame add up fast. Your goal is a spin that looks smooth and loads quickly on mobile, not just a perfect-looking folder on your desktop.
How does AI help with 360 product photography workflows?
AI helps most after you have a clean set of frames. It can speed up background cleanup, generate alternate backgrounds for ads, and help you create additional creatives from a single shoot. One example is using ProductAI to generate lifestyle backgrounds from your best angle, then keeping the actual 360 on the PDP for inspection. AI is less reliable for “fixing” inconsistent lighting or alignment across dozens of frames. Capture quality still sets the ceiling.
Do I need a 360 product photography app or can I build it myself?
You can build a 360 viewer yourself, but most teams use an app or plugin because the implementation details matter: lazy loading, mobile gestures, zoom, and fallbacks. If your site speed is already a challenge, an app that handles optimization and delivery can be worth it. The key is choosing a solution that lets you control image quality and compression, and that does not introduce heavy scripts site-wide.
Is 360 product photography worth it for small stores?
It depends on your product and your traffic. If you sell low-priced commodities, a clean hero image and a few detail shots may outperform a heavy 360. If you sell items where trust, finish, and detail drive conversion, 360 can pay for itself by increasing confidence and reducing returns. A smart approach is to pilot 360 on your top 10 products, measure conversion and return rate changes, then expand only if the numbers justify it.
What are the most common mistakes when learning how to do 360 product photography?
The big three are auto settings (flicker), poor centering (wobble), and inconsistent cropping (breathing). After that, teams often export files that are too large, which slows PDPs and hurts conversion. Start with a repeatable setup, lock your camera, and build a simple QA checklist. If you need help with background consistency in general product work, this guide on How to Remove Background from Image: Complete Guide is a solid reference.
How many degrees should I rotate between shots for a 360 spin?
Divide 360 by your frame count. For 24 frames, that is 15 degrees per shot. For 36 frames, it is 10 degrees. For 72 frames, it is 5 degrees. The key is not the exact number, it is consistency. If you are manual, a printed dial helps. If you are motorized, set a fixed step and a short pause so every frame is sharp.
Should I shoot 360 product photography in portrait or landscape orientation?
Shoot in the orientation that matches how the 360 will display on your product detail page. If your viewer is wider than it is tall, landscape makes sense. If your product is tall, portrait can preserve more pixels where it matters. What many teams miss is that changing orientation changes how much empty space you export, and that affects file weight across every frame. Whatever you choose, keep it consistent across a category so your PDP layout does not feel messy.
Can I reuse my 360 frames to create lifestyle images for ads?
Yes, as long as you treat your 360 set as a high-quality asset library, not just a viewer output. Pick one or two “best” angles from the rotation and use those for ad creatives. This is where AI can be helpful after capture, because you can generate background variations for campaigns without reshooting the product. The important part is that the base image is clean, sharp, and well-lit, otherwise every variation looks off-brand.
Key Takeaways
Consistency beats fancy gear: lock settings, stabilize the camera, and center the product to avoid flicker and wobble.
Choose frame count based on ROI: 24–36 frames works for most SKUs, 72 is for premium inspection and higher value items.
Light for the full rotation, not one angle: symmetrical, diffused lighting keeps exposure stable around 360 degrees.
Export for the web: image weight and viewer performance matter as much as visual quality.
Use AI after capture to scale variations, not to rescue messy rotations. For background ideas, see Location Backgrounds for Product Photography.
Conclusion
If you are serious about how to shoot 360 product photography, treat it like a system. The capture stage is about control: fixed settings, stable camera, centered product, symmetrical lighting. Get that right and your post-production becomes simple, fast, and repeatable. Get it wrong and you will spend hours chasing wobble and flicker that never fully goes away.
Start with a pilot: pick a handful of high-impact SKUs, shoot 24–36 frames, publish, and measure conversion, engagement, and return rates. Then decide whether to expand, increase frame counts, or invest in a better turntable and workflow. And if you want to create additional marketing visuals from your shoot without booking another session, tools like ProductAI can help you generate background variations and prep assets for campaigns.
If you want to see AI product photography in action, explore ProductAI’s free tools and test them on one SKU first.
Last updated: February 2026
About the Author
Giles Thomas, Ecommerce & AI Product Photography Expert – Founder, AcquireConvert.
Giles helps e-commerce teams build repeatable product imaging systems that improve on-page trust and conversion rates. His work focuses on practical capture workflows—like consistent 360 spins—paired with modern automation and AI-assisted post-production to scale visual output without sacrificing quality.

Hi, I'm Giles Thomas.
Founder of AcquireConvert, the place where ecommerce entrepreneurs & marketers go to learn growth. I'm also the founder of Shopify agency Whole Design Studios.