What Is a Packshot? Why Listings Need One (2026 Guide)
Last updated: February 2026
What You Will Learn
What a packshot is (and what it is not)
Why packshots impact conversion rates
Common packshot types: white, ghost mannequin, 360, and more
What makes a “good” packshot for marketplaces and DTC
How to create packshots: studio, machine, photographer, or AI
Workflow and quality control for consistent listings
Budgeting and costs: what you are really paying for
Marketplace and feed requirements that affect packshots
Packshot prep checklist by product type
AI packshots: what to watch for (labels, shadows, and ownership)
You have a great product. Your reviews are solid. Your pricing is competitive. Then you look at your listing images next to the top sellers and something feels off. Their photos look consistent, crisp, and trustworthy. Yours look like they were shot across three different weeks, on three different phones, under three different kitchen lights.
That is usually a packshot problem.
A packshot is the product photo equivalent of showing up to a sales meeting in a well-fitted suit. It is not “creative,” but it builds confidence fast. And in e-commerce, confidence is what turns scrolling into clicks, and clicks into checkout.
In this guide, I will break down what a packshot actually is, what counts as a good one, how it differs from lifestyle photography, and when you should use 360 packshots. You will also get practical, production-focused advice, whether you are hiring a packshot photographer, building an in-house setup, or using AI tools to speed up catalog consistency.
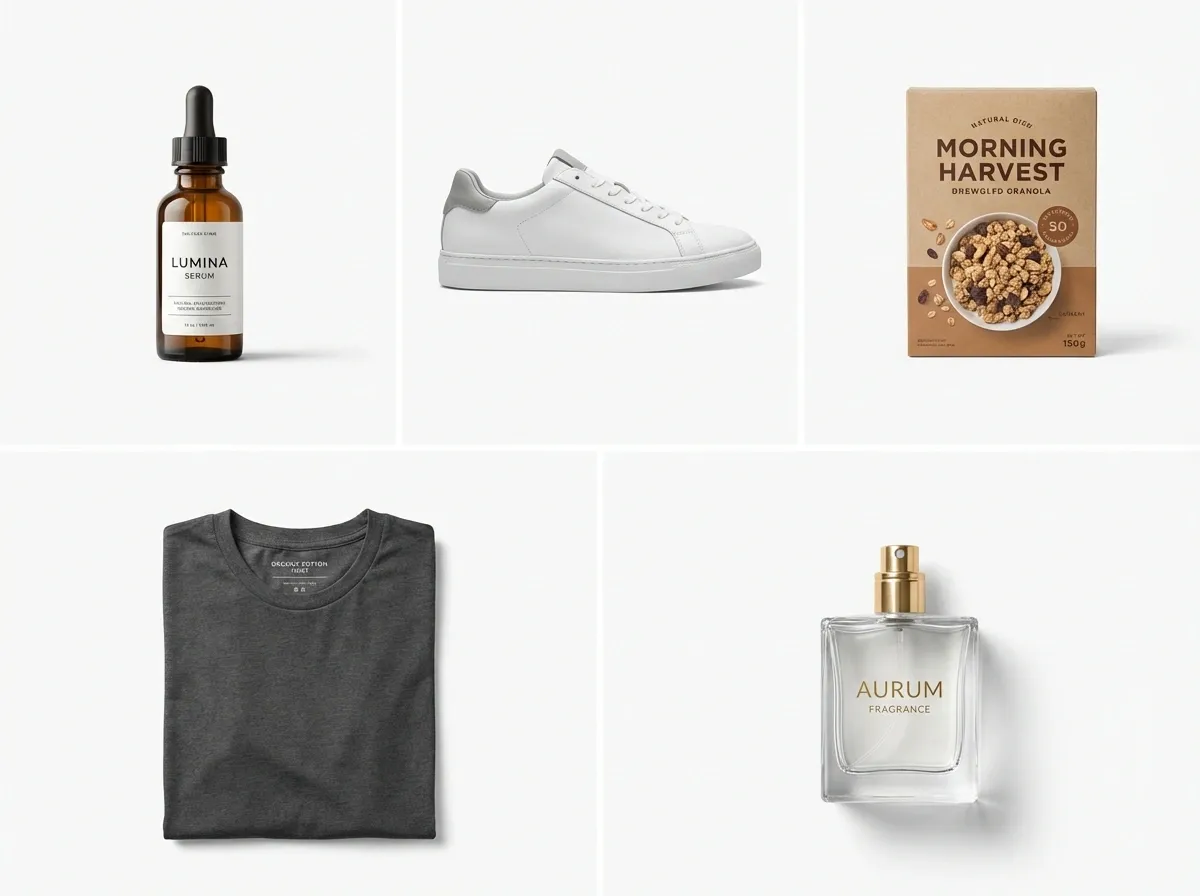
What is a packshot?
A packshot is a clean, accurate product photo designed to show exactly what you are selling, with minimal distraction. Think front-of-pack cereal box photography, a single skincare bottle on white, or a sneaker shot perfectly centered with true-to-life color.
Packshot meaning in plain English: it is the “this is the product” image. It is not primarily about storytelling. It is about clarity.
Packshot vs lifestyle photo
Now, when it comes to e-commerce, you need both. Packshots answer rational questions: What is it? What does it include? What does it look like from different angles? Lifestyle images answer emotional questions: How does it fit my life? Will I look good using it?
If you had to pick one to fix first for better listings, you typically start with packshots. They are the baseline for trust, especially on marketplaces where shoppers compare ten similar products in one session.
What “packshot produit” means if you sell internationally
You will see the term “packshot produit” (French) and “packshot fotografie” (German and broader EU usage). The concept stays the same: accurate product representation, consistent lighting, and standardized framing suitable for catalogs and listings.
Why your listings need packshots (even if you sell premium)
Here’s the thing: shoppers do not judge your brand in isolation. They judge you next to whoever appears beside you in search results, category pages, and ads.
Strong packshot photos create three business outcomes you can actually measure: higher click-through rate, higher add-to-cart rate, and fewer returns. If the photo communicates size, materials, and details clearly, you reduce “expectation gaps” that lead to disappointment and refunds.
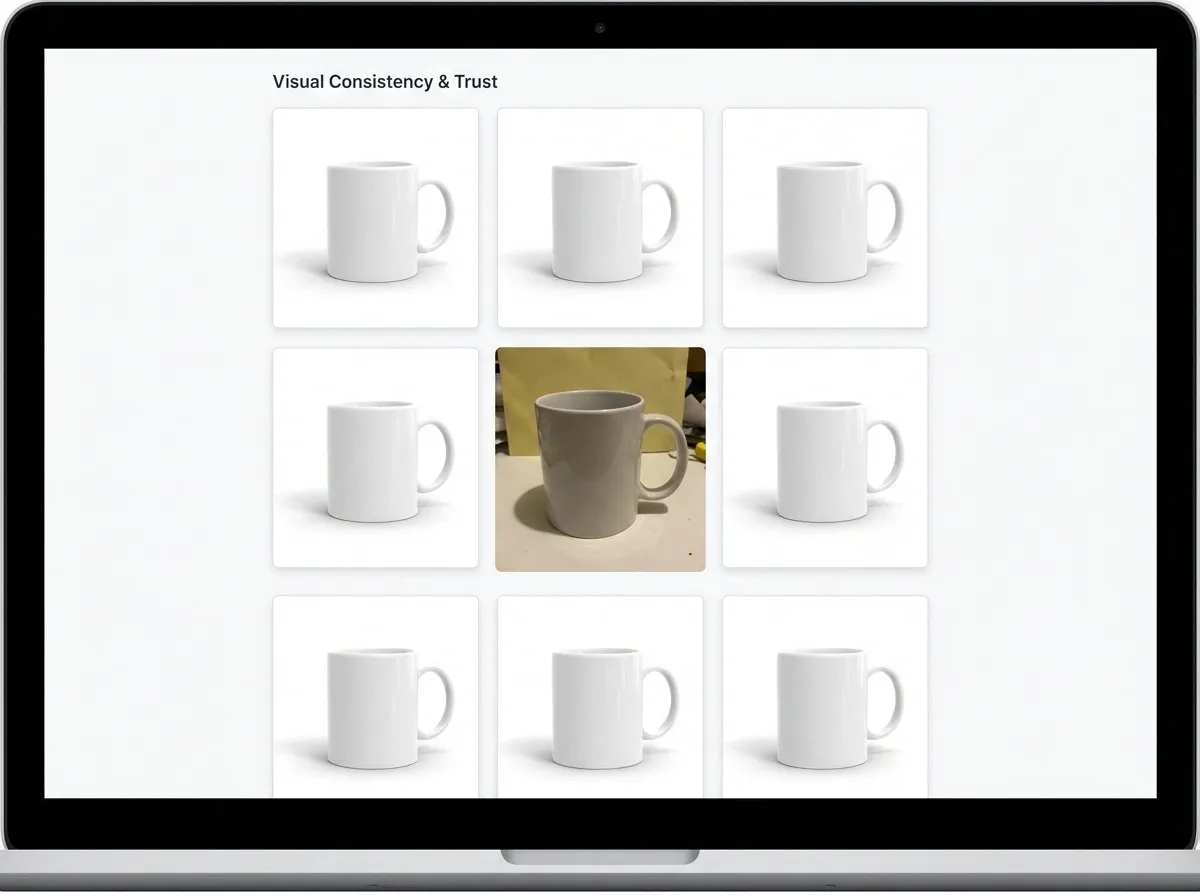
Packshots are your consistency engine
If you have more than a handful of SKUs, consistency becomes the competitive advantage. A clean, standardized packshot style makes your store look organized and established. It also makes shopping faster because customers can compare products without “mentally correcting” for different backgrounds, angles, or lighting.
Packshots support every other image type
Your creative campaign shots and UGC can be amazing, but they work better when anchored by a solid packshot set. This is why most brands build a core library of product photos first, then layer in lifestyle, seasonal, and ad variations.
The main types of packshot photography (and when to use each)
People say “packshot” like it is one format. In practice, it is a family of formats that serve different product categories and channels.
1) White background packshot
This is the classic marketplace-friendly image. It is ideal for Amazon-style requirements, comparison shopping, and clean category grids. It also makes your PDP feel tidy and premium when done well.
2) Transparent background packshot
Useful for graphic design, bundles, and placement on colored blocks in your theme. Brands often use it for email and landing pages where background control matters.
3) Shadow and reflection packshot
Consider this if you sell premium objects like bottles, watches, electronics, or luxury packaging. Shadows and subtle reflections add realism without turning it into lifestyle photography.
4) Ghost mannequin and fashion packshot
For apparel, the “packshot fashion” version often means ghost mannequin or flat lay with consistent folds and fit. The goal is still accuracy and standardization, especially around sizing cues and drape.
5) Packshot 360 (spin)
A packshot 360 shows the product rotating through multiple angles, usually 24 to 72 frames. It is powerful for products where details drive the sale: footwear, bags, furniture, and high-consideration items. It also reduces “I wish I could see the back” hesitation.
The trade-off is production complexity. You need tight consistency across frames, or the spin looks jittery and cheap.
What makes a good packshot photo?
A good packshot is not about having the most expensive camera. It is about control and repeatability.
Sharpness, color accuracy, and distortion control
Sharpness matters most where shoppers zoom: logos, texture, seams, labels, ports, and ingredients. Color accuracy is crucial in fashion, beauty, and home decor because mismatches drive returns. Distortion control keeps your product proportions honest, especially with wide-angle phone lenses.
Consistent framing and scale cues
What many businesses overlook is that “consistent” means measurable. Your hero images should share the same crop style, product size in frame, and camera height. If one SKU is shot from slightly above and another from eye-level, your grid will look messy even if each photo is “good.”
Clean background and edges
The most common packshot failure is sloppy cutouts: fringing around hair-like materials, soft edges, or background color spill. If you are editing, invest the time to get clean edges. If you are outsourcing, make sure “background cleanup” is specified in the deliverables.
Channel fit: marketplace vs DTC
Marketplaces tend to want strict, literal packshots. DTC can be a bit more branded, like an off-white background, a subtle gradient, or consistent shadow style. Either way, the core requirement is the same: the product must read instantly.
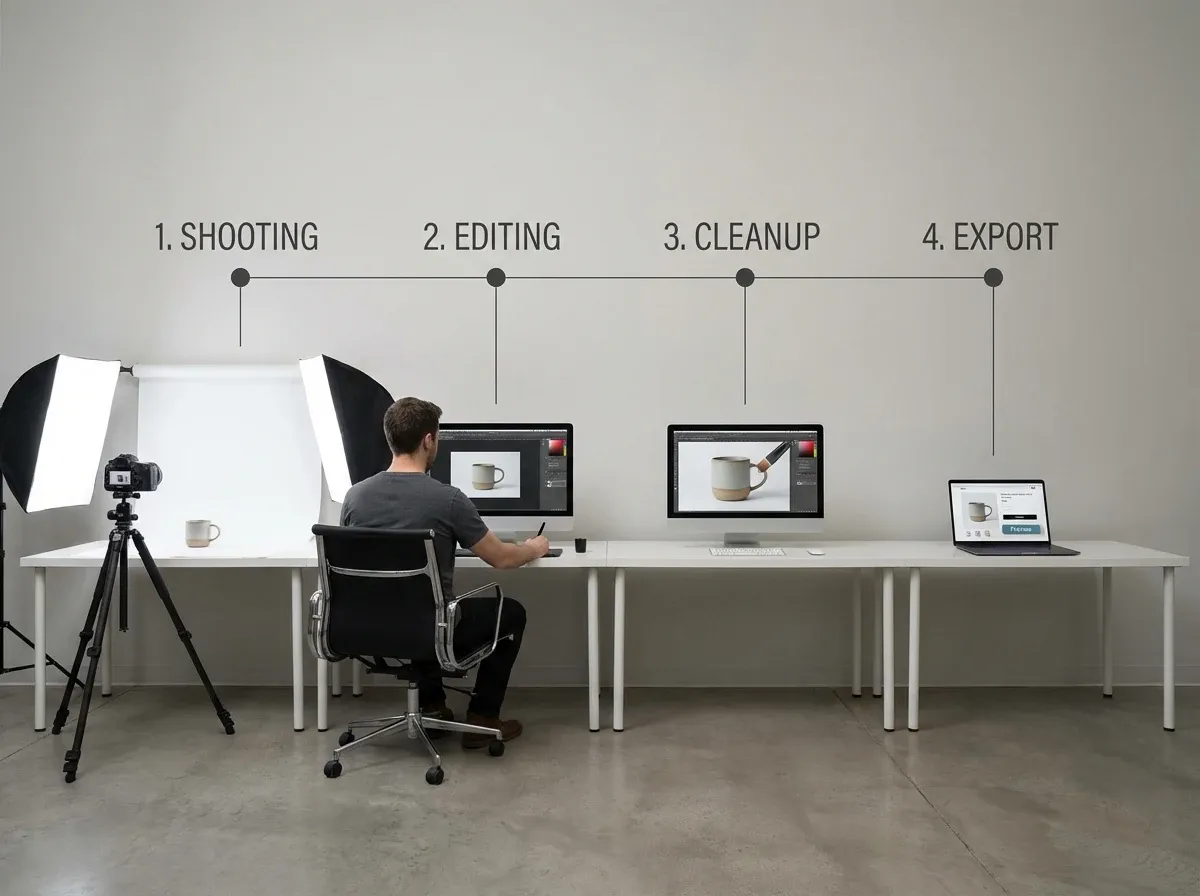
How to create packshots: 4 practical options

Your best option depends on SKU count, how often packaging changes, and how quickly you need new images for launches.
Option 1: Hire a packshot photographer
A packshot photographer is often the fastest route to high-quality results, especially for reflective products, glass, or anything that needs careful light shaping. If you go this route, ask for a consistent “style recipe” so future shoots match: lens choice, lighting diagram, distance, and crop rules.
If you want a deeper look at the craft and process, this guide on packshot photography is a good next step.
Option 2: Build a small in-house studio
From a practical standpoint, a basic setup can outperform a high-end camera if it gives you consistent light. A table, sweep paper, two lights, and a tripod can take you far. The win is control: you can shoot new SKUs anytime, reshoot packaging updates, and keep your grid cohesive.
Option 3: Use a packshot machine (turnkey booth)
A “packshot machine” is usually a product photo booth with controlled lighting and sometimes automated turntables for 360. It can be a great fit for teams that want repeatability and speed, especially for high SKU volume. The limitation is flexibility. Unusual products, very large items, or complex surfaces can still require custom lighting.
Option 4: Use AI to speed up background, consistency, and variants
AI will not magically fix a blurry, low-detail source photo. But it can be excellent at standardization tasks that eat time: background cleanup, generating consistent white backgrounds, and creating on-brand variations for different channels.
One example: tools like ProductAI can help you generate clean packshot-ready backgrounds quickly, so you can test more creative without reshooting. If you are experimenting, the Free White Background Generator is a straightforward way to get marketplace-style outputs from existing product shots.
And if you want more variety for ads while keeping the product consistent, the AI Background Generator can produce multiple contextual options from one base image. Treat it as a way to expand coverage, not a replacement for accurate hero packshots.
A simple workflow to keep packshot e-commerce images consistent
If your catalog is growing, you need a workflow that prevents “random” photos from sneaking into listings.
Step-by-step packshot workflow
Define the standard: background, crop, shadows, angles, and file naming.
Shoot (or collect) a high-quality base image: sharp, well-lit, correct perspective.
Edit for consistency: straighten, color correct, remove dust, unify shadows.
Export to channel specs: square for grids, high-res for zoom, compressed for speed.
QA check: zoom edges, check color against real product, confirm alignment with other SKUs.
Quality checks that prevent expensive mistakes
Think of it this way: a packshot is a promise. If the color, finish, or shape is wrong, you pay for it later in returns, support tickets, and negative reviews.
Create a checklist your team actually uses. Verify white balance, compare against a reference SKU, and check how the image looks on mobile where most customers will see it first.
Background removal: where most teams lose time
Background cleanup is repetitive and easy to mess up. If that is your bottleneck, this How to Remove Background from Image: Complete Guide breaks down what good cutouts look like and how to avoid the usual halos and jagged edges.
Packshot costs: what you are really paying for
When people search “packshot e commerce” they often end up asking the same question: why do packshots cost what they cost?
The reality is that you are not paying for someone to press a shutter button. You are paying for setup time, lighting control, styling, retouching, and the ability to repeat the same result across every SKU.
Why 360 and fashion packshots cost more
360 requires consistency across dozens of frames, and that means locked lighting, stable product positioning, and a careful post-production pipeline. Fashion packshots often require steaming, pinning, styling, and more detailed retouching around fabric texture and wrinkles.
How to budget without guessing
Rather than budgeting per “photo,” budget per SKU, per angle set, and per deliverable format. Make sure you know what “included retouching” means, and whether revisions are part of the process.
If you want real benchmarks and what typically changes the price, Product Photography Pricing: How Much Should It Cost is a helpful reference point when you are comparing quotes.
Marketplace and feed requirements that affect packshots
Most brands only think about packshots as “what looks good on my PDP.” The reality is your hero packshot also has to survive a long chain of cropping, compression, and automated checks in marketplaces and product feeds.
That is why a packshot style that looks great in your theme can still underperform in ads or get flagged in a marketplace upload.
White backgrounds are often a compliance play
Many marketplaces favor plain, bright backgrounds because they are easy to scan and compare, and because moderation systems can detect what is a “product” versus what is a prop. Even when a pure white background is not strictly required, it is often the safest option for a primary image.
From a practical standpoint, it helps you avoid edge cases: background textures that look like stains after compression, gradients that band, or shadows that read like a defect.
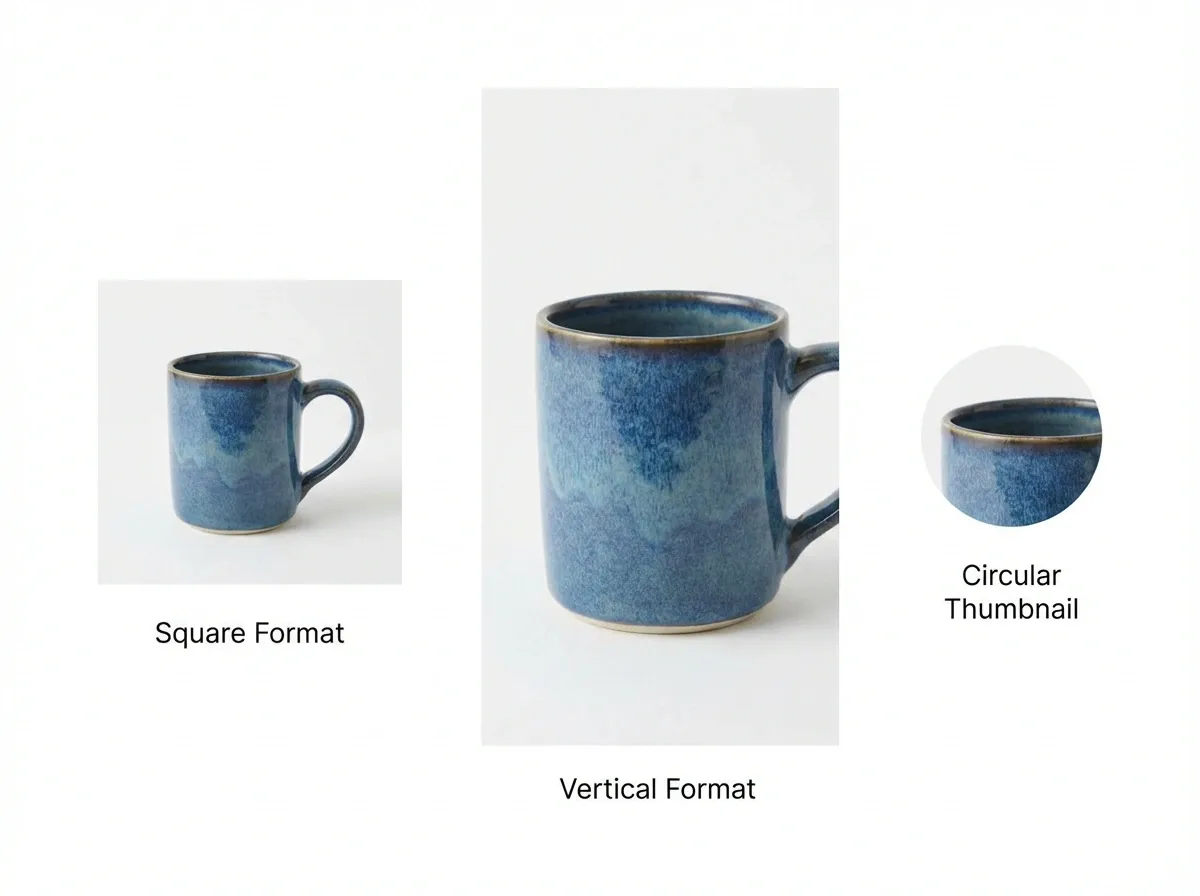
Leave room for crops and aspect ratios
Shoppers see your images in squares, rectangles, circles, and tiny thumbnails depending on placement. If your hero packshot is framed too tight, key parts of the product will get cut off in at least one of those contexts.
Consider this when you set your “product size in frame” rule. You are not just optimizing for your PDP, you are optimizing for the smallest version of your image in a carousel, a grid, or a shopping ad.
Text, badges, and bundles can create problems
When you add text overlays, promo badges, or extra elements, you are no longer in pure packshot territory. Sometimes it is worth it for a specific ad or landing page, but it can cause issues in feeds and marketplaces that expect the hero image to be only the product.
If you sell bundles, be careful with what the image implies. Your packshot should make it obvious what is included without creating a mismatch between the photo and the product title.
Compression and color shifts are real
Even a clean packshot can look rough after automated compression. Fine gradients can band, subtle shadows can break apart, and white backgrounds can pick up a tint.
One simple habit helps: QA your exported images on mobile and in a grid view. If your whites look inconsistent from SKU to SKU, it is usually not a camera problem, it is an export and compression problem.
Packshot prep checklist by product type
Packshots fail for boring reasons: dust, fingerprints, wrinkled labels, and slightly crooked products. Fixing those problems after the shoot is possible, but it is an expensive way to work.
Here are a few category-specific checks that prevent the most common issues.
For beauty, skincare, and supplements
Wipe the packaging with a microfiber cloth, and then check it under strong light before shooting.
Rotate the product until the label is perfectly square to camera. Small rotations make text look cheap fast.
Decide which side is your “front.” If you have multiple label versions or country variants, separate them before the shoot so they do not get mixed into the same SKU folder.
For apparel and soft goods
Steam or iron first. Wrinkles are one of the biggest time sinks in retouching.
Lock a repeatable fold or mannequin setup. If you change the fold style mid-catalog, your grid will look inconsistent.
Capture at least one detail angle that answers your common sizing or fabric questions, like cuffs, seams, and texture.
For reflective products like glass and metal
Wear gloves to reduce fingerprints, and keep cleaning supplies within arm’s reach.
Control reflections by controlling what the product “sees.” The room becomes part of the photo.
Be consistent with your shadow style. If one SKU has a hard shadow and the next has no shadow, the set will not match.
For products where scale is the main objection
If customers often ask “How big is it?” your packshot set should anticipate that. You can do that without turning the hero into lifestyle.
Use consistent angles and include secondary images that show dimensions, packaging, or familiar reference cues, and keep those cues standardized so they do not distract from the product itself.
AI packshots: what to watch for (labels, shadows, and ownership)

AI can be a huge accelerator for packshot consistency, but only if you treat it like production software, not magic. The goal is still accuracy.
Watch label text and fine details
If your product has ingredients, instructions, or model numbers, you need to be extra strict. AI edits can subtly warp typography, change small marks, or soften micro-details that matter for trust.
The simplest rule: if the label is a buying factor, always compare the final output to the real product, zoomed in, before you upload.
Shadows and reflections should be consistent, not “creative”
Some AI outputs will add heavier shadows or stylized reflections. That might look premium in isolation, but it can break your catalog consistency when mixed with studio shots.
Think of it this way: consistency wins the grid. If you use AI for shadows, define one shadow direction and intensity, then keep it stable across SKUs.
File ownership and reuse: treat it like an asset
Your packshots are not just images, they are reusable assets across product pages, ads, marketplaces, and email. Keep a clean archive of the source photo, the edited version, and the exported variants so you can trace where an image came from and reproduce it later.
This also helps with quality control. If a customer flags that a product looks different than expected, you want to be able to audit the image pipeline quickly.
A simple hybrid workflow that works
Shoot one solid base packshot per SKU with correct perspective and sharp detail. Then use AI for what it is best at: background standardization and fast variants. Finally, run a quick QA pass focused on edges, label accuracy, and color.
That hybrid approach is usually where teams get the best ROI, because you reduce editing time without gambling on invented details.
Frequently Asked Questions
What is a packshot in e-commerce?
A packshot in e-commerce is a clean, accurate product image designed to show exactly what the customer is buying. It is usually shot on a plain background (often white) with consistent lighting and framing so it works well in product grids, marketplaces, and PDP galleries. The goal is clarity and trust: correct color, sharp detail, and minimal distractions. Lifestyle images can support the story, but packshots do the heavy lifting for comparison and decision-making.
What is the packshot meaning compared to product photography?
“Product photography” is the umbrella term, and “packshot” is one specific category inside it. Product photography can include lifestyle shots, on-model shots, flat lays, and creative campaign images. A packshot is the standardized, catalog-ready version that focuses on accurate representation. If you are building a scalable image system for your store, packshots are usually your foundation, then you add lifestyle and creative variations once consistency is locked in.
Do I need a packshot photographer, or can I do it myself?
You can do packshots yourself if you can control lighting and repeat the same setup across SKUs. Many brands start with a simple in-house studio because it gives them speed for launches and restocks. A packshot photographer makes sense when you sell reflective items (glass, metal), need high-end retouching, or want a consistent style across a large range fast. The decision is usually about throughput and quality risk, not creativity.
What is packshot 360, and is it worth it?
Packshot 360 is a rotating product view made from multiple frames shot around the product, often on a turntable. It can increase confidence for high-consideration products because customers can inspect details and shapes better than with 2D angles alone. It is “worth it” when your product benefits from inspection (shoes, bags, electronics, furniture) and when your margins can support the extra production work. Poor 360, though, can look jittery and hurt perception.
What makes a packshot photo look “cheap”?
The giveaways are usually inconsistent lighting, odd shadows, wrong color temperature, and messy background edges. Another common issue is perspective distortion, often from shooting too close with a wide phone lens, which makes products look warped. Inconsistent framing across SKUs also reads as low effort, even if each individual photo is acceptable. A good packshot feels calm and confident. Your customer should focus on the product, not the photography.
Can AI create packshot images?
AI can help produce packshot-style outputs, especially for background standardization, cleanup, and creating consistent variants from a good base image. It works best when your original photo is sharp, well-lit, and accurate. AI is less reliable when it has to invent fine details or fix heavy blur. In practice, many teams use a hybrid approach: shoot a solid base packshot, then use AI to generate white backgrounds and alternate compositions for ads and channels.
Are white background packshots still important in 2026?
Yes, because they are still the clearest comparison format for marketplaces, category pages, and mobile shopping. Even if your brand favors a lifestyle-first look, white background packshots usually remain essential for your product grid, Google Shopping feeds, and “quick scan” browsing behavior. The key is quality: a clean white background with correct shadows and true color. A rushed white background edit can do more damage than a neutral off-white studio shot.
How many packshot angles do I need per SKU?
Most products need at least 3 to 6 angles for a solid baseline: front, back, side, top, and one detail close-up, plus packaging if it matters. Apparel often needs more to show fit and construction, while simple products may need fewer if the hero image is clear. Start by looking at your customer questions and return reasons. If people ask about a specific detail, that detail should probably be one of your standard packshot angles.
What file format and size should packshots be for e-commerce?
For most stores, JPEG is the default for product photos because it balances quality and file size well. Use PNG when you need transparency. Aim for high enough resolution to support zoom (often 2000px on the long edge for DTC), then compress for fast load times. Also keep consistent aspect ratios across SKUs so your grid stays aligned. Always test on mobile, because that is where softness and compression artifacts show up first.
What is “packshot e commerce” style consistency, practically speaking?
It means your customer sees a predictable pattern across your entire catalog: same background tone, similar product size in frame, consistent camera angle, and consistent shadow style. That consistency reduces cognitive load. Shoppers can compare quickly and feel like they are buying from a serious operation. The simplest way to enforce it is to document a “packshot style guide” and run a quick QA checklist before images go live, especially when multiple people are shooting or editing.
Do packshots need to show the packaging too?
It depends on what the customer expects to receive. If packaging is a key part of the product experience, like giftable items, premium unboxing, supplements, or anything where “what arrives” affects trust, then yes, you should include packaging in your standard image set.
A simple approach is to keep your hero image product-only, then add a consistent secondary image that shows the packaging next to the product. That protects clarity while still setting expectations.
Why do my packshots look inconsistent across my Shopify store grid?
Most grid inconsistency comes from small variations that add up: camera height, product rotation, crop rules, and background tone. Even if every individual image is sharp, your catalog can still look messy if product size in frame varies from SKU to SKU.
Fix it by choosing one reference SKU and matching everything to it. Define a measurable crop rule, like “the product fills X percent of the frame,” and then QA the full collection view, not just single PDPs.
What should I check before uploading AI-edited packshots?
Check three things: edges, accuracy, and consistency. Edges are where halos and cutout artifacts show up. Accuracy is where label text, small marks, and fine details can drift. Consistency is whether the shadow style and background tone match the rest of your catalog.
If you are using AI for white backgrounds, zoom into the output and compare it side-by-side with your source photo. If anything looks invented, reshoot or retouch instead of hoping customers will not notice.
Key Takeaways
A packshot is a standardized, accurate product photo built for clarity, comparison, and trust.
Consistency across your catalog often matters more than having “creative” images on every SKU.
Packshot types vary: white background, fashion, and 360 each solve different buying objections.
A repeatable workflow with QA checks reduces returns and prevents listing quality drift.
AI can speed up background and variant production, but it still needs a sharp, accurate base image.
Conclusion
A packshot is not glamorous, but it is one of the highest ROI image assets you can build for e-commerce. It gives shoppers clarity fast, and it gives you a system you can scale as your SKU count grows. If your listings feel inconsistent today, the fix is rarely “take more photos.” It is usually “standardize what good looks like,” then build a workflow that repeats it every time.
Start by defining your packshot style rules (background, crop, shadow, angles), then update your next 10 SKUs using the same recipe. Once your grid looks consistent, you will feel the knock-on effects across ads, marketplaces, and conversion rate.
If you want to see how AI can support packshot consistency, explore a few free tools and test outputs on a small SKU batch.
Last updated: February 2026
About the Author
Giles Thomas, Ecommerce & AI Product Photography Expert – Founder, AcquireConvert.
Giles helps e-commerce brands build scalable product image systems that improve listing consistency, reduce returns, and increase conversion rates. His work focuses on practical packshot workflows, marketplace-ready standards, and using AI responsibly for faster background cleanup and catalog-wide consistency.

Hi, I'm Giles Thomas.
Founder of AcquireConvert, the place where ecommerce entrepreneurs & marketers go to learn growth. I'm also the founder of Shopify agency Whole Design Studios.