Product Rendering for Ecommerce Explained (2026 Guide)
.webp)
Last updated: February 2026
What You Will Learn
What product rendering is (and what it is not)
Why e-commerce teams use product rendering
3D rendering vs photography: how to choose
A practical product rendering workflow you can manage
Realism, accuracy, and the trust problem
Where AI fits: faster variations without losing control
You are about to launch a new SKU. The packaging is still in transit, the color variants are not all in hand, and your paid social team is asking for ten image angles by Friday. If you have been there, you already know the bottleneck is not always “marketing,” it is getting usable product visuals fast enough to sell.
That is where product rendering comes in. Instead of photographing a physical item every time you need a new angle, finish, or lifestyle setting, you generate product images from a 3D model. Done well, it can give you consistent lighting, perfect alignment across a catalog, and the ability to create new scenes without re-shooting.
This guide breaks down what product rendering actually is, when it beats photography, what it costs in time and effort, and how e-commerce teams use it in practice. If you are new to the broader topic of product visuals, start with this hub overview on product photos and come back when you are ready to choose a production workflow.
What product rendering is (and what it is not)
Product rendering is the process of generating 2D product images from a 3D model. You (or your 3D artist) build the product in software, apply materials, set lighting, place a camera, then export images that look like photography.
Here is the thing: product rendering is not automatically “fake.” It is a production method. Your customers only care about whether the image matches what arrives at their door.
Render vs model vs scene, explained simply
Teams often mix these terms, which causes confusion in briefs.
3D model: the digital version of your product’s shape and parts.
Materials: surface properties like gloss, metal, fabric weave, translucency.
Render: the final exported image (your “product photo”).
Scene: the environment around the product (surface, props, background, shadows).
If you only need clean images for a marketplace listing, you may keep scenes minimal. If you are building a brand story, the scene becomes a creative asset.
Why e-commerce teams use product rendering
From a practical standpoint, rendering is about control and repeatability. Once your model is right, you can generate consistent angles for every SKU, without setting up lights again.
It also changes the timeline. Photography usually happens after manufacturing. Rendering can happen while you are still finalizing tooling or packaging, as long as you have CAD files or accurate measurements.
The business benefits that actually show up in metrics
These are the wins I see most often with e-commerce teams:
Faster launches: imagery ready before inventory lands.
More variation: more angles, close-ups, and “hero” compositions for A/B tests.
Catalog consistency: uniform lighting and camera distance across product families.
Lower reshoot costs: update a label or a colorway without booking studio time.
If your goal is to create a stronger merchandising flow, rendering also supports more structured product showcase assets like spin sequences, interactive views, and modular angle sets.
3D rendering vs photography: how to choose
Most brands do not pick one forever. They pick per product line, per channel, and sometimes per campaign.
If you want a deeper decision framework, see product photography vs 3d rendering. For now, here are the trade-offs in plain English.
When product rendering is the better call
Rendering tends to win when you have lots of variants, strict consistency requirements, or complex logistics. Think configurable products, frequent packaging updates, or global teams that need the same asset kit.
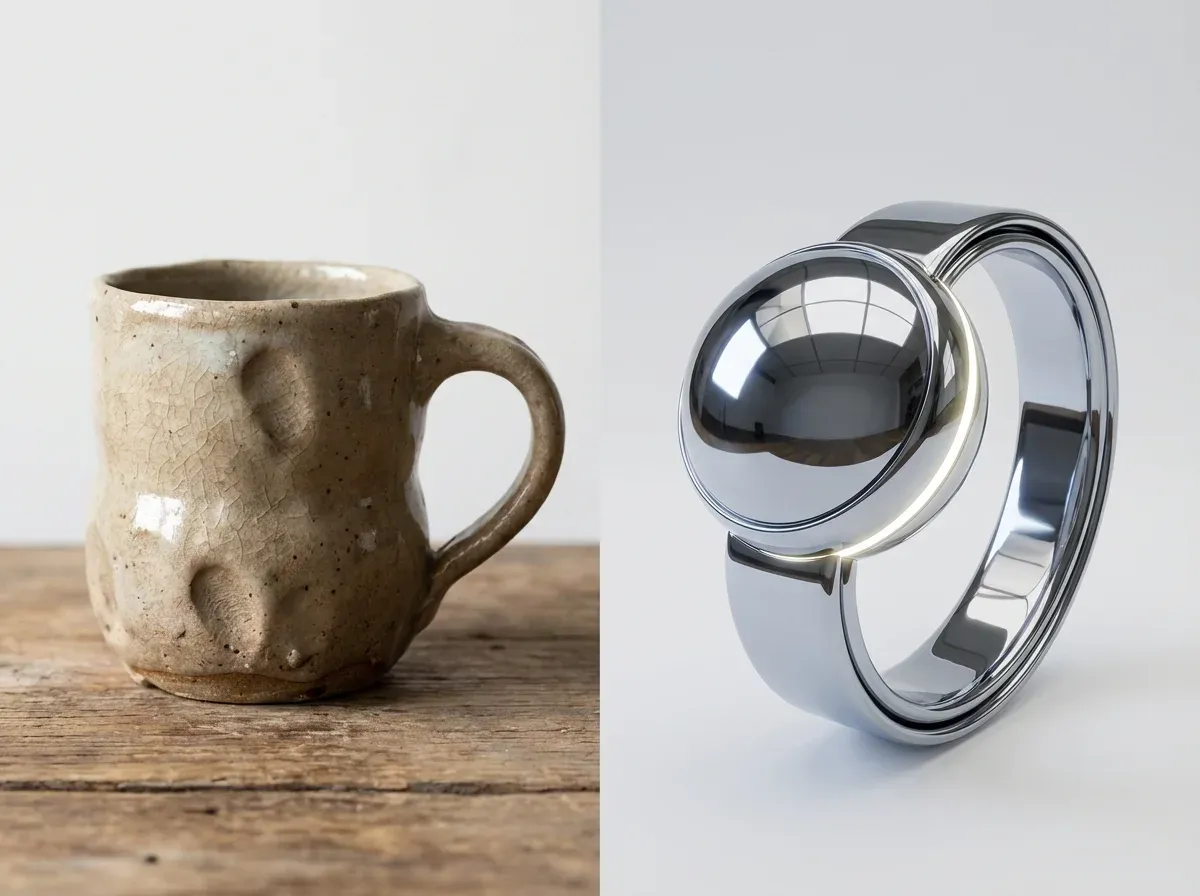
It is also strong for materials that are hard to light in a small studio, like glossy plastics, chrome, or transparent items. With rendering, you can tweak highlights and reflections with precision instead of fighting glare for hours.
When photography is still the safest option
The reality is that some products sell on texture and imperfections. Handmade ceramics, certain fabrics, and anything where “real world” micro detail matters can be easier to trust when it is photographed.
Photography can also be cheaper for one-off products. If you only need a handful of images and you already have a small product photography setup, building a 3D model from scratch can be overkill.
A hybrid approach that works for many stores
Consider this: use real photography for your core PDP images (color accuracy, texture truth), then use rendering and AI-assisted variations for seasonal backgrounds, ad creative, and additional angles.
This is where 3D starts to plug into 3d ecommerce more broadly. Your 3D model becomes an asset you can reuse across images, interactive experiences, and even video.
A practical product rendering workflow you can manage
Good renders are not magic. They come from a tight workflow and clear acceptance criteria. If you have ever struggled with how to set up product photography, the same discipline applies here: inputs, process, review, and consistency.
Step-by-step: from files to finished images
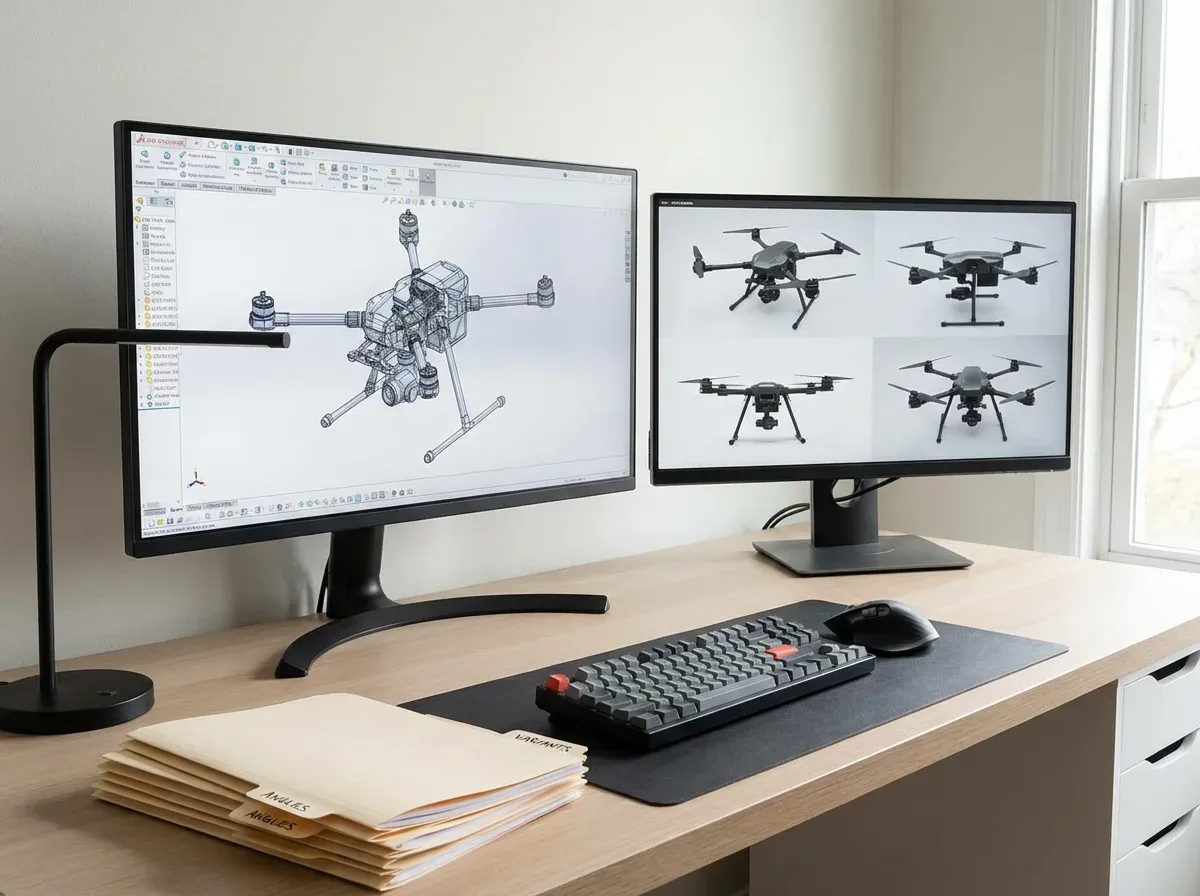
Start with accurate source data: CAD files, dimensions, material references, and packaging dielines.
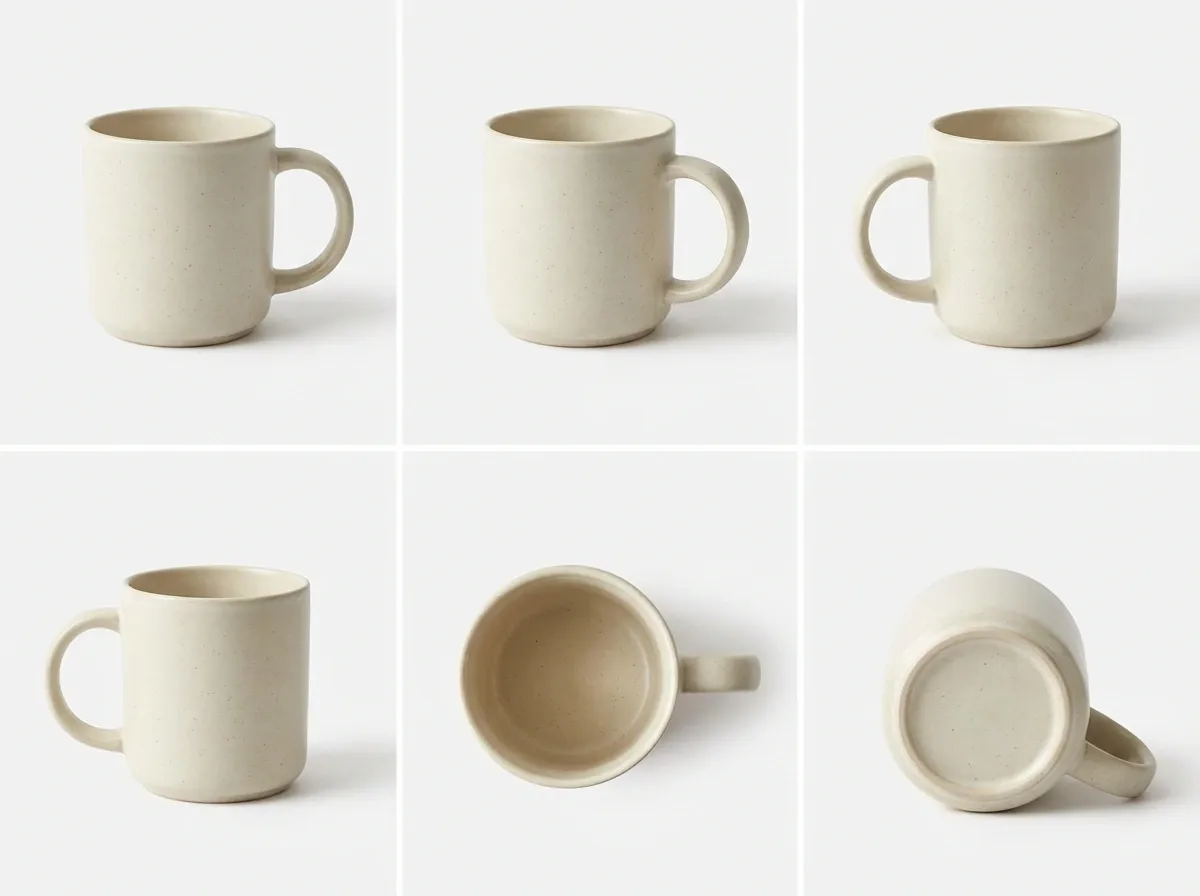
Define your angle set: hero, 45-degree, side, back, top, detail macro, scale reference.
Set a lighting standard: one “catalog” light rig you reuse across SKUs.
Build material presets: store approved color values and roughness settings per finish.
Render in layers: separate product, shadow, reflections, and background for easier edits.
Export to channel specs: square for marketplaces, 4:5 for social, high-res for zoom.
In practice, this means you can update a background or adjust a shadow without touching the product itself. That is a big deal when you need speed without “starting over.”
Where teams waste time
Most delays come from unclear approvals. Someone will say “make it pop” when what they really mean is “increase contrast, reduce reflections, and match the hero angle to the rest of the category.”
Fix this with a simple render checklist: accurate proportions, material realism, color match, consistent camera, consistent shadow direction, and no distracting reflections. Treat it like a brand style guide for visuals.
Realism, accuracy, and the trust problem
Rendering can look perfect, which is exactly why it can backfire. If customers feel like the image is too “CG,” trust drops. Returns rise when color or finish does not match reality.
How to keep renders honest
What many businesses overlook is that you do not need hyper-realism everywhere. You need consistency and truth where it matters.
Use real-world references: photograph a sample under neutral light to calibrate materials.
Match scale cues: include predictable shadows and contact points so the product feels grounded.
Be careful with “beauty” tweaks: smoothing scratches or changing textures can become misleading.
If you do still life product photography today, think of rendering as moving that same craft into a digital set. The same rules apply: shape, light, and believable surfaces.
Where AI fits: faster variations without losing control
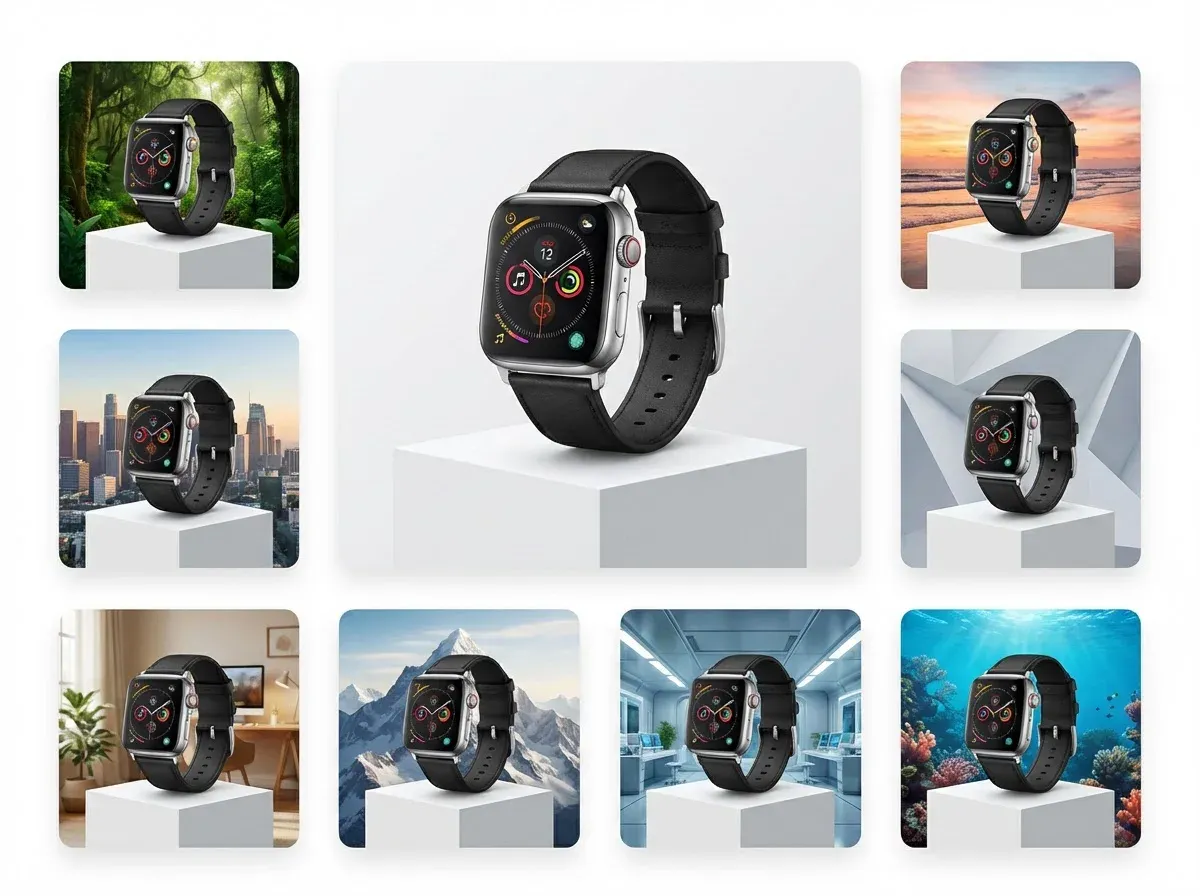
AI is showing up in two places: speeding up what used to be manual editing, and generating background variations for ads and social. It is useful, but you need guardrails.
AI-generated backgrounds for product photography (and renders)
If you already have a solid product cutout, AI can help you explore scenes quickly. One example is ProductAI, where tools like the AI Background Generator can create multiple context options fast, which is handy for testing creative before you commit to a full campaign.
Now, when it comes to control, AI backgrounds are not a replacement for a fully art-directed lifestyle shoot. They are best when you treat them like a concepting and variation engine. You pick what performs, then decide if it deserves a higher-production version.
Image resolution and channel requirements
Renders and AI edits can sometimes leave you with images that are slightly too small for zoom, marketplaces, or high-quality retouching workflows. If that happens, tools such as Increase Image Resolution can help you scale assets for different channels without rebuilding the entire file pipeline.
A quick reality check on AI limitations
AI can introduce “almost right” details: shadows that do not match, reflections that imply a different product shape, or scenes that look plausible but not physically consistent. For ecommerce, that is not a creative problem, it is a conversion and returns problem.
Your safest approach is to lock the product (from a render or a clean photo), then use AI mainly around it: backgrounds, crops, and minor cleanup.
Common e-commerce use cases for product rendering
Product rendering is not only for high-end brands. Small business product photography can benefit too, especially when you cannot afford repeated shoots for every colorway.
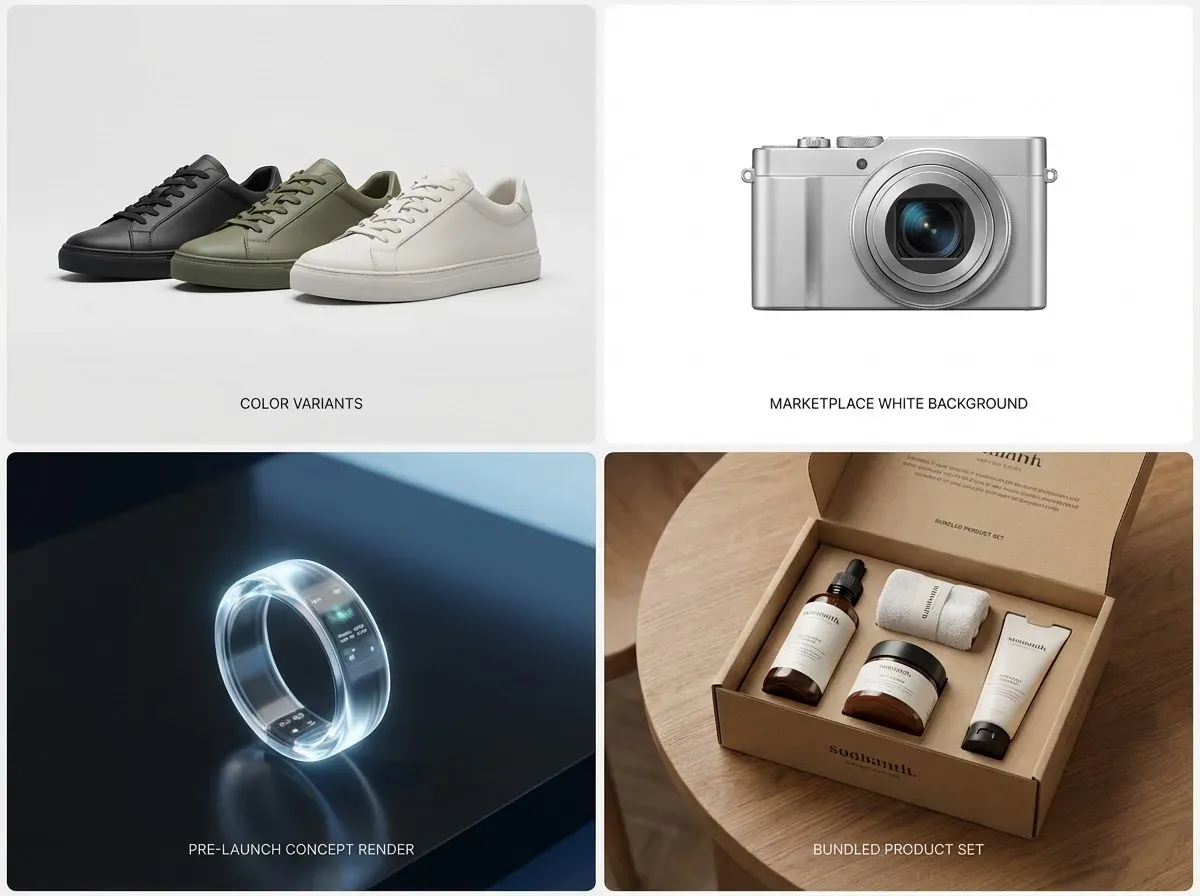
Use case 1: Variant explosions (colors, bundles, sizes)
If you sell in 12 colors, traditional photography can turn into a bottleneck fast. Rendering lets you keep lighting and angle identical, then swap materials. That consistency can lift conversion because shoppers can compare variants without visual noise.
Use case 2: Marketplaces that demand standardization
Amazon-style rules reward clean, consistent imagery. You can render on white, keep margins perfect, and maintain a standard camera distance. If you also sell on Shopify and Meta, you can reuse the core assets and then adapt the backgrounds for ads.
Use case 3: Pre-launch and crowdfunding
For early-stage products, you often need visuals before manufacturing is complete. Rendering gives you a way to sell the idea with accuracy, as long as you validate materials and final finishes when samples arrive.
Use case 4: Outsourcing when you need speed
If you are comparing vendors, it helps to understand what you are actually buying: modeling, rendering, revisions, and file handoff. This overview of a product rendering service is useful when you start evaluating providers and scopes.
Frequently Asked Questions
What is product rendering in ecommerce?
Product rendering is creating product images from a 3D model instead of photographing a physical item. In ecommerce, you use it to generate consistent hero images, angle sets, close-ups, and sometimes lifestyle scenes. The upside is control: you can keep lighting and camera settings identical across your catalog and produce new variants without re-shooting. The key requirement is accuracy. Your 3D model and materials must match the real product closely, or you risk undermining trust and increasing returns.
Is 3D product rendering cheaper than product photography?
It depends on volume and reuse. If you have a single product and need 6 to 10 images, photography is often cheaper and faster. If you have dozens of SKUs, frequent packaging updates, or many variants, rendering can become more cost-effective because the model is reusable. Think of rendering like building a machine: the upfront setup can be higher, but the marginal cost per new image or new colorway can drop significantly once the pipeline is in place.
What is the difference between 3D rendering and product photography?
Photography captures real light reflecting off a real product. 3D rendering simulates that light in software using a digital model, materials, and a virtual camera. Photography is usually more “naturally believable” for textures and real-world imperfections. Rendering is stronger for consistency, speed of iteration, and creating images before the product is physically available. If you are weighing the options, this guide to product photography vs 3d rendering is a solid next read.
How do I start a product rendering workflow as a small business?
Start with one product line and a tight angle set, not your whole catalog. Gather source files (CAD, dimensions, color references), then define a standard “catalog” lighting setup you will reuse. Get one hero image approved before you render everything else, because that locks your look. Many teams also keep a simple reference photo taken with an iPhone under neutral light to sanity-check color and finish. The goal is repeatability, not a one-off masterpiece.
What file types do I need for 3D product rendering?
CAD formats like STEP or IGES are common starting points for manufactured products, but they often need cleanup for rendering. Some workflows also use OBJ, FBX, or GLB depending on the software and the handoff. From an ecommerce standpoint, the important part is not the file type, it is whether the geometry is accurate and optimized, and whether you have reliable material references. Ask your vendor what they prefer, and make sure you clarify ownership and reuse rights for the final 3D assets.
How realistic can 3D rendering product photos look?
Very realistic, especially for hard-surface products like electronics, bottles, packaging, and furniture. Realism depends on three things: accurate modeling, physically believable materials, and lighting that matches the context. Where renders often fall apart is reflections, translucency, and micro-texture like fabric weave or skin-like materials. A good test is to place the render next to a real photo at the same angle and lighting. If you can spot it in two seconds, customers probably can too.
Can I use AI generated backgrounds with product renders?
Yes, and it can be a practical way to create more ad variations without re-rendering new scenes. The safe approach is to keep the product itself fixed and accurate (from your render), then experiment with surroundings. Tools like ProductAI can help you generate multiple background concepts quickly, which is useful for testing creative direction. If you go this route, review shadows, reflections, and horizon lines carefully so the product still looks grounded and the scene does not feel “floaty” or inconsistent.
How does product rendering help with a product showcase?
Rendering is a natural fit for structured merchandising assets because it is consistent by design. Once your camera angles and lighting are standardized, you can render the same view for every SKU, which makes collections easier to browse. It also supports interactive experiences such as spins and 360-style sequences, because you can output a clean set of frames without physically rotating the product. If your goal is to improve on-site merchandising, explore product showcase strategies alongside your render pipeline.
What should I ask before hiring a product rendering service?
Ask what is included: modeling, texturing, lighting, number of angles, number of revisions, and file handoff. Get clarity on how they handle color accuracy and what reference materials they need from you. You should also ask about output specs for each channel, and whether you will own the 3D model for future reuse. If you are actively comparing vendors, this breakdown of a product rendering service will help you scope the project and avoid surprise costs.
How do I compare product photography pricing to rendering costs?
Compare them like you would compare any production system: upfront cost, ongoing cost, and time to produce new assets. Photography pricing usually scales with shoot days, products, and retouching complexity. Rendering costs often include modeling first, then cheaper incremental updates for new angles and variants. A good rule is to estimate how many times you will reuse the asset in the next 12 months: new colors, new bundles, new campaigns, new channels. This article on Product Photography Pricing: How Much Should It Cost helps you benchmark the photography side of the equation.
What is the best way to shoot product photography if I am not ready for rendering?
If you are not ready to invest in 3D, focus on getting a repeatable DIY setup: stable tripod, consistent lighting, a simple background, and a fixed angle guide. Shoot slightly higher resolution than you think you need so you can crop for multiple channels. Keep your editing light and consistent, especially for color. You can also plan ahead by creating clean cutouts that can be reused later for background tests. This is where learning the basics of how to edit product photography pays off.
How do I choose backgrounds that make renders look believable?
Choose backgrounds that match the product’s story and the lighting logic. A glossy perfume bottle on a rustic wood table can work, but the reflections and shadow softness need to match the scene. Avoid backgrounds with strong directional light unless your product lighting matches it. When in doubt, start neutral, then test more branded scenes in ads. For practical do’s and don’ts, this guide on Location Backgrounds for Product Photography is a helpful reference for keeping things credible.
Key Takeaways
Product rendering creates product images from a 3D model, which makes consistency and iteration much easier at catalog scale.
Rendering wins when you need many variants, early launch assets, or strict standardization across channels.
Photography still matters for texture truth and products where real-world imperfections drive trust.
AI is best used around a locked product cutout or render, especially for background variation and concept testing.
Start small: one product line, one lighting standard, and a fixed angle set before you expand.
Conclusion
Product rendering is really a decision about operations, not aesthetics. If your team struggles to keep up with new variants, seasonal campaigns, and channel requirements, rendering gives you a repeatable way to produce images on demand. It can also reduce the stress of launch timelines, because you can build visuals before inventory arrives.
Think of it this way: a great 3D model is a reusable asset. You can turn it into clean PDP images, standardized angle sets, and richer merchandising experiences that support how customers actually shop. The trade-off is you need tighter QA around color, materials, and “believability,” because customers are quick to spot visuals that feel off.
If you want to experiment with faster creative variation, you can explore tools like ProductAI for background concepts and scaling assets, then apply the winners to your render pipeline.
Try a few variations on one SKU and see what improves speed and consistency for your team.
Last updated: February 2026
About the Author
Giles Thomas, Ecommerce & AI Product Photography Expert – Founder, AcquireConvert.
Giles helps e-commerce teams build scalable product visual workflows that balance speed, consistency, and conversion performance. His work focuses on practical production systems—like 3D product rendering and AI-assisted variations—that reduce launch bottlenecks while keeping imagery accurate and trustworthy.

Hi, I'm Giles Thomas.
Founder of AcquireConvert, the place where ecommerce entrepreneurs & marketers go to learn growth. I'm also the founder of Shopify agency Whole Design Studios.