Product Photography Box: Build or Buy? (2026)
A product photography box can be a smart purchase for ecommerce brands that need clean, repeatable product shots without renting a studio. It is especially useful for small items like cosmetics, accessories, electronics, and packaged goods. The real question is whether you should build one yourself, buy a ready-made light box, or skip the hardware and use AI editing tools instead. For most Shopify store owners, the right choice depends on catalog size, how often you shoot new products, and how consistent your current images need to be. If you only photograph occasional products, a DIY setup may be enough. If you need speed and reliable white background images, buying usually makes more sense. If your bottleneck is editing, not shooting, AI tools can often deliver faster improvements.
Contents
Overview
A product photography box, often called a product photography light box or product photography lighting box, is a small enclosed setup designed to help you capture evenly lit product photos with fewer shadows and distractions. For ecommerce, that matters because image consistency affects trust, click-through rate, and conversion rate optimization. Shoppers may forgive a simple store design before they forgive unclear product photos.
These boxes usually include a white or neutral interior, built-in LED strips or external lighting support, and one or more openings for top or front shooting angles. They are commonly used for white box product photography, especially when a store needs marketplace-friendly images for Amazon, Shopify collections, and paid social creatives.
For a broader studio setup, it helps to compare a light box with a full product photography studio workflow. A box is more compact and repeatable, but it is not as flexible for large products, textured materials, or lifestyle scenes. If your goal is faster image creation after the shoot, AI-supported workflows such as ai photoshoot and ai product photography can sometimes reduce the need for elaborate sets.
Photography Rules That Matter for Ecommerce Shots
Most Shopify store owners do not need more “photography theory.” You need a repeatable way to get clean, consistent product images without wasting half a day troubleshooting shadows and angles. Two simple rules can help you do that, especially if you are shooting inside a product photography box.
The 20/60/20 rule (setup, shooting, editing)
Think of the 20/60/20 rule as a sanity check for where your effort goes. In product photography, results usually come from a balanced process, not from spending all your time in one place.
From a practical standpoint, aim for roughly 20% of your time on setup, 60% on shooting, and 20% on editing. The exact percentages will vary by product, but the idea holds.
Here is the thing: many ecommerce shoots fail because store owners under-invest in setup, then try to “fix it in editing.” In a light box workflow, setup includes cleaning the product, leveling the sweep so there is no harsh horizon line, placing lights so the interior is evenly lit, and locking in camera position so every SKU is framed the same way.
Once that is right, the shooting stage becomes efficient. You can move fast through your shot list, because your exposure and white balance are stable. Editing then becomes a light polish step, not a rescue mission. That is where your workflow typically becomes scalable across a growing catalog.
The 3/4 rule (three-quarter angle) for product photos
The 3/4 rule in product photography usually refers to shooting from a three-quarter angle, often a 45-degree turn from straight-on, so the viewer can see the front and one side of the product at the same time. For many Shopify product pages, that angle communicates shape, depth, and packaging details better than a flat head-on shot.
Consider this: your collection page thumbnails need clarity at small sizes. A straight-on shot can be the cleanest option there, especially if you sell boxed products with strong front-facing branding. On the product detail page gallery, the 3/4 shot often does a better job of showing what the item really is, so it can reduce uncertainty for shoppers.
The reality is that marketplaces may still require a true front-on image as the primary image, particularly for strict white background standards. Even if you prefer 3/4 for your Shopify PDP, keep a straight-on “compliance” shot in your set so you have options for feeds, ads, and listings.
A simple approach that works for most catalogs is: use front-on for the first collection-friendly image, then include a 3/4 angle early in the gallery to show depth, then add top-down or detail shots where they help explain the product.
Pricing and Costs
There is no single product photography box price because the market ranges from homemade cardboard setups to premium portable light boxes with integrated LEDs. Since no exact commercial light box pricing was returned by the product data tool for this topic, the practical decision is less about a specific sticker price and more about total workflow cost.
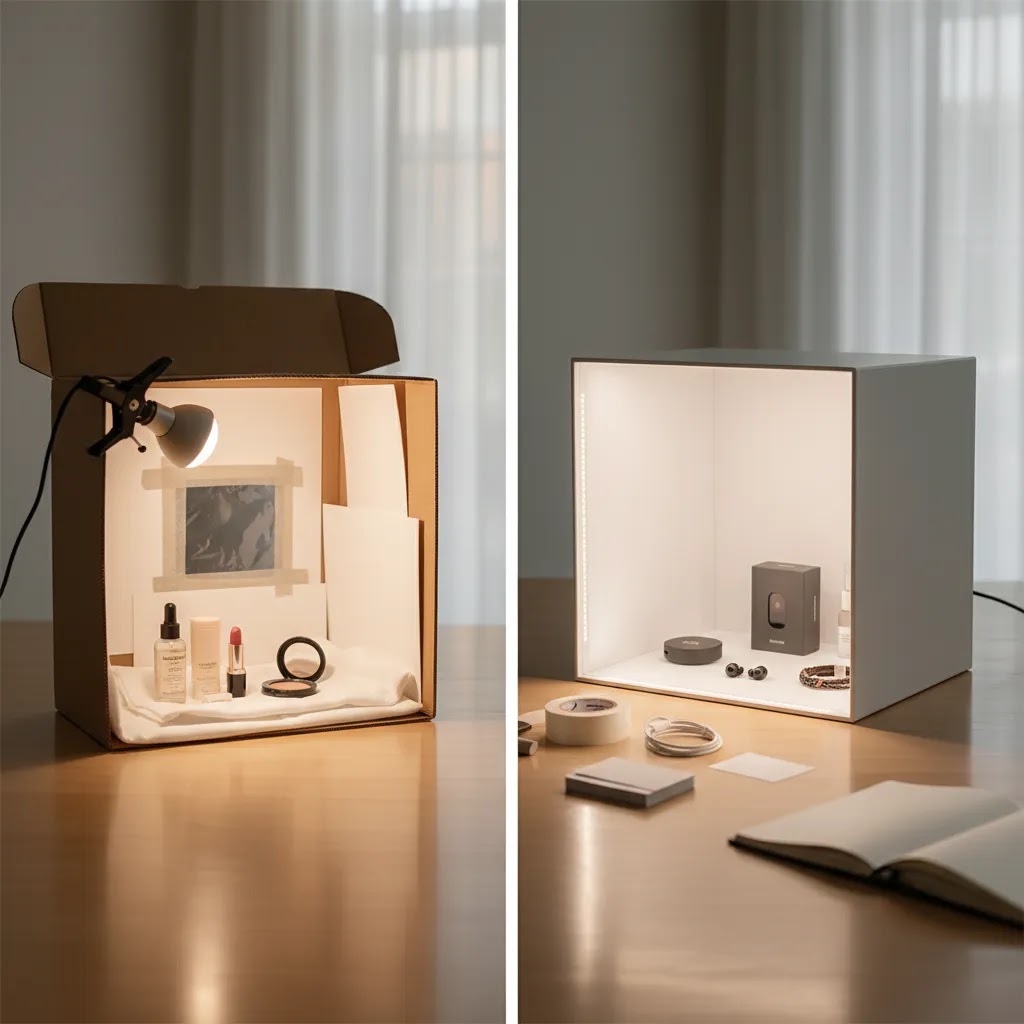
A DIY product photography box usually involves foam board, white paper, fabric, tape, and separate lights. That can keep upfront spending low, but it costs time. You also may need to replace materials as they crease, stain, or warp. For smaller catalogs, that tradeoff can be reasonable.
A purchased product photography box with light typically costs more upfront but reduces setup time and gives you more consistent results from day one. If your store adds products weekly, that time saving may justify the spend. The same logic applies to Amazon sellers handling strict image requirements for white backgrounds.
Do not forget editing costs. If you already have usable photos but need cleaner backgrounds, tools like Free White Background Generator or AI Background Generator may be a lower-friction option than reshooting everything. For stores reviewing setup costs overall, the AcquireConvert Product Photo Lighting category is also worth checking.
Choosing the Right Size (12x12 vs 24x24 vs Large Light Boxes)
What many store owners overlook is that “product photography box” is not one size. If you pick the wrong dimensions, you can end up with cramped angles, dark edges, and a setup that only works for a small slice of your catalog. The right size is the one that gives your product breathing room inside the box, not the smallest box the product can technically fit into.
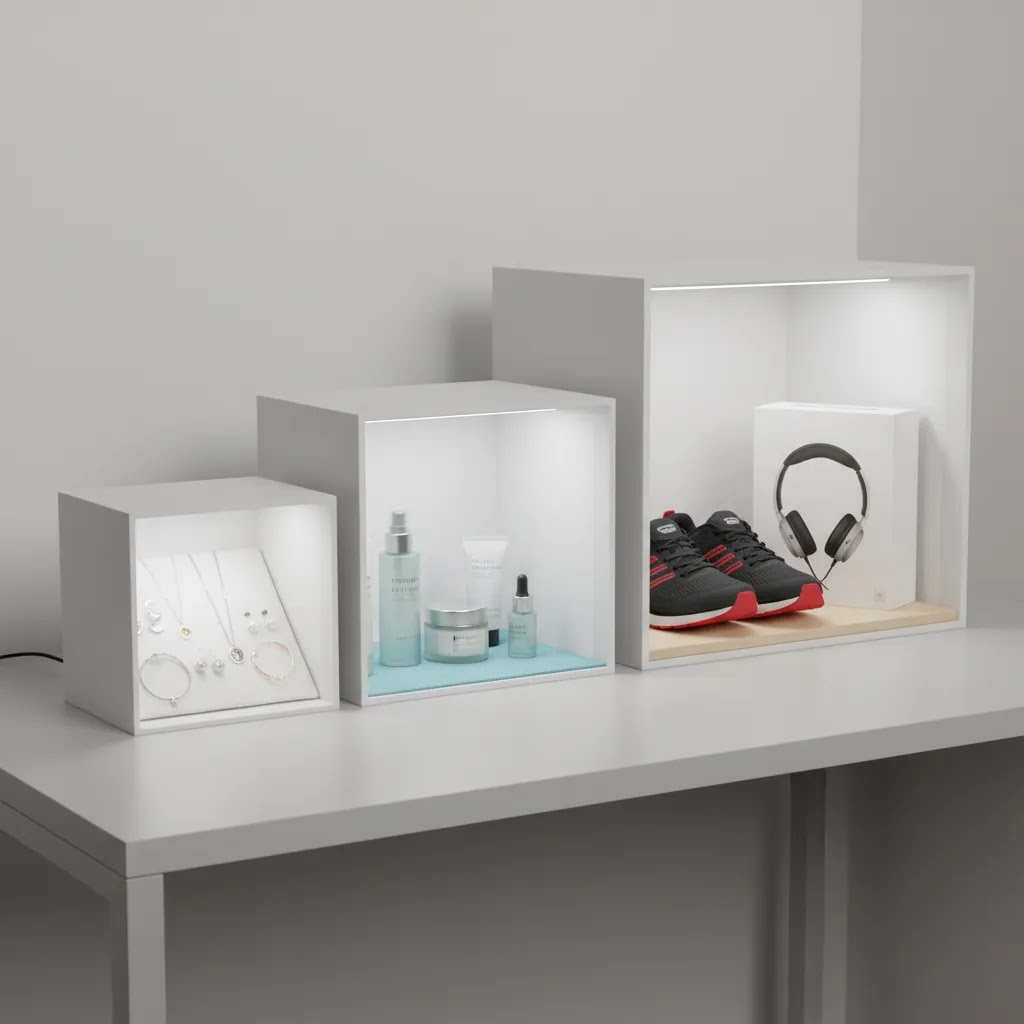
As a practical guide, a 12x12 light box is typically best for small items like jewelry, small cosmetics, nail products, compact electronics accessories, and smaller skincare bottles. It can be a good entry point, but it becomes limiting fast if you sell anything taller, wider, or packaged in sets.
A 24x24 light box tends to be the “most useful” size for many Shopify catalogs because it fits a wider range of packaged goods. Think supplements, candles, home fragrance, boxed products, and small bundles where you still want room to rotate the product for a 3/4 angle and keep the sweep clean behind it.
Now, when it comes to a large light box for photography, it is usually necessary when you sell bulkier items, multi-pack bundles, larger gift sets, or products that need space for stands and supports. That includes taller bottles, larger electronics boxes, and some fashion accessories that look awkward when shot too close. It is not just about size, it is about being able to place lights far enough away to keep illumination even.
Fit checks are straightforward, but you need to do them before you buy. Measure your largest product, then look at the internal dimensions of the box, not the external marketing dimensions. You want extra space around the product for the sweep curve and for rotation. If the product is too close to the side walls, you can get edge shadows, uneven background brightness, and reflections that are hard to edit out later.
Think of it this way: if you sell a mixed catalog, buy for your “largest common SKU,” not your smallest. If a light box only works for 20% of your products, you will end up with inconsistent images across your Shopify collection pages, which is exactly what you are trying to avoid.
When comparing options without relying on brand promises or price, focus on three cues: build quality, lighting strength and diffusion, and portability. Build quality shows up in how well the walls stay rigid, whether the sweep stays smooth over time, and whether the openings and seams leak light. Lighting strength matters because weak LEDs can force high ISO and softer images. Portability matters if you plan to store it between shoots or move it around your workspace. For most stores, the best box is the one you will actually use weekly, not the one that looks impressive on paper.
Trust and Credibility
This is one of those buying decisions where practical experience matters more than marketing copy. A light box is not automatically the right answer just because it promises clean lighting. The best choice depends on your product size, material finish, image standards, and how often your team actually shoots new items.
At AcquireConvert, we evaluate image workflows through the lens of ecommerce performance, not photography theory alone. That means asking whether a setup is realistic for a lean store team, whether it creates consistent images for Shopify collection pages, and whether it reduces production bottlenecks. Giles Thomas brings that perspective as a Shopify Partner and Google Expert, which is especially relevant when product imagery affects shopping feeds, paid acquisition performance, and on-site conversion quality.
Trust also comes from being clear about limitations. A product photography white box can improve consistency, but it will not fix poor camera settings, reflective packaging, or weak merchandising choices. In many cases, stores get better results by combining a simple shooting setup with modern editing tools such as photoroom for cleanup and asset production.
Key Features
If you are deciding whether to build or buy, these are the features that actually matter for ecommerce use.
Even lighting is the main reason to use a product photography box. Diffused lighting reduces harsh shadows and makes product edges easier to separate from the background. This is especially helpful for small packaged goods and beauty products.
Consistent white background capture matters for collection pages, Google Merchant Center compliance, and Amazon image standards. A box designed for product photography white box shots helps you repeat the same angle and light balance across an entire catalog.
Compact footprint is useful for merchants working from a home office, stock room, or small studio corner. A foldable box can stay out of the way when not in use, which is often more realistic than maintaining a permanent shoot area.
Multiple shooting angles are important if you need front, top-down, or close-up detail shots. A top opening is particularly useful for flat lays and cosmetics packaging. That is one reason beauty brands may combine a light box workflow with tools in adjacent niches, including resources around an ai makeup generator for complementary creative production.
Editing flexibility matters more than many merchants expect. A light box gets you a cleaner raw image, but not always a finished one. If you need background swaps, a lifestyle look, or sharper marketplace images, tools like Increase Image Resolution, Background Swap Editor, and Magic Photo Editor can extend what your basic photo box can do.
For merchants comparing lighting setups beyond a box, the broader Catalog Photography section offers more context around product image workflows.
Pros and Cons
Strengths
Considerations
Who It's Best For
A product photography box is best for ecommerce merchants selling small, physical products that need clean, repeatable catalog images. That includes Shopify stores in beauty, supplements, electronics accessories, stationery, home fragrance, and giftable products. It is also a good fit for Amazon sellers who need standardized white background photos.
If you are a solo founder or lean team with limited space, buying a ready-made box usually makes sense once your catalog grows beyond occasional launches. If you only need a few product photos per quarter, a DIY setup may still be enough. If your products need styled scenes, hand placement, or branded campaign visuals, a photo box should be treated as one part of the workflow, not the whole solution.
How to Get Started
Start by auditing your current product image problems. Are you struggling with shadows, inconsistent backgrounds, poor color, or slow editing? If the issue is raw capture quality, a photography box is worth testing.
Next, classify your products by size and surface. Matte packaging and small objects usually work well in a light box. Reflective and transparent products may need extra lighting control or post-production.
Then decide whether time or cash is your tighter constraint. If time is limited, buy a ready-made product photography light box. If cash is tighter and your shooting volume is low, build a simple DIY version first and validate the workflow.
Once you have images, create a repeatable process: same camera distance, same angle list, same light settings, same export dimensions. After capture, use editing tools where needed. For example, Remove Text From Images can help clean image assets, while Creator Studio may help you generate additional creative variations from your source photography.
DIY Light Box Build: A Practical Step-by-Step
If you are going the DIY route, the goal is not to build a perfect studio. The goal is to build something stable enough that you can repeat the same lighting and angles across multiple SKUs, then improve it over time. Cardboard can work for testing, but foam board usually holds shape better, stays cleaner longer, and makes your results more consistent.
Materials that tend to work best
For most DIY product photography box builds, foam board is a strong baseline because it is rigid, bright, and easy to cut cleanly. Use white poster board or matte white paper for the “sweep,” which is the curved background that removes the horizon line. For diffusion, white fabric, a thin white shower curtain, or tracing paper can work. The key is that it needs to be translucent enough to soften light, but not so textured that it shows up in reflections.
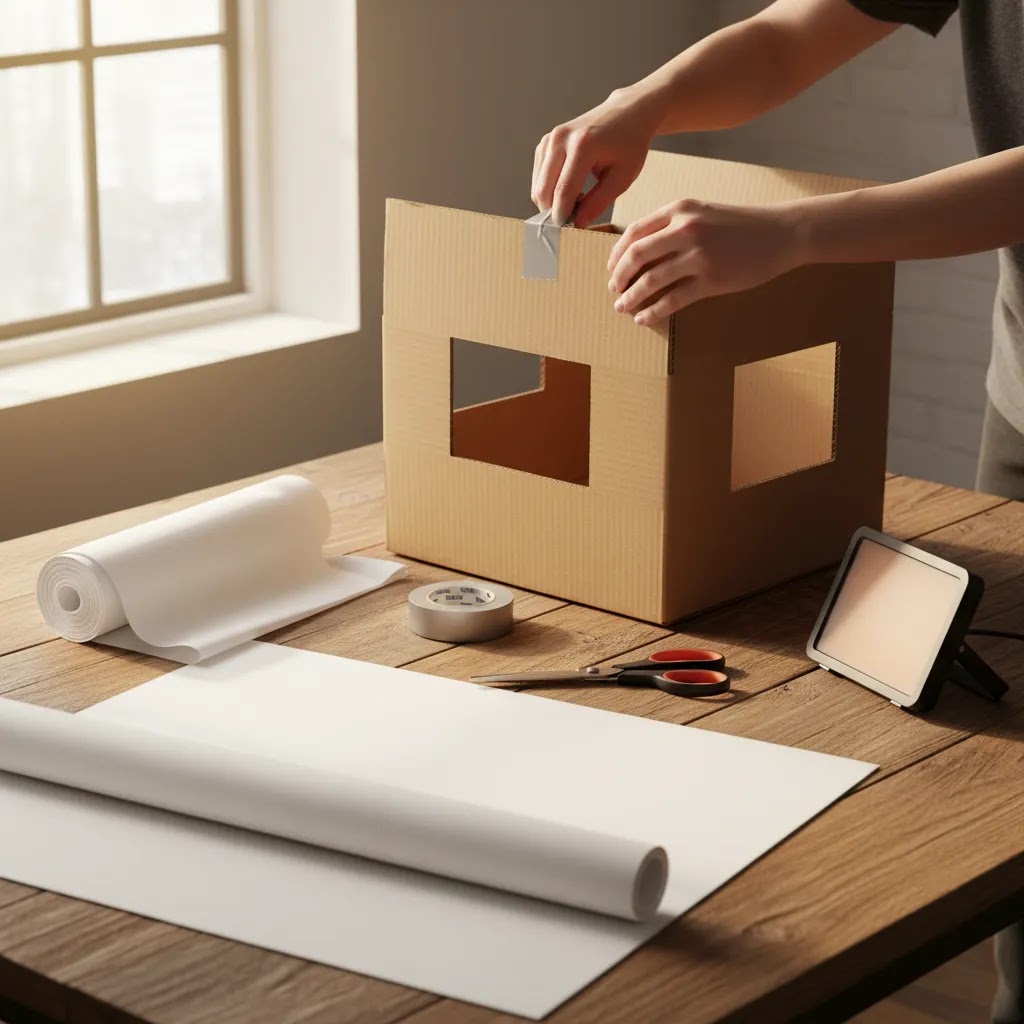
How to cut the box and create a seamless sweep
Start with a box or foam-board cube that is large enough for your most common products, plus extra space for rotation. Cut large windows on the left and right sides, and often the top, leaving a solid frame around each window so the structure stays rigid. Tape diffusion material over those windows so your lights shine through the diffusion, not directly onto the product.
Then place your sweep: tape the top edge of your poster board to the back wall near the top, and let it curve down to the floor of the box without creasing. If you see a sharp bend, you will usually see it as a line in your photos. A clean curve is what gives you that smooth white background look.
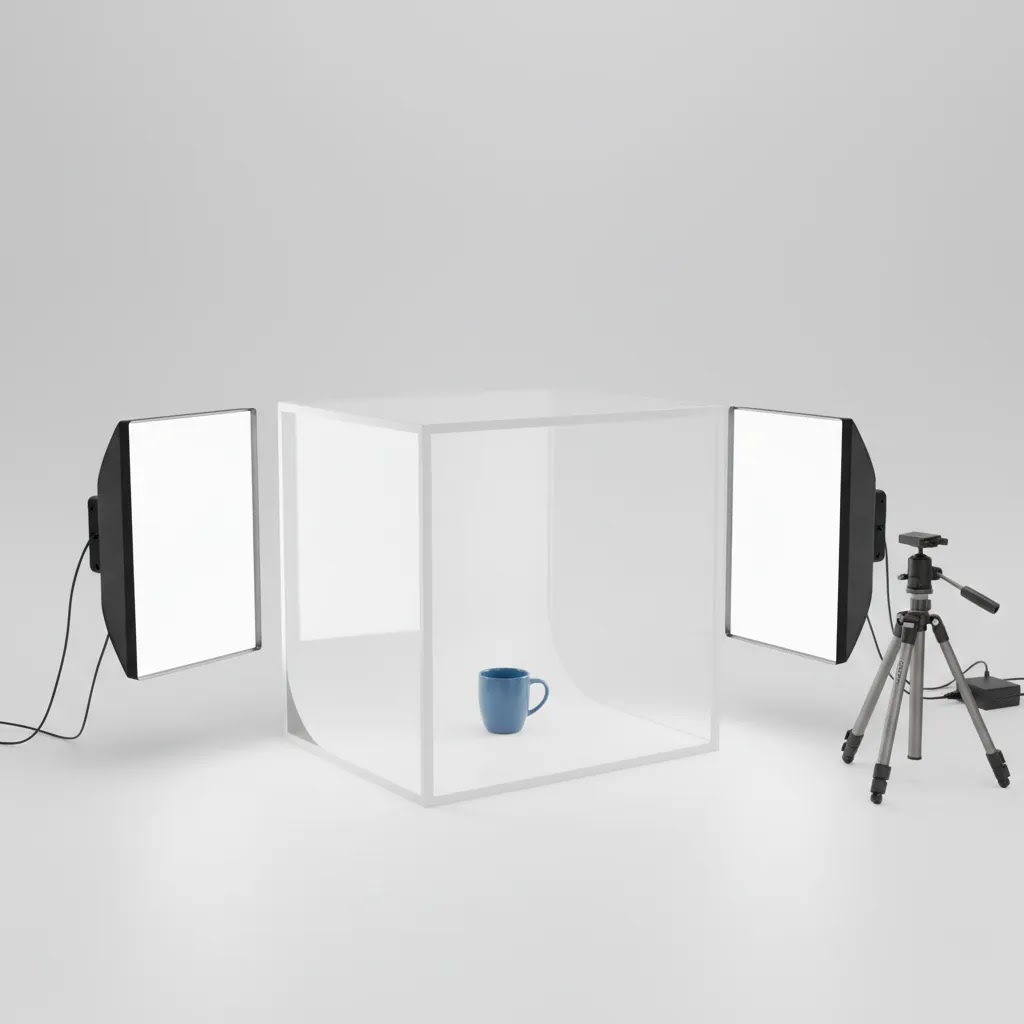
Lighting placement for consistent, repeatable results
A simple two-light setup is often enough. Put one light on each side aimed through the diffusion windows, slightly forward of the product so you get even front lighting without hard edge shadows. If your background looks gray or uneven, add a third light above, or slightly behind aimed at the sweep, so the background lifts without blowing out product detail.
If you get harsh shadows, move the lights farther away, increase diffusion, or raise the lights slightly so they angle down. If one side of the product is darker, match the distance and angle on both sides before you start changing camera settings. Consistency in placement usually matters more than chasing the “perfect” exposure for each SKU.
A Shopify-friendly workflow that keeps your catalog consistent
The way this works in practice is that you pick a standard shot list and reuse it for every SKU. A simple set that covers most ecommerce needs is: a straight-on front shot, a 3/4 angle shot, a detail close-up, and a scale shot that shows size or packaging volume. If you sell sets or bundles, add one “what is included” image from above.
To prevent chaos six months from now, use a predictable file naming pattern by SKU and angle so you can find and replace images without guessing. Keep the same background and camera distance whenever you reshoot. That way new products do not look like they belong to a different store, and older products can be updated gradually without breaking visual consistency across your Shopify collections.
Frequently Asked Questions
Is a product photography box worth it for a small Shopify store?
Usually, yes, if you sell small products and update your catalog regularly. The value comes from consistency and time saved, not just from better lighting alone. If you only add a few products per year, a DIY setup may be enough. If you launch often, buying a box can be more practical.
What is the difference between a DIY product photography box and a bought one?
A DIY product photography box is cheaper upfront and useful for testing. A bought one is usually faster to set up, more durable, and more consistent across shoots. The tradeoff is simple: DIY favors lower initial spend, while a commercial box favors efficiency and repeatability.
Can I use a product photography box for Amazon product photos?
Yes, many sellers use a product photography box amazon workflow for clean white background shots. That said, the box itself does not guarantee compliance. You still need the right framing, background cleanliness, resolution, and product visibility. Editing may still be needed before upload.
Does a product photography box with light replace photo editing?
No. It can reduce editing work, but it rarely removes the need entirely. You may still need background cleanup, brightness correction, color balancing, or retouching. For many stores, the best workflow is a simple box for capture plus lightweight editing for final polish.
How do I make a product photography box at home?
Most DIY setups use a cardboard box, cutout side panels, white diffusion material, and white poster board for the sweep. Add two lights on either side and test angles carefully. It can work well for learning, but expect some trial and error before results become consistent.
What is the 20 60 20 rule in photography?
It is a simple workflow guideline that encourages balance: spend a smaller portion of effort on setup, most of your effort on shooting, and the remaining portion on editing. For ecommerce product photos, it is a reminder that good setup and consistent lighting reduce retakes, and clean capture reduces how much you need to “save” images in editing.
What is the 3/4 rule in photography?
In product photography, the 3/4 rule usually refers to shooting a product from a three-quarter angle, often around 45 degrees, so you can see the front and one side. It often communicates shape and depth better than a straight-on shot, although some marketplaces still require a true front-facing image as the primary photo.
Can a light box handle reflective or transparent products?
Sometimes, but not always well. Reflective metal, glass, and glossy packaging can still show glare, hotspots, or strange reflections inside a small box. Those products often need more advanced lighting control, flags, or post-production. A light box helps, but it is not a universal fix.
Should I buy a box or use AI product photography tools instead?
It depends on where your bottleneck sits. If you do not have decent source photos yet, start with capture and improve your lighting. If you already have acceptable images but need faster variants, cleanup, or background changes, AI-based editing may be the better investment.
Key Takeaways
Conclusion
For most ecommerce brands, the decision to build or buy a product photography box comes down to shooting frequency, product type, and how much time your team can realistically spend on setup. If you sell small products and need a steady flow of clean catalog images, buying a ready-made light box is often the more practical choice. If your needs are occasional, a DIY version can still get the job done. Just be realistic about its limitations. A light box is not a full creative system, and it will not solve every imaging problem on its own. The smartest next step is to test one small workflow: shoot three products, compare your editing time, and decide whether hardware, AI tools, or a mix of both fits your store best.
Disclosure: AcquireConvert may receive affiliate compensation from some links mentioned in this article. That does not affect our editorial assessment. Any results from photography hardware or AI image tools will vary based on your product type, source images, store niche, and implementation quality. No specific outcome is guaranteed.

Hi, I'm Giles Thomas.
Founder of AcquireConvert, the place where ecommerce entrepreneurs & marketers go to learn growth. I'm also the founder of Shopify agency Whole Design Studios.