Product Photography Equipment You Need (2026)
If you sell online, the right product photography equipment can improve image consistency, reduce editing time, and help your store look more trustworthy. The good news is that most ecommerce brands do not need a fully loaded commercial studio to get strong product images. In most cases, you need a controlled light source, a stable camera setup, a clean background, and a workflow that fits your catalog volume. For many Shopify merchants, the smartest setup is a hybrid one: basic physical gear for capturing clean originals, then AI tools for background cleanup, white background output, and creative variations. If you are still planning your broader product photography studio, this guide will help you prioritize what to buy first, what to skip, and where software can replace hardware.
Contents
Overview
A practical product photography equipment list depends on what you sell, how often you shoot, and where those images will be used. A small jewelry brand, an apparel store, and a cosmetics merchant all need different setups. Still, most ecommerce stores share the same baseline needs: controlled lighting, stable framing, consistent backgrounds, and a post-production process that does not eat up hours every week.
From an ecommerce operations standpoint, equipment should be judged by output quality and workflow speed, not by how professional it looks on paper. That is why many store owners now combine a simple shooting setup with AI editing tools. ProductAI offers several relevant options in this workflow, including AI Background Generator, Free White Background Generator, Increase Image Resolution, Remove Text From Images, Background Swap Editor, Place in Hands, Magic Photo Editor, and Creator Studio. The available tool data provided includes URLs for these tools, but no current pricing or rating data.
If your main goal is catalog consistency, start with lighting and background control. If your goal is more lifestyle content without frequent reshoots, software may save more time than buying additional physical gear. That is also why many merchants exploring ai photoshoot workflows are reducing the number of props, sets, and one-off studio purchases they make.
AcquireConvert evaluates these workflows through the lens of real ecommerce performance. Giles Thomas, a Shopify Partner and Google Expert, focuses on what helps merchants create better storefront assets without building an unnecessarily expensive studio.
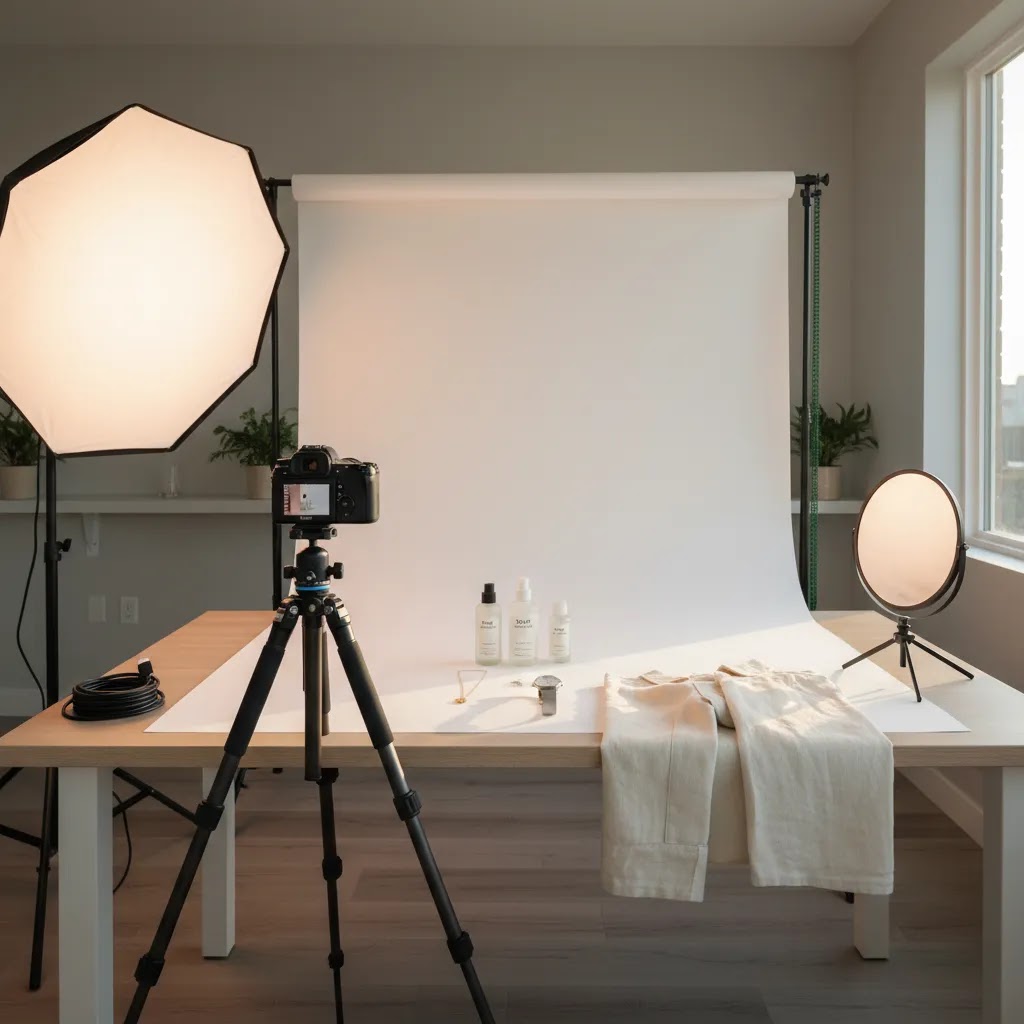
At-Home Product Photography Setup: Room, Surface, and Light Control
Here is the thing: for most Shopify store owners, the room you shoot in is part of your product photography equipment. You can buy good lights and a solid tripod, then lose half the benefit because of mixed lighting, reflections, or a backdrop that never sits the same way twice.
Start by picking a spot you can control. If you shoot with window light, choose one window and commit to it. Turn off overhead room lights so you do not mix color temperatures, which can create ugly color shifts that are hard to fix consistently across a whole collection. Also pay attention to what is near your setup. Brightly colored walls, posters, and even a red couch can bounce a color cast onto glossy packaging and cosmetics.
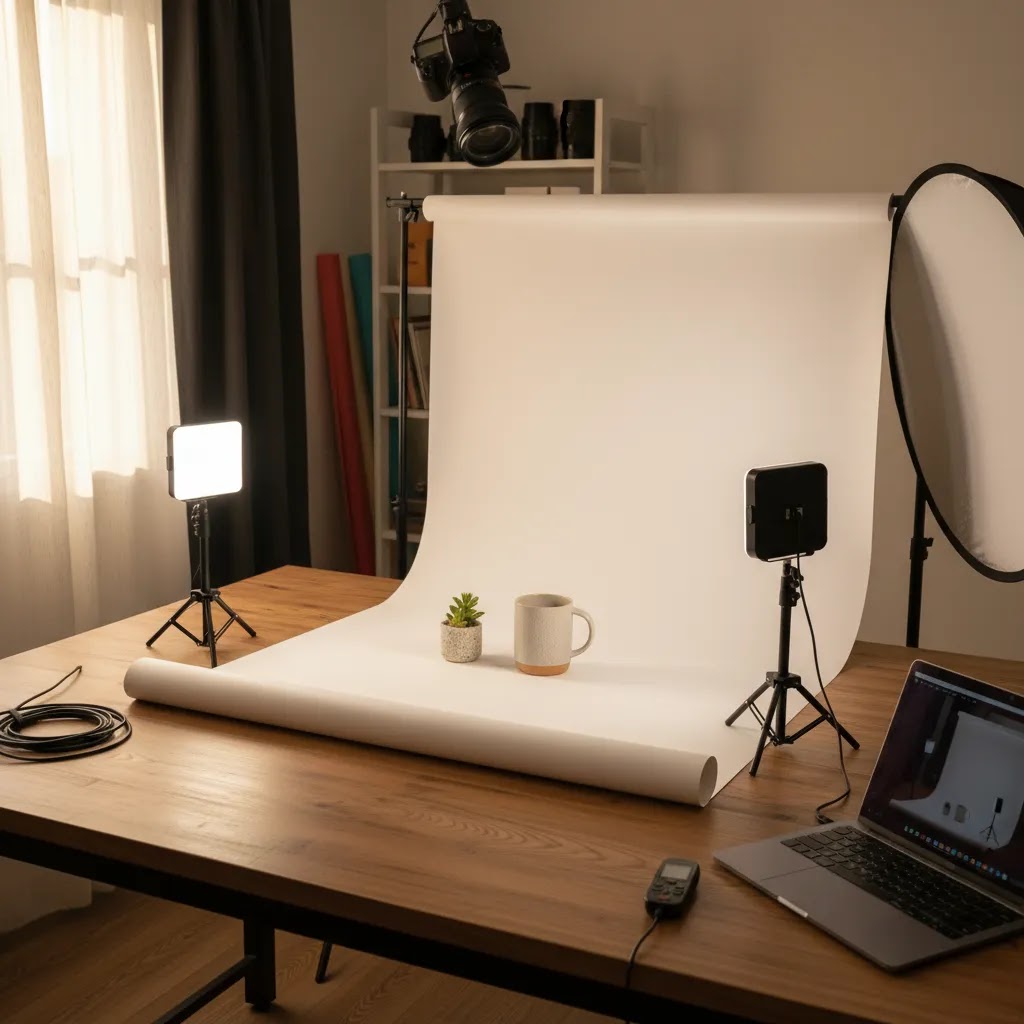
A minimum viable space can be very small. A corner of a room with a table and a backdrop stand can work if you can control the light. What matters is repeatability. If your Shopify product pages show images in a grid, customers notice when angle, crop, and shadow direction change from one SKU to the next.
Tabletop setups are the default for most products. You can build a simple shoot station with a table, a sweep backdrop (paper or fabric), one or two diffused lights, and foam boards to fill shadows. Floor setups become necessary when the product is larger, heavier, or needs full-height framing, for example larger home goods, footwear on stands, or bags. The big difference is that floor setups need more distance between product and backdrop to avoid harsh shadows and visible texture. If you cannot get that distance, you will spend more time trying to fix the background later.
What many store owners overlook is how small problems compound on shoot day. Uneven backdrops create distracting horizon lines. A light that is too close creates a hot spot on one side of the product and deep shadow on the other. Inconsistent camera height changes perspective, which makes your collection page look messy even if each image is technically sharp. The fastest fixes are usually practical: clamp the backdrop so it does not drift, mark tripod feet positions with tape so you can reset quickly, and keep lights in fixed positions once you find an arrangement that works.
What Equipment You Actually Need
The core product photography setup equipment for beginners is smaller than most people expect. For standard ecommerce product pages, prioritize these items first:
For apparel, add a mannequin, flat lay surface, or hanging rack. For cosmetics and small packaged goods, macro capability and precise light diffusion matter more. For large items, the room itself becomes part of the setup, so wall color, ambient light control, and floor space matter.
If you are considering 360 degree product photography equipment or product photography 360 equipment, that is a different tier entirely. You may need a turntable, motion control, fixed lighting positions, and a workflow for consistent frame capture. That setup makes sense for higher-ticket products where shoppers benefit from more visual detail, but many smaller stores should first improve standard catalog imagery before investing in 360-degree product photography equipment.
Some merchants can also replace lifestyle props or contextual shots with software rather than physical staging. For example, ProductAI includes tools such as Place in Hands and Background Swap Editor, which may help create contextual visuals after the base image is captured. If you are comparing software-first alternatives, a focused review like photoroom can help you assess whether editing tools are a better next investment than more hardware.
Product Photography Camera and Lens Recommendations (Beginner to Pro)
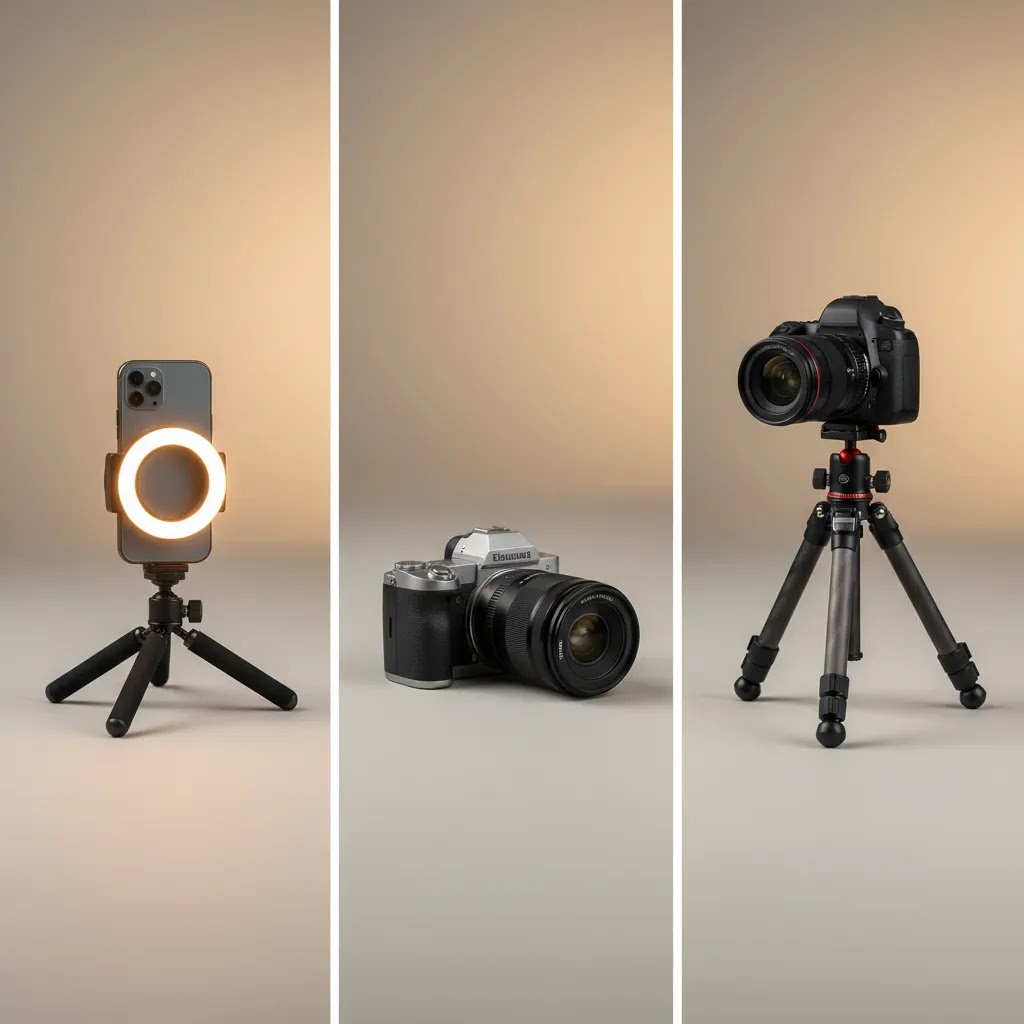
The reality is that most ecommerce catalogs are not limited by camera bodies. They are limited by lighting, stability, and consistency. Still, if you are choosing gear, it helps to think in tiers, based on how real store owners usually buy.
Tier 1: smartphone plus control. A recent smartphone is often enough if you can lock exposure and focus, stabilize the shot on a tripod, and keep lighting consistent. This tier is best for simple catalogs, fast drops, and stores where speed matters more than extreme detail. The main risk is inconsistency, especially if you shoot at different times of day with changing window light.
Tier 2: entry mirrorless or DSLR. This is the step up that usually makes sense once you want more consistent depth of field, cleaner edges, and better control over white balance and color. It is also helpful when you start shooting the same SKU at multiple angles and want each image to match precisely across the collection. For most Shopify product pages, the practical benefit is not “more megapixels,” it is repeatability.
Tier 3: upgrades only if you have a clear need. Higher-end camera bodies, multiple specialty lenses, and more complex capture workflows can be worth it for high-volume teams or products where fine texture detail drives the purchase decision. If you are still fighting uneven shadows or background issues, upgrading the camera rarely fixes that problem.
Now, when it comes to lenses, this is where ecommerce shoots either look clean and consistent, or they look slightly off even if the lighting is decent. Lens choice affects distortion, working distance, and how consistent your catalog looks across SKUs.
Focal length basics: a “normal” focal length is often the easiest path to natural-looking product shapes. Shorter focal lengths can introduce distortion, which makes products look wider or stretched at the edges of the frame. Longer focal lengths can look more flattering and consistent, but they require more space between the camera and product.
50mm vs 85mm style choices: in practice, a normal to short-telephoto focal length is a common sweet spot for tabletop products because it keeps shapes looking natural. A slightly longer lens can be great for consistency across a catalog because it reduces perspective distortion, but you need the room to back up and keep your framing consistent.
Do you need a macro lens? For small products like jewelry, cosmetics textures, labels, and details where shoppers zoom in, macro capability matters. A true macro lens can focus close while keeping detail sharp. If your products rely on fine detail, macro is often a better investment than a more expensive camera body. If you sell larger items or your detail shots are limited, you may not need macro right away.
Consider this when planning your workflow: the more consistent your lens choice and camera-to-product distance, the easier it is to maintain a uniform look across your Shopify collection pages. It also makes post-production faster because you are not correcting perspective and crop differences on every SKU.
From a practical standpoint, used gear can be a smart way to build a capable kit without overspending, but be selective. Lenses are often safe to buy used if the glass is clean, autofocus works properly, and there is no haze or fungus. Tripods and light stands can also be good used buys if the locks are solid and nothing wobbles. Be more cautious with batteries, storage media, and very cheap lighting that produces inconsistent color. Color inconsistency is one of the quickest ways to make a product catalog look untrustworthy, even if each photo looks fine on its own.
Pricing and Costs
Because the current tool data available for ProductAI only includes product names and URLs, with no live pricing attached, it would not be accurate to quote plan costs here. What we can say with confidence is that software cost should be compared against the hardware it may replace or reduce.
A lean beginner setup often includes a tripod, two lights, a backdrop, clamps, and reflectors. A more advanced product photography studio equipment setup may add a dedicated camera body, specialty lenses, extra modifiers, a shooting table, tethering accessories, and storage. Costs can rise quickly if you buy professional product photography equipment before you know your repeat workflow.
In practical terms, store owners should think in three budget bands:
The key is not spending the least. It is avoiding purchases that do not meaningfully improve conversion-focused image quality. Many Shopify merchants will get a better return from stronger lighting plus editing software than from upgrading to a premium camera too soon. If you want a broader view of this topic, the Catalog Photography section covers practical decisions around image production workflows.
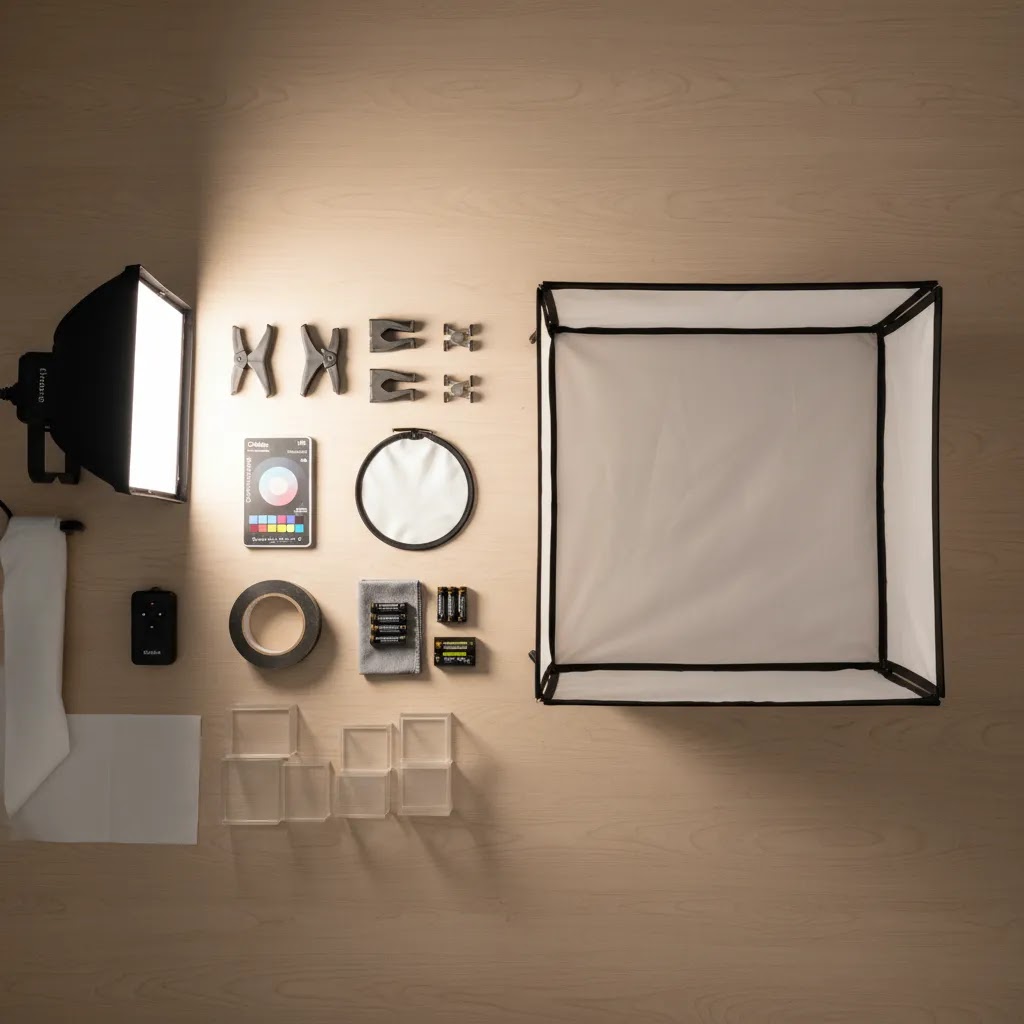
Essential Accessories Most Setups Forget (But They Fix Real Problems)
When people search for product photography equipment for beginners, they usually focus on the big items. The way this works in practice is that small accessories often determine whether your shoot feels smooth or chaotic.
Start with the basic “save the shoot” items: clamps for holding backdrops and foam boards in place, gaffer tape for marking positions and fixing small issues quickly, and a simple cleaning kit. A microfiber cloth, a blower, and a small brush can prevent you from cloning dust off every image. For apparel and fabric products, a lint roller is one of the cheapest time-savers you can buy. A small level can also help keep horizons straight and keep flat lays looking consistent across a whole collection.
Color consistency accessories are another common gap. A gray card or color checker can help you get repeatable color from session to session. That matters if you are shooting new products weekly and want your Shopify product pages to look like one cohesive catalog, not a patchwork of different lighting days.
If you want a simple process for white backgrounds that stay truly white, keep it boring and repeatable. Use the same backdrop material, keep your lights in the same place, and leave a little space between product and backdrop so you can light the background evenly without blowing out the product edges. If you push the backdrop too bright, you can lose detail on light-colored products and create haloing that looks unnatural.
Think of tethering and capture workflow as “optional but helpful” once you start shooting at volume. Extra SD cards and spare batteries prevent the worst kind of delays. If you shoot on a phone, a solid phone mount for your tripod is essential for stable framing. If you shoot on a camera, tethering to a computer or tablet can speed up decision-making because you can check focus, dust, and label readability on a larger screen before you shoot 40 more SKUs the same way. Tethering is not required, but it can reduce reshoots when your catalog gets bigger.
Pros and Cons of Different Setup Levels
Strengths
Considerations
Frequently Asked Questions
What equipment do I need for product photography as a beginner?
Most beginners need a camera or modern smartphone, a tripod, one or two soft lights, a white or neutral background, and simple reflectors. That setup covers a large share of standard ecommerce use cases. If your images need cleanup or alternate scenes, adding software may be smarter than buying more physical equipment right away.
Do I need a DSLR or mirrorless camera for ecommerce product photos?
Not always. For many Shopify stores, a recent smartphone paired with strong lighting and a tripod can produce usable catalog images. A dedicated camera becomes more helpful when you need advanced color control, interchangeable lenses, macro detail, or higher-volume professional workflows.
What camera is best for product photography?
The best camera is the one that lets you shoot consistently with manual control. For many Shopify stores, a recent smartphone on a tripod with strong, diffused lighting is enough for clean catalog images. An entry mirrorless or DSLR becomes a better fit when you need more consistent color, interchangeable lenses, and repeatable settings across larger catalogs. Higher-end cameras can be useful for specialized needs, but lighting and setup control typically matter more than the camera body.
What lens do I need for product photography (and do I need a macro lens)?
A lens that minimizes distortion and stays consistent across your catalog is usually the best choice. Many store owners do well with a normal to short-telephoto focal length because it keeps product shapes looking natural. A macro lens can be worth it if you sell small items like jewelry or cosmetics where detail shots and texture drive the purchase decision. If you rarely shoot close-ups, macro may not be necessary at the start.
Is it better to use natural light or studio lights for product photography?
Natural light can work well if it is consistent and you can avoid mixed lighting from overhead bulbs and nearby lamps. Studio lights tend to be more repeatable, which helps when you need your Shopify product pages to look uniform across weeks or months of shooting. For many stores, a simple continuous light setup is the most predictable option, especially as catalog volume grows.
What is the best way to photograph products at home with a simple setup?
Pick a controllable spot, keep your light source consistent, stabilize the camera on a tripod, and use a clean sweep backdrop. Turn off other room lights to avoid mixed color temperatures, and keep products a little away from the backdrop to reduce harsh shadows and uneven backgrounds. The goal is repeatability, so you can shoot new SKUs that match your existing catalog without re-learning the setup every time.
What is the most important product photography lighting equipment?
The most important piece is a controllable, diffused light source. For beginners, continuous softbox or LED lighting is usually the most practical choice. It makes shadows easier to manage and speeds up learning. If lighting is poor, even a good camera will struggle to produce clean ecommerce-ready images.
Is white background product photography equipment enough for most stores?
For core catalog images, yes, often it is. White background images are especially useful for collection pages, marketplaces, and consistent product page presentation. Many stores then add lifestyle or themed visuals later. If you want to improve your lighting choices, AcquireConvert's Product Photo Lighting category is a useful next step.
Should I buy 360 degree product photography equipment?
Only if it matches your product type and buying journey. 360 capture can help for higher-consideration products where shoppers need more visual confidence. For many smaller stores, standard front, side, detail, and scale shots will do more for conversion rate optimization before a full 360 setup becomes worthwhile.
Can AI reduce the amount of photography equipment I need?
In some cases, yes. AI tools can help with background replacement, cleanup, scene variations, and resolution improvements. That may reduce the need for extra backdrops, props, or reshoots. In beauty-related merchandising, adjacent tools such as an ai makeup generator show how software can extend visual production beyond the physical studio.
Key Takeaways
Conclusion
The product photography equipment you actually need is usually less complicated than the internet makes it sound. For most Shopify merchants, the highest-value setup is a controlled lighting arrangement, a stable camera position, a clean white background, and a reliable editing workflow. That gets you consistent catalog images faster, which matters more than owning every piece of professional gear. If you run a small or growing store, start lean and fix the biggest quality bottlenecks first. Then decide whether your next investment should be better hardware or software that helps you create more visual variations from the same source images. A sensible next step is to audit your current product pages, identify where image quality is holding you back, and upgrade one part of the workflow at a time.
Disclosure: AcquireConvert may receive affiliate compensation from some third-party links referenced in its content, where applicable. We aim to evaluate tools and workflows honestly based on practical ecommerce use. Any results from photography equipment, editing tools, or AI image software will vary based on your product type, image quality, implementation, and store context. Current product data available for referenced ProductAI tools did not include live pricing or ratings, so readers should verify those details directly before purchase.

Hi, I'm Giles Thomas.
Founder of AcquireConvert, the place where ecommerce entrepreneurs & marketers go to learn growth. I'm also the founder of Shopify agency Whole Design Studios.