Product Photography Table: Which Surface Works? (2026)
If you sell physical products online, the surface under your product matters more than many store owners expect. A good product photography table can help you get cleaner shadows, more consistent color, and fewer editing headaches across your catalog. A bad one can create glare, absorb light unevenly, or make products look less premium than they are. If you are building a better product photography studio, choosing the right surface is one of the simplest upgrades you can make. This guide compares the most useful table surfaces for ecommerce photography, explains where each one works well, and shows you how to choose based on your products, lighting setup, and content goals. The aim is practical: better-looking product shots that fit your brand and support conversions.
Contents
Why the table surface matters
For ecommerce, consistency usually matters more than artistic flair. Your product photography table affects reflection control, color accuracy, cleanup time, and how easy it is to reproduce the same look across dozens or hundreds of SKUs. That matters whether you are shooting skincare jars, apparel accessories, candles, tools, or boxed products.
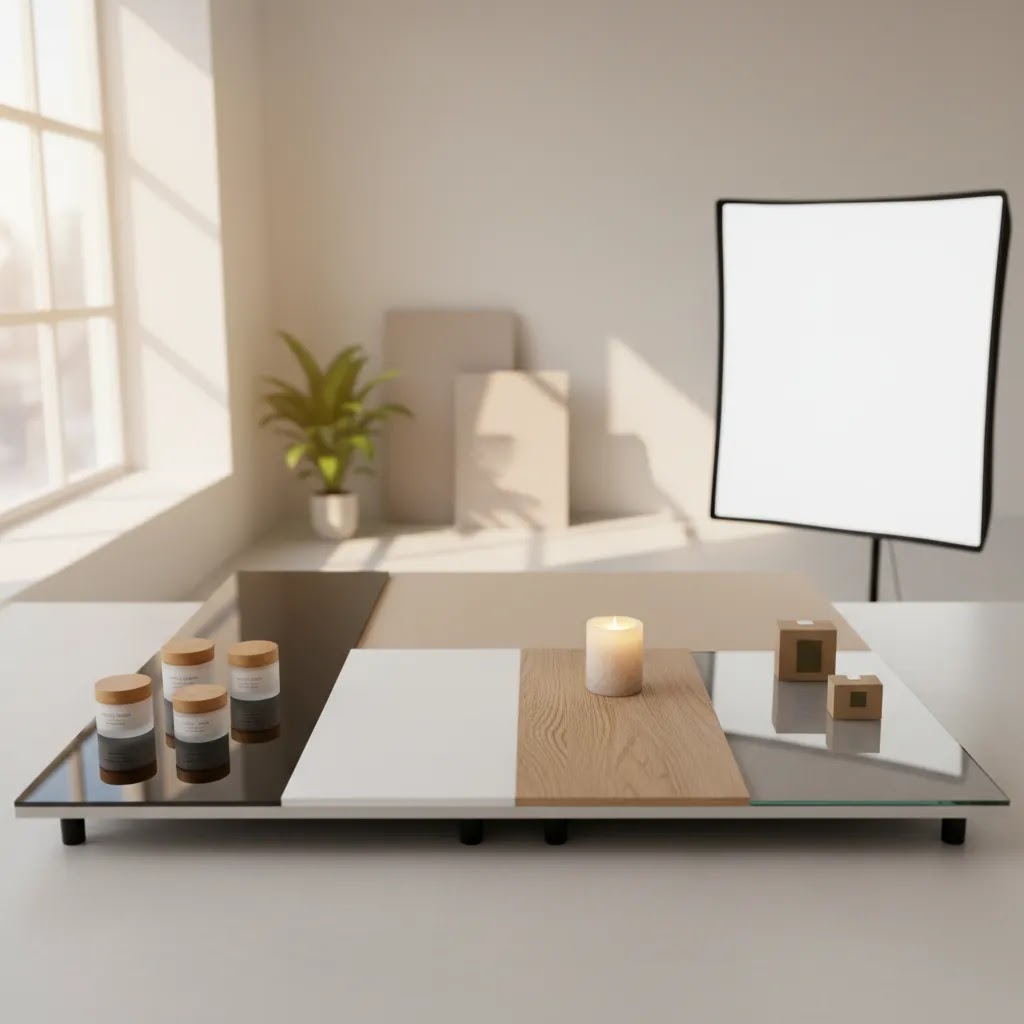
A tabletop surface acts like part of the lighting setup. Glossy acrylic can create polished reflections that look premium for beauty or tech products. Matte foam board can reduce glare and help with straightforward catalog photography. Wood or textured boards can add warmth, but they may also distract from the product if your brand style is meant to feel clean and minimal.
If you are also testing AI-assisted workflows, your base image quality still matters. Good lighting and a reliable surface make it easier to produce files that can later be enhanced with ai photoshoot tools or more advanced ai product photography workflows. In other words, your physical setup and your editing workflow should support each other, not fight each other.
Common product photography table surfaces
There is no single best product photography table surface for every store. The right choice depends on product size, finish, lighting, brand aesthetic, and how often you need to shoot. Here are the surfaces most ecommerce teams use in practice.
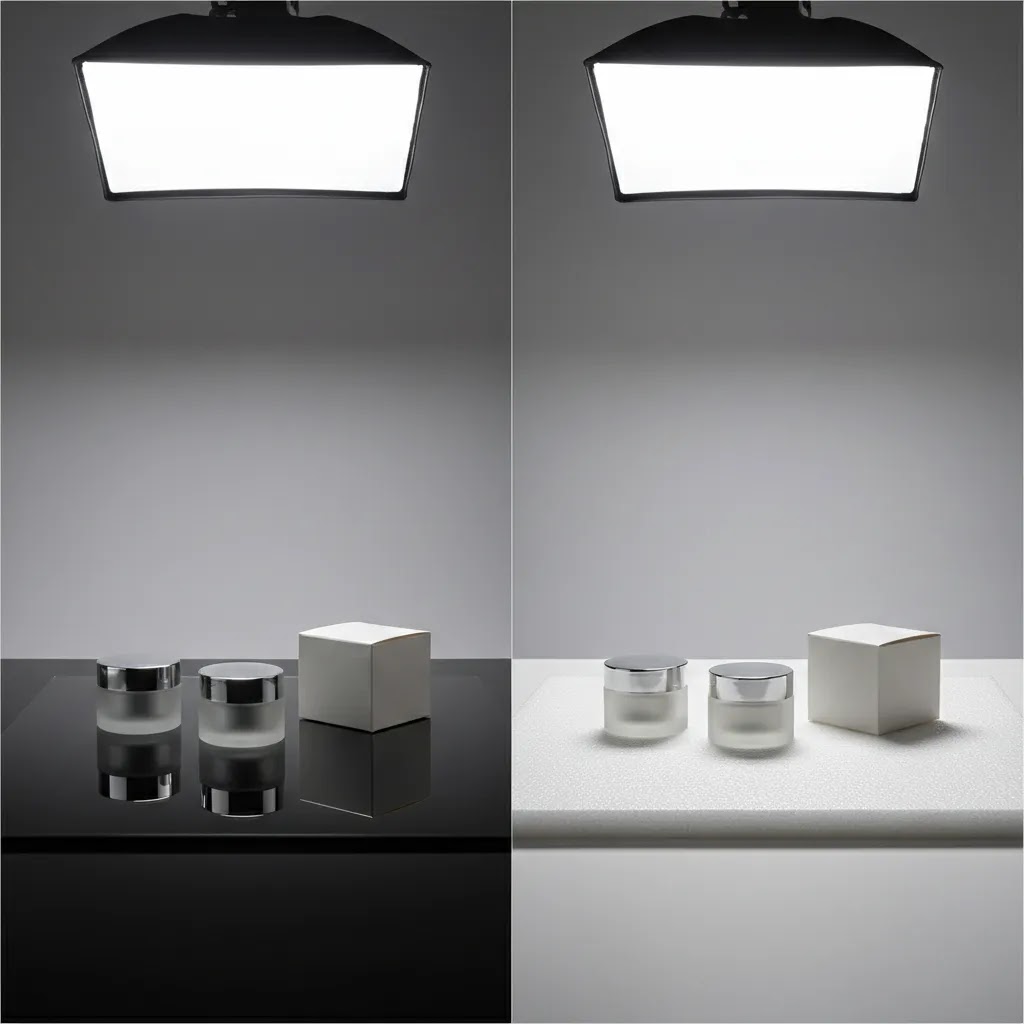
White acrylic
White acrylic is a strong option for table top product photography when you want a polished catalog look. It reflects light well, can create controlled mirror effects, and works especially well for beauty, wellness, and premium packaged goods. The trade-off is glare. Fingerprints, dust, and strong reflections show up quickly, so you need careful light placement and routine cleaning.
Matte white foam board
This is one of the most practical choices for home product photography and product photography basics. It is lightweight, affordable, and forgiving under soft light. It does not give the premium reflection of acrylic, but it makes exposure easier to manage and keeps attention on the product. It can dent, stain, and warp over time, so it is better for lighter use or DIY setups.
Seamless paper sweep
A paper sweep creates that familiar infinite background look where the surface curves gently into the backdrop. This works well for ecommerce catalog images because it keeps the frame clean and reduces visual clutter. It is excellent for small-to-medium products, but paper tears and gets dirty fast, especially when shooting products with rough edges or heavy bases.
Wood or faux wood boards
For aesthetic product photography, wood can work very well. It adds warmth, texture, and a lifestyle feel that suits handmade goods, food-adjacent products, candles, homeware, and some skincare brands. The risk is inconsistency. Strong grain patterns, color shifts, and surface wear can make products look different across shoots. It is best used for brand content, social posts, or secondary imagery rather than your main product page gallery.
Glass or light table setups
Light table product photography can be useful when you want strong edge definition, bright shadows, or a glowing base effect. Some photographers use frosted glass with light placed underneath for translucent or small premium items. This can look impressive, but it is the least forgiving setup here. It requires more space, more control, and more testing than most independent store owners want for routine catalog production.
Rotating table surfaces
A product photography rotating table is less about surface material and more about efficiency for video, 360-degree product views, or consistent angle testing. If you sell collectibles, shoes, beauty items, or packaged products, a rotating platform can help create product videos and spin-style assets. Still, not every store needs one. For static ecommerce photos, it is usually an add-on, not your core table choice.
Product photography table sizes, weight limits, and space planning
Here is the thing: most buying guides focus on surfaces, but the physical table matters just as much. If your shooting area is too small, you will constantly fight unwanted shadows, bent paper sweeps, and tight crops that make your catalog look inconsistent.
For many tabletop product shoots, a square shooting area around 24 x 24 inches is a practical baseline. It gives you enough room for a small product plus space for a sweep and light falloff. If your products are larger, think in terms of your largest product footprint plus breathing room on all sides. In practice, giving yourself at least 8 to 12 inches around the product helps you position lights and reflectors without crowding the scene.
Now, when it comes to height and camera angle, table height is not a minor detail. A table that is too low pushes you into awkward angles for hours, especially if you are shooting batches. A table that is too high can make it harder to keep your camera level for straight-on product shots. Many store owners end up using a standard table height and rely on a tripod or a boom arm for consistent framing. The goal is simple: you want a setup where you can repeat the same angle quickly, not reinvent it every shoot.
Weight limits and stability are the unglamorous specs that matter most if you sell heavier products. If you are photographing tools, large candles in glass, bulk supplements, or multi-packs, prioritize a table that does not wobble when you place products down or adjust a sweep. Wobble shows up as tiny framing shifts, and that can make your product grid look messy on collection pages. Load capacity also matters if you are placing an acrylic sheet, clamps, and lights on the same surface.
For small-space setups, you can still run a serious tabletop studio in an apartment or spare room. The main constraint is storage and teardown. Folding tables, rollable carts for lights, and surfaces you can stand upright against a wall make the workflow realistic. Consider where your sweep will live between shoots, because paper dents and acrylic scratches often happen during storage, not during shooting.
Pros and Cons
Strengths
Considerations
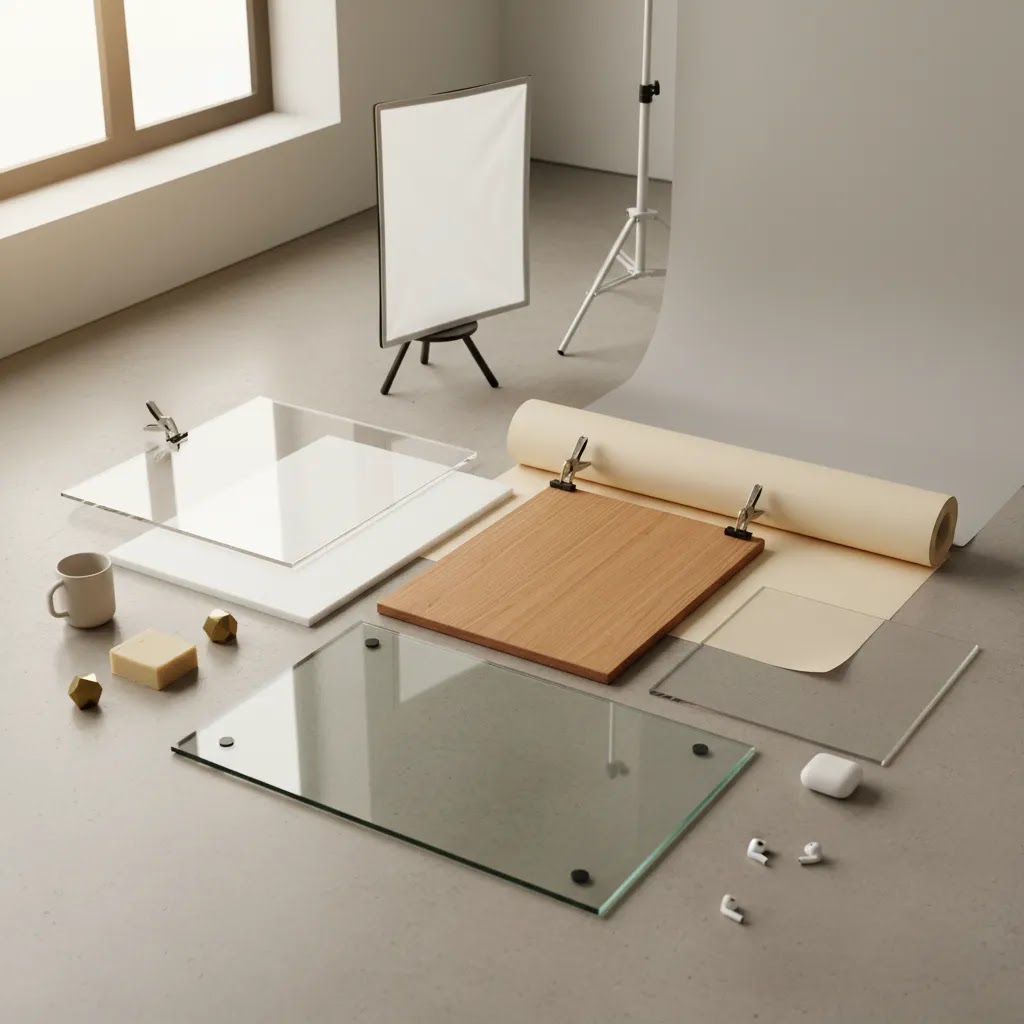
Tabletop studio system setups that actually work
What many store owners overlook is that a product photography table is often sold and used like a system, not a standalone surface. The surface, the sweep, and the lighting all interact. If one piece is off, you will spend your time patching problems in editing.
A simple, repeatable system usually looks like this: a stable table, a sweep (paper or board) that curves smoothly, and two soft, consistent lights. Softboxes are common because they give you a large, forgiving light source. LED panels can also work well if they are diffused and you can control their output consistently. The goal is predictable light you can reproduce every shoot, not the brightest light possible.
Consider this if you are using acrylic: hotspots are the number one complaint. They usually come from small, hard light sources or lights that are too close and too direct. The practical fix is to increase diffusion and adjust angles. Move the light slightly higher and more to the side, soften it with diffusion, and watch what happens to the reflection line on the surface. If you can see the light source in the acrylic, your customers will see it too.
Paper sweeps have their own failure modes. Uneven paper sweeps are usually a clamp and tension problem, not a camera problem. If the sweep is sagging or kinking where it meets the table, you will get weird gradients and shadows that make background cleanup harder. A smooth curve and even lighting across the sweep are what create that clean, high-key look.
Light table setups add another variable: underlighting. Underlighting can help with edge definition and certain glass products, but it can also flatten the product if it overpowers the key light. In many cases, you still need a main light from the front or side to shape the product, plus controlled underlight to lift shadows. Without that balance, your images can look clinical in a way that does not match how the product looks in real life.
For most Shopify store owners, a starter setup is a matte surface or paper sweep plus two soft lights and a simple reflector. Then, if you want to level up, you add a second surface (often acrylic), a more controlled diffusion approach, and tighter repeatability. That upgrade path tends to produce more consistent catalog output than buying a complex kit upfront and realizing you do not have the space or time to use it properly.
Who should care most about table choice
Table choice matters most if you shoot products regularly, manage a growing SKU count, or want to improve conversion without paying for a full studio every time. For Shopify merchants, cleaner and more consistent photos can make your product pages feel more trustworthy, especially on mobile where visual clarity carries a lot of the selling job.
This is especially relevant for beauty, skincare, supplements, jewelry, tech accessories, and home products. If you shoot occasional social content only, you can get away with a simpler setup. If your store depends on repeatable product imagery across ads, PDPs, marketplaces, and email campaigns, the right professional product photography table setup becomes a real operational decision.
How to choose the right surface
1. Start with your main image requirement. If your priority is clean catalog photography on white, begin with matte white foam board or a seamless paper sweep. If you want a more premium reflection-heavy look, test white acrylic. Your default surface should support the kind of image you need most often, not the occasional creative shot.
2. Match the surface to the product finish. Glossy packaging, glass bottles, metallic lids, and reflective jars are harder to photograph on shiny tables. In those cases, a matte surface usually gives you more control. Flat-lay products, folded apparel, stationery, and boxes can work well on many surfaces as long as the lighting is soft and even.
3. Think about repeatability. Great product photography is not just about one strong shot. It is about whether you can reproduce the same result next week with ten new products. Acrylic scratches. Paper tears. Wood changes tone under different lights. Choose a setup you can maintain without constant adjustments.
4. Separate catalog needs from brand content. Many stores benefit from a two-surface approach. Use one plain surface for core ecommerce photography and another styled surface for social media, campaigns, and editorial content. This is often more effective than trying to make one setup do everything.
5. Keep post-production in mind. If you plan to use editing tools or remove backgrounds later, the cleanest possible original photo usually wins. That is one reason simple white or neutral surfaces remain popular. If you are comparing editing-first options, our look at photoroom can help you decide whether software can offset a simpler physical setup.
For most independent ecommerce brands, the safest starting point is a matte white surface for standard product shots plus one styled board for campaign images. That keeps your workflow flexible without overcomplicating the setup.
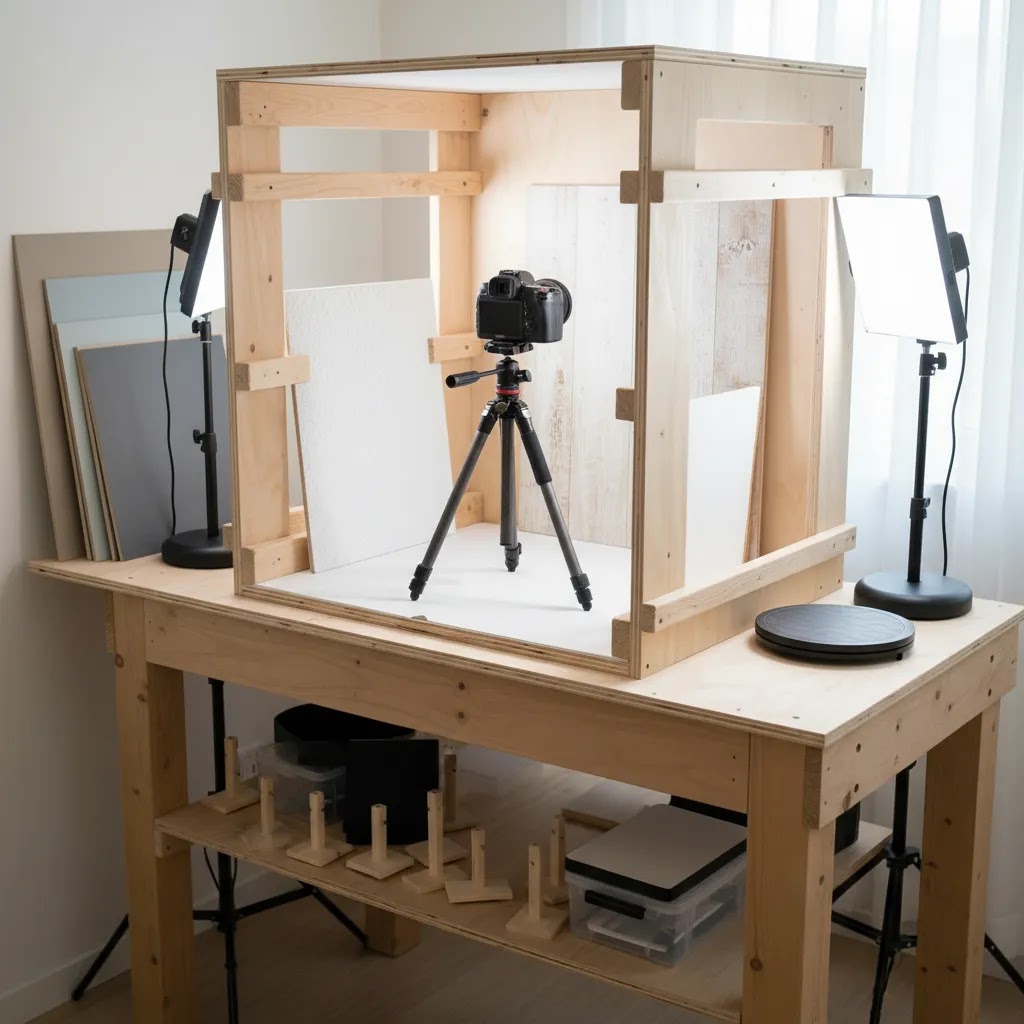
Product photography table DIY build options that hold up
A DIY product photography table can absolutely work. The reality is you are trading money for time and consistency. If you are shooting a handful of SKUs per month, DIY is often the right call. If you are shooting weekly, the setup that saves you 30 minutes each session is not a luxury, it is a workflow decision.
Here are three DIY builds that tend to work well for ecommerce.
1) Folding table + paper sweep (fastest, most flexible)
This is the classic: a stable folding table, a roll or sheet of seamless paper, and clamps to hold the top edge in place. The key is getting a smooth curve so the background does not crease where it transitions from table to backdrop. In practice, you will replace paper regularly. That is not a failure, it is part of the system. Plan for it, and keep spare rolls or sheets on hand.
2) Foam board infinity curve (cheap, forgiving for beginners)
Foam board works well because it is matte and easy to light. Use one board as the base and another as the backdrop, then create a gentle curve by bending the backdrop board rather than forcing a hard corner. This is great for small products and test shoots. The main downside is durability. Foam board dents and picks up marks, so you may need to replace it when you notice consistency slipping across your catalog.
3) Frosted acrylic on risers (DIY light table effect)
If you want a brighter base or a subtle glow, you can place a frosted acrylic sheet on risers or supports, then position a diffused light underneath. This can help with certain glass, translucent packaging, or products where you want cleaner edge separation. It also introduces more variables, so you will need to test exposures and keep the acrylic clean. Acrylic shows dust and scratches quickly, and those issues can become very obvious in high-key photography.
For all DIY builds, the small accessories matter more than you think. Clamps keep your sweep repeatable. Tape choice matters because some tapes leave residue or damage paper and boards. Cleaning matters because a smudge that looks minor in your room may show up as a gray streak on a white background. If you are running a DIY setup as part of your Shopify workflow, the goal is to reduce the number of things that can drift between shoots, not to build the most complex rig.
AcquireConvert recommendation
From a practical ecommerce perspective, most store owners should not overbuild their first table top product photography setup. Start with a matte white base if your goal is clean PDP imagery, then add acrylic or a textured styling board only once you know where your current images are falling short. That approach usually gives you the best balance of control, speed, and consistency.
AcquireConvert focuses on the decisions that actually affect online selling, not just photography theory. Giles Thomas brings the perspective of a Shopify Partner and Google Expert, which is useful because product imagery does not sit in isolation. It influences product page conversion, creative testing, shopping feeds, and ad performance. If you want to build out your visual workflow further, browse the Catalog Photography section, revisit the Product Photography Fundamentals, and see how adjacent tools and techniques like ai makeup generator workflows may fit specialized beauty content.
Frequently Asked Questions
What is the best product photography table surface for beginners?
For most beginners, a matte white foam board or simple paper sweep is the best starting point. Both are easy to light, inexpensive to replace, and forgiving when you are learning product photography basics. They also work well for straightforward ecommerce shots where clarity matters more than dramatic styling.
Is acrylic better than paper for product photography?
Acrylic is better if you want polished reflections and a more premium visual style. Paper is better if you want a cleaner, lower-maintenance workflow with fewer reflection issues. For many ecommerce stores, paper or matte board is the practical default, while acrylic is used selectively for hero images or beauty-style content.
Can I build a product photography table DIY setup at home?
Yes. A product photography table diy setup can work very well for small products. Many store owners use a folding table, foam board, clamps, and a window or softbox lighting setup. The key is stability and repeatability. If your setup shifts every shoot, consistency becomes harder to maintain across your catalog.
What surface works best for product photography skincare brands?
Skincare often looks strong on white acrylic, frosted acrylic, or clean stone-effect styling boards. White surfaces support a clinical, premium feel, while soft textures can add warmth for lifestyle shots. For Shopify skincare stores, it is often smart to use a plain surface for product pages and a styled surface for campaigns and social assets.
Do I need a professional product photography table?
Not always. If you shoot small to medium products and have decent lighting, a basic tabletop studio setup can be enough. A professional product photography table becomes more useful when you need high-volume repeatability, specialized lighting control, or a dedicated space for ongoing content production.
Are rotating tables worth it for ecommerce?
A product photography rotating table can be worthwhile if you create product videos, 360-degree views, or frequent social content. For still photography alone, it is usually not essential. Most stores will get more value from improving lighting and surface choice before investing in motion-focused equipment.
What is light table product photography best for?
Light table product photography is best for products that benefit from a glowing or high-key base, such as glass, cosmetics, or small premium items. It can produce striking results, but it is less beginner-friendly and usually requires more careful exposure control than a standard tabletop setup.
How do I make table top product photography look more premium?
Focus on even lighting, careful spacing, clean surfaces, and color consistency first. Premium-looking images usually come from disciplined execution more than elaborate props. Once your base image is strong, you can experiment with reflections, shadows, and post-production. If you want more styled outputs, AI-assisted tools may help extend variations after the core shot is captured well.
Should I use textured backgrounds for my main product photos?
Usually no. Textured backgrounds can work well for secondary images, social posts, and brand storytelling, but main product page images generally perform better when the product is the clear focal point. For ecommerce, clarity and consistency often beat visual novelty, especially across collections and mobile browsing.
What size product photography table do I need?
A practical baseline for many tabletop products is a shooting area around 24 x 24 inches, but the better way to choose is to start with your largest product and add breathing room on all sides. In many cases, leaving 8 to 12 inches around the product makes lighting and sweep placement much easier. If you plan to shoot larger bundles, shoe boxes, or wide products, a larger table or a setup that allows a wider sweep will save time and reduce inconsistent crops.
What is a shooting table in product photography?
A shooting table is a dedicated tabletop setup designed for product photography, usually with a surface and a way to create a sweep or infinite background. The advantage is repeatability. You can keep your lighting, camera angle, and background consistent, which matters for ecommerce catalogs where you need dozens of SKUs to look like they belong together.
Can I use a glass table for product photography, and is it safe?
You can, but it depends on your products and your space. Glass can create strong reflections and it can be useful for certain high-key or underlit effects, but it is less forgiving than matte surfaces. Safety comes down to stability and load. Use thick, stable glass that is properly supported, avoid heavy products if you are not confident in the setup, and control fingerprints and dust because they show up quickly. For many store owners, frosted acrylic is a safer and more predictable alternative for a similar look.
What is the best product photography table for clothes?
For clothes, it depends on whether you are shooting flat-lays or small apparel items like hats and accessories. For flat-lays, you want a larger, stable surface, a matte background (often paper or board), and soft, even lighting to avoid harsh fabric shadows. If you are shooting full outfits, a tabletop is usually not the right tool. You are better off with a standing setup, a sweep, or a mannequin workflow, depending on your brand and how consistent you need your product page imagery to be.
Key Takeaways
Conclusion
The right product photography table surface is the one that helps you produce consistent, brand-appropriate images without slowing down your workflow. For most ecommerce stores, that means starting simple: a matte white surface for reliable catalog shots, then adding acrylic or textured boards for specific creative needs. You do not need a complicated tabletop studio to get strong results, but you do need a setup you can repeat confidently. If you are refining your visual workflow, AcquireConvert is a useful next stop for practical, store-owner-focused guidance. Explore related catalog photography resources, compare editing options, and use Giles Thomas’s Shopify and ecommerce expertise to make smarter decisions about the content that supports your product pages and paid acquisition.
This article is editorial content created for educational purposes. It is not a paid endorsement unless explicitly stated otherwise. Product photography results vary based on lighting, products, equipment, and editing workflow. Any tool pricing or feature availability referenced on linked pages is subject to change, so verify details directly with the provider before making a purchase decision.

Hi, I'm Giles Thomas.
Founder of AcquireConvert, the place where ecommerce entrepreneurs & marketers go to learn growth. I'm also the founder of Shopify agency Whole Design Studios.