[Complete] Google Tag Manager Tutorial for Shopify
In this post you’ll learn how to set up and get the most out of your Shopify store by properly configuring your Google Tag Manager. As an ecommerce entrepreneur or marketer, you’re always looking for ways to make better data driven decisions. Google Tag Manager is one of the must-have tools that can assist you in achieving this goal.
Need help with tag manager for ecommerce? Check out our Shopify Google Tag Manager Set Up Service for $199 USD.
What is Google Tag Manager (GTM)?
It’s a Tag Management System (TMS) that replaces hard-coded tags that are used for marketing, analytics, and testing on a website, with dynamic tags that are easier to implement and update.
The benefits of tag management (and specifically Google Tag Manager) are enormous to any business, be it a startup or an established company. But Google Tag Manager has a lot of advantages if you own an e-commerce store. It is the best tagging and tracking solution that will lead to an overall breakthrough in your marketing operations.
However, it is not the easiest tool to deploy on your website, that’s why I decided to write this hands-on article that I hope will help you lead your marketing operations through accurate data, and therefore accurate conclusions.
As hundreds of thousands of websites use Shopify for their e-commerce store, in this article I will only focus on this implementation process.
By the end of this article you will know: how to install GTM in your Shopify store, how to enable basic and enhanced e-commerce tracking and how the data generated by this tag management system will help with every aspect of your store. Let’s dig in!
How to install GTM in Shopify
Google Tag Manager is not for junior marketers. It requires some previous experience with tracking tools, analytics tools, HTML tags and so on. But the benefits of using GTM are countless, that’s why I believe the process will be worth it in the end.
Before installing Google Tag Manager with your Shopify store, make sure you copy the code snippets, that are provided by Google Tag Manager, in your liquid theme (theme.liquid) and in your checkout page (checkout.liquid).
To add the Google Tag Manager code to your Shopify Plus store, you need to:
1.
Install Google Tag Manager to get the code snippets that you will need to copy and paste into your Shopify store. Because Shopify uses templates, you only need to copy the snippets into the theme.liquid and checkout.liquid files.
- ❗If this is your first time installing Google Tag Manager, then use the installation steps provided by Google Tag Manager. Pause at step 6 from Create a new account and container where you are given two code snippets to add to your web pages, and then follow the instructions below.
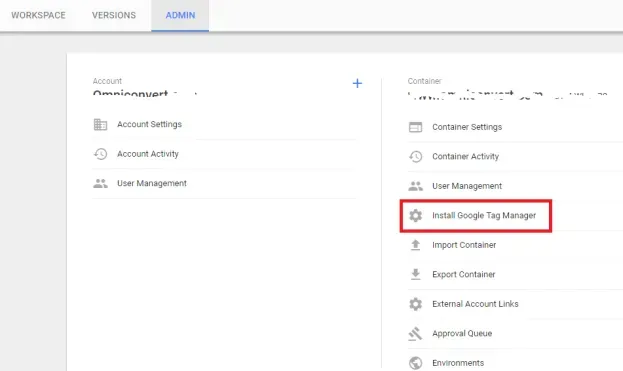
- If you have already installed Google Tag Manager, then you can find these code snippets in your Google Tag Manager by clicking Admin, and then clicking Install Google Tag Manager:
2.
In your Shopify admin, click Online store, and then click Themes.
3.
In the theme drop-down, click Edit Code.
4.
Copy the first code snippet from Google Tag Manager into the
tags of your theme.liquid and checkout.liquid code:
- Copy the first code snippet from Google Tag Manager
- In your Shopify admin, open your theme.liquid file.
- Paste the code snippet as high in theof the theme.liquid code as possible.
- Open your checkout.liquid file.
- Paste the code snippet as high in theof the checkout.liquid code as possible.
5.
Copy the second code snippet from the Google Tag Manager into the
tags of your theme.liquid and checkout.liquid code:
- In your Shopify admin, open the theme.liquid page.
- Paste the code snippet as high in theof the theme.liquid page as possible.
- Open the checkout.liquid page.
- Paste the code snippet as high in theof the checkout.liquid code as possible.
6.
In your Shopify admin, click Save.
7.
In Google Tag Manager, continue installing the Google Tag Manager. When prompted to add tags, do not add the following types of tags:
- Universal Analytics for Google Analytics
- Classic Google Analytics for Google Analytics
- Facebook Pixel.
The process above is recommended by Shopify. But if you’re not in the position to modify core theme files or you don’t want to risk these changes being overwritten, there’s a workaround here. You can implement the GTM direct in the Admin and this works very well for all Shopify Stores. Here are the four simple steps to follow:
Implement the GTM direct in the Admin
1.
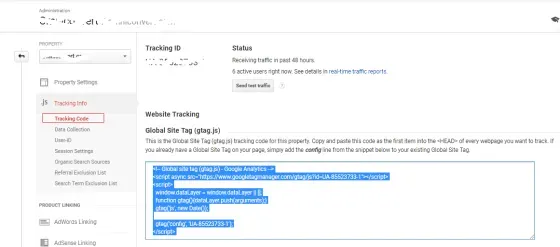
Copy your Universal Google Analytics (GA) script from Google Analytics
2.
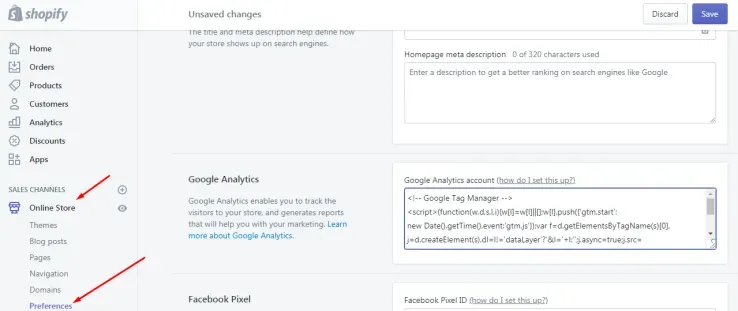
Paste your Google Analytics script into your Shopify Admin, then SAVE it
3.
Copy your Google Tag Manager snippet from your GTM admin

4.
(the workaround): paste the copied script in your Shopify Account > Sales Channels > Online Store > Google Analytics > Additional Google Analytics Javascript, so it looks like the below:
And that’s it. Now, you want to make sure that all the hard work you’ve done was worth it. To verify that your Google Tag Manager is properly installed, I recommend you to install Google Tag Assistant.
Install Google Tag Assistant
Google Tag Assistant is one of the top Chrome extensions for Google Tag Manager, a very useful tool in testing and debugging your implementation. All you need to do is:
1.
Install Google Tag Assistant in your browser (Google Chrome would be better).
2.
On a new tab open your Shopify store. Click the tag assistant icon and then the enable button.

3.
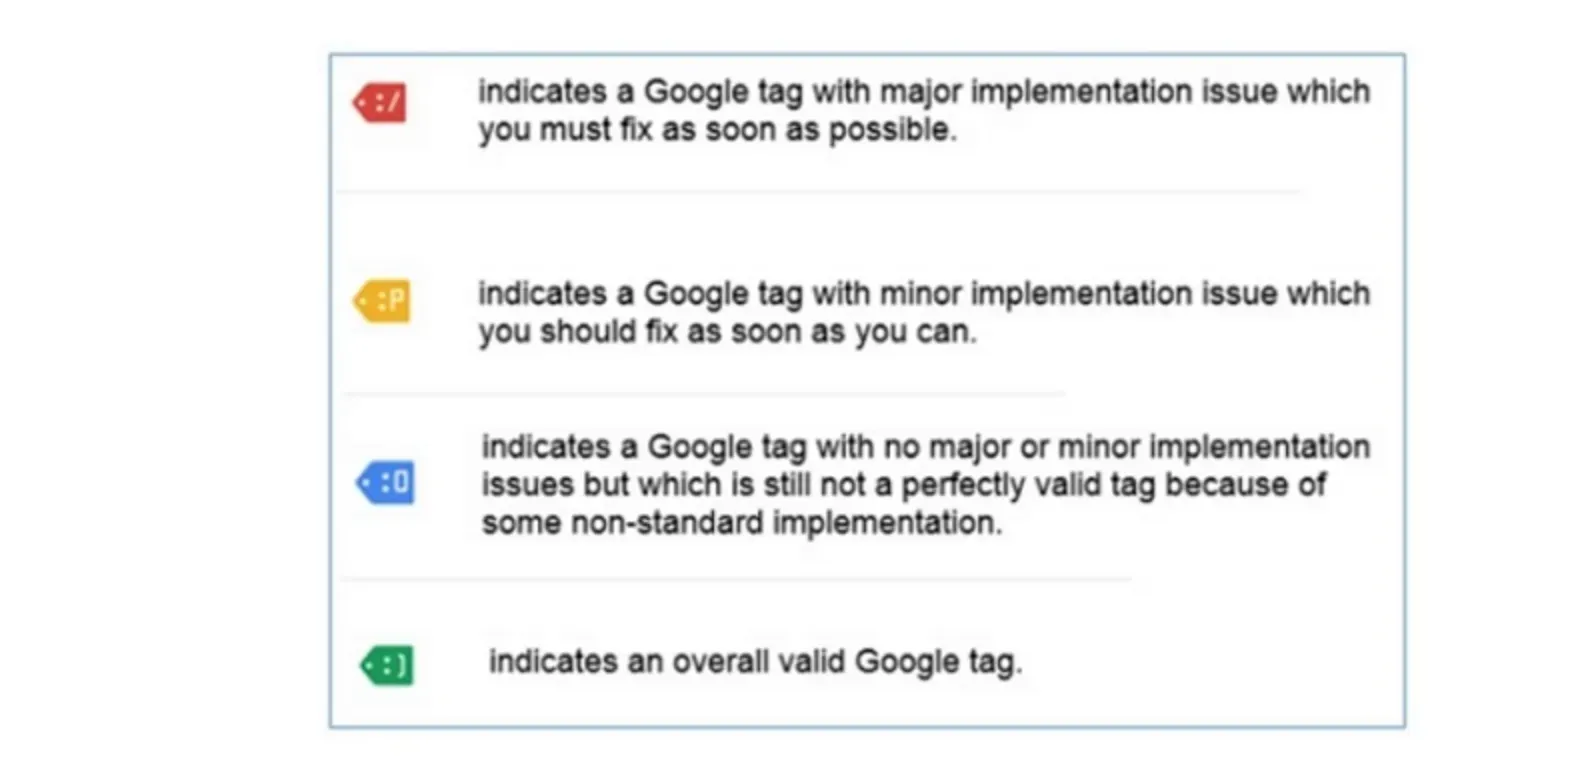
Reload the same page and click on the tag assistant icon. If you have yellow or red, there are problems with your installation.
What you should see is this:
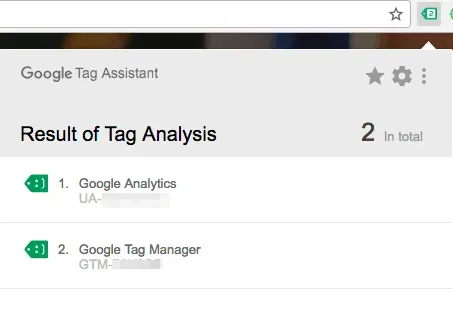
Once you’re all set with the implementation of Google Tag Manager, you’re job is half done. If you want to correlate sales data with website usage data like sessions, bounce rates, product impressions, product clicks, if you want to track checkout steps, you need access to Universal Analytics.
Setting up enhanced e-commerce tracking via Google Tag Manager
Getting your e-commerce data to report in Google Analytics can give you headaches, but it doesn’t have to be this way.
In most implementations, to do this, you should enable Enhanced E-commerce on each of your Universal Analytics pageview or event tags. You can do this:
- By using the Data Layer (Recommended)
- By using a Custom JavaScript Macro
Although both methods provide equivalent e-commerce functionality, a custom JavaScript Macro might require access to a developer or at least someone with some programming skills. So I recommend going with Data Layer instead because it’s automatically triggered once Google Tag Manager is installed and you’ve enabled your enhanced e-commerce tracking.
Before going further with enabling enhanced analytics, I want to give you some information about what a data layer is. Look at it as the context you give to Google Tag Manager.
Technically speaking, a data layer is a JavaScript object or variable that stores and sends information from your site to Google Tag Manager (later, that data is transferred to other tools, like Google Analytics). In other words – it’s like a virtual layer of your website which contains various data points (Get it?).

In order to understand everything that comes from all these data layers, you need to setup enhanced e-commerce tracking. To do this via GTM, for a Shopify store, you need to follow the next steps:
Setting up Universal Analytics
Shopify supports and recommends using Universal Analytics, which is the latest version of Google Analytics. It does everything that Classic Analytics can do, and provides more features. If you’re already running Classic Analytics, you can upgrade from your Online Store preferences in the Admin (Online Store > Preferences > Google Analytics)

Enabling Universal Analytics
1.
From the Google Analytics home page, click Sign in.
2.
Click Analytics in the drop-down menu.
3.
Choose the account you want to sign in with, or click Add account to sign in with a new Google account.
4.
On the next page, choose Website, not Mobile app, and fill in the form. Enter your primary domain for the Web Site URL. The checkboxes at the bottom are not relevant, so uncheck them all.
5.
Click Get Tracking ID at the bottom of the page to complete signup.
6.
Click I Accept to acknowledge that you have read the terms of service for your country. Use the drop-down to select your country if it is not already pre-selected.
7.
On the next page, you’ll see a lot of information and options. The only thing you need is the tracking ID code snippet that Google provides:
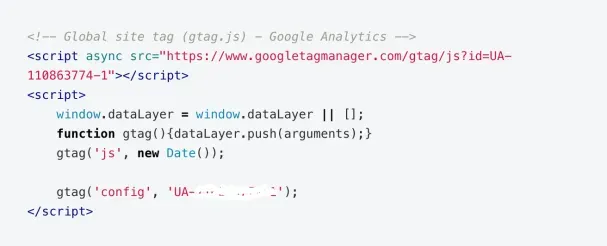
Copy the tracking ID code snippet to your clipboard by highlighting it and pressing ctrl+C on PC or command+C on Mac.
8.
Open your Shopify store Admin in a new browser window or tab.
9.
From your Shopify admin, go to Online Store > Preferences.
10.
Paste your tracking ID code snippet into the Google Analytics account field:

NB: Make sure you’ve removed password protection from your online store, otherwise Google Analytics won’t be able to track visitors.
Now, I know this has been a long article already, but bare with me here: you are only one step away from getting access to all that magic that will come from the data you will soon collect.
Enable ecommerce tracking
After you’ve enabled your Universal Analytics, the code is added automatically, but you must enable e-commerce tracking at the view level in Google Analytics, to make sure that e-commerce data is included in your reports. Here’s how to enable basic e-commerce tracking:
1.
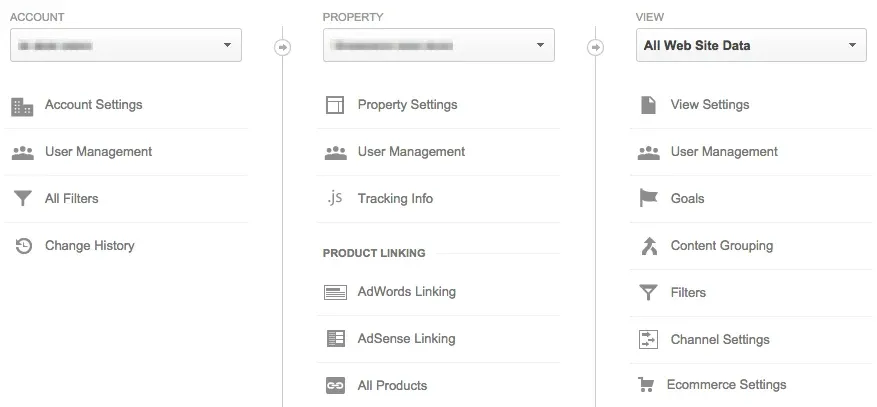
Click Admin in the Google Analytics menu bar.
2.
3.
Click E-commerce Settings.
4.
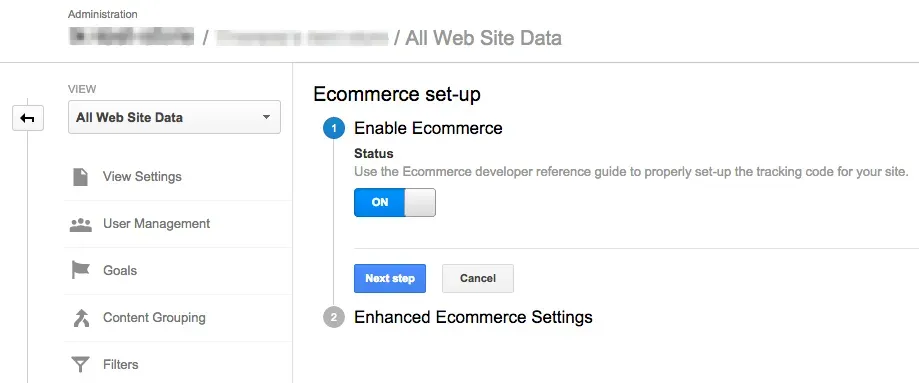
Enable Enhanced ecommerce tracking
As a marketer who’s constantly looking for more details about the customers, you might want to go even deeper and get more tracking information. To do this, you’ll have to go one step further and enable Enhanced E-commerce tracking.
1.
From your Shopify admin, go to Online Store > Preferences.
2.

3.

4.
Click Save.
5.
Sign in to your Google Analytics account if you have not done so already, and click Admin in the Google Analytics menu bar.
6.
Use the drop-down menus to select the Account, Property, and View that you want to track:
7.
Click E-commerce Settings.
8.
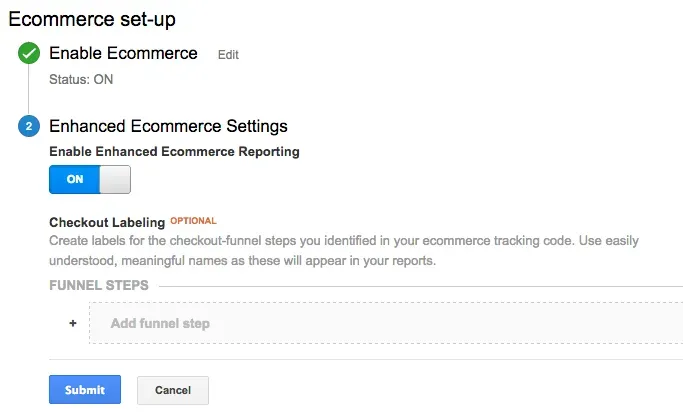
At Step 1 of the E-commerce setup, click the Enable E-commerce Status toggle to ON. If you want to generate Related Products data, click the Related Products Status to ON.
Click Next step.
Click the Enable Enhanced E-commerce Reporting toggle to ON:
9.
Click Submit to complete the setup.
Complete Shopify Google Tag Manager Set Up
I know that these are not simple processes, but think about them this way: once you set them up, you can use all that data that exists on your website at its full potential.
Google Tag Manager and its enhanced e-commerce tracking enables the measurement of user interactions with products on e-commerce websites across the user’s shopping experience, including: product impressions, product clicks, viewing product details, adding a product to a shopping cart, initiating the checkout process, transactions, and refund.
All this data will be of great help in your efforts of delivering persuasive and tailored messages for each segment of your audience.
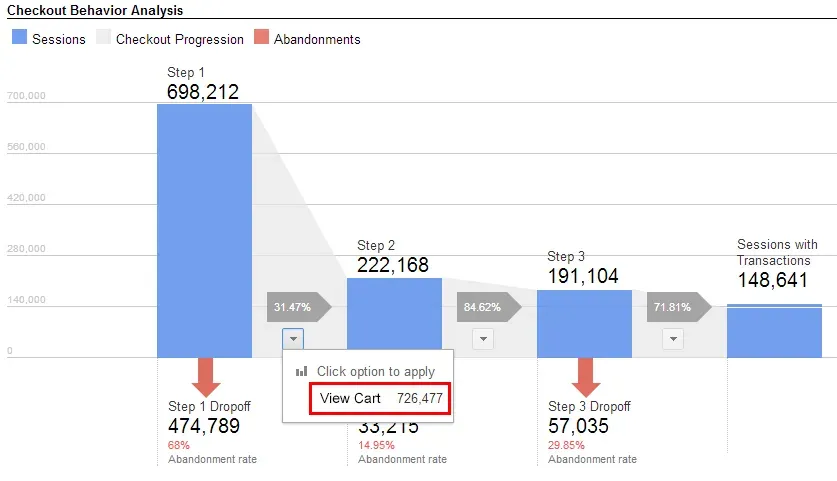
There are four categories of data you can collect via Google Tag Manager and Enhanced E-commerce Tracking:
- Impressions Measure product impressions by using the impression action and one or more impressionFieldObjects.
- Product Data on the individual products viewed, added to cart, and so on. Referred to as a productFieldObject.
- Promotion Measure a promotion impression, and referred to as a promoFieldobject that describes the promotions displayed to users on the page.
- Action Information about actions related specifically to e-commerce.
In cases where you have both product impressions and an action, it is possible to combine and measure them in a single hit.
This has been a long article, but trust me on this: Google Tag Manager is worth it. It allows you to lead your marketing operations on your own and generate statistics about your customers on every stage of your sales funnel.
Valentin Radu is a serial entrepreneur and visionary involved in tech and digital marketing for the past 12 years. He is the founder of Omniconvert, a growth enabler tool for mid-size eCommerce websites looking to become customer-centric. Omniconvert is a conversion rate optimization platform that combines the power of AB testing, web personalization, web surveys using an advanced segmentation engine.

Hi, I'm Giles Thomas.
Founder of AcquireConvert, the place where ecommerce entrepreneurs & marketers go to learn growth. I'm also the founder of Shopify agency Whole Design Studios.