Giles Thomas, Author at Acquire Convert - Page 17 of 21
Categories
Ecommerce UX

Ecommerce Product Images: Best Practices That Help You Sell More

This places extra emphasis on your ecommerce product images. Getting them right doesn’t just affect the appearance of your store; it will affect conversion rates and sales, and it also influences the amount of organic traffic you receive.

So how do you present your products in the best light to maximize sales? Below are some guidelines to creating images that look great and will appeal to the target audience on your ecommerce store.

These are ecommerce product image best practices that will show you how to:

  • Plan your images and the importance of sizing
  • Shoot your own images with professional lighting techniques
  • Use post-production techniques to get the most out of your images
  • Understand the different requirements for category and product pages
  • Use tools to make life easier
  • Optimize your images for SEO

So let’s get straight into all that…

Planning your images

Before we get into actually shooting your product images, you need to plan. But how can you do this until you know what’s needed with your images and where exactly they’re going to go?

Well, you can’t really. But you can start considering how your final images will create the most impact on your store. This will be explained in full in the rest of the article. It’s enough here to point out that you should have a clear idea on the following aspects of your images before you set out:

  • What is the best size for ecommerce product images
  • What’s the ideal file size to maintain good page load times?
  • What file types are best to use?
  • Which images are you going to provide for thumbnails?
  • What type of images do you need to optimize category pages and individual product pages?

image06 1

I’ll get into this in more detail later in the section on optimizing images, but for now get clear on the types of details you need to consider. You are probably aware that it’s not simply a case of picking up the camera and shooting, but you may be surprised how a lack of attention to the planning stage with images leaves you with a poor user experience later.

Creating your raw images

It will help greatly if you are able to shoot the ‘raw’ images in a way that presents each product in enough detail, in its best light, AND minimises the amount of post-production work necessary.

It takes time (and money) to fix up images later, so shooting them as close as possible to the desired end state makes sense.

If you are an amateur producing your own images, start with three important elements: choosing the right camera, getting the lighting right, and shooting in high enough resolution.

Camera and image quality

As this product photography guide points out, DSLR cameras will nearly always take better images than smartphone cameras – but there is no mistaking that the best smartphones are closing the gap.

image00 1

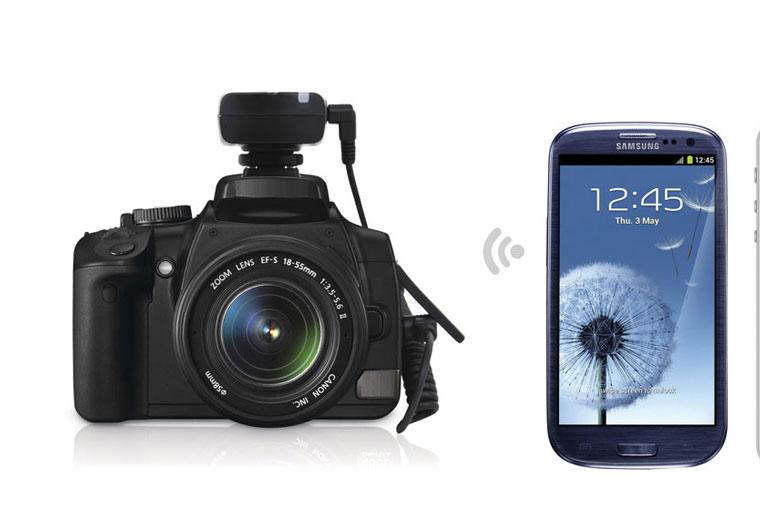
The important thing is to understand what your camera can and can’t do. You can compensate for most shortcomings in a good smartphone camera by setting your camera and photography session up correctly.

If you have a DSLR camera you’ve probably spent a bit of money on it, so make sure you get to know the basics about aperture, shutter speed, and ISO. Getting these elements right will give you the best chance of shooting near-perfect product images with the correct brightness, depth of field, and focus. Most product photography requires a slow shutter speed with a small aperture. Never use a flash!

With a smartphone, set your camera up free of filters, frames, zooms, and flash, as effects can be added later, if necessary. The beauty of these cameras is that practically anyone can take a decent shot, given the right setup, because you can just activate the auto focus feature by tapping the viewer before taking the shot. Most decent smartphone cameras can produce sharp, well-defined, high-quality product images.

Lighting and consistency

You may have guessed from the above that lighting is always critical. The most important elements of lighting to focus on are:

  • Is there enough natural light?
  • Is it consistent across your product images?

The first element can be solved by setting up your product-shooting session to the side of a window (the light should not face the camera or be behind it). It’s best to avoid using artificial lighting unless you are an experienced photographer and know what you’re doing; and generally keep away from outside shots, as powerful sunlight may make consistency more difficult.

This brings us to the second element. Keep your lighting consistent across your products. Your customers will be expecting a consistent appearance for your products so that they can compare like for like, side by side. It’s easier to arrange this while shooting the raw image than fixing it up later in post-production. Be aware that the strength of natural light can change in a room very quickly – so don’t delay too long in taking your pictures.

Show detail and the full product range

The Shopify blog has some great tips on shooting high-quality images and especially on this topic.

Making sure that your images carry enough detail means shooting in high enough resolution to be able to show close ups of your product. Especially with items like clothing and jewellery, people expect to be able to see it up close, so you will need to provide the option of zooming in on the details.

image11

People expect to see images of everything that’s mentioned in a tag line or key product feature. If there are three diamonds on that ring, make sure that your customers can see all three diamonds from as many different angles as possible. Show the back of the shoe as well as the front…

image03

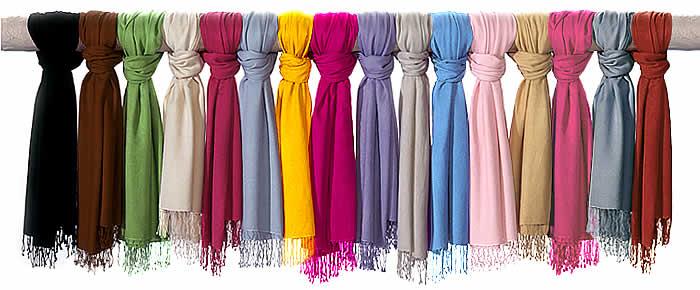
Additionally, don’t leave too much up to  people’s imagination. Shoot a range of colors and sizes with your products – people may have trouble visualizing their particular size or color: your images are a good way of showing them exactly what they can expect.

image04

I’ll finish this section with a few other quick technical tips below that will help you achieve the right quality and consistency in your store’s product images:

  • Use the same plain white background for all products – no distractions!
  • Steady your camera with a tripod or smartphone mount to ensure sharpness of image
  • Use a reflector to avoid shadows on your product

The above will help ensure that you shoot raw images that are sharp and attractive enough to sell the product benefits – which is, after all, what you are looking to achieve. But that’s only the first part of the work. Next, they need to be edited…

Post-production image tips

Nobody is going to shoot website-ready images all the time –  even the professionals. But, with the array of post-production tools now available to image editors, there is less of a need to.

Much can be done after the event and you can use these tools to adjust your work and create the best user experience in your store.

There are several notable areas to pay attention to here.

Consistency, consistency, consistency

Again, the most important thing is to maintain quality and consistency. Maintaining high quality is a given, but you are also looking for consistency of size, look, feel, format, page loading – pretty much everything. It looks more professional and will add an edge to your store that can set it apart from others.

Consistency and impact can be achieved through many of the editing tools I mention below.

Photoshop ‘actions’

Much of your image editing will be done using Adobe Photoshop, as this is still the industry standard program for post-production. There are many inbuilt tools you can use to apply automated ‘actions’ that rapidly bring consistency to your images. You can apply a specific set of filters to images, such as curves, colour-grading etc. Simply drop all images onto a particular action and lessen the amount of post-production work needed to achieve consistency.
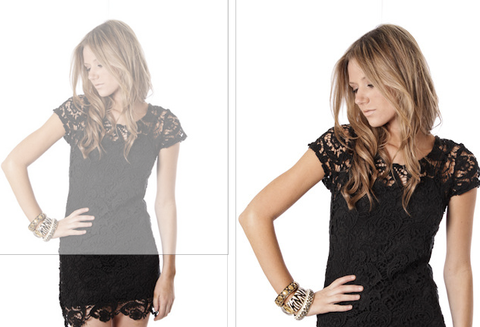
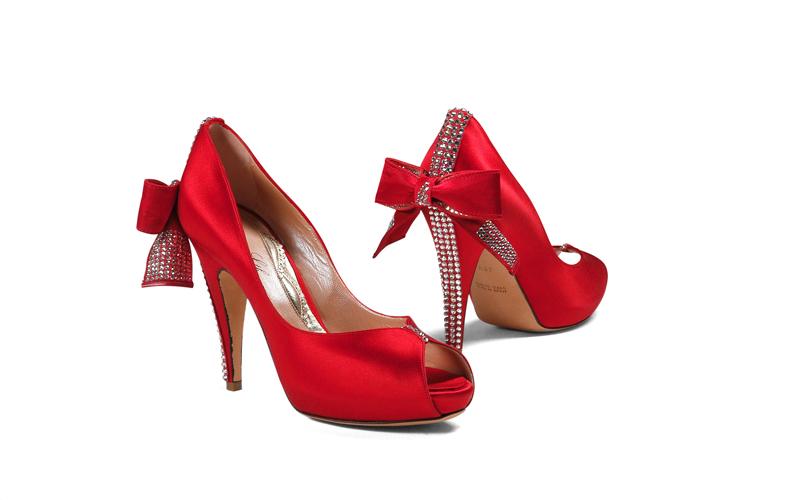
Adding shadows

Simple touches to existing photos can add a professional edge to the product images on your site. Adding shadow is a great example of an effect that is easy to add in Photoshop and which subtly elevates the appearance of your products.

Note that I am talking about shadows created by a product on its white background – which adds depth to the product – NOT about shadows on the products themselves, which are often a nuisance and obscure detail. You can find more about this subject here but, meanwhile, see what adding shadows does for this pair of red shoes…

image01 1

Photoshop Lightroom

One of Adobe’s best tools is Lightroom, which can be used to touch up image lighting. It uses templates to help you maintain that all-important consistency, and the tool can also help you to touch up colors and add vibrancy to dull-looking images.

Remove unwanted backgrounds with Pixc

A great tool for removing unwanted backgrounds is Pixc. You can edit the image yourself or send it to them to do. This can help you achieve the perfect white background that will make your images stand out. Remember that unwanted distractions may reduce the impact of your images and other colors may clash with your product colors. The tool also allows you to crop and resize all your images so the products area sized correctly and sit in a uniform line. Play safe with white and your professional, clean-looking images will help you sell.

image08 1

Outsource repetitive tasks

Many of the post-production tasks for getting your images into shape are repetitive and time-consuming. There are talented contractors out there who can probably do it quicker and more effectively than you, so why not outsource these tasks to them, using Upwork or a similar freelancer site.

Make sure that you have your Standard Operating Procedures (SOPs) clearly outlined and you prepare detailed briefs so that your contractors have clear guidelines of what’s expected.

Optimizing your images

As you are editing, consider the basic optimization requirements of your images. There are some differences between optimizing images for category pages and for single product pages. These are detailed in the next section with specific examples, but for now, consider some general factors below:

How big should your images be?

If you are using Photoshop, develop a product image template by creating a blank file and resizing it to the required dimensions. This will help you maintain consistent image sizes. There is more about the need for this below but a good starting point for a template size to use across your store is between 1200px and 1600px on its longest side. Remember you want enough detail for customers to be able to zoom.

image07

How can you reduce page load times?

A key consideration here is reducing the file size of images to keep page-load times to a minimum. Nothing ruins a user experience quite like a slow-loading page. In fact, 47% of users expect a webpage to load in under 2 seconds, and 40% will abandon a page that takes more than 3 seconds to load.

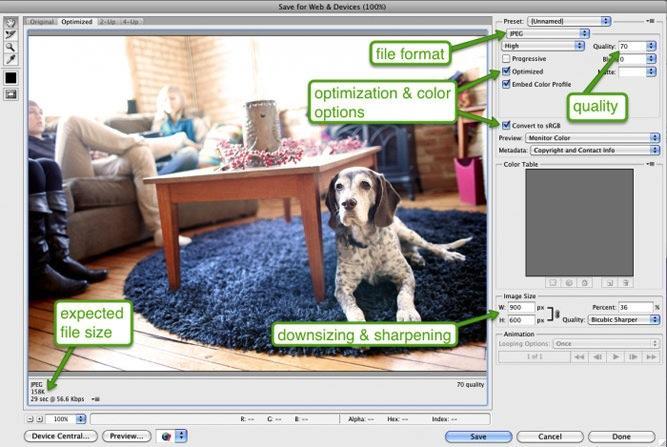
So it’s vital that you avoid large file size images, which naturally take longer to load. A general rule would be to AIM for image file sizes below 70 Kb. Fortunately, these days it’s possible to reduce your filesize without a significant loss in image quality by using Photoshop’s ‘Save For Web’ tool, as depicted here:

image02

More information on page load times can be found on my vlog.

What file types should you use?

You will be working with either JPEGs, GIFs, or PNGs. The Shopify blog has an excellent rundown on the major qualities of these three image filetypes.

  • JPEGs – standard internet image files, due to the ease of compressing
  • GIFs – lower quality images often used for icons and simpler images
  • PNGs – often good alternatives to GIFs, supporting more colors, with no degeneration after repeated saving (unlike JPEGs) but tend to be large file sizes.

Generally speaking, JPEGs will be your focus, as they support higher quality at smaller file sizes.

Thumbnail requirements

Most ecommerce stores should employ thumbnails as a quick visual product reference for their customers but beware of their impact on page load times. Make sure they do not hold up pages from loading. If you are using Shopify, then your thumbnails will be automatically optimized, but still try to keep file sizes down.

Use the right names and alt tags

Name your images more descriptively than the messy name that your camera will give to them. It’s much better to name an image 2016-red-polo-short.jpg than DCMIMAGE10656.jpg, for instance.

Alt tags are what customers see when they hover their mouse over a product image, so make it descriptive and accurate. Using your keywords in the alt tag for that product will also help your SEO efforts, as images show up in Google image search. Make sure that you choose different alt tags for your thumbnails and your main images so that your main images are the ones indexed and that appear in the search results. More about SEO below.

image05 1

Optimizing category pages vs. single product pages

Here we need to understand that image requirements on category pages are different to those on individual product pages.

Category pages

The most important element here is, once again, consistency of size. Blue Acorn A/B tested their product category pages and found that the page with consistently sized images converted with 17 percent higher revenue than the page with different-sized images.

Secondly, it’s important to get the number of images per grid right. Here, like with many areas of your ecommerce store, you need to have two approaches – one for desktop and one for mobile.

For desktop, it’s best to have three large images per row, while for mobile there should only be one per row, making sure that its height does not exceed smartphone screen height. Also, for ease of use on a smartphone, include a swipeable carousel of images on the category page, as this will help users scan through the images a lot quicker, without first having to go through to the product page.
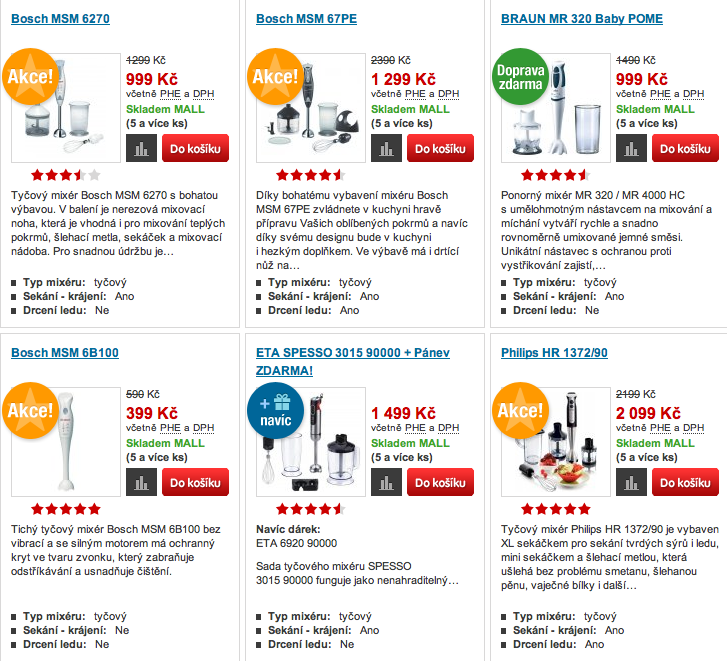
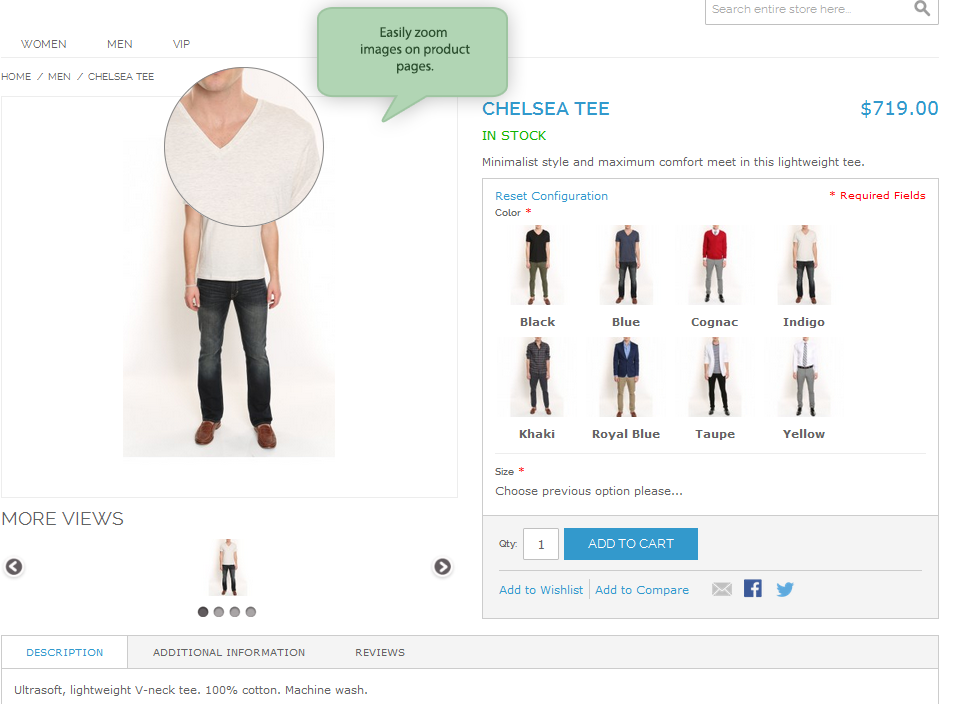
image12 1

Product pages

When your customer clicks through to the individual product page, there should be an image of the product taking up around two-thirds of the width of the page on desktops; on mobile, it should take up practically the whole screen.

Here you need larger images, with a zoom feature that allows customers to really see the details of your products down to the bone. You should also provide them with a 360-degree view of the product, so the user will feel like it’s almost there in front of them.

There should be multiple images of the product from multiple angles and make sure that there is an image for every color or product variation you have. As mentioned earlier, don’t expect people to be able to visualize too much.

Another important element of your product pages is contextual images. These are images of your product being used in real life and they are VERY important, especially for items like clothing, jewellery, accessories, or furniture. Show the ring being worn, the scarf being used on a cold winter’s day, or the couch looking beautiful in the apartment. But first, consider who your target market persona is. If, for example, your target market is 30-something white Caucasian females, then create images with these people using the product. The customer will then relate more to the product.

image09 1

Other benefits of a smart product image strategy

There are many advantages of getting your product image strategy right – but there are two benefits I have not really discussed yet.

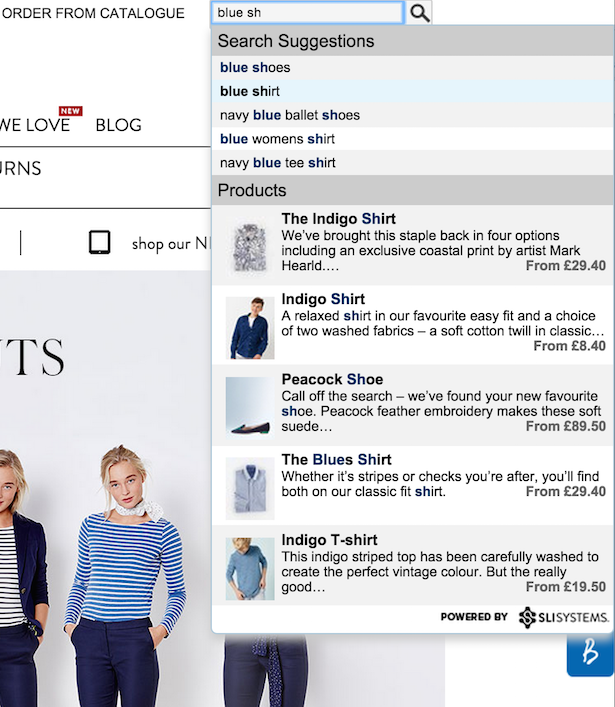
Firstly, using images in your site search can help sell your products. When customers search for products and you are able to return images as well as text, they are FAR more likely to click through to the product page. You can easily see why here:

image13

The right product images also aid your SEO. I have already covered naming and alt tagging your image in the optimization section, but you can further improve SEO by creating an image sitemap to help the search engines recognise your images. This is especially useful when you have a lot of images on your site. Web crawlers are not able to find images that are not in the source code for the page, so detailing where and what they are is very helpful.

image10 1

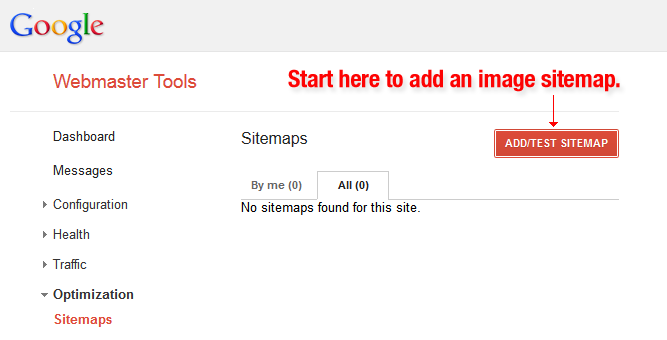
Google’s image publication guidelines can be found here. Image sitemaps are an added optimization technique that most sites miss and which can give you the edge over the competition.

Final thoughts about ecommerce product images

Images have the potential to elevate the look and feel of your store and to act as an important sales tool. All the tools you need to make this happen are readily available and I have tried to include the most important tips and techniques above.

The best part is that you can do all (or most of it) yourself. As mentioned, some of it can be time-consuming, but it’s not difficult or expensive to hire talented freelancers if you don’t have the time yourself.

Now you have reached the end of the article it’s time to go back to the start again: planning is the key. You should have all the information you need to plan a product image strategy that sets your store apart from your competitors.

Categories
Email Marketing

5 Steps To Optimize Your Double Opt-In Email (For Ecommerce)

For example, customers of Klaviyo, a Shopify tailored email service provider, make at least $75 for every dollar they spend on email marketing, not too shabby ey?

When you ask most ecommerce entrepreneurs and marketers what their email acquisition strategies are for double opt-in emails you get blank faces.

With all the money spent on traffic and list building, you’d think people would be considering their double opt-in conversion funnel…

…You’d be wrong.

And don’t worry if you fall into the same boat, you’re not alone.

It seems ecommerce marketers far and wide have overlooked what could be the most valuable optimization process in their business.

But fear not, with this guide you can learn the ins and out of opt-ins (and how to optimize against opt-outs).

And get more of your sign ups to confirm their email and drive traffic and sales to your store.

In this in-depth guide to double opt-in email optimization you’ll learn about:

    • Double opt-in vs single opt-in
        • What is a single opt-in email?
      • What is a double opt-in email?
  • Double opt-in email best practices & optimization
      • Email opt-in form best practices
      • ‘Almost Finished’ page secrets
      • Confirmation email template examples & optimization
      • Thank you page analytics
    • Opt-out page optimization

Let’s get started.

Double opt-in vs single opt-in

When it comes to collecting email addresses from your customers, you have to decide whether or not you want to confirm their email address.

Their are pros and cons to both approaches, let’s find out what each approach entails and for beginners answer the question: “What does double opt-in mean?”

What is a single opt-in email?

sign-up-confirmed

Single opt-in definition: Single opt-in is when a user submits their email address through your form. They are then automatically added to your email list. They do not have to confirm validate their email in any way.

Pros

    • People get on your list fast.
    • You don’t miss out on people that do not confirm their email address.
  • Conversion rates from visitor to lead can be higher because of these reasons.

Cons

    • You will likely get a lot of fake or spam emails.
    • If your offering content in exchange for their email you will definitely get many people abusing the system by using fake email addresses to access the content.
  • According to Mailchimp you’re better off with double opt-in in terms of open rates and click through rates, this is huge.

What is a double opt-in email?

confirmationlink-1

Double opt-in definition: A double opt-in email is when the user submits their email to your list and is then required to confirm their email. This means when they subscribe to your newsletter they then receive an email with a confirmation link they must click to confirm the validity of their email address. Only after they click the link and visit the confirmation page in the browser are they added to your list.

Pros

    • You generally get better engagement in the form of higher open rates and click through rates with double opt-in
    • You are protected from spammers and fake email addresses that cost you email service provider fees and dilute the quality and per lead value of your list
  • Your conversion rates from list subscriber to customer will likely be higher as the user has shown a real interest in your business

Cons

    • You risk losing a lot of subscribers that don’t double opt-in
  • You risk losing sales by collecting less emails

The truth is, for some businesses single opt-in does work better, I’ve seen the numbers.

So you could A/B test it for yourself, but I’d go with double opt-in every time.

Why create yourself an extra job of weeding out fake emails and getting rid of people from your list that just really aren’t that interested. Plus you’re paying for them every month to Klaviyo or whoever!

The most important thing to A/B test would be the cost of the list monthly from your email service provider vs the profit it generates.

Open rates and click through rates are fine for indicators of engagement.

But I prefer to look at dollars in my account in wages and dividends when it comes to measuring success.

Double opt-in email best practices

There are a surprisingly large number of mistakes you can make in double opt-in email marketing.

In this next section you’ll learn best practices for optimizing your double opt-in email funnel and we’ll look at some double opt-in email examples from clients I’ve helped with optimization.

The first and best lesson to take away from this article is to think about your double opt-in as a sales funnel.

If you think about each step in the user journey like a step in a sales funnel, you can then learn where the biggest drop offs are and optimize them.

The key to this is tracking, you need to set up a Google Analytics goal and funnel visualization so you can understand the numbers.

You can also use tools like Hotjar or Kissmetrics for this purpose.

The main steps in the double email opt-in sales funnel are:

    1. Opt-in form submission
    1. Nearly there page
    1. Confirmation email
    1. Thank you page
  1. Unsubscribe page

Now let’s look at the first step in our double opt-in funnel. The opt-in form.

Step 1: Email signup form best practices

I’ve written at length before about form optimization, and let me tell you, there are a lot more moving parts than you would think.

In this article you’ll look at one specific form example and how you can improve it.

6

Here we have a classic opt-in form with one form field for email.

The question you should ask yourself is:

Should I ask for the visitors name as well as email address? Or any other information for that matter?

The truth is it depends, the only way to truly know this is to test it. And it really depends on your business.

What it comes down to is something called lead quality.

What is lead quality?

Lead quality determines how profitable a lead is to your business.

Say you removed the name field, conversions increased and you collected more emails, you’d be happy right?

Wrong.

What if those emails are worth much less in revenue and profit to your business than emails you collect from a longer form where you ask for more lead information.

For example as a service business you could test asking for a phone number and email address.

You could then end up closing twice as many sales and making twice as much profits from the same number of leads because you had a direct contact or multiple contact methods.

This is because the leads are often more qualified and show more intent to spend money with you by completing a longer form.

But as in all things CRO, there is no hard and fast rule. So test it.

Email opt-in form design and development

So as we learned, your form design will depend on the lead information you need for your business.

The more information you ask for, the lower your conversion rates will be (most of the time) but the higher the lead quality (in theory).

The lead is showing more intent to buy by going through a longer opt-in process and you have more contact information to keep getting in touch with them.

Remember, 80% of sales are made on the fifth to twelfth contact so having more ways to contact a lead aint a bad thing.

The classic design is to simply ask for name and email or just email as an in-line form or pop up, but now you have an array of tools and choices of how to get visitors to opt-in to your ecommerce email marketing newsletter.

Incentivizing email opt-ins

The first thing to strategize before choosing your design is how you will incentivize people to give you their email address.

You and I know well, that getting hundreds of newsletters in your inbox each week isn’t fun, so convincing someone to opt-in to receive more isn’t easy.

Historically in ecommerce people would offer a lead magnet.

14

This is typically a discount of your first order.

If you’re still doing this:

15

You’re in serious trouble. I wouldn’t be surprised if your email opt-ins were converting at 0.01%.

Best practices in 2016 for email opt-in design suggests you use three main strategies to collect email leads from your ecommerce traffic.

Strategy 1: Discounts

As I mentioned, many people offer first time buyer discounts.

There are some cases when this works well, but for premium products that don’t want to constantly be discounting in the future it can be very dangerous and should be avoided.

Strategy 2: The Content Upgrade

The content upgrade is where you ditch the generic email opt-in and use page specific opt-ins.

Unique giveaways on each page that are related to the context of the page and also the keyword that page ranks for.

The main two locations to use the content upgrade are on blog posts and on your product pages.

Product pages

image28

For example if you were a wine retailer online, rather than have a pop up that offers discounts or a generic opt-in you could offer wine content to your visitors in exchange for their email address.

Depending on the wine and keyword you could prepare videos with wine pairings, teach people about wine tasting or even tour them around the vineyards the wine came from in videos or image galleries.

Because you are aligning the search intent of the visitor and the email opt-in offer your conversion rate to lead generally go from around 0[d].5% to closer to 5%.

If you wanted a Malbec, landed on this page, and were offered a discount, you might be compelled to opt-in.

But if you were offered a video that explained the difference between a blended Malbec Mendoza and a Malbec or food pairings for this Malbec. You’d be much more compelled to opt-in.

Ecommerce blog opt-in optimization

The same content upgrade approach can be used on your ecommerce blogs.

But, again, so many ecommerce brands fail to monetize their content marketing efforts well.

In this blog post Alima Pure talks about what makeup to take on the road in summer.

But they don’t have any email opt-in on the page at all.

All that money and time spent to create content, positioned at a specific keyword and they let the visitors bounce and leave.

They could offer a summer lookbook with make up recommendations per outfit, a video of how to apply makeup when on a road trip. The content upgrade idea list goes on.

The lesson here is to incentivize the opt-in and use a content upgrade, page specific opt-in offers which are tied to the search intent of the pages keyword and the context of the page.

This has 10x some of my clients visitors to lead conversion rates in the past, that’s ten times as many leads to monetize with your email newsletter.

How much more a year would you be making with 10x as many sales from email?

Strategy 3: Loyalty Programs

The third common strategy is loyalty programs. You can offer people to join the loyalty program in the pop up.

How to structure a loyalty program really depends on a ton of variables from you business.

So I’ll write a post separate post about it rather than discuss it at length here.

Commonly loyalty software rewards customers for actions such as:

    • Page views
    • Social shares
    • Referrals
    • Reviews
  • Hashtag use

Customer can then redeem those points in the form of cash off their orders.

Form design checklist

As I mentioned I won’t go into length about the form design as I already wrote 10k words on it, but I will give you a short checklist to make sure you’re getting the basics right (you can always use a lead capture tool for this):

Use real labels not placeholders as labels

placeholder

Use the placeholder as intended, as an example entry

free-trial

Make sure form validation is on page and inline

form-validation

deviantart-errors

Make sure validation is in real time

Include a disclaimer message to reassure privacy

join-1

Use timing words

image342

Test personalized call to action buttons

wiebe-control-2 wiebe-treatment-b-2

Step 2: How to optimize your ‘Nearly There’ page

When it comes to the double opt-in confirm subscription page, the truth is most people end up with this:

10

There are so many things wrong with this approach it makes my head spin.

Here is a great example of how to do it right for my client Haute Hijab.

step-01

Here you can see that the confirmation message in onsite, not on the email service provider’s server, but on a webpage in your store.

Next you’ll notice we added the personal brand image of Haute Hijab, Melanie the founder, to humanise the process, like she is asking you to complete the confirmation.

We’ve added a timer to create urgency to complete the confirmation immediately.

The UX of the process is clearly explain to the user in a step by step flow.

They know what they’ve done and what is left to do.

Here you could also test showing the image of the email and the link that should be clicked.

7

You could even add a value proposition to the header of the page and convince the user why to confirm, tie this to your incentive or content upgrade.

9

You can also give instructions on what to do if the email cannot be found or your confirm subscription emails doesn’t turn up.

Although if you have high traffic, expect customer service work to come from this.

Step 3: Optimizing the confirmation email

Email design

Most people have a confirmation email that looks something like this:

4

For Haute Hijab we created one that was more on brand and had a clear call to action.

1200 grid for designers and developers

The blue call to action is made more prominent by the surrounding darker border.

We also continued the personal brand of Melanie through into the email.

You could test tieing the value proposition of the incentivized opt-in back into the copy and call to action here as well.

For example:

If the form design offer a discount the header could read, “Claim your discount” and the call to action, “Subscribe and claim my discount”.

Another opt-in email example would be in a plain text format.

8

For some brands or personal brands this converts higher as it feels more authentic and for some people like it was really sent by the person to them personally.

Subject line

The subject line of the email is also important.

Some brands are aggressive and offer warnings or write things like “URGENT”.

neel_image02-05

However you fear this might hurt your brand equity, the number above show it does increase open rates.

neel_blog01-01

Mailchimp suggests that using the first and last name of the soon to be subscriber can affect the open rate the most.

So I would advise to pair time sensitive language with personalization for a winning recipe.

Urgent: <<first name>> <<last name>>, confirmation needed.

However avoid capitalization of copy as it makes little difference to the open rates and looks spammy.

neel_blog01-10

Step 4: Thank You Page Optimization

The thank you page is a bit trickier to optimize, as it really depends on the purpose of it.

So you may need to have multiple version of the page depending on the source of the lead.

1200 grid for designers and developers

In this example we carry the design through from the confirm subscription or ‘nearly there’ page.

The step by step has progressed and the user is now asked to whitelist their email.

Now at this point you’ve already got them double opted-in and on your list.

Therefore I don’t think it is detrimental to the UX to then ask them to whitelist your email, to make sure your email don’t end up in their ‘updates’ tab or spam folder in Gmail (or whatever other email client you use if you’re living in the past)

In our example we then dynamically pull in the content upgrade content below the fold.

You can also choose to make the email more focused on the content upgrade as in the below example. And mention white listing below the fold. This seems to be more fair to the user, who really at this point just wants their content.

11

Some people also ask for social sharing at this stage, I’ve never seen this bring much of a result so I’d focused on white listing the email instead.

Step 5: Optimizing for fewer unsubscribes

When it comes to conversion optimization you should always be looking for hidden wins and profit.

And optimizing the unsubscribe page is definitely an easy win that is normally overlooked.

12

Firstly, when someone clicks on an unsubscribe link in your emails, give them the option to simply change their subscription preferences.

That is not to say make it hard for them to unsubscribe, but simply offer them with compelling alternatives.

For example:

“I want to receive emails:

    1. Once per week
    1. Every two weeks
  1. Once per month”

This should reduce the unsubscribe rate.

Next for the people hell bent on leaving the list at least try to capture some qualitative data around why they want to do.

That way in future you can optimize those parts of the business or email marketing to cause less people to want to unsubscribe.

Try to customize the questions to your audience specifically.

13

More emails = more cash (mostly)

Most people overlook the need to optimize their double opt-in.

As you’ve learned in this detailed guide there are many opportunities to fine tune your sequence and get more emails and most important more email revenues if done right.

I’ll be following this post up with a couple of case study examples in the coming month or two so stay tuned.