Don’t double up with Google Analytics!
It’s important before you start to make sure that you don’t already have Google Analytics installed in your Shopify store. If it’s installed twice, you’ll get inaccurate data — and that’s pretty useless.
To check whether Google Analytics is installed in your store , follow these steps:
-
- From your Shopify admin, click Settings > Apps and sales channels.
- From the Apps and sales channels page, click Online store.
- Click Open sales channel.
- Click Preferences.
- In the Google Analytics section, the box should say only Paste your code from Google here. If you see this, continue to the next step. If, instead you see a code beginning with UA, you have Google Analytics enabled already.
- Click Themes.
- Click Actions > Edit code.
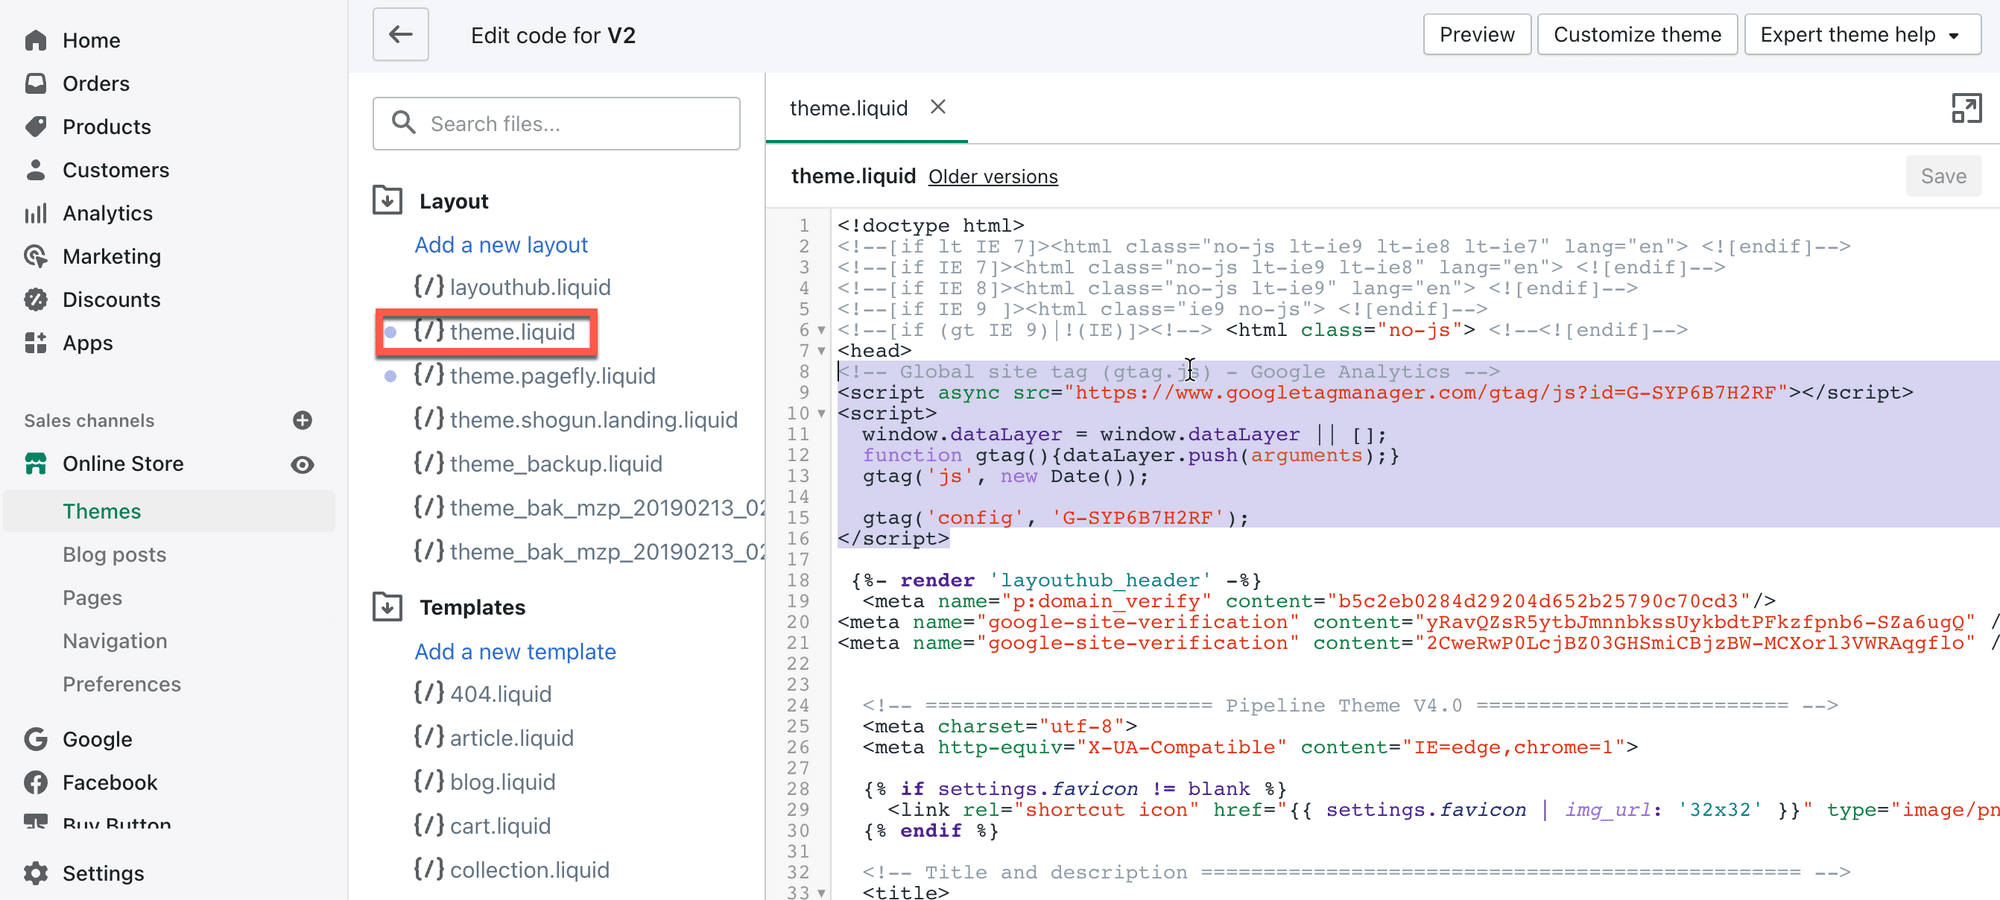
- In the Layout section, click {/} theme.liquid.
- In the theme.liquid file, look for any of the following Google Analytics tracking tags: ga.js, dc.js, gtag.js, or analytics.js. If you see any of these tags, you have Google Analytics enabled already.
Let’s assume you don’t have Google Analytics installed already and are starting from scratch…
If you don’t have Google Analytics set up already…
Step 1: Create a Google Account
To use Google Analytics, the first step is to create a Google account
If you use Gmail or Google Ads, you have a Google account already and can run Google Analytics from the same account. This will apply to most readers so just skip to Step 2 if that applies to you.
Otherwise, you can create a Google account here. Don’t worry if you never intend to use the Gmail account that comes with it. Just use it to sign in and out of Google Analytics.
Then you need to set up a Google Analytics account and continue to Step 2.
Step 2: Enable Google Analytics
To enable Google Analytics, you’ll need to create a Universal Analytics property in Google and add it to your Shopify store.
To do that, follow these steps:
- Sign in to Google Analytics from any web browser
- Click Admin.
- In the Account column, select the correct account.
- In the Property column, click Create Property.
- Enter a name for the property.
- Select Create a Universal Analytics property only.
Google automatically creates Google Analytics 4 properties that are incompatible with Shopify. Make sure that you create a Universal Analytics property as follows:
- Click Next.
- Select the appropriate settings.
- Click Create.
- Copy the Universal Analytics property to your clipboard by highlighting it and pressing ctrl+C on PC or command+C on Mac.
GA4 is not automatically created by Google all the time. It is available for a new account but for old accounts, we need to create it manually.
- In Admin, look at the Account column to make sure that you’ve selected the right account. Then, in the Property column, click Create Property.
- Select the appropriate settings.
- Click Create.
- Copy the Universal Analytics property to your clipboard by highlighting it and pressing ctrl+C on PC or command+C on Mac.
- In a new browser tab, open your Shopify admin.
- Go to Online store > Preferences.
- In the Google Analytics section, paste your Universal Analytics property in the Google Analytics account field.
Step 3: Turn on ecommerce tracking
Google Analytics 4’s ecommerce tracking works on two levels:
- Basic ecommerce tracking: for transaction and revenue data only
- Enhanced ecommerce tracking: for additional data on visitor behavior
You’ll need enhanced ecommerce tracking enabled and, to do that, follow these steps:
- From your Shopify admin, click Settings > Apps and sales channels.
- From the Apps and sales channels page, click Online store.
- Click Open sales channel.
- Click Preferences.
- In the Google Analytics section, check Use Enhanced Ecommerce. Users with a previous version of GA might need to click Upgrade to the latest version before this option appears.
- Click Save to enable Shopify to track and send your website data to Google Analytics.
- In your Google Analytics account, click Admin.
- In the View column, click Ecommerce Settings.
- Click the Enable Enhanced Ecommerce Reporting toggle to turn it from OFF to ON.
- Click Save.
You can customize your Google Analytics 4 setup by adding Javascript code to the Additional Google Analytics Javascript section.
-
- From your Shopify Settings, click Checkout
- From the Checkout page, click Additional script
- Add the cusromized code as per the Information you are looking for
If you already have a Google Analytics set up…
The following steps apply for installing Google Analytics 4 on Shopify if you already have a Google Analytics account.
Step 1: Create your tracking ID
To create your tracking ID in Google Analytics, follow these steps:
- Log into your Google Analytics account.
- Click on the Admin section of the left-hand menu.
- From the Property section, select Data Streams.
- Click on Add Stream to create a new stream for your Shopify store.
- Select either iOS app, Android app or Web from the dropdown menu.
- For Web, provide the URL of your Shopify store and click Create stream.
- The stream detail will appear.
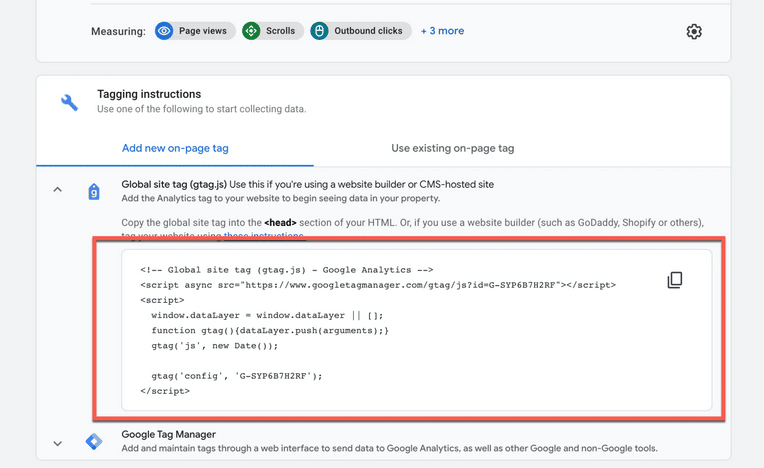
- Under Tagging Instructions, select Add new on-page tag.
- Click on the Global site tag option and copy the code that appears.
Step 2: Implement tracking in your store
- Log into your Shopify account.
- Click on Online store from the left-hand menu.
- Select Themes from the available options.
- Click on Actions on the right-hand side.
- Select Edit code from the dropdown options.
- Paste the code that you retrieved in Step 1 above in the <head> section of the code box.
- Click on Save and preview your Shopify store.
How to validate data in Google Analytics real-time reports
With Google Analytics 4 set up, you can generate many useful reports that help you to analyze performance in your Shopify store.
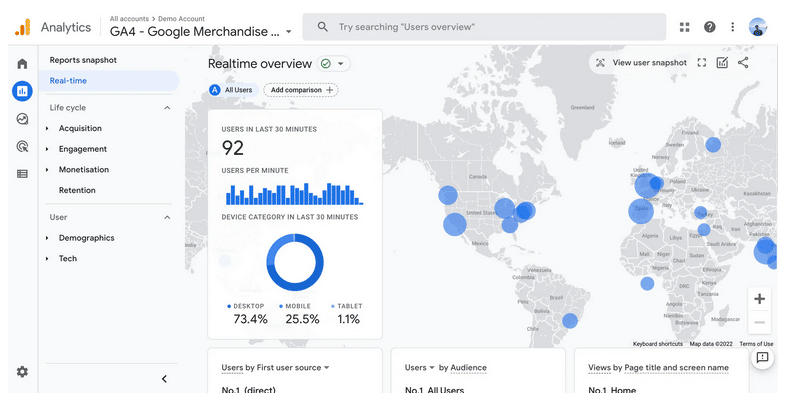
To validate data in Google Analytics 4 real-time reports, follow these steps:
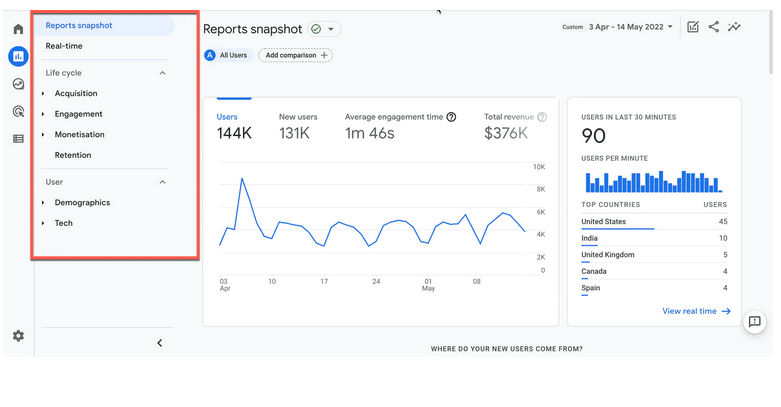
- Login to your Google Analytics account and click on Reports below the Home button.
- Click on Realtime.
- You can view the number of real-time users and what type of devices they’re using.
- You can also view the user data by events, page title and audiences.
Other advanced reports available in Google Analytics 4 include acquisition reports, engagement reports, ecommerce purchases reports, attribution reports, and more.
Important update on Google Analytics from Google
Google recently posted this important update:
“On July 1, 2023, standard Universal Analytics properties will no longer process data. You’ll be able to see your Universal Analytics reports for a period of time after July 1, 2023. However, new data will only flow into Google Analytics 4 properties…”
So, it’s more important than ever to install and start using Google Analytics 4.
Go forth and analyze…
Whether you already have a Google Analytics account or not for your Shopify store, you’re now all set to start using the latest version of this irreplaceable analytics tool and gather important insights on how your store is performing.
You don’t need to be a data analytics expert to identify how you can increase sales and revenue in your Shopify store. By analyzing the detailed data reports, you can make the improvements that help your store grow.
