Ghost Mannequin Clothing Photography (2026)
Ghost mannequin clothing photography is one of the most practical ways to make apparel look structured, consistent, and ready for ecommerce. If you sell fashion on Shopify or any other online store platform, it helps shoppers see fit, shape, and details without the distraction of a visible model. That matters on collection pages, product pages, ads, and marketplaces where clean presentation can improve perceived product quality. This guide walks you through the full process, from setup and styling to shooting and editing, so you can decide whether to do it in-house or outsource it. If you are comparing other apparel image styles too, our guide to photography fashion model approaches can help you choose the right format for your catalog.
Contents
What ghost mannequin photography is
Ghost mannequin clothing photography is a product photography method where you photograph a garment on a mannequin, then remove the mannequin in editing so the clothing appears naturally shaped but hollow inside. You may also hear it called invisible ghost mannequin photography or clothing photography ghost mannequin styling.
For ecommerce, this method sits between flat lay and live model photography. Flat lays are quick and cost-effective, while model shots can show movement and lifestyle context. Ghost mannequin images are often the most scalable option when you need consistent front, back, and detail images across a large apparel catalog.
It works especially well for shirts, jackets, dresses, blazers, knitwear, and structured tops where shape matters. It can be less effective for very loose, draped, or highly textured items unless you style them carefully.
If you are building a broader apparel image workflow, it helps to understand where ghost mannequin fits alongside standard clothing photography techniques. Many growing stores use a mix: ghost mannequin for core PDP images, model imagery for campaigns, and detail close-ups for texture and construction.
Step-by-step setup and shooting process
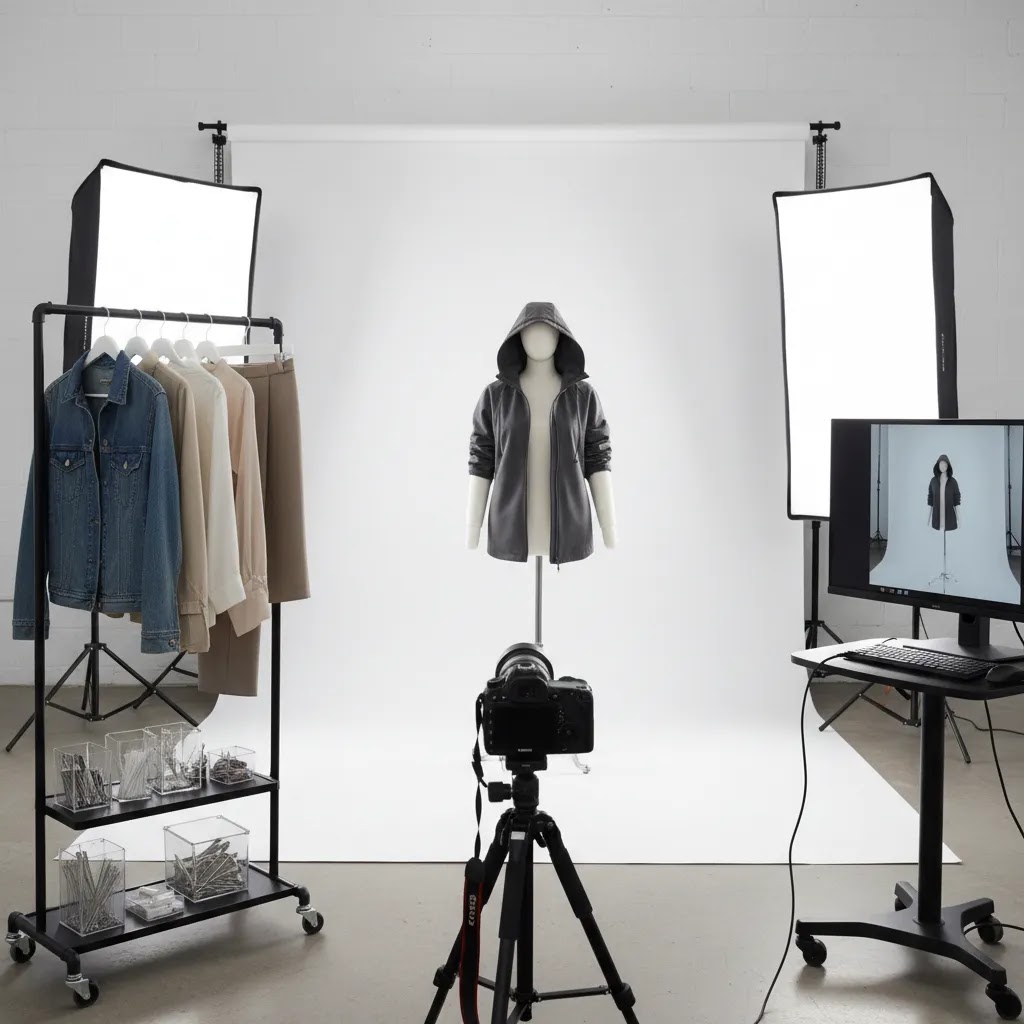
Here is a practical ghost mannequin photography tutorial you can follow in a small in-house setup or a dedicated ghost mannequin photography studio.
1. Choose the right mannequin
The best ghost mannequin for clothing photography usually has removable parts such as the chest, arms, or neck insert. Those removable sections make it easier to capture inner collar and back-neck areas that help create the invisible effect in editing.
If you are photographing tops only, a torso mannequin may be enough. For dresses, jackets, and full looks, a full-body mannequin can give you better drape and alignment. Your mannequin for clothing photography should match the fit profile of your garments as closely as possible. An oversized mannequin can stretch products, while one that is too small can make items look lifeless.
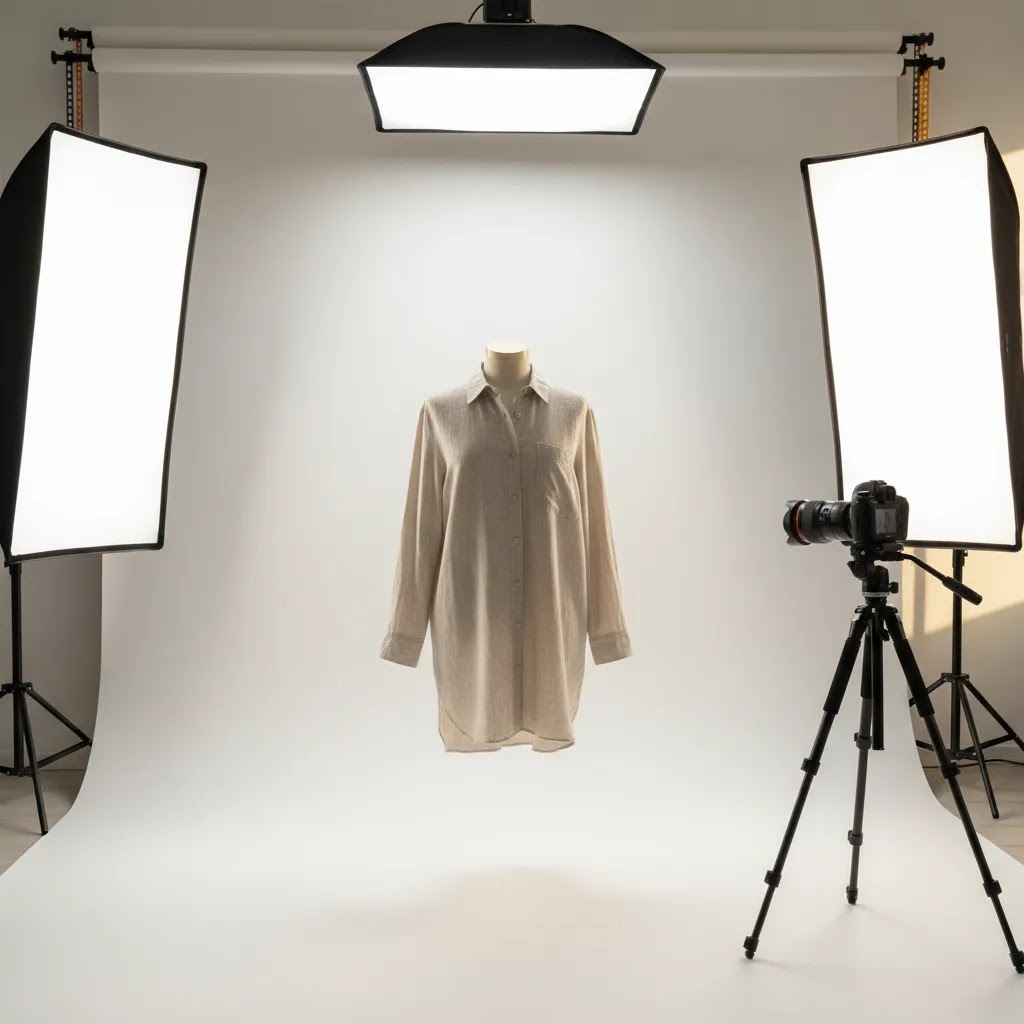
2. Build a repeatable lighting setup
Consistency matters more than complexity. Use a plain white or light neutral background, keep your camera on a tripod, and light the garment evenly from both sides. Softboxes or diffused continuous lights work well for many ecommerce teams because they make shadows easier to control.
If you are still building your process, this is where a dedicated product photography studio workflow can save time. Standardizing your shooting space helps every SKU look like it belongs in the same catalog.
3. Prep each garment carefully
Before shooting, steam or press the item, lint-roll it, button or zip it correctly, and shape sleeves, collars, hems, and shoulders. This step is often what separates amateur-looking ghost mannequin product photography from clean commercial results.
Do not rely on editing to fix wrinkles, collapsed collars, or twisted seams. Those issues usually slow down post-production and can make fabric look unnatural.
4. Style for shape, not just fit
Use clips, pins, and tissue stuffing sparingly to create structure without distorting the garment. For ecommerce, accurate representation matters. You want the item to look polished, but not tighter, shorter, or more tailored than it really is.
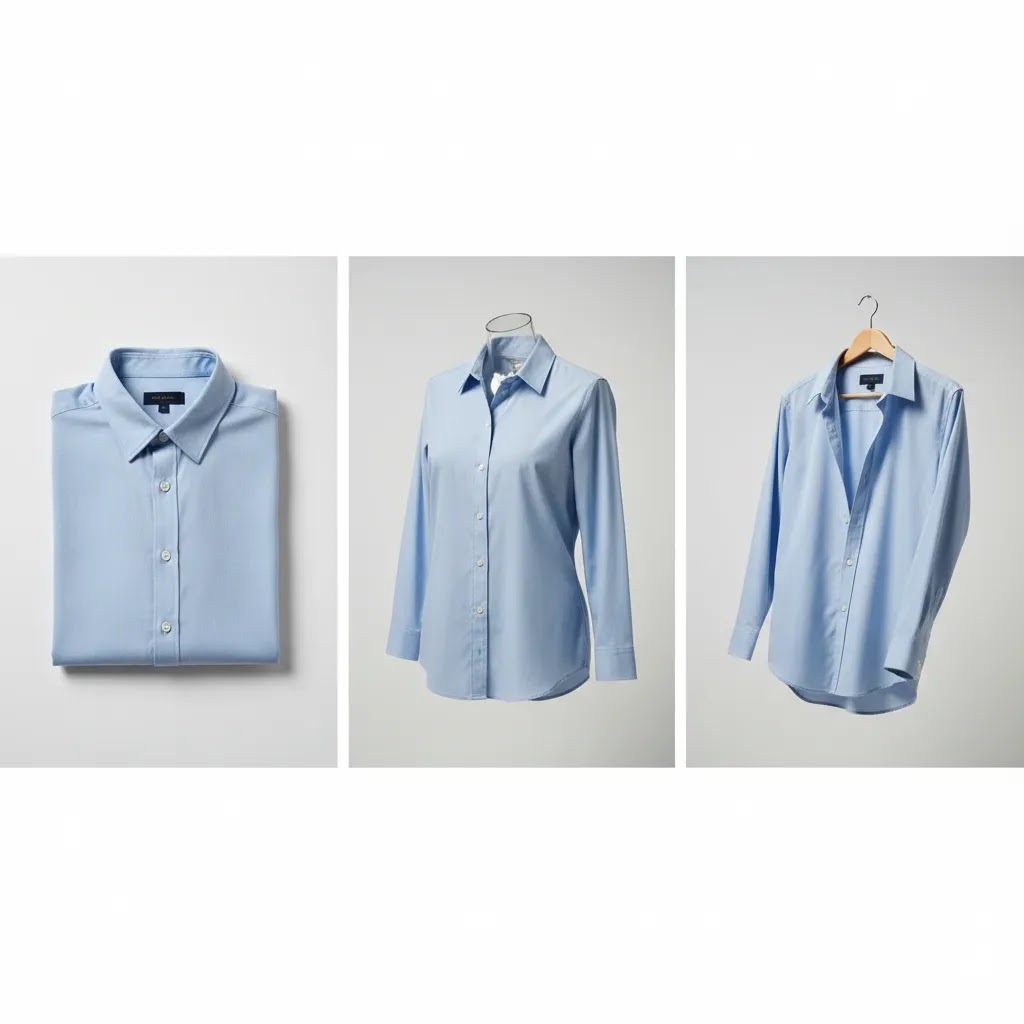
5. Capture the main product angles
At minimum, shoot the front and back. For higher-ticket apparel or products with important craftsmanship, add side views and detail shots. Keep framing, camera height, and lens choice consistent from one product to the next.
6. Shoot the inner detail plates
This is the step many beginners miss when learning how to do ghost mannequin photography. After your main front image, remove the garment and photograph the inner neck, label area, or inner back panel separately. These “inside” shots are composited later to create the invisible mannequin effect.
That separate inner-panel image is what makes the final result look complete rather than obviously edited.
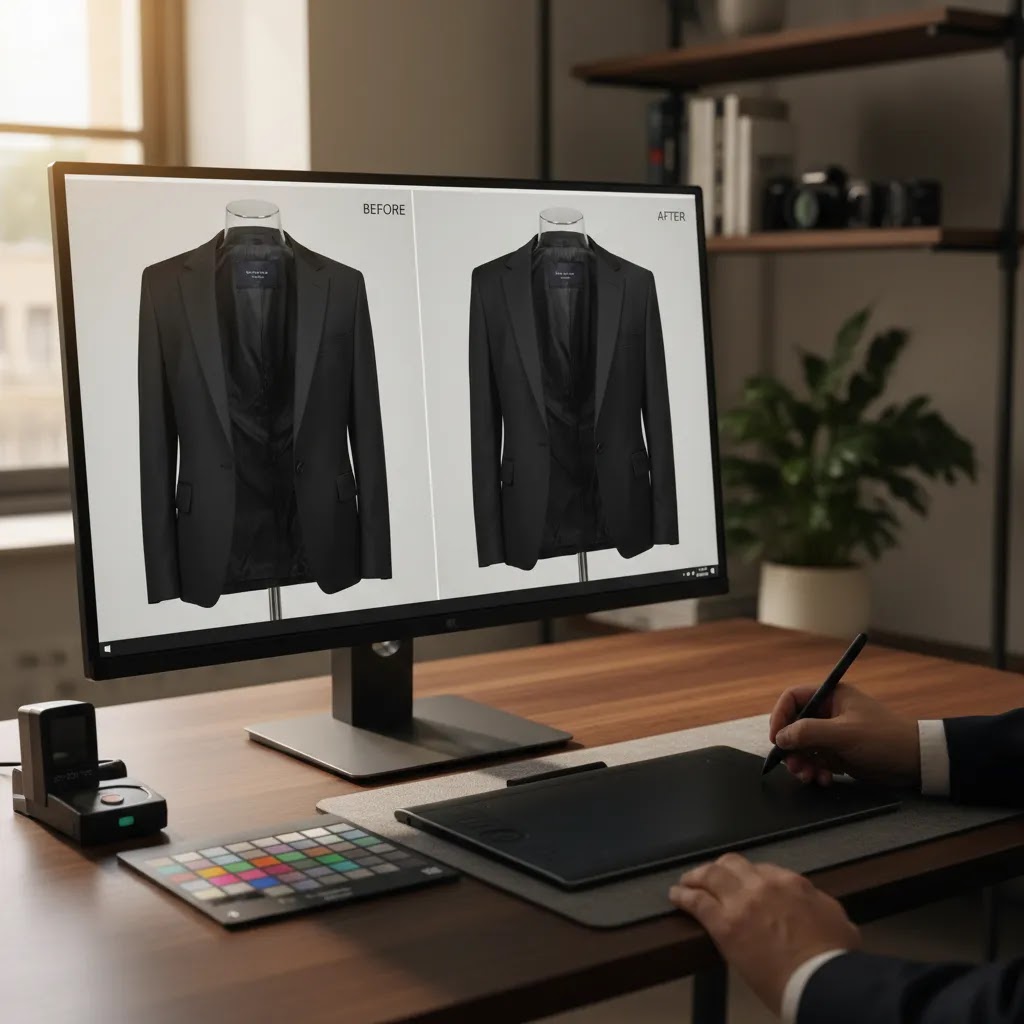
How to edit the invisible mannequin effect
Post-production is where ghost mannequin for photography either looks polished or falls apart. The core process is straightforward:
For many stores, the hardest part is not the clipping path itself. It is keeping every image consistent across dozens or hundreds of products. If your catalog uses mixed imagery styles, this is also a good point to decide whether some products are better served by model photos or even selected ai fashion creative use cases for marketing assets rather than core PDP images.
If you need a cleaner white background during editing, tools like Free White Background Generator and AI Background Generator may help with certain cleanup tasks. For removing distractions or patching simple image issues, Magic Photo Editor can also support post-production workflows. These tools can be useful for background and cleanup tasks, but they do not replace solid garment prep or careful compositing for true ghost mannequin work.
Ghost mannequin photography challenges (and how to fix them)
Here’s the thing: most ghost mannequin images do not look “off” because the background cutout is sloppy. They look off because the garment shape and inner-panel composite do not match what fabric would do on a real body. The good news is that most of the common issues are predictable, and you can prevent them before you spend hours in retouching.
Neckline and collar realism
The fastest way to spot weak invisible ghost mannequin photography is the neckline. If the collar looks collapsed, too symmetrical, or oddly flat, shoppers may not trust the product image, even if they cannot explain why.
From a practical standpoint, removable neck and chest pieces help because you can shoot a clean inner-panel plate that matches the outer neckline. If your mannequin does not have a removable neck insert, you can still get there, but it usually takes more repositioning and more careful compositing.
The hollow “cutout” look
This happens when the inside panel looks pasted on, or when the inner area is too dark, too bright, or too sharp compared to the rest of the garment. It can also happen when the inner panel is shot with different lighting direction or a different camera height.
Consider this: your main image and your inner plate should be lit and framed like they were captured at the same moment, because in the final composite, shoppers assume they were. A simple fix is to keep the garment on the mannequin, remove only the relevant mannequin section, then shoot the inner plate without moving the tripod or changing light positions.
Uneven fabric tension and “pulled” seams
Clipping and pinning can help, but it can also create unnatural tension at the side seams, shoulders, or placket. That is a merchandising risk, because the photo may show a silhouette the garment does not actually have.
A good rule for most Shopify store teams is to pin from the back, and keep pins and clips at consistent anchor points. For example, pin at the center back and then check symmetry at the shoulder seams and hem before shooting. If the garment is visibly skewed, fix it physically. Do not assume you will “straighten it in Photoshop” later.
Mismatched inner panel alignment
Even with a good mannequin, alignment is where time disappears. If the inner panel does not match the outer collar curve, or the shoulder seam line does not continue naturally, the result looks like an obvious composite.
The way this works in practice is simple: treat the inner plate like a critical hero shot, not a quick add-on. Match camera height, focal length, and distance. Then in editing, align to seams first, not edges. Seams are what your shopper’s eye follows, especially around collars and armholes.
A simple pre-shoot checklist that reduces retouch time
What many store owners overlook is that a 30-second checklist can save you minutes per SKU in post:
When to switch approaches for specific products
The reality is that not every garment wants to be a ghost mannequin image. Very sheer fabrics can reveal the mannequin edge and composite join lines. Draped pieces can look “stiff” when forced into a hollow form. Fuzzy knits and fringe can create halos and messy cutouts that take too long to perfect.
For those items, a clean flat lay or an on-model image may be the more honest merchandising choice. You can still keep your catalog consistent by using ghost mannequin for the structured core of your range, then choosing the format that best represents the tricky pieces without over-editing them.
Pros and Cons
Strengths
Considerations
Who this method is best for
Ghost mannequin clothing photography is usually the best fit for ecommerce apparel brands that need clean, repeatable product images at scale. If you run a Shopify fashion store with regular product drops, it gives you a practical balance between polished presentation and production efficiency.
It is especially useful for brands selling basics, uniforms, private-label fashion, boutique apparel, or wholesale lines where consistency matters more than editorial storytelling. If your brand identity depends heavily on lifestyle visuals, you may still want ghost mannequin images for PDP clarity and model shots for ads and landing pages. Some brands also test AI-assisted creative workflows through tools and guides like our ai clothing generator coverage, but core product accuracy should remain the priority for ecommerce listings.
How to choose your setup
If you are deciding between in-house production, a freelance editor, or ghost mannequin photography services, focus on these five criteria.
1. Catalog size and shooting frequency
If you release new products every week, building a repeatable in-house workflow may make sense. If you launch smaller seasonal collections, outsourcing may be more efficient. The more frequently you shoot, the more important standard operating procedures become.
2. Garment complexity
Simple tees and sweatshirts are easier to manage in-house. Structured blazers, dresses with lining, or garments with layered collars can be harder. The more construction detail a product has, the more skill you need in both styling and editing.
3. Your quality bar for PDPs
Luxury and premium apparel stores usually need tighter retouching standards than entry-level stores. Color consistency, seam alignment, and neckline realism all affect perceived product quality. If your average order value depends on premium presentation, invest accordingly.
4. Team capability
Ask whether your team can realistically prep garments, shoot accurately, and composite images without slowing merchandising. A small store owner can absolutely learn this, but it is still a production skill. If your time is better spent on merchandising, CRO, or customer acquisition, outsourcing may be the better commercial decision.
5. Channel requirements
Think beyond your website. Marketplaces, paid social, email, and Google listings may all need slightly different crops, backgrounds, or image ratios. A standardized process makes that easier. If you are still working out your broader image standards, the resources in Fashion & Apparel Photography and Product Photography Fundamentals are useful reference points.
Camera, lens, and settings for clean ghost mannequin results
Good ghost mannequin product photography is often won or lost in the camera settings, because distortion and inconsistent exposure create more editing work than most teams expect. If you want your Shopify product pages to feel consistent across the catalog, standardizing capture settings is one of the highest-leverage moves you can make.
Lens choice and focal length (and why wide angles can ruin fit)
A common “why does it look wrong?” issue is using a wide lens too close to the mannequin. Wide angles can warp shoulders, widen the chest, and curve hems. That is especially noticeable on tailored products, button-ups, and jackets, where shoppers expect straight lines.
In many cases, a standard to short-telephoto focal length gives you a more natural product shape. The exact number depends on your camera system and studio space, but the principle is consistent: step back, zoom in, and keep perspective neutral so the garment looks like the garment.
Baseline settings to standardize output across SKUs
If you want repeatable results, shoot in manual exposure and lock it in for a batch, then adjust only when the garment color or material forces a change. Auto modes tend to brighten dark items and dim light items, which makes your catalog look inconsistent.
For sharpness across the whole garment, use an aperture that keeps the front of the garment in focus from collar to hem. If your aperture is too wide, you can end up with a sharp logo but soft hems or cuffs. If your aperture is too narrow, you may introduce softness from diffraction depending on your camera and lens. Many teams land in a mid-range aperture because it is a practical balance for ecommerce.
White balance is another consistency lever. If you leave white balance on auto, the same “white” background can shift warmer or cooler across SKUs. That can lead to product color looking inconsistent on Shopify collection pages. Set a consistent white balance for your lighting, and keep it the same across the shoot.
How to avoid motion blur with continuous lights
Continuous lights are popular because they are simple to use, but you still need a shutter speed that avoids blur if you are hand-steaming, adjusting collars, or working fast. Your tripod locks the camera down, but fabric can still move slightly during styling or when you trigger the shutter.
Use a remote trigger or camera timer to reduce vibration, and watch your shutter speed if you are shooting handheld detail shots. If you see softness in edges like collars and cuffs, it is often shutter speed, not focus.
File handling basics for ecommerce consistency
Shooting RAW can give you more flexibility for white balance and exposure correction, which is helpful for tricky colors like deep blacks, bright whites, and saturated reds. JPEG can be faster, but it gives you less room to correct batch-to-batch differences later.
Whatever you choose, keep file naming consistent so your editor can match inner plates to the correct main images without guessing. A simple pattern like SKU-angle and SKU-inner can prevent a lot of back-and-forth.
Color consistency matters for trust. If a shopper sees the same “navy” hoodie with different shades across photos, it can trigger returns and customer support issues. A consistent capture setup, locked white balance, and repeatable editing recipe usually go further than heavy retouching.
Workflow and cost considerations for scaling ghost mannequin photography
For most Shopify apparel stores, the real challenge is not learning how to do one great ghost mannequin image. It is scaling the process across a growing catalog without losing consistency, burning out your team, or creating a post-production bottleneck.
A practical production workflow (and what typically slows teams down)
A repeatable workflow usually looks like: garment prep, styling on mannequin, shoot front and back, shoot detail angles, capture inner plate, then edit and export for your PDP image sizes.
Time per SKU varies a lot, but the slowdowns tend to come from the same places:
Think of it this way: the more SKUs you have, the more expensive small inconsistencies become, because you repeat the same problem hundreds of times.
In-house vs outsourcing (beyond quality)
Quality matters, but operational factors matter too. In-house can be great when you need rapid iteration, frequent drops, and tight control over how products are presented. Outsourcing can be the better move when you need predictable throughput and your internal team is focused on merchandising, customer acquisition, or conversion rate optimization.
If you outsource, the briefing process often decides whether you get a consistent catalog. Give your editor clear standards: background tone, crop rules, shadow policy, color handling, how you want labels treated, and what “acceptable” neckline realism looks like. Also define the revision loop upfront. If you have to request changes on every batch, it slows launches and creates avoidable costs.
Turnaround time is another factor. If you are running Google Ads or Meta campaigns tied to new arrivals, delays in image production can slow your ability to launch or refresh creatives. Policies and placements change, so always check current platform requirements before building a workflow around a specific crop or background rule.
Efficiency, templates, and where automation fits (with realistic expectations)
Competitors talk a lot about automation, but for ecommerce, accuracy still needs human quality control. The most reliable “automation” is standardization: consistent camera height, locked settings, and repeatable editing templates.
Batch editing can speed up export and normalization when your capture setup is consistent. Templates for cropping, background brightness, and basic color corrections can help you keep your Shopify collection pages looking uniform. Just keep a human check on final outputs, because small issues like a misaligned inner panel or incorrect color cast can undermine product trust quickly.
AcquireConvert recommendation
For most ecommerce apparel brands, ghost mannequin photography is worth using for core product page imagery if you sell structured clothing and need consistency at scale. The key decision is not whether the technique works. It is whether your team can execute it accurately enough to protect product trust.
AcquireConvert approaches this from the store owner’s side, not just the photographer’s side. Giles Thomas brings a practical ecommerce lens as a Shopify Partner and Google Expert, which matters because product imagery affects merchandising, paid traffic efficiency, and conversion paths, not just aesthetics. If you are comparing apparel image formats, start with our guides to clothing photography and ai fashion, then use this workflow to decide what should stay in-house and what should be outsourced.
Frequently Asked Questions
What is ghost mannequin clothing photography used for?
It is mainly used for ecommerce apparel listings where you want clothing to look worn and structured without showing a model or visible mannequin. It is popular for shirts, dresses, jackets, and knitwear because it gives shape while keeping the shopper’s focus on the product itself.
Is ghost mannequin better than flat lay for clothing photos?
It depends on the garment and your brand presentation. Ghost mannequin usually shows structure better than flat lay, which can help with tailored or fitted items. Flat lays can still work well for casualwear, accessories, or stores that need a faster, lower-complexity production process.
Do I need a special ghost mannequin for photography?
Usually, yes. A mannequin with removable neck, chest, or arm sections makes the editing process much easier. You can improvise with a standard mannequin, but you may spend more time trying to capture the inside areas needed for a convincing invisible mannequin effect.
Can I do ghost mannequin photography at home?
Yes, many small apparel sellers start at home with a tripod, consistent lighting, a clean background, and careful garment prep. The challenge is less about space and more about process discipline. If you can keep lighting, camera angle, and styling consistent, home setups can work for smaller catalogs.
How do I make the inside of the collar visible?
You usually shoot a second image of the inner neck or back panel after removing or repositioning the garment. In editing, that inner shot is composited into the main photo once the mannequin is removed. That extra image is what creates a believable invisible effect.
What clothes work best with ghost mannequin photography?
Structured items such as shirts, coats, dresses, blazers, and sweaters often work best. Very loose, transparent, or heavily draped garments can be harder to style and retouch. Those products may need model imagery or a hybrid approach depending on your brand and merchandising goals.
Should I outsource ghost mannequin photography services?
If you have a large catalog, limited internal time, or high visual standards, outsourcing can make sense. If your assortment is smaller and your margins are tight, building an in-house workflow may be more practical. The right choice depends on product volume, team capability, and how polished your storefront needs to look.
Does ghost mannequin photography help conversions?
It may help shoppers understand product shape and detail more clearly, which can support better product presentation. But results vary by category, site design, pricing, and traffic quality. Product photos are only one part of the conversion equation, so it is best to test image formats within your own store context.
What equipment do I need for ghost mannequin photography?
At a minimum, you need a mannequin with removable sections (especially neck or chest), a camera, a tripod, consistent lights with diffusion, and a clean background. You also need basic styling tools like clips or pins, a steamer, and a lint roller. Many store teams find that a neutral lens choice and a consistent camera height matter just as much as the camera body itself.
How much does ghost mannequin photography cost?
Cost depends on whether you shoot in-house or outsource, how many images you need per SKU, and how complex your garments are to prep and retouch. In-house costs are often driven by time, space, and consistency. Outsourcing costs typically depend on the service scope, expected turnaround time, and revision standards, so it helps to define your catalog guidelines clearly before you commit.
How long does it take to edit ghost mannequin photos?
Editing time varies based on the garment, how clean the capture is, and how consistent your lighting and camera settings are. If the inner plates are shot correctly and the garment prep is solid, compositing can be much faster. If collars are collapsed, seams are misaligned, or the inner plate does not match the main image, editing can take significantly longer.
What is the difference between ghost mannequin and flat lay (or model) photography?
Ghost mannequin shows a shaped, worn look without a visible body, which is great for structured PDP images at scale. Flat lay is typically faster and simpler, but it can hide shape and fit details. Model photography shows real drape, movement, and lifestyle context, but it is usually more complex to produce and keep consistent across large catalogs. Many Shopify apparel brands use a mix depending on product type and channel.
Key Takeaways
Conclusion
Ghost mannequin clothing photography is not the right choice for every apparel brand, but it is one of the most dependable formats for clean, scalable ecommerce product images. If your goal is to show fit, structure, and product detail without the cost and complexity of full model shoots, it is often a smart middle ground. The results depend on disciplined styling, consistent lighting, and careful editing, not just buying the right mannequin. If you want to sharpen your apparel image strategy further, explore AcquireConvert’s fashion photography resources and related guides. Giles Thomas’s perspective as a Shopify Partner and Google Expert keeps the advice grounded in what actually helps online stores present products more clearly and sell with more confidence.
This article is editorial content created for educational purposes and is not a paid endorsement unless explicitly stated otherwise. Pricing, product features, and third-party tools mentioned are subject to change, so verify current details directly with the provider. Any ecommerce results from photography changes may vary by store, product type, traffic quality, and execution.

Hi, I'm Giles Thomas.
Founder of AcquireConvert, the place where ecommerce entrepreneurs & marketers go to learn growth. I'm also the founder of Shopify agency Whole Design Studios.