Ghost Mannequin Photography (2026 Guide)
Ghost mannequin photography is one of the most practical ways to present apparel online. It gives shoppers shape, fit, and garment structure without the distraction of a visible model. For ecommerce brands selling shirts, jackets, dresses, or activewear, that usually means cleaner product pages and more consistent catalog imagery. If you are building a stronger visual merchandising system, it often sits somewhere between full model shoots and standard flat lays. It also works well alongside other apparel formats such as photography fashion model content when you want a balanced mix of editorial and conversion-focused images. This guide explains what ghost mannequin photography is, how to shoot it, how to edit it properly, where AI can help, and when it makes sense to hire a studio or service instead of handling it in-house.
Contents
What Ghost Mannequin Photography Is
Ghost mannequin photography, also called invisible ghost mannequin photography, is an apparel product photography technique that makes clothing appear worn and shaped while removing the mannequin from the final image. The result is a hollow-body effect that shows garment construction more clearly than a flat lay, while keeping attention on the product instead of the person wearing it.
For ecommerce, this matters because shoppers want visual cues about fit, drape, collar structure, sleeve shape, and interior details. A folded shirt on a table rarely answers those questions well. A model photo can help, but it introduces variables like pose, body type, styling, and art direction. Ghost mannequin images are more standardized, which is useful for collection pages, filter pages, and product grids.
This technique is especially common in clothing photography for stores that need high-volume consistency. It can be used for tops, outerwear, dresses, denim, uniforms, kidswear, and many accessories with structure. If your goal is cleaner merchandising, lower visual noise, and a more consistent apparel catalog, ghost mannequin photography is often a strong middle-ground option.
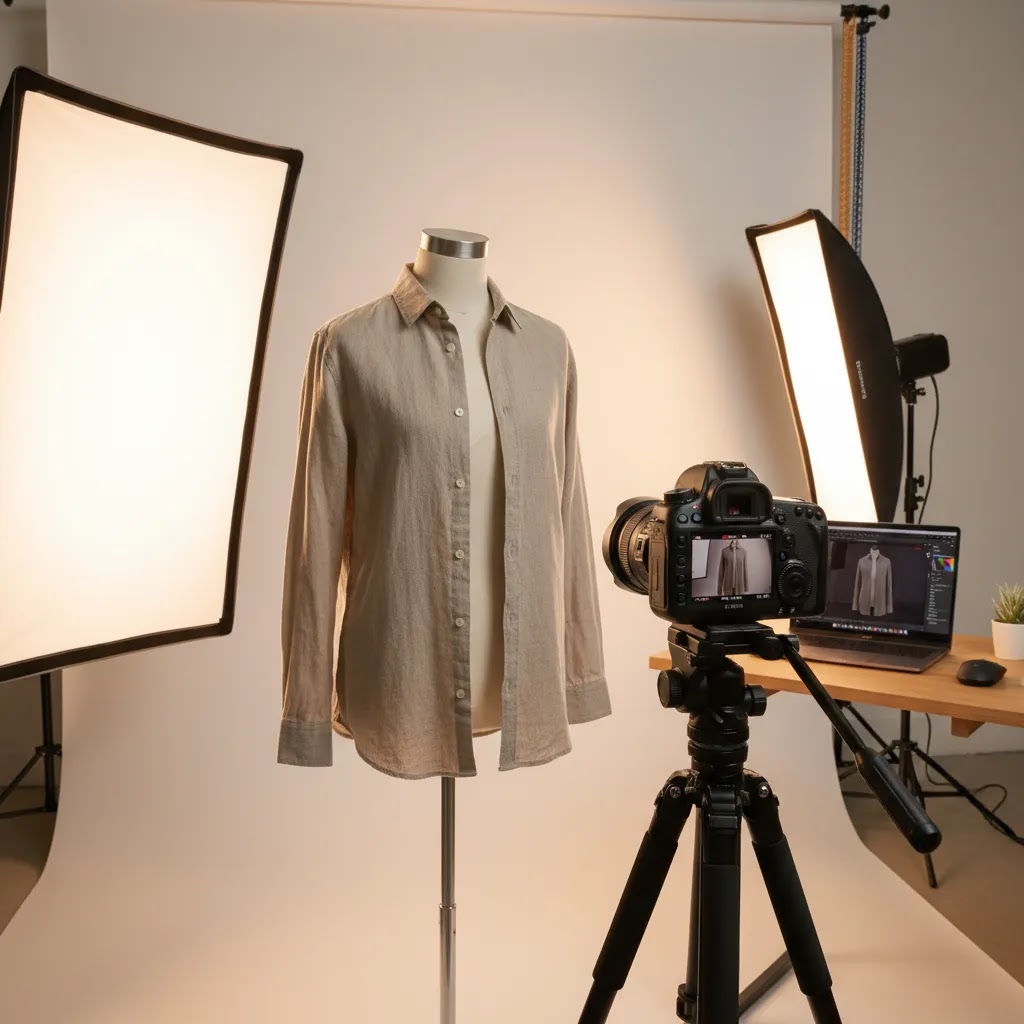
Equipment and Setup Checklist (What You Actually Need Before You Start)
Here is the thing. Most ghost mannequin workflows fall apart because the setup is not repeatable, not because the camera is not expensive enough. If you can create consistent light, consistent framing, and consistent garment prep, you can produce a clean catalog look in-house.
A minimal kit that is realistic for most Shopify stores
You do not need a full studio build-out, but you do need a few basics to keep output consistent from SKU to SKU.
Workspace and process basics for repeatability
From a practical standpoint, the goal is to reduce decisions. Set up once, then run the same process for every product so editing becomes a production line rather than a rescue mission.
Mannequin choices that affect the final look
What many store owners overlook is that the mannequin is part of the product story. A mannequin that is too small can make garments look baggy. A mannequin that is too large can distort seams and make fit look tighter than it is.
For tops and outerwear, a torso mannequin is often the best starting point for speed. For dresses, jumpsuits, and sets, a full-body mannequin can help with drape and length, but it can also increase retouch time. Whichever you choose, plan the interior cutout areas in advance and confirm the mannequin has removable parts that match your product mix.
How to Shoot Ghost Mannequin Photography
If you are wondering how to do ghost mannequin photography, the process is more about consistency than expensive gear. A basic setup can work well if you keep lighting, camera position, garment styling, and editing workflow controlled.
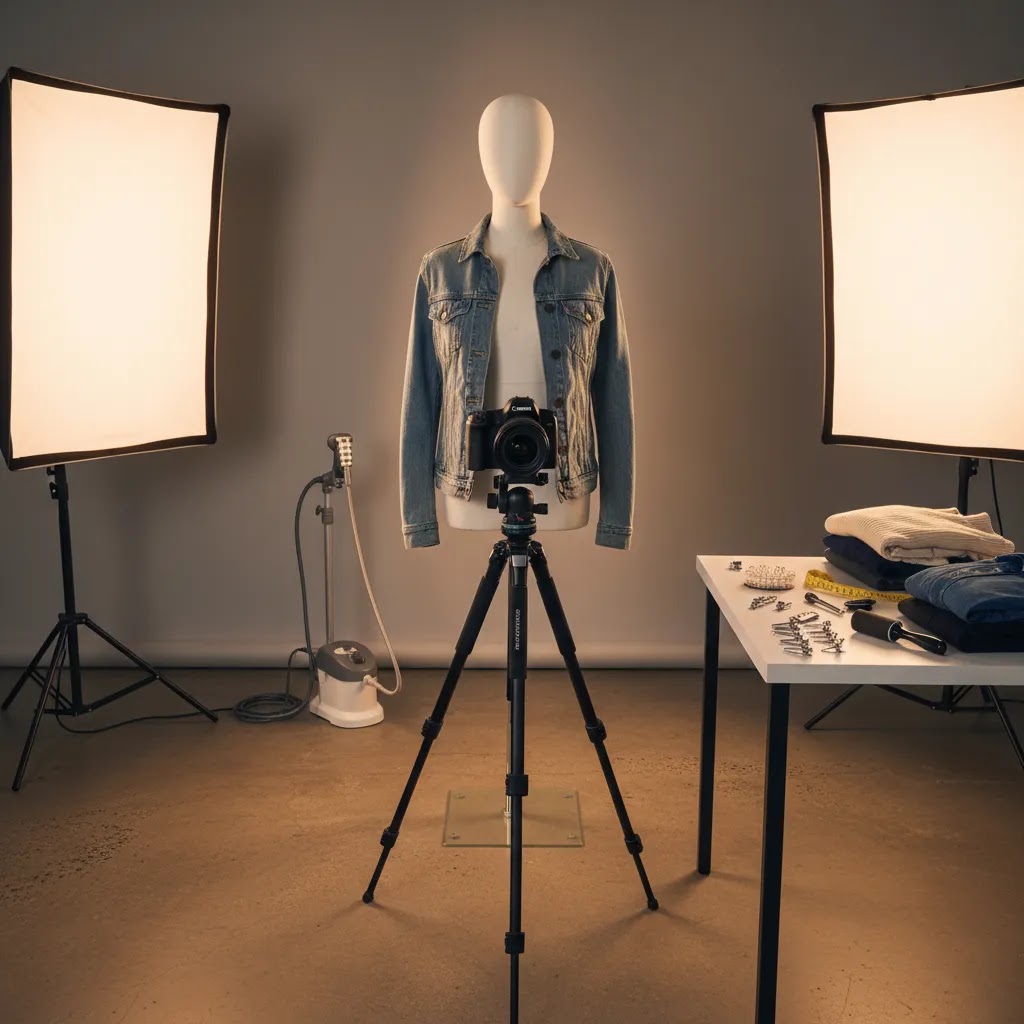
1. Start with the right mannequin
Choose a mannequin close to the garment’s intended fit. For structured pieces, a torso with removable parts is especially helpful. Detachable neck, arms, or chest inserts make it easier to photograph hidden interior sections that you will composite later.
2. Light for consistency, not drama
Use soft, even light from both sides and keep shadows minimal. This is catalog photography, not editorial fashion. You want texture and shape to show, but not deep contrast that makes post-production harder. If you need a stronger foundation, review broader Product Photography Fundamentals for lighting and angle consistency across a larger product range.
3. Steam, pin, and style carefully
Most ghost mannequin issues start before editing. Wrinkles, twisted seams, sagging shoulders, and uneven collars become much harder to fix later. Steam each garment, clip excess fabric behind the mannequin if needed, and make sure hems and plackets sit straight. Small setup mistakes create obvious ecommerce quality problems on zoomed-in product pages.
4. Shoot the main front and back frames
Capture standard front and back images first. Keep camera height consistent across the catalog, especially if you sell multiple SKUs in one collection. This improves side-by-side product page presentation and reduces the “messy catalog” look that can hurt perceived brand quality.
5. Shoot interior fill-in panels
To create the invisible effect, photograph interior areas separately. For example, shoot the inside neck label area, inner back collar, or inner chest panel after removing part of the mannequin or laying the garment flat. These images are what let you rebuild the missing inside section during editing.
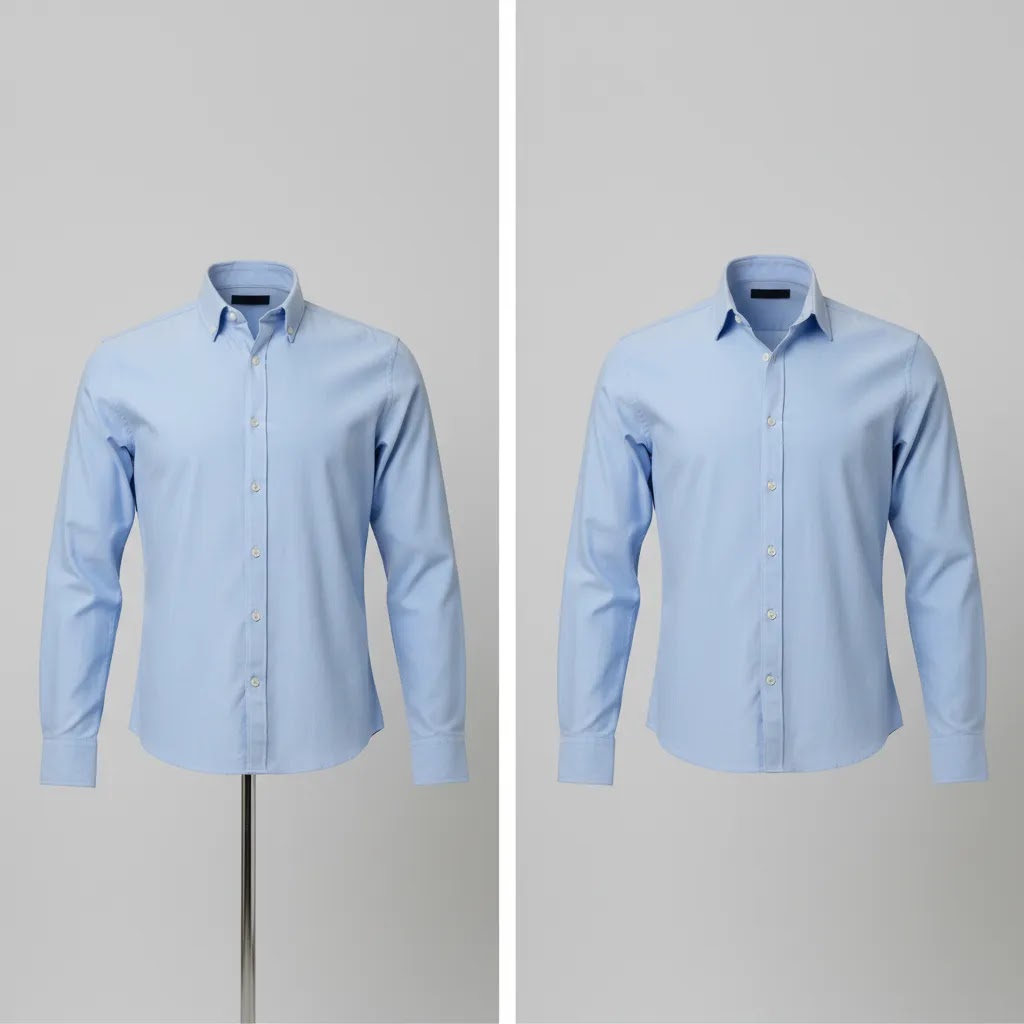
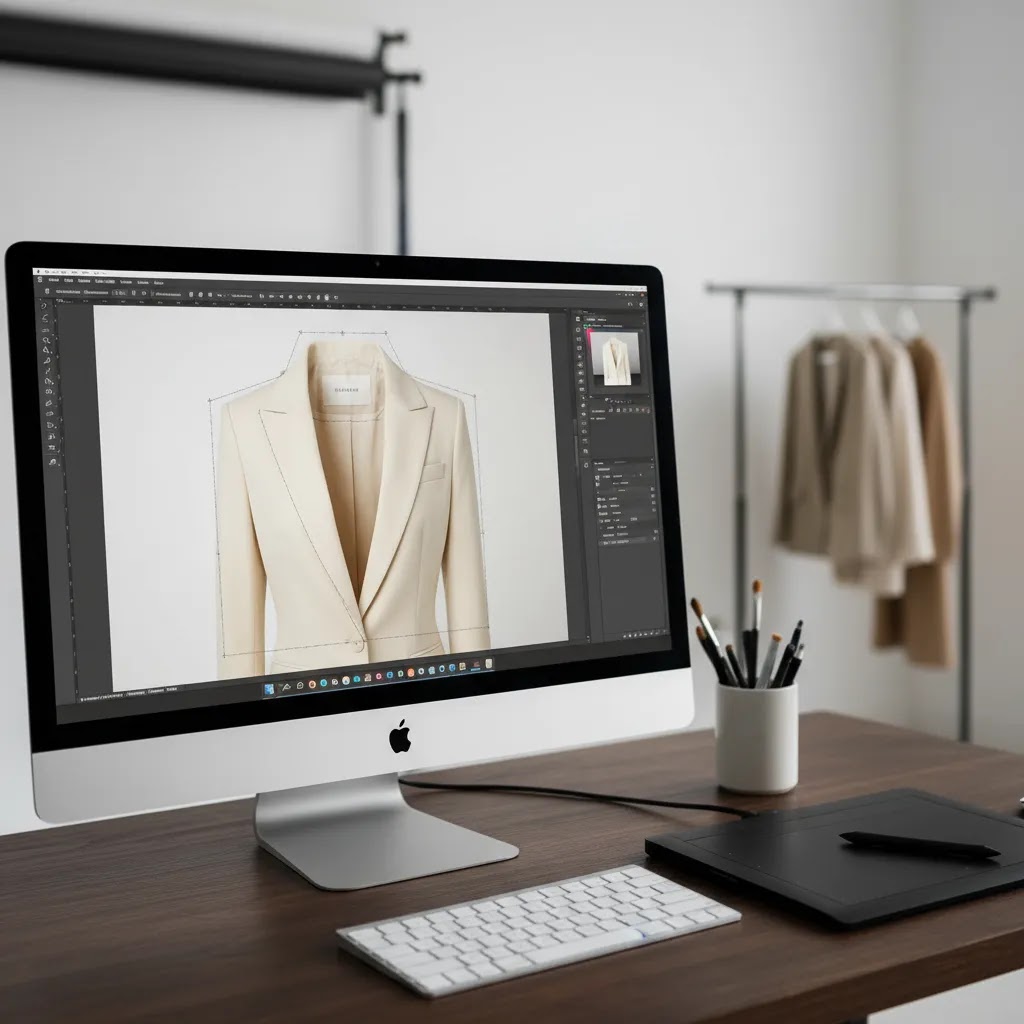
How to Edit the Invisible Mannequin Effect
The edit is where ghost mannequin photography becomes believable or falls apart. The goal is not just removing the mannequin. The goal is creating a clean, natural garment shape that still feels accurate to the product.
Remove the mannequin cleanly
Start by masking the garment from the mannequin. Pay close attention to edges around collars, armholes, sleeves, and waist curves. Jagged cutouts or halos are easy for shoppers to spot, especially on white or light-gray backgrounds.
Composite the interior area
Bring in the extra image you took of the inside collar, inner back, or other hidden section. Position it carefully behind the main frame so the garment looks naturally hollow. This is the defining step in a ghost mannequin photography tutorial because it creates depth without showing the form underneath.
Keep proportions honest
Do not over-warp the garment just to make it look slimmer or more dramatic. For ecommerce, accuracy matters more than visual exaggeration. If the product arrives looking very different from the photos, returns may rise and trust may drop.
Standardize the background and crop
Most stores use white or very light neutral backgrounds for ghost mannequin images. Consistent crops, image dimensions, and garment placement matter almost as much as the retouching itself. If your broader catalog includes editorial assets or AI-assisted visuals, that is where topics like ai fashion become relevant, but your core product imagery still needs a dependable, repeatable structure.
Common Challenges and How to Fix Them (Collars, Sleeves, Layering, Knits)
The reality is that shoppers do not judge ghost mannequin photography on the 95 percent that looks fine. They judge it on the few areas where the edit looks unnatural. Those failure points show up repeatedly in apparel catalogs, especially when a store is trying to move fast.
Collars that look too deep, too sharp, or “floating”
The most common issue is a collar insert that does not match the main frame, so the neckline looks like it has been cut out and pasted back in. This is usually caused by mismatched angle, lens perspective, or lighting between the main and insert shots.
Fix it at the shoot stage by keeping the camera on the tripod and shooting the insert without changing height, distance, or focal length. If you must move the garment to capture the interior panel, keep lighting and direction identical, and take a quick reference frame to confirm highlights and shadows match.
In editing, pay attention to collar thickness and the natural fold. A tiny shadow under the collar edge can make the depth feel real. Too much shadow makes it look fake. Too little can look flat.
Sleeve openings that look cut-out
Sleeves are another giveaway area, especially on short-sleeve tees and polos where the armhole shape is simple and viewers know what “normal” looks like.
Plan for sleeve inserts if needed. Some teams photograph a clean sleeve opening by slightly rotating the mannequin arm or using a removable arm piece. In post, do tight edge cleanup and zoom in. If you see jagged pixels or a halo, shoppers will see it too on a retina phone screen.
Mismatched lighting between the main shot and the insert shot
Even if the collar insert is positioned correctly, mismatched lighting makes the composite feel stitched together. This tends to happen when the garment is taken off the mannequin for the insert shot and placed somewhere else with different shadow falloff.
The way this works in practice is simple: keep your insert workflow in the same lighting pocket as the main shot. If you shoot the interior panel flat, try to keep the same light direction and intensity. Then in editing, match color temperature and contrast between the two layers before doing final background cleanup.
Warped proportions and “over-shaped” garments
Over-warping can make images look more fashion-forward, but it can also create a fit mismatch that leads to disappointment. This comes up with waist shaping on dresses, shoulder shaping on jackets, and tapering on pants.
A safer approach is to style physically first, then do minimal warping. Use clips behind the mannequin to remove excess fabric, and keep seam lines straight. In editing, use small adjustments rather than large transformations, and check against a real product measurement if you have one available.
Layering issues (jackets over hoodies, shirts under sweaters)
Layered garments are hard because the “hollow body” illusion depends on clean interior geometry. If a jacket is styled over a hoodie, the neckline can turn into a complex stack of layers that is difficult to composite convincingly.
Consider this: ghost mannequin works best when there is a clear primary garment silhouette. If you must show layering, you may be better off using ghost mannequin for the primary item, then adding separate detail shots that explain the layering in a more honest way. If you proceed with a layered ghost composite, plan extra insert frames for each interior layer and expect more retouching time.
Knits and textured fabrics (sweaters, ribbed tops, chunky knits)
Knits show every masking mistake because texture creates visual noise at the edges. They also pick up lint and small wrinkles that look minor in real life but obvious in a product grid.
Steaming and lint rolling matter more here. During masking, use an approach that preserves texture at the edges rather than blurring it away. If you clean too aggressively, the garment can start to look plastic and over-processed.
Category-specific notes store teams run into
Tools, Services, and AI Help
If you do not want to build every step manually in Photoshop, a few editing tools can speed up supporting tasks in the workflow. Based on current tool data, ProductAI offers several image utilities that may help ecommerce teams prepare or clean apparel images before final upload.
That said, ghost mannequin photography AI still has limits. AI can assist with cleanup, background standardization, and image variations, but it may struggle with precise apparel geometry, accurate seams, and true-to-product interior details. For stores selling premium apparel, technical garments, or high-return categories, human retouching is usually still the safer choice.
Now, when it comes to the common question, “What is the app that creates ghost mannequins?”, it is important to set expectations. Many “app-style” tools can remove backgrounds or help with basic cutouts, but true ghost mannequin work is a composite. You are rebuilding missing interior sections using extra photos. Some apps can assist parts of that workflow, but you still typically need careful layer alignment, edge cleanup, and color matching to make the interior look natural. If you rely on a one-click approach, build in time for human QC before you publish to your Shopify product pages.
If you are choosing between in-house production and outsourcing, a dedicated product photography studio can make sense once SKU volume rises. It is also worth comparing ghost mannequin imagery with creative alternatives such as ai clothing generator workflows for marketing assets, while keeping your primary PDP images grounded in accurate product photography.
For broader apparel-specific learning paths, the Fashion & Apparel Photography category is the best starting point.
What Ghost Mannequin Photography Typically Costs (and How to Think About ROI)
If you are budgeting for ghost mannequin photography, you will usually see three cost buckets: in-house production, per-image retouching, and full-service studio packages. The right choice depends on how many SKUs you launch, how complex your garments are, and what level of consistency you need for your Shopify catalog.
Typical cost ranges by approach
Pricing varies widely by market, turnaround, and quality standards, but these ranges are common enough to help you plan.
What drives price up (and why it matters for planning)
When you get quotes, the line items often map to real production pain.
A practical way to estimate cost per SKU for a Shopify catalog
Think of it as cost per product, not cost per photo. A typical Shopify product might need multiple images, and not every image needs the same editing effort.
Start with your standard shot plan: how many final images per product will go on the PDP (for example, front, back, and a detail). Then estimate what percentage of your catalog needs advanced compositing. A tee might only need a basic neck insert. A blazer could need collar, lapel, inner lining cleanup, and more precise edge work.
Finally, factor in revision rate. If you typically do one revision pass for fit shaping or color matching, that is part of the real cost. If you often do two or three passes because different stakeholders approve imagery, that can change the economics quickly.
How to judge ROI without guessing or overpromising
Ghost mannequin photography can pay off, but not always for the reasons people expect. It often helps when it improves product understanding. Clear collar shape, accurate drape, and consistent scale across a collection can reduce confusion, which in some stores may reduce sizing-related hesitation and support fewer avoidable returns. It can also improve how your collection pages look, which can make the brand feel more trustworthy.
At the same time, ghost mannequin images will not fix a weak offer. If your sizing info is unclear, your traffic quality is poor, your product pages load slowly, or your pricing is misaligned with the market, better imagery alone may not move the needle much. The best way to evaluate impact is to treat it like a merchandising upgrade. Improve the core product images, keep everything else stable, and monitor the metrics that matter to your store, like add-to-cart rate, return reasons, and support tickets about fit or product details.
Pros and Cons
Strengths
Considerations
Who It Is For
Ghost mannequin photography is a strong fit for ecommerce teams selling apparel at scale and needing a repeatable product image system. It works especially well for Shopify merchants with medium to large catalogs, brands refreshing seasonal collections, and retailers that want cleaner collection-page presentation without the time and cost of styling every item on a live model.
It is also useful if your brand sits between pure basics and full editorial fashion. You can use ghost mannequin images for standardized PDP assets while adding model, flat lay, or detail shots where needed. If you are running a lean team, the best setup is often a simple in-house workflow for core SKUs and outsourced retouching or studio support for more complex pieces.
How to Choose the Right Setup
If you are evaluating ghost mannequin photography services, studios, or an internal process, focus on these practical criteria.
1. Catalog volume
If you launch a handful of products each month, in-house shooting may be realistic. If you process dozens or hundreds of SKUs, a standardized studio workflow or specialist service often becomes more efficient. Volume changes the economics quickly because every item needs styling, multiple frames, file naming, QC, and upload prep.
2. Garment complexity
Simple tees and sweatshirts are easier than lined blazers, dresses with cutouts, layered outerwear, or textured knits. The more construction detail you need to preserve, the more valuable experienced retouching becomes. Ask whether your team can edit inside collars, cuffs, and layered structures accurately before committing to a DIY system.
3. Your ecommerce image standards
Think about where the images will appear. Marketplace listings, wholesale sheets, Shopify product pages, and social ads all have slightly different needs. For most stores, ghost mannequin images should first solve the core catalog job: clarity, consistency, and accuracy. Creative alternatives can sit around that, not replace it.
4. Speed to publish
If product launch speed is a bottleneck, map the full workflow from receiving samples to publishing images. Stores often underestimate how much time is lost in steaming, clipping, retouch requests, and reshoots. The best ghost mannequin photography service is not just the one with attractive sample images. It is the one that fits your launch cadence and revision tolerance.
5. Where AI fits, and where it does not
AI can support image cleanup and variation tasks, but it should be used carefully for primary apparel product imagery. For most ecommerce teams, the safest use of AI is around background cleanup, file enhancement, and creative asset production. If you want highly accurate garment representation, keep a human review step in place. That is especially important for brands selling premium, technical, or fit-sensitive clothing.
AcquireConvert covers this space from a practical store-owner angle. Giles Thomas brings a Shopify Partner and Google Expert perspective to ecommerce workflows, which is useful if you are thinking not just about photography quality, but also how image consistency affects merchandising, search visibility, and conversion. If you are comparing presentation formats across your apparel catalog, it is worth reviewing related guides on clothing photography and creative automation topics like ai fashion to decide where ghost mannequin fits best in your mix.
Frequently Asked Questions
What is ghost mannequin photography?
Ghost mannequin photography is an apparel imaging method where clothing is photographed on a mannequin and then edited so the mannequin disappears. The finished image keeps the shape of the garment while showing a hollow interior. It is commonly used on ecommerce product pages because it gives more structure than a flat lay without adding the distraction of a visible model.
How do you do ghost mannequin photography?
You style the garment on a mannequin, shoot the main front and back views, then take extra photos of hidden interior sections like the collar or inside back panel. In editing, you remove the mannequin and composite those interior images into place. Good results depend on even lighting, careful garment prep, and precise masking during retouching.
Is ghost mannequin photography better than flat lay?
It depends on the garment and your merchandising goals. Ghost mannequin photography usually shows structure, drape, and fit cues more clearly than flat lay images. Flat lays can still work well for soft basics, accessories, or editorial-style product sets. Many apparel brands use both, with ghost mannequin as the core catalog format and flat lays for secondary views.
Is ghost mannequin photography better than model photography?
Not always. Model photography is stronger for brand storytelling, lifestyle context, and showing fit on a person. Ghost mannequin photography is stronger for standardized catalog consistency and keeping focus on the garment itself. Most growing ecommerce brands benefit from a mix, using mannequin images for primary product views and model shots for supporting images.
Can AI create ghost mannequin photography?
AI may help with parts of the workflow such as background cleanup, resolution improvement, or creative variations. It can also assist with retouching support tasks. Still, fully accurate invisible mannequin results often require manual editing, especially for collars, interior panels, and complex garments. If product accuracy is important, human review is still a smart safeguard.
How much does ghost mannequin photography cost?
Costs vary based on whether you shoot in-house, outsource retouching, or hire a full-service studio. In-house costs are usually an upfront equipment investment plus staff time. Outsourced editing is often priced per image or per product, with higher rates for complex garments and faster turnaround. Studio packages may be priced per SKU or per day and typically depend on shot count and QC standards.
How to create a ghost mannequin image?
Photograph the garment on a mannequin for the main front and back images, then take additional “insert” photos of the interior areas that will be missing after you remove the mannequin, often the inside collar or inner back panel. In editing, mask out the mannequin from the main image and composite the insert image behind it, then match color and shadows so the final result looks natural.
What is the app that creates ghost mannequins?
Many apps can remove backgrounds or help with cutouts, but true ghost mannequin images are usually composites built from multiple photos, including interior insert frames. Some tools can speed up cleanup, yet you typically still need careful alignment, edge refinement, and color matching to make the hollow-body effect believable. For primary ecommerce product images, plan on human QC before publishing.
What is invisible mannequin photography?
Invisible mannequin photography is another name for ghost mannequin photography. It is the process of photographing clothing on a mannequin and editing the mannequin out so the product keeps a worn shape while showing a hollow interior. It is used in ecommerce to show structure and construction details in a clean, standardized way.
Do I need a professional ghost mannequin photography studio?
Not always. Small catalogs with simple products can often be handled in-house if you have a stable setup and solid editing skills. A professional studio becomes more attractive when SKU volume rises, garments are more technical, or internal production slows launches. The decision usually comes down to output consistency, turnaround needs, and available team time.
What products work best with ghost mannequin photography?
Shirts, jackets, sweaters, dresses, blazers, uniforms, and many children’s apparel items tend to work well because shape and structure matter. Very loose, highly draped, or extremely detail-heavy products may need additional image types to fully explain the item. The more fit-sensitive the garment, the more valuable it can be to combine ghost mannequin and model views.
What background should ghost mannequin images use?
Most ecommerce brands use a white or very light neutral background because it looks clean, supports catalog consistency, and works well across product grids and marketplaces. White backgrounds also make retouching issues easier to spot during QC. If you use creative backgrounds for marketing assets, keep your primary product page images standardized for clarity and easier comparison.
Can ghost mannequin photography help conversion rates?
It may help in many stores because it can make apparel images clearer and more consistent, which improves product understanding. Still, results depend on many factors such as traffic quality, pricing, page layout, brand trust, and product-market fit. It is best viewed as one part of a stronger product page experience rather than a guaranteed conversion fix.
Key Takeaways
Conclusion
Ghost mannequin photography remains one of the most reliable apparel formats for ecommerce because it balances shape, clarity, and catalog consistency. It is not the right answer for every garment or brand style, but it often gives store owners a cleaner and more scalable way to present clothing online. If you are deciding between in-house shooting, studio support, or AI-assisted editing, start with your real needs: SKU volume, product complexity, and how quickly images need to go live. AcquireConvert is built for that kind of practical decision-making. If you want more apparel imaging guidance from a Shopify-focused perspective, explore the related fashion photography resources on the site and use Giles Thomas’s practitioner-led insights to shape a workflow that fits your store.
This article is editorial content created for ecommerce education and is not a paid endorsement unless otherwise stated. Tool availability and features may change over time, so verify current details directly with the provider before making a decision. Any performance or conversion impact discussed is illustrative only and not guaranteed.

Hi, I'm Giles Thomas.
Founder of AcquireConvert, the place where ecommerce entrepreneurs & marketers go to learn growth. I'm also the founder of Shopify agency Whole Design Studios.