Shoe Product Photography Tips for Ecommerce (2026)
Shoe product photography has a direct impact on how shoppers judge quality, fit, and style before they ever read your product copy. If you run a Shopify store or manage an ecommerce catalog, the goal is not just attractive images. You need photos that help customers understand shape, materials, sole details, and scale quickly. That usually means a mix of clean packshots, conversion-focused angle selection, and a repeatable process your team can maintain. If your wider apparel image strategy also includes models, lookbooks, or editorial shots, it helps to understand how product-only photography fits alongside photography fashion model content. In this guide, you’ll get practical tips on angles, lighting, backgrounds, and setup choices that can improve consistency across your shoe catalog without overcomplicating production.
Contents
What good shoe product photography needs to do
Shoes are harder to photograph well than many small products. They have curved shapes, texture changes, reflective parts, stitching details, and structure that can disappear if the lighting is flat. A customer also expects more visual proof before buying because fit is uncertain and returns can be expensive for the store.
That is why strong shoe product photography needs to do three jobs at once. First, it should show the product accurately. Second, it should support conversion by reducing uncertainty. Third, it should stay consistent across your catalog so category pages and collection pages look professional.
For most ecommerce stores, the highest-performing image set includes a white background hero image, multiple angle shots, close-ups of materials, and at least one contextual or lifestyle image. If you also sell apparel, there is a lot of overlap with broader clothing photography workflows, especially around fabric texture, color accuracy, and maintaining a repeatable studio process.
If your shoe line changes often, consistency matters more than chasing elaborate creative concepts. You want a system that your team can repeat SKU after SKU.
Lookbook vs packshot shoe photography (and when you need both)
Here’s the thing: “shoe product photography” can mean two very different image types, and they serve different ecommerce goals. If you do not separate them in your workflow, you often end up with photos that are too plain for marketing or too creative for conversion.
Packshot photography is your clean, product-first catalog set. For shoes, that typically means a consistent hero image (often on white), plus standardized angles and close-ups. These images do the heavy lifting on your product detail page because they reduce uncertainty and make comparison easier across a collection.
Lookbook photography is your styled, editorial, or lifestyle set. For footwear, that could mean shoes on-foot, paired with an outfit, shown in motion, or photographed in a setting that signals the brand. These images often matter more for ads, social, and brand perception because they help customers imagine the shoe in a real context.
From a practical standpoint, most Shopify teams need both, but not in equal quantity. A simple decision framework looks like this:
Consider this: you can often shoot packshots and “light lifestyle” images in the same session, as long as you keep the catalog set disciplined. The key is cohesion. If your lookbook images shift color temperature, contrast, or cropping too far from the packshots, your PDP can feel visually messy. Try to keep lighting and color consistent, even if the background changes. You want the customer to feel like every image is of the same product, not a different version of it.
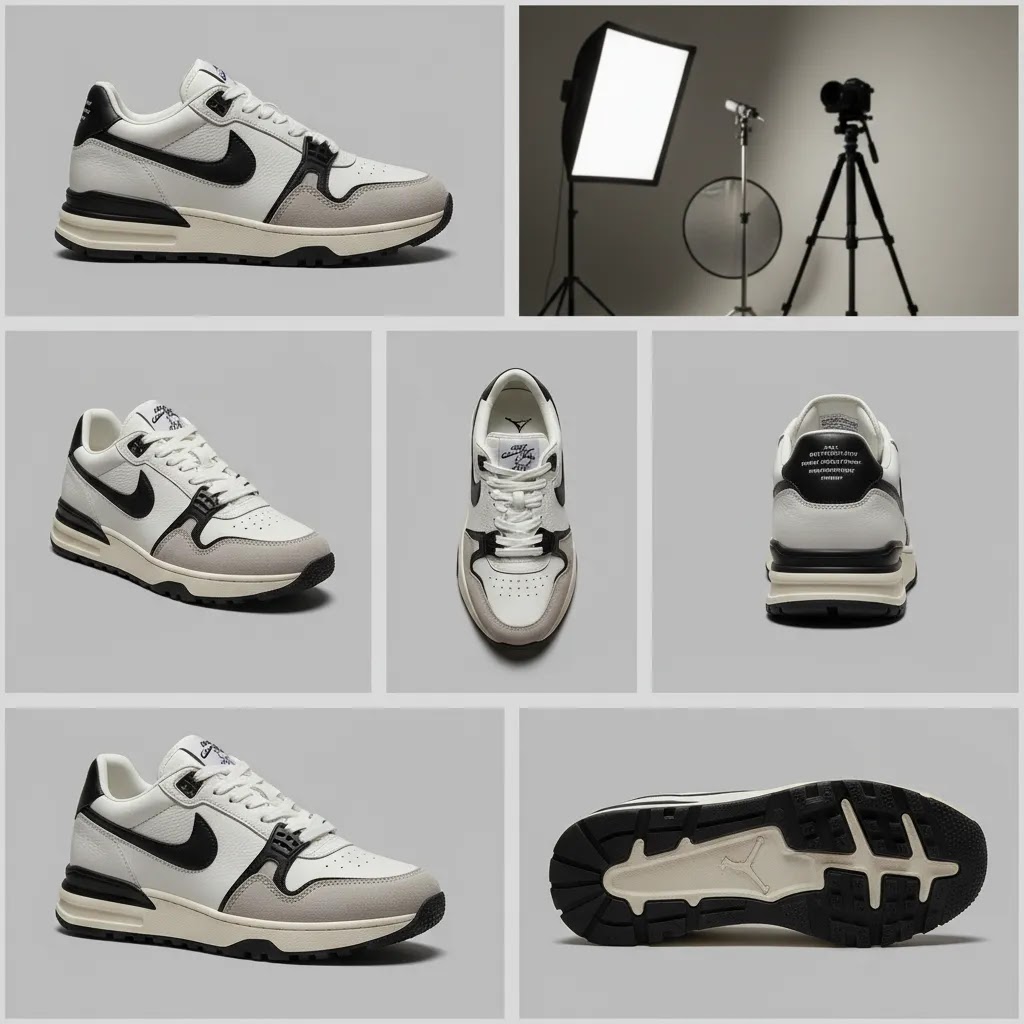
Best angles for shoe product photography
The right angles depend on the style of shoe, but ecommerce teams usually need a reliable core set rather than a different plan for every product. A good starting point is five angles per SKU.
For boots and technical footwear, add close-ups of hardware, stitching, or waterproof materials. For premium fashion shoes, a detail crop of leather grain or finish can help communicate value. For kids’ shoes, include scale-friendly framing and closure details because parents often care about practicality first.
Keep angle selection standardized. If one product has a strong side profile and another starts with a top-down shot, your collection pages can feel inconsistent. Standardization also supports faster editing and simpler template-building inside your product photography business workflow.
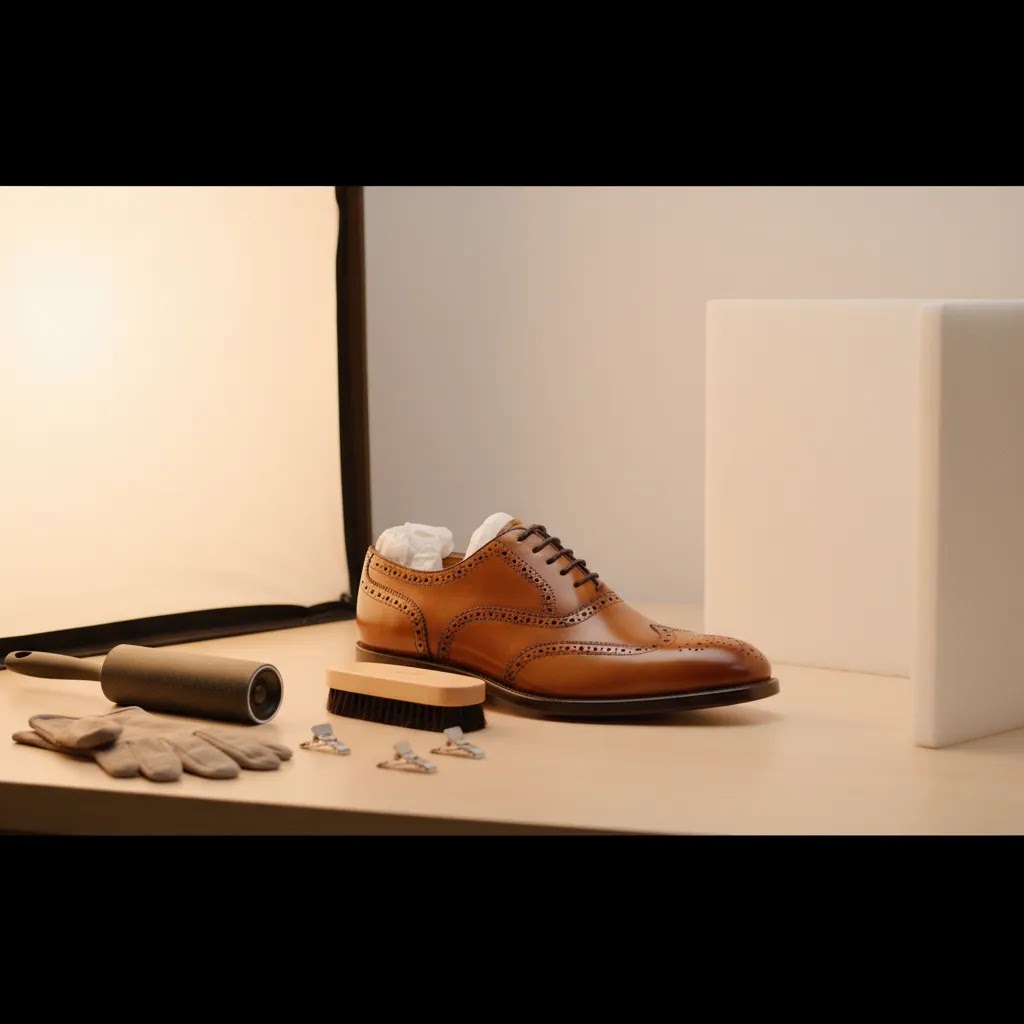
Shoe prep and styling that improves repeatability
What many store owners overlook is that “inconsistent photography” often starts before the camera turns on. Shoe prep and styling is what makes your angles repeatable across SKUs, and it typically reduces editing time because the product already looks clean and correctly shaped.
A practical prep checklist for footwear usually includes cleaning the upper, removing dust and lint, polishing where appropriate, and checking the outsole. White soles and outsoles show grime fast, and customers notice. If you are shooting returns or samples, inspect for small scuffs and creases before the shoe hits set.
Then there is styling. Shoes can look flat or deflated on camera if the tongue and collar collapse. Use tissue, inserts, or light stuffing to keep structure, and shape the tongue so branding and lace layout read clearly. For lace-up shoes, standardize the lace tension so one pair does not look “loose” and another looks “cinched.”
Now, when it comes to common footwear issues, a few show up over and over:
The way this works in practice is simple: pick a standard. Always shoot the left shoe for side profile, or always shoot the right. Always use the same lace knot style, or skip knots entirely and tuck laces consistently for the catalog set. Always keep the “pose” the same, meaning toe angle, heel height, and distance from background. When these variables stay locked, your Shopify collection pages look cleaner and your team spends less time trying to fix differences in post-production.
Lighting tips for clean, sellable images
Lighting is where many DIY product photography setups fall apart. Shoes need shape, but they also need accurate color. If the light is too harsh, you get ugly shadows and blown highlights on leather or synthetic materials. If it is too flat, the product loses depth.
For most shoe product photography white background shots, soft diffused light is the safest choice. That can come from a softbox setup, a light tent, or strong window light with diffusion for smaller-scale tests. The goal is to create even illumination while leaving enough shadow to define the form.
Use these practical lighting rules:
If you want a more editorial look for ads or social content, directional light can work well, but keep that separate from your standard catalog images. Your main product page still needs clean, readable visuals first. Creative images can support paid social or seasonal campaigns later.
Camera settings and shooting technique for shoes (sharpness, depth, and materials)
Good lighting gets you most of the way there, but camera settings are what make shoes look crisp and “real” on a product page. The goal is simple: sharp focus where it matters, enough depth of field to keep the shoe readable, and consistent color from frame to frame.
If you are using a camera, start by stabilizing everything. A tripod is the difference between “mostly sharp” and consistently sharp. Once the camera position is locked, you can prioritize low-noise files and repeatable exposure.
For many shoe packshot setups, a mid-range aperture is a practical default because it gives you enough depth of field without making the image feel flat. If the whole shoe needs to be sharp, you may need a smaller aperture, but keep an eye on whether the image starts to lose that sense of separation. Shutter speed is less of a constraint when the camera is on a tripod, so you can slow it down to keep ISO low. Lower ISO typically means cleaner files and smoother gradients on white backgrounds.
Manual focus can help when the camera keeps hunting on glossy details or low-contrast materials. Pick a consistent focus point, often near the front third of the shoe, and keep it consistent across the set so your images feel uniform when customers swipe through them.
Shoes also include materials that are genuinely difficult to photograph. Think of it this way:
For consistency at scale, lock your variables. Use a fixed focal length lens, or if you use a zoom lens, do not change the zoom position between SKUs. Set a fixed white balance rather than auto, and take a few test frames at the start of every session. If the shoe looks “flat” in the test shot, it is usually a sign your lighting is too frontal or your fill is too strong. Adjust before you shoot the entire catalog.
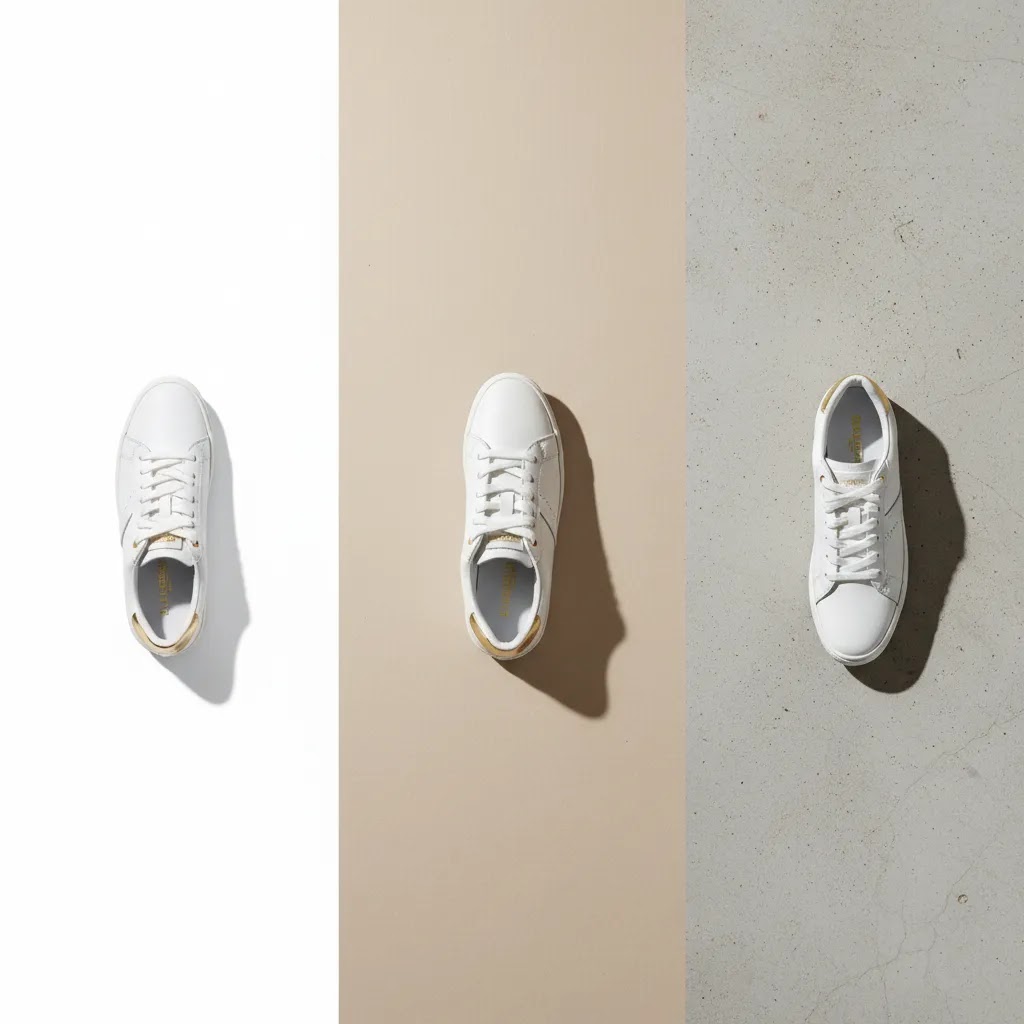
Background choices for shoes
For catalog and marketplace use, a white background is still the most practical default. It keeps the focus on product shape, helps with consistency across listings, and usually works best for navigation pages where shoppers compare products quickly. If you sell on multiple channels, white background assets also make content reuse simpler.
That said, not every shoe image should be plain white. Most ecommerce brands benefit from three background types:
If your current setup makes background cleanup slow, AI-assisted editing tools may help. AcquireConvert covers adjacent topics such as ai fashion workflows, which can be useful when you are balancing catalog accuracy with faster content production.
For a broader view of clean catalog imagery standards, it is also worth reviewing AcquireConvert’s White Background Photography category.
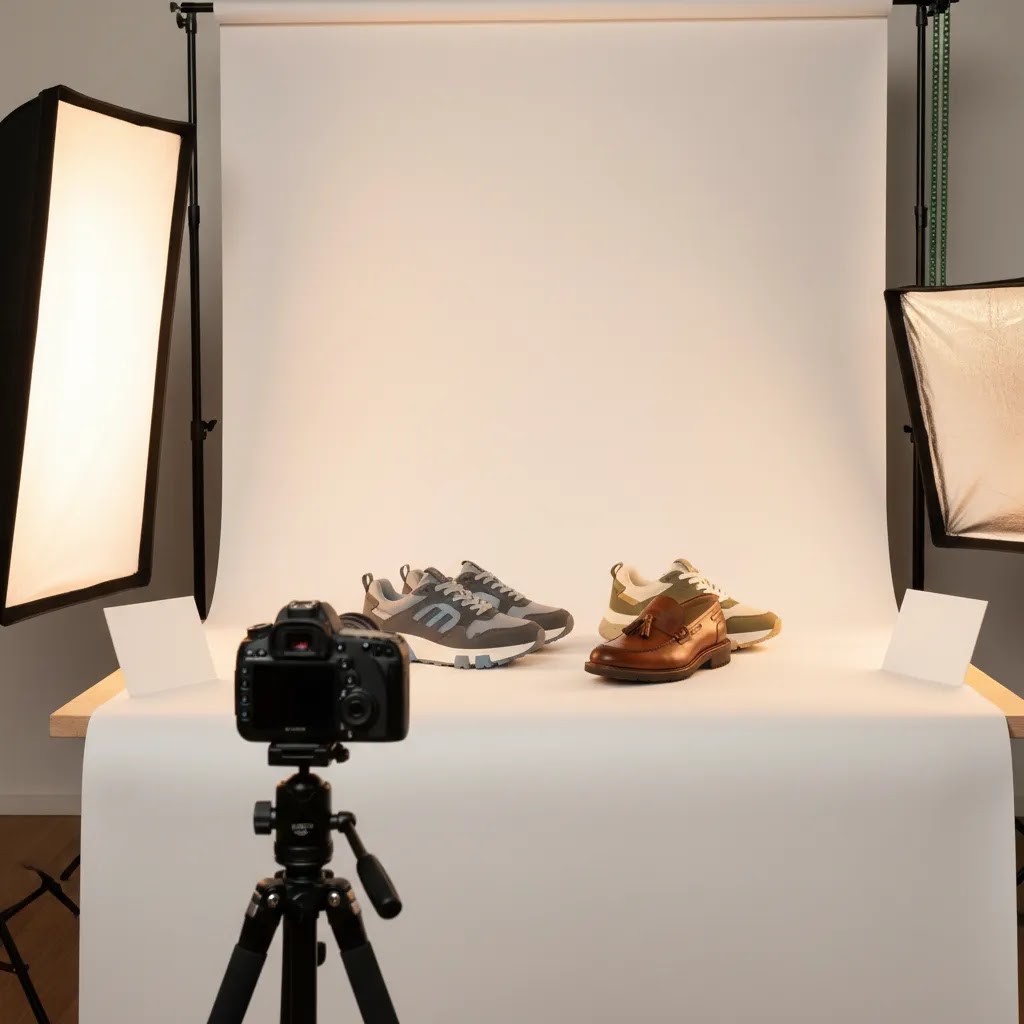
A practical product photography setup for shoe brands
You do not need an oversized studio to get strong results, but you do need a repeatable setup. For most growing ecommerce brands, the best product photography setup includes a table, seamless background paper, two soft light sources, reflectors, a tripod, and a camera or modern smartphone with manual control options.
A simple workflow looks like this:
If your catalog is expanding, consider whether an in-house setup is still efficient or whether a specialist product photography studio could handle volume more consistently. The right answer depends on SKU count, launch frequency, team capacity, and your tolerance for reshoots.
For founder-led brands, the mistake is often overinvesting in gear before building a consistent process. A modest setup with a documented shot list usually outperforms a more expensive setup run inconsistently.
Helpful editing and AI tools for shoe photography workflows
Once the photo is captured, post-production often becomes the bottleneck. That is especially true for white background cleanup, shadow control, and preparing variants quickly. Based on current AcquireConvert product data, a few tools are relevant for ecommerce image workflows:
These tools may save time, but they are not a substitute for getting the angle, lighting, and product prep right in the first place. AI editing tends to work best as a production support layer, not as a fix for poor source photography.
If your apparel brand is also testing creative automation more broadly, AcquireConvert’s guide to ai clothing generator workflows can help you think through where AI fits and where human direction still matters.
For wider inspiration and process ideas, the Fashion & Apparel Photography section is a useful next stop.
Pros and Cons
Strengths
Considerations
Who this approach is for
This approach suits Shopify merchants, DTC shoe brands, apparel retailers, and small ecommerce teams that want images to be both conversion-friendly and operationally realistic. It is especially helpful if you are shooting sneakers, sandals, boots, or fashion footwear in-house and need a repeatable method that works across many SKUs.
If you run frequent launches, want better product page consistency, or are comparing DIY product photography against agency support, these guidelines give you a practical baseline. If your brand depends heavily on editorial campaigns, you may still need a second creative workflow beyond standard ecommerce packshots.
How to choose your shoe photography approach
There is no single best product photography model for every store. The right setup depends on your assortment, margin profile, internal resources, and how heavily visuals influence conversion in your category.
1. Start with your sales channel requirements
If your primary focus is your own Shopify store, you have more flexibility in image sequencing and lifestyle content. If you also sell on marketplaces or retail platforms, white background compliance and consistent packshots become more important. Build the core image set around the strictest channel first.
2. Decide whether speed or control matters more
In-house shooting gives you control over restocks, new arrivals, and quick revisions. Outsourcing may improve consistency and reduce team strain if your volume is high. Many growth-stage brands use a hybrid approach: studio-standard white background images for the catalog and lighter internal production for social or testing.
3. Match production quality to product value
Premium leather shoes, technical running footwear, and design-led fashion pieces usually deserve more detail shots and stricter color control. Lower-priced basics may not need the same production intensity. Your image standards should reflect how much visual reassurance the customer needs before buying.
4. Be realistic about editing time
A lot of brands underestimate post-production. Background cleanup, file naming, cropping, retouching, and export formatting can consume more time than the shoot itself. If editing is your bottleneck, process improvements or selective automation may have a bigger impact than buying a new camera.
5. Build for repeatability, not one perfect shoot
The best shoe product photography system is the one your team can repeat every week. Document your shot list, camera height, lighting placement, naming conventions, and editing presets. That gives you a scalable workflow whether you keep production in-house or hand part of it to a partner later.
AcquireConvert’s content is useful here because it connects image production decisions to wider ecommerce performance. Giles Thomas brings a Shopify Partner and Google Expert perspective to how product visuals support search visibility, paid traffic efficiency, and on-site conversion behavior. If you are comparing imagery workflows across apparel categories, the related resources on apparel photography can help you evaluate the trade-offs more clearly.
Frequently Asked Questions
What is the best angle for shoe product photography?
The side profile is usually the most important starting angle because it shows the shoe’s overall silhouette quickly. Still, one angle is rarely enough for ecommerce. Most stores should also include a three-quarter front view, top view, back view, and sole shot so shoppers can judge design and construction more confidently.
Do I need a white background for shoe photos?
For most ecommerce catalogs, yes. A white background works well for hero images, collection pages, and multichannel selling because it keeps the focus on the shoe and creates consistency. Lifestyle backgrounds can still be valuable for ads and brand storytelling, but they usually work best as supporting images rather than the primary product photo.
Can I do DIY product photography for shoes?
Yes, many small and mid-sized brands can handle shoe photography in-house with a simple setup. The key is consistency. Use the same angles, lighting, camera placement, and editing process for every SKU. DIY works best when your catalog size is manageable and someone on the team owns the workflow from prep through post-production.
What camera works best for shoe product photography?
A dedicated camera can give you more control, but a modern smartphone can still work for many ecommerce teams if lighting and stabilization are handled well. What matters most is sharp focus, color accuracy, and repeatable framing. Before upgrading gear, make sure your current lighting and shooting process are not the real issue.
How many photos should I show for each shoe?
Five to seven images is a practical range for many stores. Start with the hero image on white, then add alternate angles, detail shots, and one contextual image if helpful. Higher-consideration products may need more close-ups, especially if material quality, tread, cushioning, or hardware are part of the purchase decision.
Are AI tools useful for shoe product photography?
They can be useful for specific editing tasks such as background cleanup, scene variation, or resolution enhancement. They are less reliable as a replacement for good source photography. If your original lighting, angle, or product prep is weak, AI tools may still leave you with results that feel inconsistent or unnatural for ecommerce use.
Should I outsource shoe photography to a studio?
That depends on your SKU volume and internal capacity. If launches are frequent and your team is spending too much time shooting and editing, a studio may be worth considering. If volume is lower and you need quick turnaround for small batches, an in-house workflow may be more practical and cost-effective.
How do I make shoes look more premium in photos?
Focus on shape, material texture, and lighting control. Clean the product carefully, support the form with inserts if needed, and use soft directional light that adds depth without harsh shadows. Premium presentation usually comes from disciplined styling and consistency, not from heavy retouching or overly dramatic creative effects.
What is the 3 shoe rule?
The “3 shoe rule” is a styling principle some photographers use for lifestyle or lookbook images: include three shoes in the scene to create a more dynamic composition, for example a pair on-foot plus a third shoe as a prop, or two shoes plus one shoe shown in-hand. It is not a requirement for ecommerce packshots. For product pages, clarity usually beats creativity, so use this idea mainly for social or campaign images where mood and storytelling matter.
What is the 20 60 20 rule in photography?
The 20 60 20 rule is often used as a rough planning guideline: spend about 20% of your effort on setup and prep, 60% on capturing the core shots consistently, and 20% on finishing and variations. For shoe product photography, that usually translates to disciplined shoe prep and lighting tests, a standardized angle sequence for every SKU, then batching your edits and exports so the catalog stays consistent.
How do I photo shoes to sell?
Start with a clean white background hero image, then show a standardized set of angles that answer buying questions fast: side profile, three-quarter front, top-down, rear, and sole. Add close-ups where materials and construction influence value, and keep lighting and color consistent across your whole Shopify catalog. If you also want lifestyle images, treat them as support assets, not replacements for clear packshots.
How do I take shoe photos for Instagram?
Instagram shoe photos usually perform better when they show context and styling, not just a plain catalog view. On-foot shots, movement, and a simple scene can help, but try to keep color accurate and avoid heavy filters that make materials look different from your product page. If you want the feed to feel cohesive with your Shopify PDP, keep your editing consistent, and consider shooting your packshots and a few social-first variations in the same session.
Key Takeaways
Conclusion
Good shoe product photography is a mix of clear angle planning, controlled lighting, clean backgrounds, and a process your team can repeat without reinventing it every shoot. For most ecommerce brands, the biggest gains come from consistency, not complexity. If shoppers can quickly understand the silhouette, materials, and key details, your images are doing their job. AcquireConvert exists to help store owners make these decisions with a practical ecommerce lens. If you want to go further, explore AcquireConvert’s related apparel photography resources and AI workflow guides to see how experienced Shopify-focused operators structure image systems that support both merchandising and conversion.
This article is editorial content created for educational purposes and is not a paid endorsement unless explicitly stated otherwise. Tool availability and features may change over time, so verify current details directly with the provider before use. Any photography, conversion, or workflow outcomes mentioned here depend on your store setup, product type, team process, and execution, and are not guaranteed.

Hi, I'm Giles Thomas.
Founder of AcquireConvert, the place where ecommerce entrepreneurs & marketers go to learn growth. I'm also the founder of Shopify agency Whole Design Studios.