Best Ecommerce Photo Editing Software (2026)
If you sell online, your product images do more than make your store look polished. They shape trust, reduce hesitation, and often influence whether a shopper clicks, zooms, or buys. That is why choosing the best ecommerce photo editing software matters. The right tool can help you remove distracting backgrounds, standardize white-background shots, create lifestyle variations, and speed up production without dragging your team into a complicated design workflow. If you are comparing options right now, this guide is built to help you choose based on actual store needs, not generic photo-editing wish lists. If you want a broader stack view as well, AcquireConvert’s guide to ecommerce tools is a useful next stop.
Contents
What Makes Photo Editing Software Good for Ecommerce
The best ecommerce photo editing software is not always the most advanced editor. For most store owners, the better choice is the one that gets product images store-ready with the least friction. That usually means fast background cleanup, consistent output sizes, simple retouching, and enough flexibility to create both catalog and lifestyle visuals.
For ecommerce, the software has to support commercial image workflows. You may need pure white backgrounds for marketplaces, transparent PNGs for design use, resized images for Shopify collections, or alternate scenes for ads and landing pages. If a tool is great for creative portrait work but slow for batch product edits, it may not be the right fit.
Based on the current tool data available, several options stand out for practical store use: AI Background Generator, Free White Background Generator, Increase Image Resolution, Remove Text From Images, Background Swap Editor, Place in Hands, Magic Photo Editor, and Creator Studio.
These tools lean heavily toward ecommerce image preparation rather than general graphic design. That matters if your goal is to publish more product photos, faster, with fewer manual edits.
Key Features to Evaluate
1. Background editing for product consistency
For many online stores, background editing is the first filter. If you shoot products in mixed conditions, software that can generate, replace, or clean up backgrounds can save significant time. Tools like AI Background Generator, Free White Background Generator, and Background Swap Editor are especially relevant if you need marketplace-friendly product shots or want to test different visual styles across product pages.
2. Resolution improvement for zoom and detail
Low-resolution images can hurt perceived product quality. Increase Image Resolution is useful when you need sharper detail for product page zoom, retina screens, or cropped ad creatives. This can be particularly helpful for stores with legacy product photos that need improvement without a full reshoot.
3. Editing flexibility for merchandising and ads
Some stores need more than cleanup. If you want to create campaign visuals, alternate scenes, or enhanced merchandising images, Magic Photo Editor and Creator Studio offer a broader editing environment. That makes them more suitable for teams producing not just PDP photos but also email, social, and seasonal campaign assets.
4. Ecommerce-specific presentation features
General photo software may give you hundreds of controls you never use. Ecommerce-focused tools are often more valuable because they solve common retail tasks directly. Place in Hands, for example, helps create contextual images that can make products feel more tangible. That can be useful for beauty, accessories, tech, and small packaged goods where scale and use context matter.
5. Workflow speed for growing catalogs
If you update products weekly, speed matters almost as much as quality. Lightweight editors with narrow, specific functions can outperform larger creative suites for store operations. Many merchants do not need a designer-grade workstation. They need a repeatable process that one person can manage between inventory updates, promotions, and site merchandising.
That is why your choice should reflect your catalog and sales channels. A large SKU count usually favors streamlined editors. A premium brand with strong creative direction may need a more flexible editing setup, and sometimes even support from an ecommerce product photographer for hero imagery.
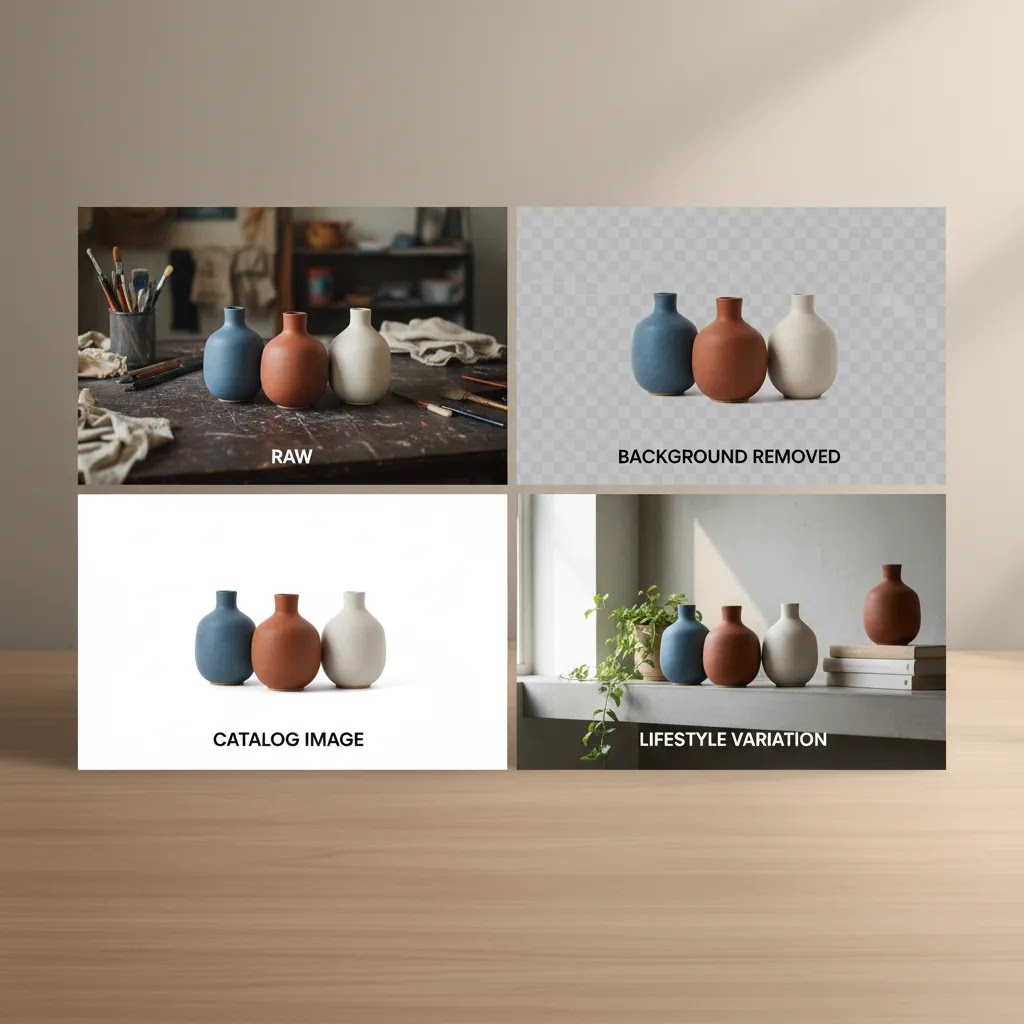
How to Edit Ecommerce Product Photos (Step-by-Step Workflow)
Here is the thing. Most stores do not need a complicated editing process. They need a repeatable workflow that produces consistent results across a catalog, even when multiple people touch the images.
The way this works in practice is simple: you want to standardize decisions. Background style, crop, color, shadow, export size, and naming should not change from product to product unless there is a clear reason.
Step 1: Start with the best source image you can get
If you control photography, aim for consistent lighting and camera settings across a collection shoot. If you do not control photography, for example you are working with supplier images, pick the cleanest, highest-resolution file as your master and do not edit from a compressed version pulled from a PDF or website.
If you are using AI tools to generate lifestyle scenes or clean up backgrounds, start with a crisp base image. AI can help with production, but it cannot reliably invent missing product details without risk, which is why human review matters before anything goes live.
Step 2: Remove or standardize the background
For most Shopify store owners, this is the highest-impact edit because it changes how your collection grid looks immediately. If you need marketplace-style images, a clean white background is usually the safest standard. If you are building a premium feel, you may choose a light neutral tone, a soft gradient, or consistent lifestyle scenes for specific collections.
From a QA standpoint, the background step is where errors usually show up. Pay attention to edges around hair, transparent packaging, handles, and product cutouts with holes or gaps.
Step 3: Correct exposure and color, then match across variants
Exposure and white balance are not just aesthetic. They affect perceived product quality and returns risk. Shoppers use photos to judge shade, material, and finish, so keep corrections realistic. If you sell variants, make sure colors look consistent across the set, and that one variant is not noticeably warmer, darker, or more saturated than another.
Consider this when you sell apparel or beauty. If the photo makes one color look different than it is, you may see more customer support friction later.
Step 4: Crop, align, and standardize framing for the catalog
Collection pages reward consistency. Pick an aspect ratio and stick to it, then crop so the product occupies a similar amount of space in each image. This is one of the easiest ways to make your store look more premium without changing your theme.
If you sell products with very different shapes, use a consistent margin rule. For example, keep the same amount of empty space around the product on all sides, so images feel balanced in the grid.
Step 5: Add realistic shadows if needed, then keep them consistent
Many stores overlook shadow style, but shoppers notice when one product looks like it is floating and another looks grounded. If you use shadows, keep the direction, softness, and intensity consistent. If you use AI to generate shadows, check that the shadow matches the product footprint and does not create an odd halo along the edge.
Step 6: Export for web, then do a final ecommerce QA check
Before you upload to Shopify, export with consistent settings, then check images at the sizes shoppers actually see. Zoom quality matters, but page speed matters too, so you are balancing detail with file weight.
Use a simple QA checklist before publishing:
Batch workflow tips for larger catalogs
Batch editing is where software choice really shows up. If you have dozens or hundreds of SKUs, you want to standardize your workflow the same way you standardize your product data.
Pros and Cons
Strengths
Considerations
When to Use a Photo Editing Service vs Software (Cost, Scale, Control)
For most Shopify store owners, the software route makes sense when you need day-to-day control. You can edit new arrivals, adjust seasonal imagery, and keep the catalog consistent without waiting on a third party.
At the same time, there are cases where a photo editing service is simply more practical. The reality is that some products are hard to edit well, and some catalogs are too large to keep up with in-house, especially during launches.
When a service may be a better fit
What to ask a product photo editing service for ecommerce
A hybrid approach usually works best
What many store owners overlook is you do not have to choose one or the other. A common setup is to use a service for complex hero imagery or tricky categories, then use software for ongoing catalog maintenance, supplier-image cleanup, and creating variations for ads and landing pages. That keeps quality high where it matters most, while still giving you speed and control for daily operations.
Who This Kind of Software Is For
This category is a good fit for Shopify merchants, marketplace sellers, and ecommerce teams that need to publish product visuals quickly without building a full in-house design operation. It is especially useful if you handle frequent SKU launches, run seasonal campaigns, or need to turn supplier photos into cleaner storefront assets.
If you are a solo operator, the best option is usually the tool that removes technical friction. If you run a larger brand team, broader editors like Creator Studio may make more sense because they support multiple use cases beyond simple cleanup. If your products need high-touch creative direction, you may pair software with a product photography studio rather than relying on software alone.
AcquireConvert Recommendation
If you are deciding between ecommerce photo editing options, start by matching the software to the exact image workflow that slows you down today. Many store owners do not need a giant editing suite. They need faster white-background conversion, sharper product detail, or more realistic merchandising images for ads and product pages. That practical filter is how we recommend approaching this category.
AcquireConvert looks at tools through the lens of real store operations, not abstract feature lists. That reflects Giles Thomas’s experience as a Shopify Partner and Google Expert, where image quality connects directly to product page performance, Shopping clicks, and conversion confidence. For more context on visual merchandising and experimentation, you can compare options like a mockup generator and also review how product photos increase conversion rate. If you want a broader category view, our E Commerce Product Photography resources are a strong next step.
How to Choose the Right Tool
Start with your most repeated task
Look at what your team does every week, not once a quarter. If you repeatedly remove backgrounds, a focused option like Free White Background Generator or AI Background Generator may be enough. If you often need flexible scene building, merchandising edits, and campaign variations, Magic Photo Editor or Creator Studio may be the better fit.
Consider where the images will be used
Catalog images, Shopify product pages, Meta ads, Google Shopping creatives, and email banners all have different needs. For clean catalog presentation, consistency matters most. For ad creative, context and variation matter more. Your software should match the output requirements of your most important sales channels.
Check how much manual review is still needed
Fast editing is helpful only if the output is accurate. Before committing, test edge quality, shadow realism, product color fidelity, and shape accuracy. This is especially important for apparel, cosmetics, glassware, and reflective packaging. AI support can speed up editing, but you still need human review before publishing.
Think about scale, not just single-image quality
One polished hero image is not the same as managing a 500-SKU catalog. If you are growing, choose software that can support a repeatable workflow. A slightly simpler tool that works consistently across your catalog may be a better business decision than a more advanced editor that slows your team down.
Do not ignore brand standards
Your product photos should feel like they belong to the same store. That means consistent cropping, lighting style, spacing, and background treatment. If you do not have visual guidelines yet, create a simple checklist before adopting any software. Even the best tool will produce uneven results if every team member edits differently. For stores improving image quality from the ground up, AcquireConvert’s Background Removal & Editing category is worth bookmarking.
Shopify-Ready Image Specs and File Optimization (Speed + Consistency)
Now, when it comes to Shopify, image quality is not just about looking good. It is also about speed, consistency in the grid, and avoiding surprises when your theme crops images across collection pages.
From a practical standpoint, you want a standard export strategy that your whole team follows. That keeps your storefront consistent and helps prevent slow-loading product pages, especially on mobile.
File format: JPEG vs PNG vs WebP
Most product photos should be exported as JPEG because it gives good quality at a smaller file size for photographic images. PNG is usually best when you truly need transparency, for example if you are placing a product cutout into other designs. WebP can offer smaller files at similar quality, but your workflow depends on what your editing tool exports and how your Shopify theme and apps handle the format.
Think of it this way. Use JPEG for most catalog photography, use PNG only when you need transparency, and test WebP if your tool supports it and your store setup reliably displays it without issues.
Sizing strategy: keep zoom quality without making pages heavy
Shoppers want to zoom, especially for details like texture, seams, ingredients, and finishes. At the same time, large files slow down page loads, and slow pages can reduce buyer confidence. The goal is not maximum resolution at any cost. The goal is enough resolution that images look sharp on modern screens, with compression that keeps files reasonably light.
A simple approach is to export a consistent maximum dimension that matches how your theme displays product images, then compress to a level that still looks sharp when zoomed. If you are seeing soft images, you may be over-compressing. If you are seeing slow pages, you may be exporting files that are larger than the theme needs.
Compression: avoid the two common mistakes
The first mistake is uploading huge images straight from a camera or supplier without compression. The second mistake is compressing too aggressively so your product looks muddy, text on packaging turns unreadable, or fine details smear.
Before you standardize an export setting, test with a few real products. Check the main image on mobile, check zoom on desktop, and check that the image still looks clean after Shopify processes it.
Consistency rules that matter for Shopify themes
Most Shopify themes reward consistent aspect ratios. If you upload a mix of tall portraits, wide landscapes, and square crops, your collection grid can look uneven. That can make a catalog feel messy even if each individual photo is good.
Pick an aspect ratio that fits your product category and stick to it across a collection. If your product shapes vary a lot, use a consistent margin rule so products appear at a similar scale.
Operational tips for team workflows
If more than one person touches images, small standards make a big difference.

Frequently Asked Questions
What is the best ecommerce photo editing software for Shopify store owners?
The best option depends on the job you do most often. If you mainly need cleaner product cutouts and white backgrounds, focused tools like AI Background Generator or Free White Background Generator may be enough. If you also build campaign assets and merchandising creative, Creator Studio or Magic Photo Editor may be a better fit for a Shopify workflow.
Do I need full design software for ecommerce photo editing?
Not always. Many ecommerce merchants only need a few high-frequency functions such as background cleanup, resolution improvement, and simple image enhancements. If that sounds like your workflow, specialized editing software can be more practical than a full creative suite. Full design tools are more useful when you need advanced retouching, compositing, or wider brand asset production.
Is AI photo editing good enough for product images?
In many cases, yes, especially for repetitive tasks like background editing, white-background conversion, and scene variations. Still, AI output should be checked carefully before publishing. Product color, edges, reflections, scale, and packaging details all need review. For high-ticket or detail-sensitive products, AI editing may work best as a first pass rather than the final approval stage.
Can ecommerce photo editing software replace a professional photographer?
Usually not entirely. Software can improve existing images and speed up post-production, but it does not fully replace a strong source image. For hero photography, luxury products, or highly stylized branding, professional photography often remains the better choice. Many stores use both: professional shoots for core assets, then editing software for scaling variations and maintaining consistency.
What features matter most for ecommerce photo editing?
The most important features are usually background editing, white-background output, resolution enhancement, consistent cropping, and quick export for product pages and ads. If you create lifestyle or promotional content, scene editing and contextual placement features matter too. The best software is the one that solves your most repeated merchandising task with the least extra work.
Does better photo editing improve conversions?
Better image quality can improve clarity, trust, and product understanding, which may support stronger conversion performance. But results vary by category, traffic quality, pricing, and page design. Photo editing should be seen as one part of a larger conversion system. Product page copy, reviews, offers, and site speed still play important roles alongside image quality.
What if I only need white background product photos?
If white-background compliance is your main requirement, a specialized option like Free White Background Generator may be more efficient than broader editing software. This is often the smartest route for merchants selling on marketplaces or maintaining very uniform catalog pages. Test a few outputs first to confirm the edge quality and product realism meet your brand standards.
How do I choose between a focused tool and a broader editor?
Choose a focused tool if your workflow is repetitive and narrow, such as removing backgrounds or improving resolution. Choose a broader editor if your team creates multiple asset types across PDPs, ads, email, and social. The right answer often comes down to workflow volume, team size, and whether you need production speed or creative flexibility more urgently.
Should I use mockups instead of edited product photography?
Mockups can be useful for previews, merchandising concepts, and some promotional assets, but they are not always a substitute for real product photography. For many stores, a blend works best: real product images for trust and accuracy, then mockups for variation and testing. If that is part of your workflow, compare software choices alongside a mockup generator.
What is the best photo editing service for eCommerce products?
The best service is the one that can hit your brand standards consistently at the turnaround time you need. When you evaluate a service, ask for sample outputs using your real images, and review edge quality, shadow style, and color matching across variants. Make sure their revision process is clear, because most ecommerce teams need at least one round of tweaks to match their exact cropping and background rules.
How to edit e-commerce product photos?
A practical workflow is: start with the best source image, standardize or remove the background, correct exposure and color, crop and align to match your catalog framing, add consistent shadows if you use them, then export for web and do a final QA check for edges, color accuracy, and sharpness. If you are editing at scale, presets and batch workflows matter as much as individual image quality.
What photo editing software do most photographers use?
Many professional photographers use Adobe Lightroom for batch corrections and color consistency, and Adobe Photoshop for detailed retouching and compositing. For ecommerce teams, the best choice is not always what photographers use. Stores often benefit from ecommerce-specific tools that speed up repetitive tasks like background cleanup, white-background conversion, and merchandising variations.
What is the 20 60 20 rule in photography?
The 20 60 20 idea is often used as a rule of thumb for where results come from. Around 20% is the gear and technical setup, around 60% is lighting and capture fundamentals, and around 20% is editing and finishing. For ecommerce, the takeaway is simple. You can improve images with editing software, but consistent lighting and good source photos usually do most of the heavy lifting.
Key Takeaways
Conclusion
The best ecommerce photo editing software is the one that helps you publish cleaner, more consistent product images without turning image prep into a bottleneck. For some stores, that means a simple background or white-background tool. For others, it means a broader editor that can support merchandising, ad creative, and ongoing campaign production. The right choice depends on catalog size, creative needs, and how hands-on your team can be.
If you want help narrowing the field, AcquireConvert is built for exactly this kind of decision. Giles Thomas brings a practitioner’s view as a Shopify Partner and Google Expert, with practical guidance for merchants who need tools that fit real ecommerce workflows. Explore our product photography resources, compare related tools side by side, and use the next guide that matches your workflow rather than guessing your way through another software trial.
This article is editorial content and not a paid endorsement unless explicitly stated otherwise. Pricing was not available in the current product data feed and should be verified directly with each provider, as rates and feature availability are subject to change. Any performance impact from photo editing software will vary by store, traffic, product category, and implementation, so results are not guaranteed.

Hi, I'm Giles Thomas.
Founder of AcquireConvert, the place where ecommerce entrepreneurs & marketers go to learn growth. I'm also the founder of Shopify agency Whole Design Studios.