How to Photograph Products for Online Store (2026 Guide)
You spend time getting traffic to your store, polish your product titles, and maybe even run paid ads, but shoppers still hesitate. In many cases, the problem is not your offer. It is your product photography. If your images look dark, inconsistent, low resolution, or unclear about size and detail, customers start filling in the gaps themselves, and that usually hurts conversion.
If you have been wondering how to photograph products for online store use without hiring a full creative team, you are in the right place. This guide walks you through the practical setup, lighting, framing, styling, and editing decisions that matter most for ecommerce. You will also see when DIY photography is enough, when templates or a mockup generator can help, and when it makes more sense to invest in ecommerce tools that speed up the workflow. For Shopify store owners especially, strong product images often do two jobs at once, they improve shopper confidence and support better page performance across product pages, collections, and ads.
Contents
Why product photos matter more than most stores think
When customers cannot touch a product, your images become your sales floor. They answer the questions shoppers would normally solve in person: What does it really look like? How big is it? What is the texture like? Will the color look the same in daylight? Is the finish glossy or matte?
That is why learning how to photograph products for your website is not just a branding task. It is a conversion task. Better imagery may reduce hesitation, strengthen trust, and improve add-to-cart behavior, especially when your photos show both the clean catalog view and the in-use context.
What many store owners overlook is consistency. One strong image does not fix a messy gallery. If some products have bright white backgrounds, others have yellow indoor lighting, and others are cropped differently, the whole store feels less reliable. AcquireConvert often covers this overlap between visual presentation and conversion strategy, and Giles Thomas's background as a Shopify Partner and Google Expert gives useful context here: the image choices that help customers buy are often the same ones that make merchandising cleaner across your store.
If you want a deeper look at the commercial impact, this guide on how product photos increase conversion rate is a useful companion read.
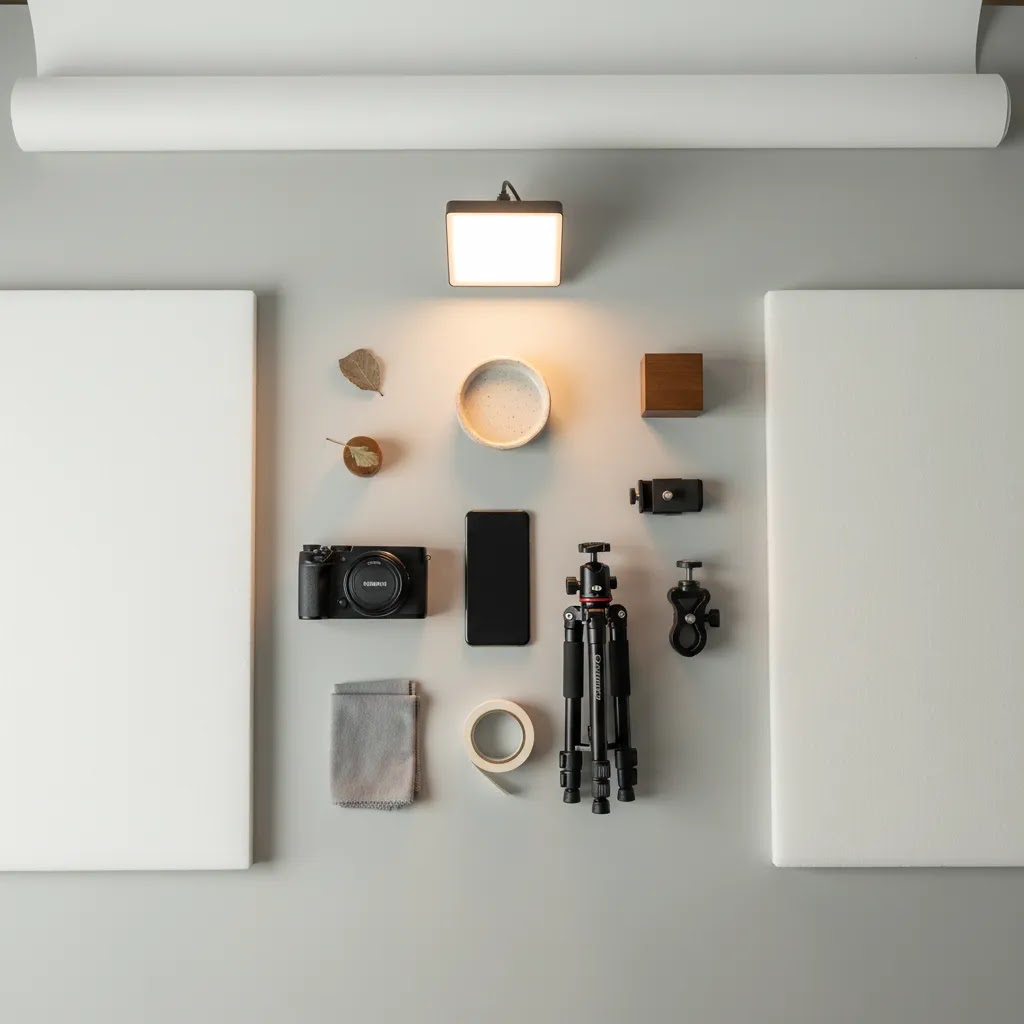
What you need before you start shooting
You do not need a full studio to photograph product well. You do need control. From a practical standpoint, controlled light, a stable camera position, and a repeatable setup matter more than expensive gear.
A simple beginner setup that works
Stability matters because ecommerce photography is less about artistic spontaneity and more about repeatability. If you are photographing ten products in a collection, customers should feel like they belong together.
Prepare the product before the camera comes out
Clean every item carefully. Dust, fingerprints, wrinkles, loose threads, and tiny scratches all become more visible once you zoom in on a product image or view it on a large desktop display.
Think of it this way: editing can fix some issues, but it usually takes longer than cleaning the product first. For reflective products like skincare packaging, sunglasses, metal accessories, or glassware, prep work can save you hours.
If you are building out your broader workflow, AcquireConvert's hub on E Commerce Product Photography is worth bookmarking.
How to take product photos with a phone that look consistent
A phone is often the fastest path to good enough product photography, especially if you are launching a Shopify store, adding new SKUs weekly, or trying to keep content costs under control. Here is the thing though: phone cameras are very good, but they also make it easy to shoot inconsistent images across sessions if you do not lock down a few habits.
The goal is not to turn your iPhone or Android into a studio camera. The goal is to create repeatable inputs so your lighting and edits behave the same way from product to product.
Use the rear camera, lock focus and exposure, and avoid wide angle distortion
Start with the rear camera. It is typically sharper than the selfie camera, and it usually handles detail and texture better.
Then lock focus and exposure before you shoot. On most phones, you can press and hold on the product to lock, then adjust exposure up or down slightly so your whites are not blown out and your blacks still have detail. This matters a lot for packaging, labels, and anything with fine print.
Now, when it comes to lenses: avoid shooting very close with an ultra wide lens. Wide lenses can warp edges, make products look stretched, and distort proportions. For small products, step back a bit and shoot at 1x, or use 2x if your phone has an optical 2x option. You will typically get cleaner edges and more natural shape, which is exactly what shoppers expect on a product page.
Simple phone camera settings and habits that improve consistency
Most store owners do not need advanced manual camera apps to get solid results. You do need a few consistent habits that reduce variation:
Consider this: the shopper does not care what format you shot in. They care that every product in a collection looks like it belongs in the same store.
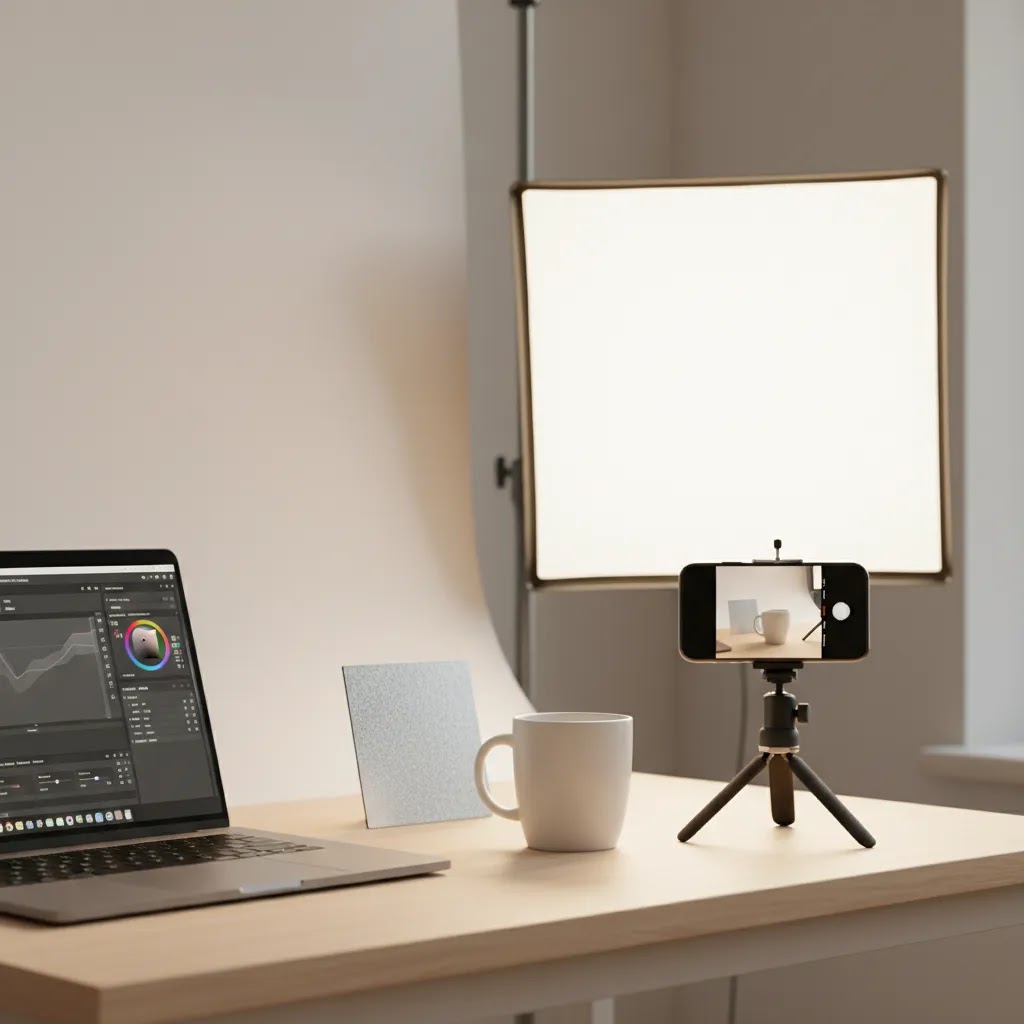
An at-home phone setup that looks studio-like
You can build a surprisingly effective setup with simple materials. A small phone tripod with a mount gives you repeatable framing, which is the hardest part to fake without a stable camera position.
For lighting control, use white foam board or even plain white card as bounce. Place it opposite your main light source to lift shadows. If you need to reduce glare on glossy packaging, a larger white card placed slightly above and in front of the product can create a softer reflection.
For backgrounds, aim to keep the same backdrop material and the same light source from session to session. Mixing warm household bulbs with daylight is one of the fastest ways to get inconsistent color across products. If you must shoot across multiple days, take one reference image at the start of each session with the same product and setup, so you can match your edits later.
How to light products for photography
Lighting is the part most likely to separate an amateur-looking image from a product photo that feels store-ready. If you are trying to figure out how to light products for photography, start by aiming for soft, even light that reveals shape without creating harsh glare.
Natural light can work, if you control it
A bright window with indirect light is often enough for small products. Place the product near the window, then use a white board on the shadow side to bounce light back in. This can work very well for handmade items, beauty products, ceramics, stationery, and apparel details.
The downside is inconsistency. Cloud cover changes. Time of day changes. If you need to reshoot later, matching the look can be difficult.
Artificial light gives you consistency
For most Shopify stores with growing catalogs, softboxes or LED panels are more reliable. Position one main light at a 45-degree angle to the product and use a reflector or second softer light on the opposite side. This gives shape while keeping shadows controlled.
Avoid mixing light temperatures. If daylight from a window hits one side of the product and a warm lamp hits the other, your colors may shift in ways that are hard to correct later.
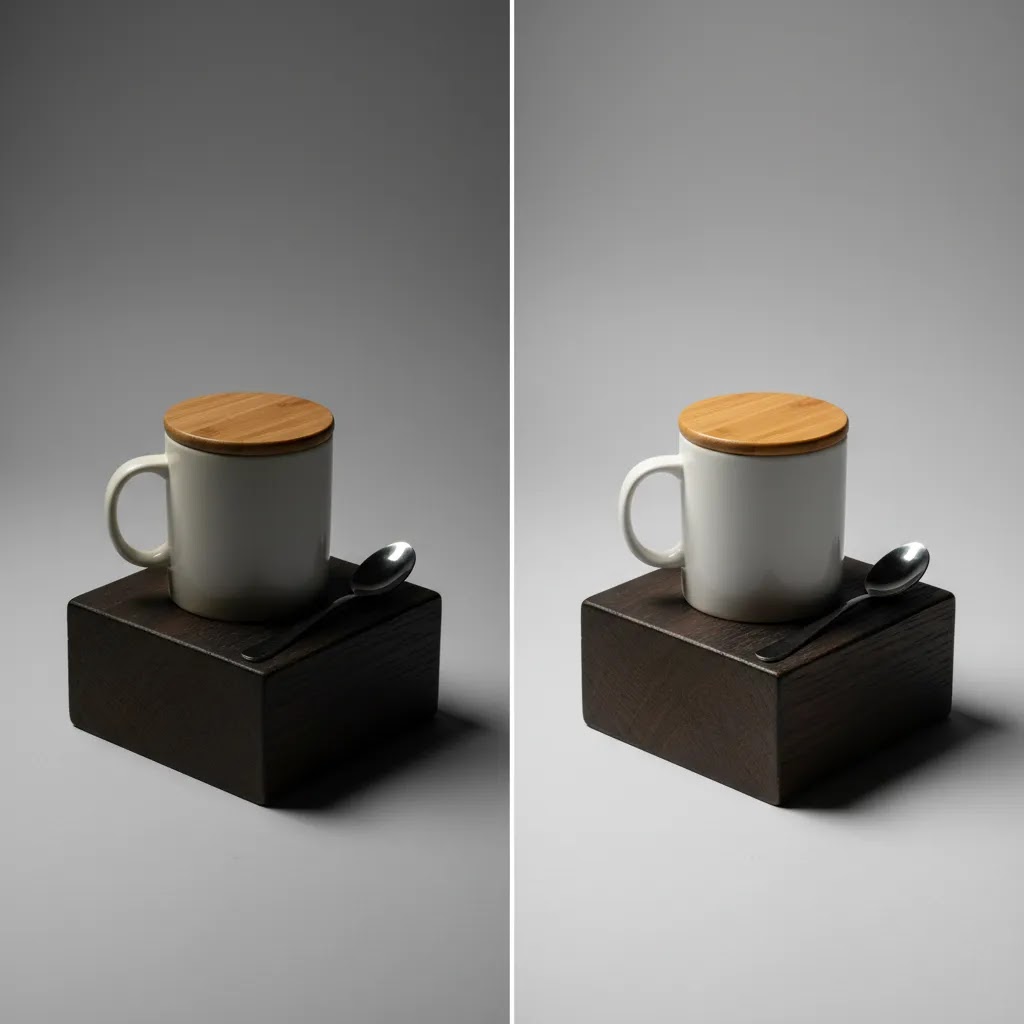
White background does not mean flat lighting
Many stores assume a white background means blasting the whole setup with light. The reality is that overlighting can wash out details and make products look cheap. You still want depth, edge definition, and accurate color.
That is especially true if you later use editing tools such as Free White Background Generator or AI Background Generator. These can help with cleanup and variation, but the starting image still needs decent lighting and separation from the background. Features and availability may change, so verify current tool details directly with the provider.
Product photography rules people ask about, and what actually matters for ecommerce
If you search photography forums long enough, you will run into rule-style advice that sounds official. Store owners then bring those questions into ecommerce context, hoping there is a single trick that makes product photos look professional.
The reality is that ecommerce product photography is less about secret rules and more about repeatability, accuracy, and trust. Still, a couple of these rules come up often enough that it is worth translating them into what actually moves the needle for a Shopify store.
The 80/20 rule in product photography
The 80/20 idea shows up everywhere, but in product photography it is simple: a small set of improvements typically drives most of the perceived quality for shoppers.
For most Shopify stores, that small set looks like this:
What many store owners overlook is that shoppers compare products quickly. If your hero images feel consistent and your gallery answers obvious questions, your store feels more trustworthy, even if you did not use expensive gear.
What is the 400 rule, and does it matter for ecommerce?
You may see people mention a “400 rule” in photography communities. It is usually discussed as a guideline around exposure settings and light levels, depending on the context and the type of camera being used.
From a practical standpoint, most ecommerce store owners do not need to chase that kind of rule. What you actually need is a lighting setup you can repeat without surprises:
Think of it this way: you are not trying to win a photography debate. You are trying to create images that look consistent on product pages, collection grids, emails, and ads.
A quick checklist that matters more than any rule
If you want a simple quality filter before you upload photos to Shopify, focus on these:
Get those right, and most of the “rule” questions stop mattering.
How to photograph products step by step
If you are looking for a repeatable system for how to take product photos for online store use, this is the simplest one to follow.
1. Choose the image types before you shoot
Do not start with random angles. Decide which images each product needs. For most stores, that includes:
This is one reason product galleries often underperform. They show multiple photos, but not multiple decision-making angles.
2. Frame consistently
Keep the product centered or intentionally aligned across your catalog. Use the same crop ratio and camera height for similar items. On collection pages, inconsistency becomes obvious fast.
3. Shoot more detail than you think you need
Customers buying online often want reassurance around seams, closures, labels, texture, finish, and scale. In practice, this means tight detail shots are often just as important as the main image.
4. Check focus and exposure on a large screen
A shot can look fine on your phone and still fail on desktop. Review images larger before you move on. Soft focus, clipped highlights, and minor dust problems are easier to catch early than during upload.
5. Keep Shopify image use in mind
For most Shopify stores, your product image is not only for the product page. It may appear in collection grids, featured product sections, search results, emails, and ads. That means your hero image should still read clearly when it is cropped down. If you need deeper foundational guidance, the Product Photography Fundamentals category is a good next stop.
How to shoot product photos for Instagram and still use them on Shopify
For many store owners, Instagram is not a bonus channel. It is where product discovery happens, and it often supports retargeting later through ads. The mistake is treating Instagram photography as a separate workflow from your Shopify product pages, which usually doubles your time and still leads to inconsistent visuals.
The way this works in practice is planning one shoot that produces both: a clean set of ecommerce-ready images, plus a handful of social-first crops and moments.
Frame for square and vertical crops without losing the product page hero
Instagram pushes square and vertical formats, while Shopify hero images often need to work in grids and smaller thumbnails. You can support both by shooting slightly wider than you think you need. Leave some negative space around the product so you can crop for 1:1 or 4:5 later without cutting off key details.
If you use a phone, this is another reason to avoid shooting too close on a wide lens. You want a natural shape that still looks accurate when someone zooms in on your product page.
Capture a few “motion-ready” shots during the same session
You do not need a full video production to make Instagram content feel alive. While you are already set up, capture a few images that imply motion or use, for example hands holding the product, an unboxing moment, or the product in the act of being used. These still images often translate well into Stories, ads, and even your Shopify gallery as a context shot.
Consider this: if your product is hard to understand from a static angle, a single in-use photo can reduce a lot of buyer hesitation.
Keep your lighting and color grading aligned across channels
Instagram filters and aggressive edits can make your feed look stylish, but they can also create a mismatch between what a shopper saw on social and what they see on your Shopify product page. That mismatch can lead to more questions, more hesitation, and in some categories more returns.
Try to keep one consistent edit style for product color and white balance, then reserve heavier creative treatments for lifestyle content where exact color is less critical. If you sell products where color accuracy matters, always sanity-check your edited images on multiple screens before you publish them.
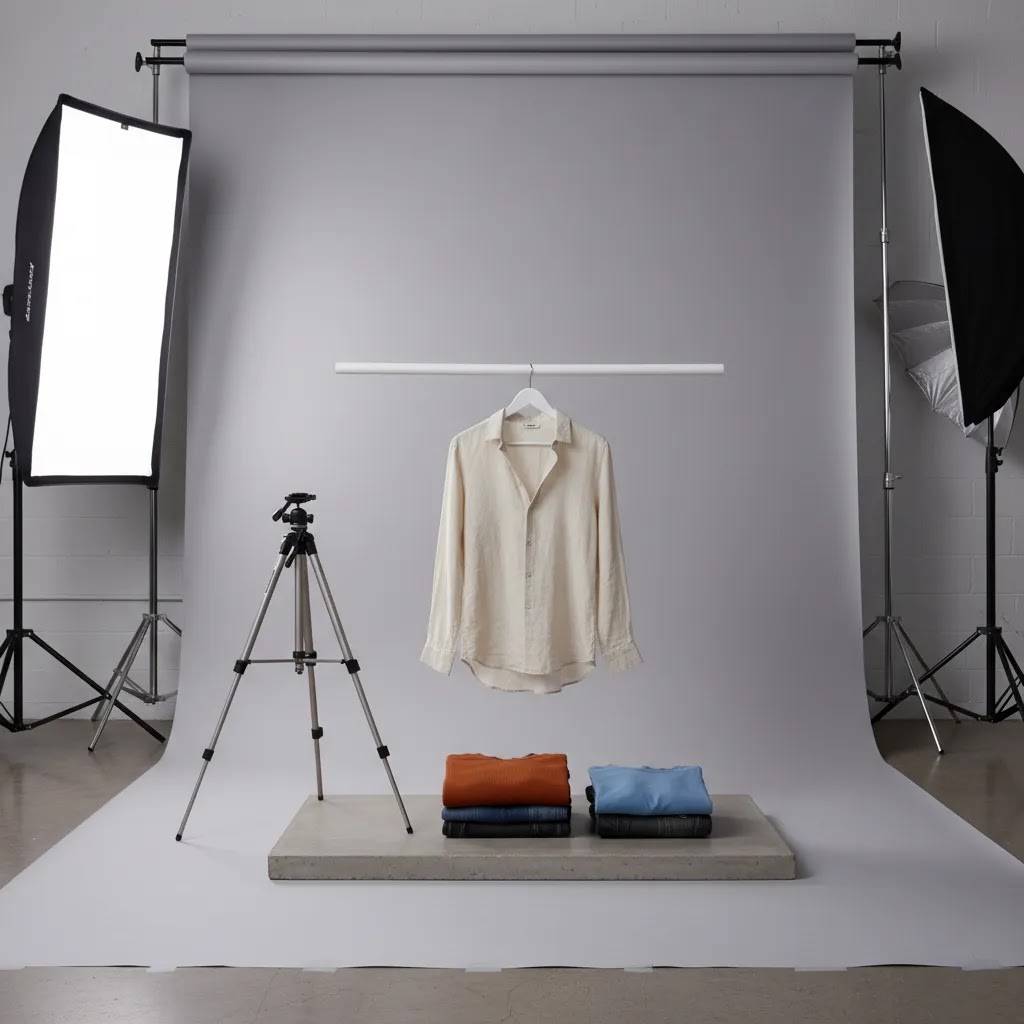
How to take pictures of clothes for online store listings
Apparel adds complexity because fit, drape, and scale are harder to communicate than with a static object. If you sell clothing, your photography needs to answer visual questions that sizing charts alone cannot handle.
Flat lay, mannequin, or model?
Each approach has trade-offs. Flat lays are efficient and clean, but they can flatten shape. Mannequins show structure better, especially for jackets, dresses, and tailored pieces. Models give the strongest context for fit and movement, but they increase cost, planning time, and styling needs.
For many smaller stores, the best mix is simple: white background product shots for consistency, plus a few model or styled lifestyle images for context.
Show what matters to buyers
Do not stop at the front view. Photograph sleeve cuffs, fabric texture, closures, stitching, pockets, hems, and any unique design elements. If a garment has stretch, structure, lining, or sheer material, your images should help communicate that honestly.
Now, when it comes to apparel visuals that are hard to shoot from scratch, mockups can help validate designs before a full production session. That is where a mockup generator may fit into your process, especially for print-on-demand or concept testing.
How to edit product photos for online store use
Shooting is only half the job. If you want to know how to improve product photos for online store performance, editing is where you tighten consistency and remove distractions.
What good editing should do
Color accuracy is critical if returns are a concern in your category. Fashion, beauty, home decor, and accessories stores often run into trouble when edited photos look better than the real item but less accurate to the product in hand.
How far should you retouch?
Enough to remove distractions, not enough to misrepresent the item. That is the line. If the product has a normal texture, slight variation, or handmade character, editing should not erase what the customer will actually receive.
Some AI-assisted tools can speed up repetitive edits. For example, Increase Image Resolution may help recover usability for certain images, and Background Swap Editor can support alternate visual treatments. Results vary by product type and source image quality, so test carefully before rolling changes across a live store.
When to DIY, use AI tools, or hire a pro
Not every store should use the same photography workflow. The right setup depends on your margins, catalog size, product complexity, and brand positioning.
DIY makes sense when
AI tools make sense when
You already have decent source images and need faster background cleanup, resolution improvements, or visual variations. For example, tools like Place in Hands or Creator Studio can be useful for concepting or adding contextual visuals when a full reshoot is not practical. Still, AI output should be reviewed closely for realism, brand consistency, and product accuracy.
Hiring a pro makes sense when
Your products are reflective, transparent, luxury-positioned, technically tricky, or central to a premium brand experience. In those cases, an ecommerce product photographer may save you time and improve quality. If you are evaluating a larger setup with lighting, surfaces, and repeatable production, this guide to choosing a product photography studio is relevant too.
AcquireConvert tends to be most useful when you are making exactly these practical decisions, not just learning theory. The site focuses on helping store owners connect visuals, conversion, and merchandising in ways that actually support sales.
The strategies and tools discussed in this article are based on current ecommerce best practices and publicly available information. Results will vary depending on your store, niche, and implementation. Always verify tool pricing, features, and platform compatibility directly with the relevant provider before making purchasing decisions.
Frequently Asked Questions
Can I use my phone to photograph products for an online store?
Yes, in many cases you can. Modern smartphones are often good enough for ecommerce if you control lighting, stabilize the shot with a tripod, and edit carefully. The biggest issue is usually not the phone camera itself. It is inconsistent light, poor framing, and lack of prep. If you shoot with a phone, use the rear camera, avoid digital zoom, clean the lens, and keep your setup repeatable across products. For small catalogs or early-stage Shopify stores, this can be a practical starting point before you invest in more advanced gear.
What background is best for product photos?
A white or very light neutral background is usually the safest choice for standard catalog images because it keeps attention on the product and works well across collection pages. That said, lifestyle backgrounds can help communicate context and brand personality. The best mix is often both: clean hero images plus a few contextual shots in the gallery. If you need a broader understanding of when each format works, the E Commerce Product Photography category offers useful examples and strategy angles for different store types.
How many photos should each product have?
Most products benefit from at least four to six useful images, not just four to six angles. Aim for a hero image, alternate angle, close-up detail, scale reference, and one lifestyle or in-use shot where relevant. Some products need more. Apparel, beauty, furniture, and technical goods often need extra images to answer fit, texture, or functionality questions. The right number depends on how much uncertainty the customer has before buying. Your gallery should reduce hesitation, not just fill space.
How do I make product photos look professional without a studio?
Focus on the basics first: controlled lighting, a clean backdrop, consistent framing, and careful editing. Professional-looking product photos usually come from repeatable process rather than expensive equipment alone. Window light plus reflectors can work, especially for smaller items. Artificial lighting becomes more helpful once you need consistency at scale. If you outgrow a home setup, review what a proper product photography studio setup offers so you understand which parts of the process are worth replicating or outsourcing.
What is the best lighting setup for ecommerce photography?
For many products, one soft key light at a 45-degree angle plus a reflector on the opposite side is enough. That setup gives shape without harsh shadows. A second fill light can help if the product is dark or highly detailed. Soft light is usually more forgiving than direct light, especially for packaging, apparel, and handmade goods. Reflective products such as bottles, metal accessories, or glossy boxes may need more careful light positioning. Test small changes in angle before changing everything else.
Should I hire a photographer or keep product photography in-house?
It depends on your product complexity, margins, and volume. Keeping it in-house often makes sense when you have frequent launches and a product type that is straightforward to shoot. Hiring an ecommerce product photographer can make more sense if you sell premium items, reflective products, or need elevated lifestyle imagery that supports a higher perceived value. Many stores use a hybrid model, handling routine catalog shots internally and outsourcing hero campaigns or technically difficult items.
Do mockups work for online stores, or do I need real photos?
Mockups can be useful for testing designs, launching preorders, or supporting print-on-demand workflows. They are fast and often good enough for concept validation. Still, real product photos usually do a better job of building trust once you are actively selling, especially if texture, finish, or fit matters. If you are exploring this route, a mockup generator can help you create early visuals, but move toward real photography as soon as the economics justify it.
How much editing is too much for ecommerce product photos?
Editing becomes too much when it changes customer expectations in a misleading way. Removing dust, correcting exposure, and cleaning a background are standard. Changing the real color, altering proportions, or erasing material characteristics creates problems later in the form of returns, complaints, and lower trust. In practice, the best editing improves clarity while staying faithful to the actual item. That balance matters more than making every image look dramatic or overly polished.
How do product photos affect conversion rate?
Good product photos can support conversion by reducing uncertainty and helping customers feel more confident about what they are buying. That may show up in better engagement, fewer abandoned sessions, and stronger add-to-cart behavior, although results vary by niche, traffic quality, price point, and page design. Photos work best when they are part of a complete product page that also includes strong copy, clear shipping information, and trust signals. For more on that relationship, see this resource on how product photos increase conversion rate.
What file size and format should I use for Shopify product images?
Use high-quality images that still load efficiently. In most cases, JPEG works well for product photos, while PNG may be useful when transparency matters. Keep enough resolution for zoom and larger displays, but compress images so they do not slow down the product page. The exact ideal size depends on your theme layout and image container dimensions. For most Shopify stores, the goal is a clean balance between sharpness and speed. Your product image should look good on desktop and mobile without becoming a page-speed problem.
How do I take pictures of stuff to sell online at home with my phone?
Start by controlling three things: light, stability, and consistency. Use a bright window with indirect light or a simple softbox, place the product on a clean sweep or neutral backdrop, and stabilize your phone on a tripod with a mount. Clean the lens, use the rear camera, and lock focus and exposure so your brightness does not jump between shots. Avoid shooting very close with an ultra wide lens, step back and use 1x, or 2x if you have optical zoom, to reduce distortion. Then keep your setup the same for every product, including camera height, distance, and background.
What is the 80/20 rule in photography, and how does it apply to product photos?
In product photography, the 80/20 idea usually means a few improvements create most of the perceived quality: soft consistent lighting, standardized angles and cropping, accurate color, and galleries that include scale and detail shots. You do not need to perfect everything at once. Focus on the repeatable basics that make your catalog look cohesive and trustworthy.
What is the 400 rule in photography?
The “400 rule” is often referenced in photography discussions as a guideline related to exposure and lighting, depending on the specific context and camera system. For ecommerce product photography, it is usually more useful to focus on consistency instead: do not mix light temperatures, keep your main light in a repeatable position, and aim for predictable white balance so colors stay accurate across your Shopify catalog.
How to take product photos for Instagram that still look accurate on a Shopify product page?
Plan one shoot that supports both channels. Capture clean hero and detail shots first under consistent lighting, then shoot slightly wider so you can crop for square and vertical Instagram formats without cutting off important product features. Keep your edits realistic, especially white balance and color, so what someone sees on Instagram matches what they see on the Shopify product page. If you use creative filters, reserve them for lifestyle images rather than the shots customers rely on for accuracy.
Key Takeaways
Conclusion
If you have been trying to work out how to photograph products for online store growth, start by simplifying the process. You do not need a perfect studio on day one. You need a repeatable system that gives your customers clear, accurate, and confidence-building images. For many stores, that means improving lighting, standardizing angles, adding the right close-ups, and editing for consistency rather than trying to make every image look artistic.
Here is the next step: choose three of your highest-traffic products and audit their galleries this week. Check whether each one has a strong hero image, a detail shot, a scale reference, and an in-use or lifestyle image. Then compare the before and after engagement once updates are live. If you want more practical visual merchandising guidance, explore AcquireConvert's product photography resources and related Shopify-focused articles to keep refining what shoppers see before they click buy.
Disclaimer: Results from ecommerce strategies vary depending on store type, niche, audience, budget, and execution. Nothing in this article constitutes a guarantee of specific outcomes. Third-party tool features and pricing are subject to change: verify current details directly with each provider.

Hi, I'm Giles Thomas.
Founder of AcquireConvert, the place where ecommerce entrepreneurs & marketers go to learn growth. I'm also the founder of Shopify agency Whole Design Studios.