Lighting for Clothing Photography (2026 Guide)
If your clothing photos look flat, uneven, or packed with distracting shadows, the lighting setup is usually the first thing to fix. For ecommerce, that matters because shoppers rely on photos to judge fabric texture, color accuracy, fit details, and overall quality. A strong setup for lighting for clothing photography does not need to be expensive, but it does need to be controlled. The goal is simple: show the garment clearly and consistently across product pages, collection pages, ads, and marketplaces. If you are still learning the basics of light direction and facial-style setups, our guide to loop lighting photography is a useful starting point before adapting those principles for apparel. In this guide, you will learn what lighting works best for flat lays, mannequins, hanging garments, and simple studio-style ecommerce shoots.
Contents
Why Lighting Matters for Clothing Photos
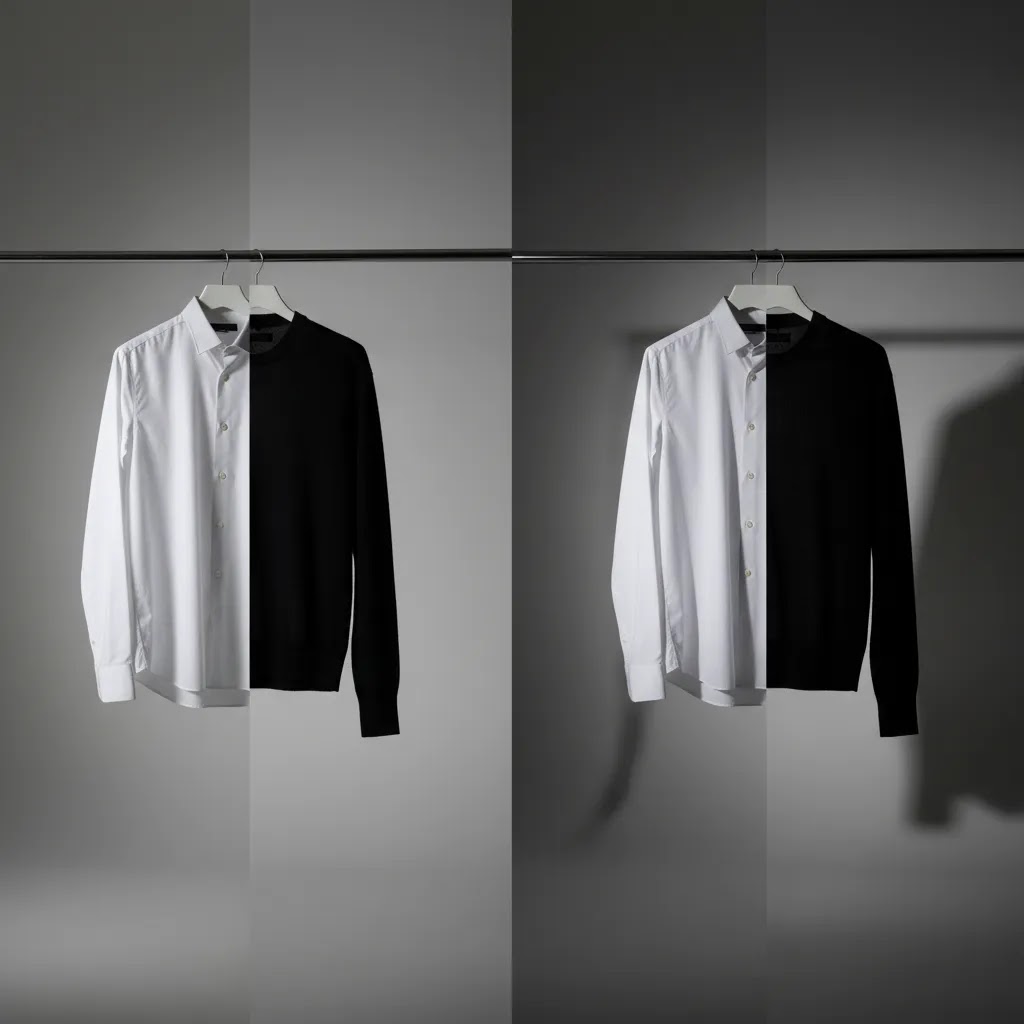
Clothing is harder to light than many store owners expect. Fabric folds create natural shadow lines. White garments can lose detail. Black garments can turn into featureless blocks. Sequins, satin, and activewear reflect light in ways that can create hotspots. Even small color shifts can lead to customer disappointment and more returns.
That is why lighting for product photography needs to be judged by consistency, softness, and repeatability, not just brightness. For ecommerce, you are usually not trying to create dramatic editorial contrast. You are trying to present the product accurately while keeping the image clean enough for collection grids, paid social creative, and marketplace requirements.
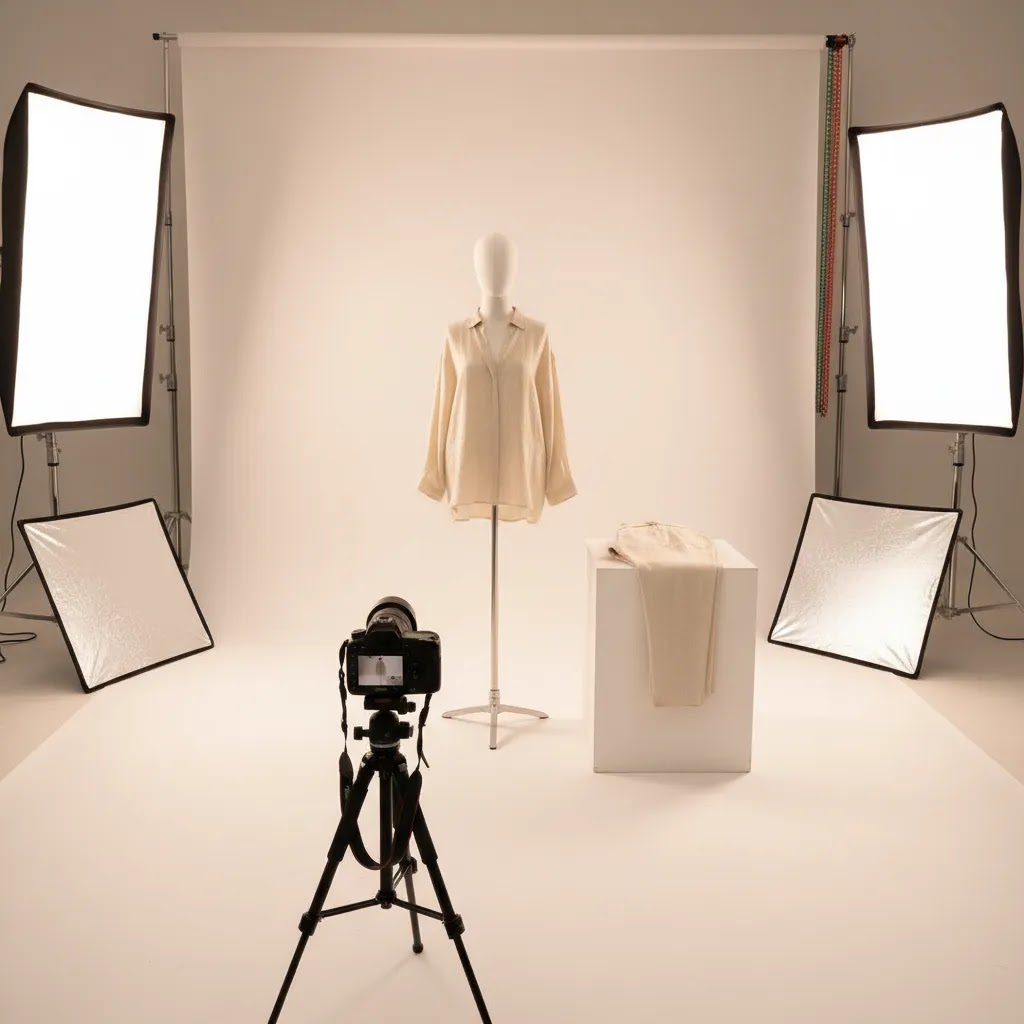
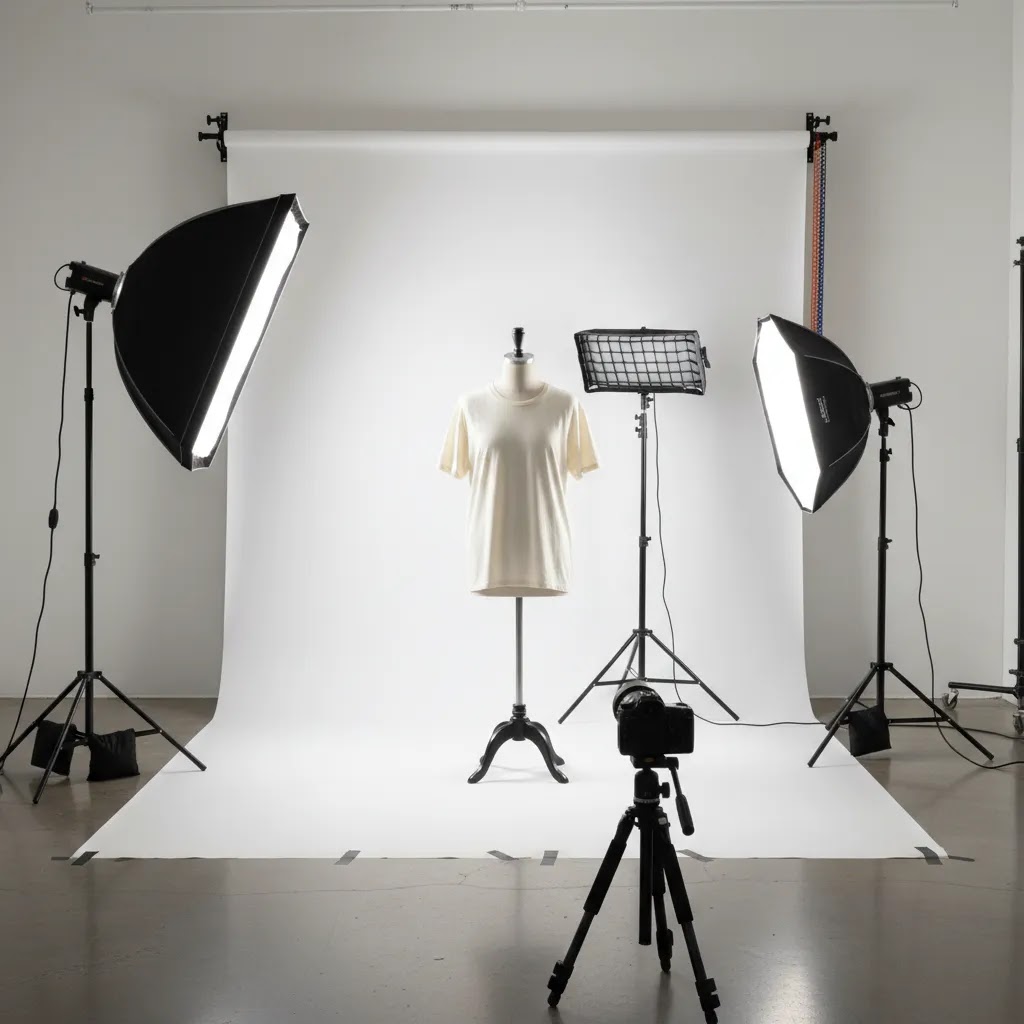
For most clothing photography for ecommerce, the best setup uses large, diffused light sources positioned to reduce harsh side shadows while still preserving shape. A single bare bulb or ceiling light rarely gets you there. You need directional control, light modifiers, and enough distance between the garment and the background to avoid muddy shadow spill.
If you are building your setup from scratch, start with the right photography lighting equipment rather than chasing camera upgrades first. In many apparel shoots, better lighting improves results more than a more expensive camera body.
The Best Lighting Setups for Clothing Photography
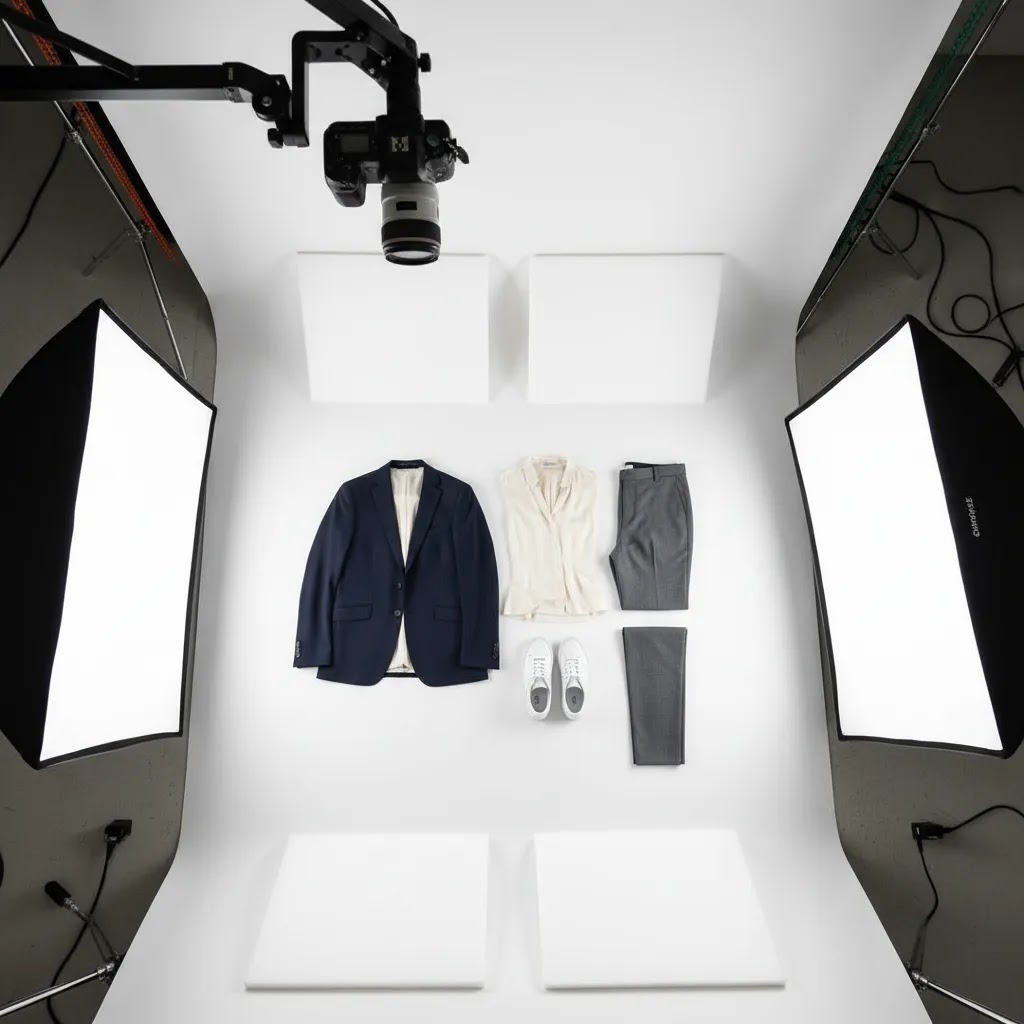
The right setup depends on how you shoot. A flat lay on a table needs different light placement than a mannequin, ghost mannequin, or hanging rail shot. Still, most strong clothing photo setups follow the same principles.
1. Two soft lights at 45-degree angles
This is the most dependable option for catalog and product page photography. Place two softboxes or diffused LED panels on either side of the clothing item, slightly above it, aimed down at roughly 45 degrees. This helps reduce harsh shadows and keeps fabric texture visible.
It is often the best lighting for clothing photography if you need repeatable, clean results across many SKUs. It also works well for a mannequin for clothing photography because you can shape light evenly across shoulders, sleeves, and torso.
2. Overhead diffused light for flat lays
For lighting for flat lay clothing photography, use a large soft source directly above the setup or two matched lights bounced through diffusion from each side. The point is to avoid one sleeve or pant leg looking darker than the other. Keep the camera centered to maintain symmetry.
If your setup still produces edge shadows, raise the lights higher and increase diffusion. For diy lighting for product photography, even a simple setup with continuous lights and a diffusion sheet can work if you control spill and keep the angle consistent.
3. Key light plus reflector for smaller spaces
If you are shooting in a spare room or compact studio corner, one large soft key light and a reflector on the opposite side can be enough. This is a practical choice for newer merchants who want inexpensive lighting for photography without buying a full multi-light kit immediately.
The trade-off is that reflectors are less precise than a second light. You may need extra adjustment to handle darker garments or textured knitwear.
4. Background separation for white seamless shoots
For a clean white background for clothing photography, keep the garment away from the backdrop if possible. This reduces dense shadows behind the subject. If space allows, add background illumination separately rather than blasting your front lights harder. That helps preserve garment detail while keeping the background bright.
These same principles apply if you are planning a simple product photography studio for in-house ecommerce production. Space planning matters almost as much as the lights themselves.
5. AI-assisted cleanup after a clean capture
AI can help after the shoot, but it should not replace good source lighting. If your original clothing photo is badly underlit or covered in hard wrinkles and deep shadows, editing tools have less to work with. A better approach is to shoot with clean, soft light first, then use AI for background cleanup, consistency, or minor refinements.
AcquireConvert tracks practical AI tools for visual ecommerce workflows, including resources across fashion & apparel photography and related image production categories. For example, ProductAI offers tools such as AI Background Generator, Free White Background Generator, and Increase Image Resolution. These can be useful when you need faster post-production support for apparel listings, though results still depend on the quality of the original image.
If you want a broader foundation before choosing modifiers or bulb types, see our guide to product photography lighting. If you are actively comparing setup options, our breakdown of the best lighting for photography is a strong next read.
Lighting Gear Checklist for Apparel Shoots (What to Buy First)
Here is the thing, most clothing shoots fail because the light is too small, too harsh, or too inconsistent. The fix is rarely a single magic light. It is building a simple kit that gives you soft coverage, stable positioning, and repeatable output across every SKU.
From a practical standpoint, prioritize these pieces in order:
What many store owners overlook is that clothing lighting is basically a softness and color accuracy problem. Brightness is only part of it. A light that shifts color or flickers can make product color correction feel impossible, especially if you are shooting multiple sessions for the same collection.
If you are building a DIY kit, you can still get controlled results with simple substitutes, as long as you keep things consistent from shoot to shoot:
Consider this when buying, the best kit is the one that matches your shooting format and your available space.
Buying guidance by common apparel scenarios
Flat lay on a table: you typically need overhead diffusion and even coverage from edge to edge. That usually means a large soft source above the table, or two matched lights diffused from left and right. A small light close to the table creates hard sleeve shadows fast.
Mannequin or hanging rack: two diffused lights at 45 degrees is the most reliable baseline. Add a reflector low and in front if the lower half of the garment is going dark, which is common with pants, dresses, and longer tops.
White seamless catalog look: plan for background control. You may need more distance between subject and background than you expect, or you will get gray shadow gradients. If you cannot add distance, focus on soft front light and clean styling, then keep your background exposure consistent rather than over-bright.
Small room constraints: bigger modifiers still help, but you may need to pull them closer and increase diffusion rather than trying to push the garment far from the wall. Control ambient room light, and keep your setup marked so you can reproduce it without trial and error.
Pros and Cons
Strengths
Considerations
3-Point Lighting for Clothing (and When to Use It)
Two lights gets you surprisingly far for ecommerce. Still, there are times when a simple 3-point lighting approach is worth it for clothing, especially if you shoot reflective fabrics, darker garments, or you need cleaner separation from the background.
Think of it this way, 3-point lighting is not a rule. It is a way to solve three common problems: shape, shadow control, and separation.
How 3-point lighting maps to apparel
When 3 lights help, and when they add unnecessary complexity
Use a third light when you have a specific problem to solve. For example, your black hoodie blends into the background, your satin dress has muddy edges, or your white background is inconsistent across the frame.
Skip the third light if your priority is speed and catalog consistency and your two-light setup already produces clean results. More lights can create more angles of reflection, more chances for hotspots, and more variation between sessions if the setup is not locked down.
Simple placement guidance for mannequins and hanging garments
Start with your two diffused lights at 45-degree angles. Keep them slightly higher than the garment and aimed down a bit. This usually reduces under-chin style shadows around collars and gives more even coverage over the torso.
If you add a third light, place it behind and to the side of the garment for a rim effect, or aim it at the background instead of the clothing for separation. Keep it subtle. For reflective fabrics, the goal is often to avoid bright specular hotspots. Increase diffusion, increase the size of the modifier, and adjust the angle so reflections do not point straight back into the camera.
Who This Guidance Is For
This guide is for ecommerce store owners, Shopify merchants, marketplace sellers, and in-house content teams who need reliable clothing photos without turning every shoot into a complex production day. It is especially useful if you sell fashion, basics, kidswear, activewear, accessories worn on-body, or seasonal collections where consistency across many SKUs matters.
If you are shooting a handful of products each month, a simple continuous-light setup may be enough. If you are producing frequent launches or large catalogs, investing in a more repeatable setup with stronger light control usually makes sense. Either way, the aim is the same: reduce shadows, keep colors consistent, and create apparel images that work across your storefront and acquisition channels.
AcquireConvert Recommendation
For most store owners, the right move is not chasing the most complex studio lighting plan. It is building a repeatable apparel workflow that gives you clean, trustworthy images with minimal rework. That is the lens AcquireConvert uses across its photography content. Giles Thomas brings the perspective of a Shopify Partner and Google Expert, which matters because clothing images affect more than aesthetics. They shape product page clarity, feed quality, ad creative performance, and overall conversion confidence.
If you are still refining your setup, start with the fundamentals in the Product Photo Lighting category. Then compare apparel-specific workflows in our related content on apparel and visual merchandising. The most effective setup is usually the one you can reproduce consistently every time a new product lands, not the one that looks most impressive on paper.
How to Choose the Right Setup
Choosing the best lighting for clothing photography comes down to five practical decisions.
1. Match the setup to your shooting format
Flat lays need overhead softness and symmetry. Hanging garments need enough front fill to avoid deep side creases. Mannequin shots benefit from left-right balance and a little top-down shaping. If you shoot multiple formats, choose lights that are easy to reposition rather than fixed to one use case.
2. Prioritize diffusion over raw power
Harsh direct light exaggerates seams, wrinkles, and fabric texture in unhelpful ways. Large modifiers usually matter more than buying the brightest fixture you can find. For most clothing photo needs, softness is what removes distracting shadows while keeping natural depth.
3. Think about color consistency
If your navy shirts look different from shoot to shoot, that creates extra editing work and can affect customer expectations. Use matched lights where possible, keep ambient room light controlled, and lock your white balance. This matters even more for stores selling coordinated sets or collections where product page consistency supports trust.
4. Account for your available space
A cramped room limits how far you can pull the subject from the background. That often creates darker shadows and more spill on white backdrops. If your space is tight, use larger diffusion, keep angles shallow, and test reflectors before adding more lights. Bigger setups are not always better if your room cannot support them.
5. Build for workflow, not just image quality
A setup that takes 40 minutes to rebuild every time is hard to sustain during product launches. Mark light stand positions, note power settings, and standardize camera distance. For Shopify merchants managing frequent drops, repeatability often saves more time than chasing tiny aesthetic improvements.
The most practical setup for many stores is two diffused continuous lights, a white or neutral backdrop, enough garment-to-background separation, and a simple post-production workflow. If needed, AI cleanup tools can support that process, but only after the core lighting is stable. Good apparel lighting is less about complexity and more about control.
Camera Settings That Work With Your Lighting (ISO, Aperture, Shutter)
Good lights are only half the equation. If your camera settings change from shot to shot, your catalog will drift, even if the lighting setup never moves. For ecommerce, consistency is usually the goal, so manual settings tend to work better than auto modes.
A solid starting point for continuous lights
With continuous LEDs, start by keeping ISO low to protect color and reduce noise. In many cases, ISO 100 to 400 is a practical range, depending on how bright your lights are and how much diffusion you are using.
For aperture, most apparel shots benefit from enough depth of field to keep the full garment sharp, especially on mannequins where sleeves and hems can sit on slightly different planes. Many store teams start around f/5.6 to f/11 and adjust based on lens, distance, and how three-dimensional the garment is.
Shutter speed depends on stability. If you are on a tripod, you can use a slower shutter speed as long as nothing moves and you are not introducing blur. If you shoot handheld, you usually need a faster shutter speed to keep detail crisp, particularly for textured fabrics where blur looks like softness or noise.
A solid starting point for flash
Flash often makes it easier to keep ISO low and images sharp, since the flash burst can freeze motion. A common baseline is ISO 100, an aperture chosen for depth of field, and a shutter speed that stays within your camera’s flash sync speed. The reality is that flash takes more testing, so if your workflow is tight, continuous lights are often simpler to manage.
White balance workflow for consistent garment color
If you care about apparel color accuracy, avoid Auto White Balance for product photography. Auto settings can shift slightly between frames, which is a big problem when you are trying to keep a collection page consistent.
A more reliable approach is to set a fixed white balance. You can do this by choosing a Kelvin value that matches your lights and leaving it locked for the full session, or by setting a custom white balance at the start of the shoot. Either way, keep ambient room light controlled so you are not mixing color temperatures.
Troubleshooting common issues, even with good lights
The way this works in practice is simple, lock your lighting, lock your camera settings, and only change one variable at a time. That is how you get a repeatable catalog look that is realistic to maintain in-house.
Frequently Asked Questions
What is the best lighting for clothing photography?
For most ecommerce use cases, two large diffused lights placed at 45-degree angles give the best balance of softness, detail, and consistency. This setup works well for mannequins, hanging garments, and catalog shots. Flat lays often benefit from overhead diffusion instead. The best option depends on your product type, available space, and how repeatable the setup is for ongoing shoots.
Can I use natural light for clothing photography for ecommerce?
Yes, but it is less consistent than controlled studio lighting. Window light can work for smaller brands testing products or shooting lifestyle content, especially if diffused. The challenge is repeatability. Changes in weather and time of day can shift shadows and color. For consistent product page images, most stores eventually move toward controlled artificial lighting.
How do I remove shadows from clothing photos?
Start by increasing diffusion, raising the lights slightly, and moving the garment farther from the background. Use two-sided lighting or a reflector to reduce contrast. Avoid relying on one small direct light source. Editing can reduce remaining shadows, but the cleanest results usually come from better spacing and softer light during the shoot itself.
What background works best for clothing photography?
A white, light gray, or neutral seamless background is usually best for ecommerce because it keeps attention on the garment and supports a clean storefront look. White is especially common for product pages and marketplace listings. The key is not just color, but keeping the background evenly lit and far enough from the clothing to avoid heavy shadow spill.
Is continuous lighting or flash better for clothing photos?
Continuous lighting is often easier for newer store owners because you can see the effect in real time. That makes setup faster and helps with DIY workflows. Flash can deliver strong results too, but it usually requires more experience and testing. For many in-house ecommerce teams, continuous lights offer a more practical balance of control and usability.
How many lights do I need for clothing photography?
Two lights are enough for many apparel shoots. One on each side of the garment, both diffused, can create even coverage with limited shadows. You can start with one light and a reflector, but the results are often less consistent. If you need a bright white backdrop, a separate background light may help in larger spaces.
Can AI fix bad clothing lighting after the shoot?
AI tools may improve backgrounds, sharpness, or overall polish, but they are not a reliable fix for badly lit source images. Deep shadows, clipped highlights, and inaccurate garment colors are harder to recover cleanly. A better workflow is to get the lighting as close as possible in-camera, then use AI or editing tools for finishing touches.
What is a good DIY lighting setup for product photography?
A practical DIY setup includes two continuous lights, softboxes or diffusion material, a neutral backdrop, and a reflector. Keep the lights matched if possible and position them evenly on each side of the garment. This may not replace a full studio build, but it can produce strong ecommerce results if you control shadow direction and color consistency carefully.
Does better lighting help Shopify product pages convert?
Better lighting can improve image clarity and shopper confidence, which may support stronger product page performance. It is not a guaranteed conversion fix on its own. Pricing, reviews, page speed, fit information, and merchandising still matter. But clear, accurate clothing photos usually make it easier for visitors to evaluate products and make purchase decisions.
What is the 20 60 20 rule in photography?
The 20 60 20 rule is a simple way some photographers think about exposure balance. The idea is that one part of your setup does the heavy lifting, and the rest supports it, rather than relying on a single extreme adjustment. You will see it applied differently depending on the context, so treat it as a loose framework, not a fixed technical standard.
For clothing photography, the practical takeaway is to build most of your look with your lighting and diffusion, then fine-tune with reflectors and small camera setting changes. If you try to fix everything with one lever, like cranking exposure in editing or blasting a small light at the garment, you usually get noise, color shifts, or harsh shadows.
What is the 3 lighting rule?
People often use the phrase “3 lighting rule” to refer to the 3-point lighting concept: key light, fill light, and a third light for separation, like a rim light or background light. For apparel, it is useful when you need to reduce fold shadows while keeping clean edges against the background.
It is not required for every catalog shoot. Many stores get more consistent results with a simple two-light setup that they can reproduce quickly.
What is the best lighting to take photos of clothes?
For most product and catalog images, large diffused lighting is the best choice because it reduces harsh shadows and shows fabric texture without adding distracting contrast. A common starting point is two matched, diffused lights placed at 45-degree angles, with the garment separated from the background to prevent heavy shadow spill.
If you shoot flat lays, prioritize overhead diffusion and symmetry. If you shoot on white seamless, consider background separation and consistent white balance to keep your catalog color stable.
How to make clothes more see through in photos?
If you are photographing sheer fabric and you want the transparency to read clearly, lighting and background contrast do most of the work. Backlighting can make sheer material look more transparent, but it can also change how color and texture appear. That may or may not be appropriate for ecommerce, where accuracy matters.
For most Shopify product pages, a safer approach is to light the garment softly from the front for accurate color, then use subtle edge or background separation so the sheer areas are visible without misleading the shopper. If you edit transparency or texture, keep it honest and consistent with what the customer will receive.
Key Takeaways
Conclusion
If you want better clothing photos, start by simplifying the setup and controlling the light. You do not need a complicated commercial studio to get strong ecommerce images, but you do need consistency. Soft, repeatable lighting helps shoppers see fabric, fit, and color without distraction, which is exactly what product page photography should do. At AcquireConvert, we focus on practical guidance for merchants who need results they can actually implement. If you are refining your in-house photo process, explore more of our lighting and apparel content, compare related setup options, and use Giles Thomas's Shopify and ecommerce expertise to make smarter decisions about your visual workflow.
This article is editorial content and not a paid endorsement unless otherwise stated. Pricing, features, and tool availability are subject to change, so verify current details directly with the provider. Any performance or conversion impact discussed is illustrative only and not guaranteed. AI editing tools may assist image workflows, but they should not be treated as a complete replacement for proper lighting, photography technique, or professional judgment where required.

Hi, I'm Giles Thomas.
Founder of AcquireConvert, the place where ecommerce entrepreneurs & marketers go to learn growth. I'm also the founder of Shopify agency Whole Design Studios.