Lighting for Pictures: Get Pro Results (2026)
If your product images look flat, inconsistent, or harder to edit than they should be, lighting is usually the first thing to fix. For ecommerce store owners, better lighting for pictures does more than make a photo look nicer. It can reduce reshoots, improve color accuracy, and make your product pages feel more trustworthy. The good news is you do not need a commercial studio to get there. You need a repeatable setup that fits your products, space, and workflow. If you want a narrower technique for shaping flattering shadows and cleaner dimension, this guide on loop lighting photography is a useful next read. In this article, I’ll break down what actually matters, where store owners overspend, and how to choose a lighting setup that gives you professional-looking results.
Contents
What good lighting for pictures actually means
Good lighting is not about buying the most expensive kit. It is about control. For ecommerce photography, that usually means controlling brightness, shadow softness, color consistency, and reflection management so your product looks accurate from one photo to the next.
Most store owners need lighting that works across a catalog, not just for one hero image. That changes the buying decision. A setup that looks great for a single lifestyle shot may slow you down badly when you need 40 SKU images on a white background. If your goal is conversion-focused product photography, consistency matters almost as much as creativity.
There are three practical outcomes to aim for:
If you are still building your setup, start with the fundamentals of product photography lighting before adding more advanced modifiers or AI editing tools. Your lighting choice should support your store’s image workflow, whether that means marketplace-ready white backgrounds, richer editorial shots, or a mix of both.
Simple “3-Point Lighting” adapted for ecommerce products (not portraits)
The “3-point lighting” rule gets talked about a lot in portrait photography. Here’s the thing, the same idea is useful for product photography, you just apply it differently. Instead of lighting a face, you are trying to show shape, texture, and packaging details without ugly hotspots or harsh shadows.
In plain terms, 3-point lighting is:
For most Shopify store owners shooting products on a backdrop, your “three points” often end up being two actual lights plus something reflective, like a foam board or a reflector. Or it is two lights for the product, plus a third light aimed at the background to keep it evenly lit.
A practical 3-point layout for products on a backdrop
Key light: Place your key light at roughly a 45 degree angle to the product, slightly higher than the product, and aim it down. Use diffusion (like a softbox) so the light wraps rather than creates sharp shadows.
Fill light: Put a second diffused light on the opposite side, usually lower power than the key. If you are on a tight budget or in a tiny space, swap the fill light for a white reflector. From a practical standpoint, reflectors are often easier to control than adding another light, especially for small products.
Back or background light: If your product blends into the background, add a rim light behind and slightly to one side to create a clean edge highlight. If you are shooting on white and want fewer gray backgrounds, use the third light to illuminate the background separately, pointed at the backdrop rather than the product.
Common mistakes and quick fixes
Hotspots on glossy packaging: This usually means the light source is too small, too close, or too direct. Move the light further back, increase diffusion, or change the angle so reflections bounce away from your camera.
Uneven white backgrounds: If the backdrop looks darker on one side, your background is being lit unevenly. Either pull your product further away from the backdrop so it receives different light than the background, or use a dedicated background light to even it out.
Mixed color temperatures: If you have window light plus LED lights plus ceiling bulbs, your colors can shift frame to frame. Turn off overhead lights, block window light, and stick to one lighting type so your whites stay white and your product colors stay consistent.
Key features to evaluate in a lighting setup
When you are evaluating lighting for pictures, focus less on marketing terms and more on whether the setup helps you shoot faster and edit less. For Shopify merchants and other ecommerce operators, these are the features that usually make the biggest difference.
1. Consistent color temperature
If your lights shift warm in one shot and cool in the next, your product pages will look uneven. That is especially risky for apparel, cosmetics, home goods, and any product where buyers expect accurate color representation. Consistent light temperature also makes batch editing much easier.
2. Softness and shadow control
Hard light creates strong shadows and glossy hotspots. Sometimes that is useful for dramatic creative work, but many ecommerce stores need softer light that reveals detail without adding distraction. Diffusion, softboxes, and bounce surfaces usually matter more than raw power for small to medium products.
3. Space efficiency
Your setup has to fit your actual workspace. A spare office, garage corner, or back room puts real limits on stands, modifiers, and background support. If the kit is too awkward to keep assembled, you are less likely to use it consistently. That is where planning your wider product photography studio becomes important.
4. Background compatibility
Some merchants need pure white backgrounds for marketplaces and collection pages. Others need textured or brand-colored scenes for ads and social creative. Your lighting should make both possible. If background cleanup is still taking too long, AcquireConvert’s Background Removal & Editing category is worth reviewing for workflow options.
5. Workflow support from editing tools
Lighting still does the heavy lifting, but AI tools can save time after the shoot. Current tools from ProductAI include AI Background Generator, Free White Background Generator, and Increase Image Resolution. These can help when you need alternate backgrounds, cleaner marketplace assets, or sharper upscaled visuals. They work best when the original lighting is already solid. AI can improve an image, but it usually cannot fully rescue poor lighting, bad reflections, or missing product detail.
6. Flexibility for different product types
Jewelry, glassware, skincare bottles, shirts, and boxed products all respond differently to light. A setup that works for matte packaging may struggle with chrome, glossy labels, or transparent surfaces. Before buying, think about your hardest product to shoot, not your easiest one.
If you are comparing kits and modifiers, this guide to photography lighting equipment can help you sort what is essential from what is optional.
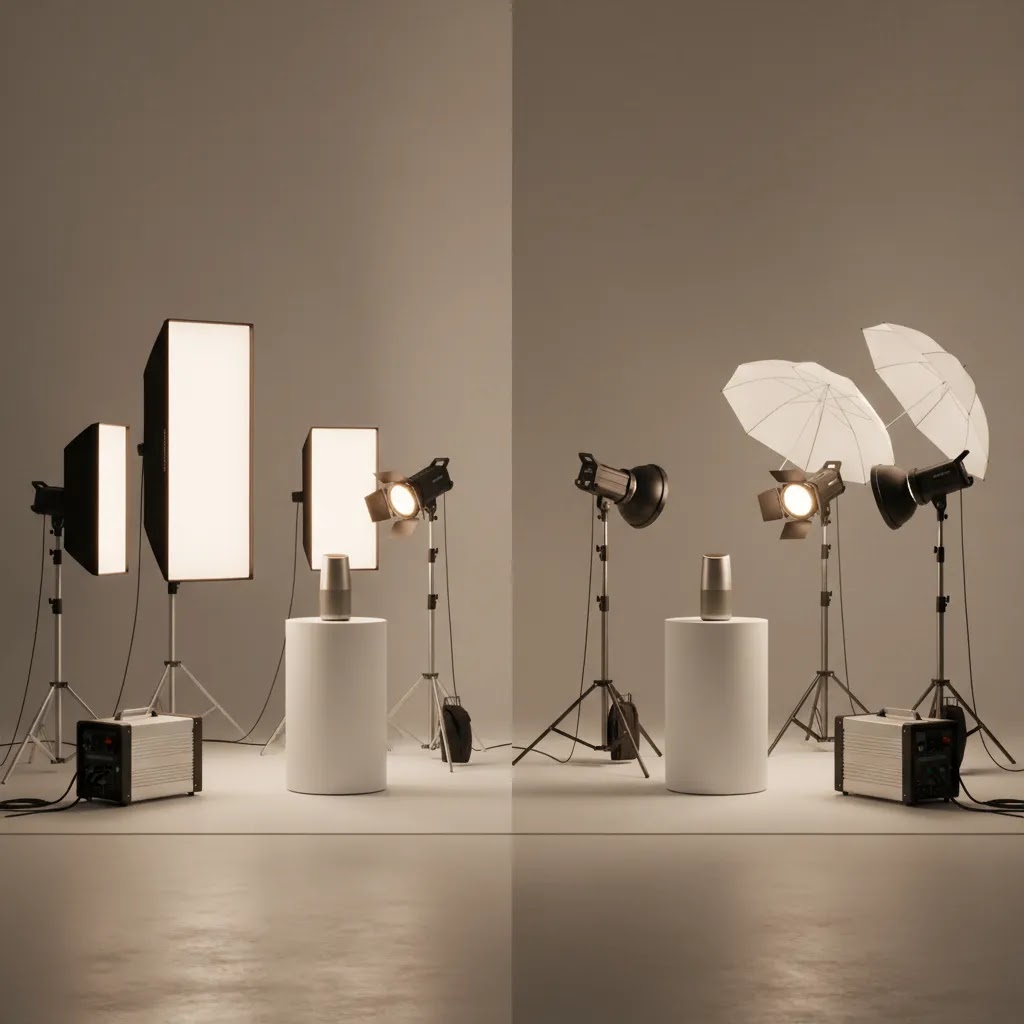
LED vs flash (strobes) for product photos: which should you use?
Store owners tend to get stuck on one question early: should you buy continuous LED lights, or should you go with flash strobes? Both can produce great results. The better choice comes down to how you shoot, what you sell, and how consistent you need to be across a large catalog.
When continuous LED is usually the better fit
LED is often the easiest path for ecommerce teams shooting in-house because what you see is what you get. You can move a light, watch reflections change in real time, and dial in your setup quickly without guessing.
Continuous LED may be a good fit if:
Consider this, cheaper LEDs can introduce flicker or banding, especially if you are shooting with certain shutter speeds or using phone cameras under mixed settings. Higher quality LED fixtures tend to handle this better. It is also common to need higher ISO with LED compared to strobes, which can add noise if your camera struggles in low light.
When flash (strobes) is usually the better fit
Strobes give you more usable power and can produce very clean, consistent images once you know the workflow. They are popular for classic white-background product photography because you can shape light precisely, keep ISO low, and maintain a consistent look across long catalog sessions.
Flash may be a good fit if:
The tradeoff is the learning curve. With strobes, you are not seeing the final light continuously, so you tend to test, adjust, and test again. Many strobes have modeling lights that help you preview shadow direction, but the final exposure still depends on strobe power settings and camera settings.
Modifiers matter more than the light type
Whether you choose LED or strobes, the modifier is what shapes the result. A small bare light source creates harsh highlights. A larger diffused source creates softer transitions. For reflective products, larger diffusion often matters more than buying a brighter light.
A quick workflow recommendation for Shopify merchants
For most Shopify store owners, it helps to think in two workflows:
What many store owners overlook is testing gear on the hardest product in your catalog before you commit. Shoot something glossy, reflective, or transparent. If your setup can handle that product cleanly, everything else typically gets easier.
Pros and Cons
Strengths
Considerations

Who this approach is for
This approach fits ecommerce store owners who want a practical system rather than a photographer’s hobby setup. If you run a Shopify store and regularly launch new SKUs, update seasonal collections, or test creative across product pages and paid ads, controlled lighting is worth prioritizing early.
It is especially useful for merchants shooting products in-house, small teams without a dedicated studio manager, and brands trying to balance white-background consistency with more lifestyle-oriented content. If you only shoot occasional custom images and outsource the rest, you may not need a large investment. But you still need to understand what good lighting looks like so you can brief freelancers or agencies effectively.
AcquireConvert recommendation
If you are evaluating lighting for pictures as part of a broader ecommerce image workflow, AcquireConvert is a strong specialist resource to keep open while you decide. Giles Thomas brings a practitioner lens as a Shopify Partner and Google Expert, which matters because product photography is not just an image quality issue. It affects conversion, ad creative performance, merchant feed quality, and how polished your store feels to first-time visitors.
For store owners comparing options, I would start with the wider Product Photo Lighting category, then review this commercial breakdown of the best lighting for photography if you are close to a buying decision. That combination gives you both the educational context and the more decision-oriented guidance you need before spending on gear or redesigning your photo workflow.
How to choose the right setup
Store owners often ask for the best lighting for taking pictures of products, but the better question is: best for what kind of catalog, space, and workflow? Here are the criteria that matter most.
Match the light to your product surfaces
Matte products are forgiving. Reflective, metallic, glass, and glossy products are not. If your catalog includes difficult surfaces, prioritize larger diffusion and careful light placement over raw brightness. A cheaper hard light can create more editing work than a softer, better-shaped source.
Choose for repeatability, not just image style
A dramatic one-off image may look impressive, but can you recreate it next month for 20 variants? If not, it is not a great ecommerce setup. Repeatability matters for collection page consistency, retargeting ads, and brand trust. Build a lighting diagram, mark floor positions, and standardize camera height where possible.
Consider how much post-production you actually want
If your team wants straight-out-of-camera white backgrounds, you will need more precise lighting separation and background control. If you are comfortable using editing tools, you can shoot slightly more flexibly and clean up afterward. ProductAI’s Free White Background Generator and AI Background Generator can support that workflow, but they are strongest when your original shadows and edges are already clean.
Factor in the full system, not just the lights
Your final image quality depends on stands, diffusion, background support, reflectors, surface materials, and editing process. That is why merchants often underestimate total setup needs. Before buying, map your full shot process from unpacking the product to exporting the finished image.
Make room for AI, but do not let it replace judgment
Search interest around ai for pictures, ai app for pictures, chatgpt for pictures, filters for pictures, and background for pictures keeps growing because merchants want faster visual production. That makes sense. AI can speed up alternate backgrounds, cleanup, upscaling, and creative testing. Tools like Increase Image Resolution may help when you need sharper assets for ads or larger displays. But if the original shot has bad reflections, mixed light color, or inaccurate product tone, AI usually adds polish rather than solving the root issue.
The best setup is the one you can reproduce every week. For many growing brands, that means two consistent lights, solid diffusion, a controlled backdrop, and a simple editing workflow. Not the biggest kit. Not the fanciest kit. Just the one that helps you publish better images on schedule.
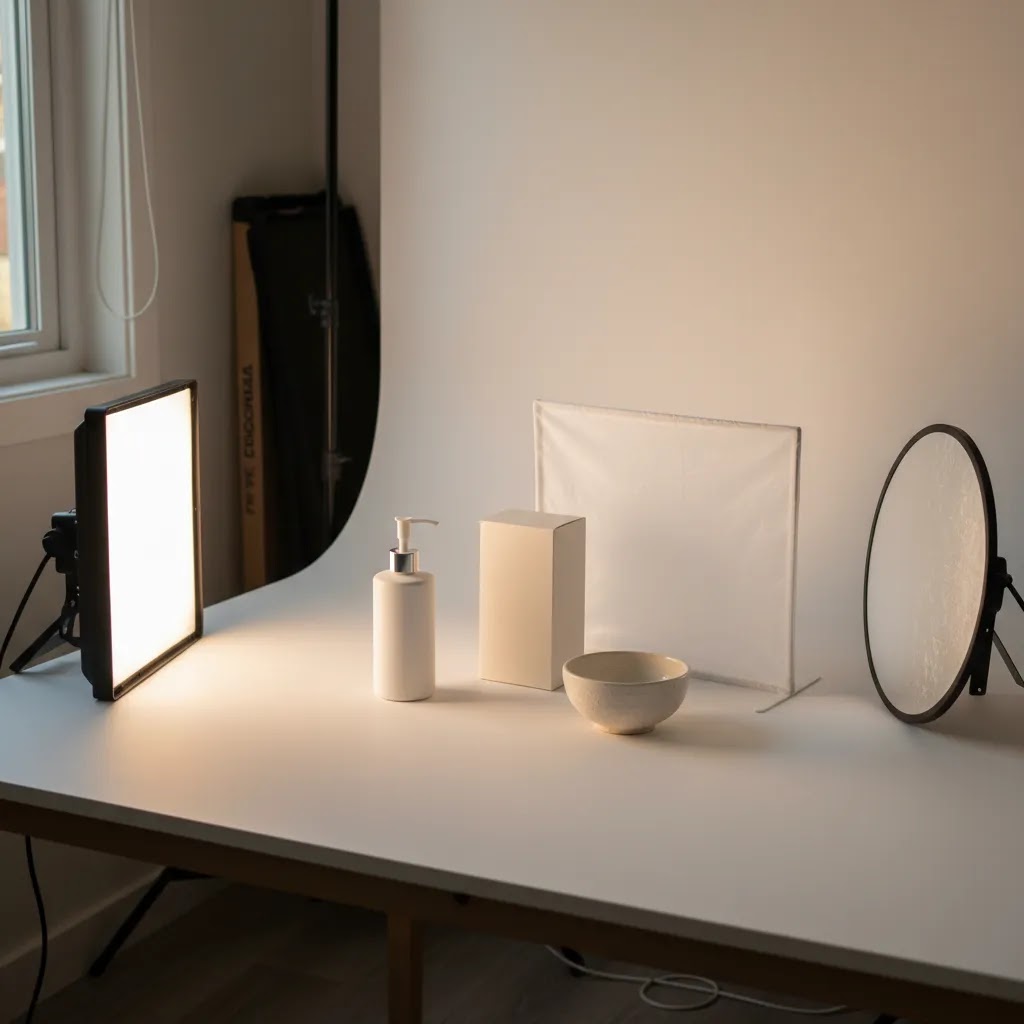
Photography lighting setup at home: a repeatable layout for small spaces
If you are shooting in a spare bedroom, office, garage corner, or even a dining room, your biggest enemy is not the camera. It is inconsistency. The way this works in practice is simple, you want a layout you can recreate in minutes, with light and reflections that behave the same way every time.
A small-room layout you can keep semi-permanent
Start by choosing one wall or corner as your “photo zone.” Put your table a few feet in front of your backdrop so you can light the background separately from the product. That distance also helps reduce hard shadows falling onto the background.
Place your camera on a tripod at a fixed spot. Mark the tripod feet positions on the floor with tape. Do the same for your product position. When you have to reshoot a SKU next month, those marks matter more than having an expensive lens.
Set your key light at 45 degrees to the product, slightly higher, with diffusion. Add a fill light or reflector on the opposite side. If you are chasing cleaner whites, consider a background light pointed at the backdrop, not at the product.
Control ambient light so color stays consistent across days
Mixed lighting is where home setups go wrong. Window light changes by the hour, and ceiling lights often have a different color temperature than your photo lights. If you want consistency, block or reduce window light during shoots and turn off room bulbs. Then rely on the lights you control.
If you cannot fully block windows, try to shoot at the same time of day each session and keep your setup orientation consistent. The goal is not perfection. It is minimizing variables so your catalog does not look like it was shot by five different people.
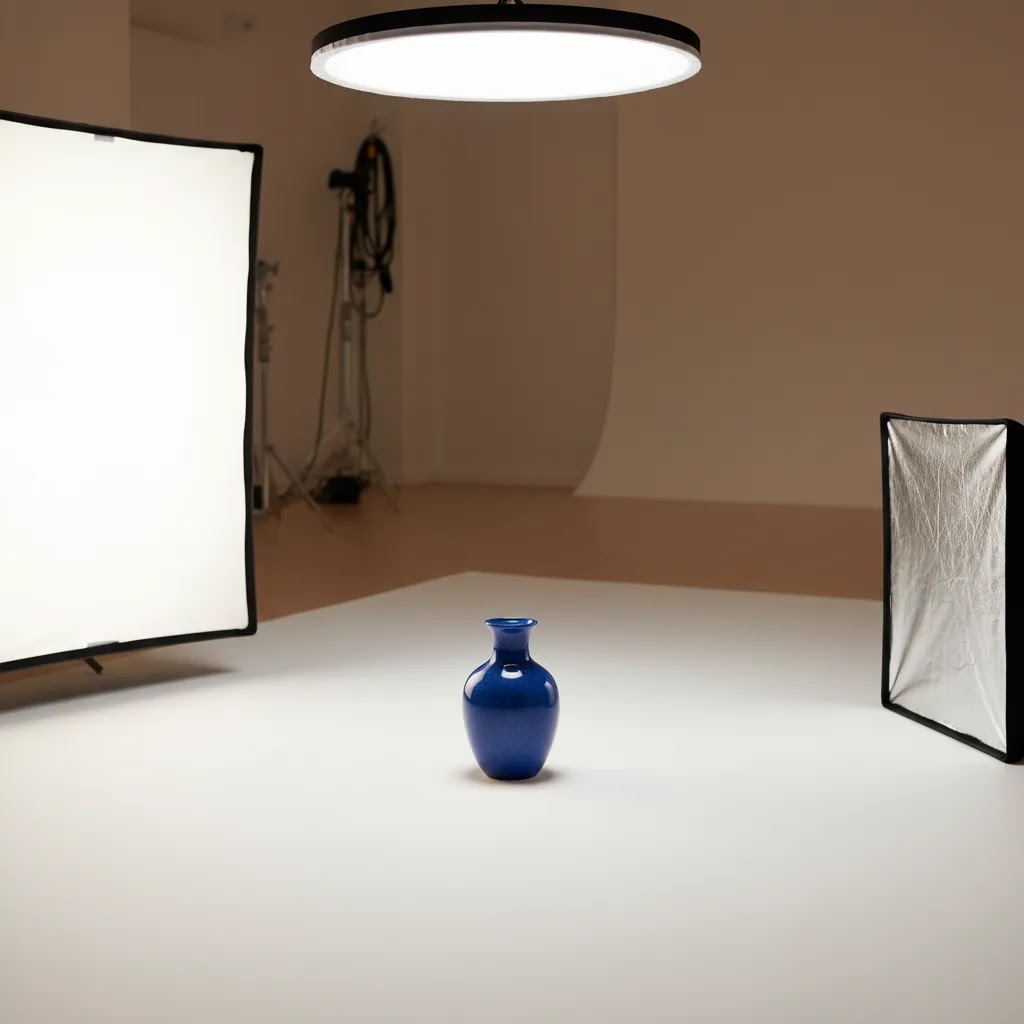
Keep reflections under control in tight spaces
Small rooms create reflection problems because your product is “seeing” more of the room. Glossy packaging and glass will reflect walls, ceilings, and even your shirt. From a practical standpoint, two things help the most: larger diffusion and controlling what is around the product.
Use plain foam boards to block or shape reflections. If you are photographing reflective products, wearing dark clothing and keeping clutter away from the set can make editing easier and reduce weird highlights.
Portable options if you cannot leave gear set up
If your space has to convert back to normal life after a shoot, prioritize compact, consistent components. A folding backdrop, collapsible diffusion, and compact light stands can keep setup time reasonable. What matters is repeatability, so store your gear together, keep your light settings noted, and keep a quick checklist for your standard camera and light positions.
Frequently Asked Questions
What is the best lighting for taking pictures of products?
For most ecommerce products, soft and consistent lighting works best. That usually means diffused light that reduces harsh shadows and keeps colors accurate. The exact setup depends on your products. Apparel, cosmetics, and packaged goods are easier than glass or chrome. Start with consistency first, then adjust creative style after your catalog images are working reliably.
How do I get perfect lighting for pictures at home?
You do not need a commercial studio, but you do need control. Use the same light sources each time, diffuse them, and avoid mixed lighting from windows and room bulbs. Keep your product position, camera angle, and background consistent. A small home setup can produce strong results if it is organized for repeatability instead of constant improvisation.
Is natural light enough for ecommerce product photos?
Natural light can work for some products, especially if you are testing content or shooting lifestyle images. The downside is inconsistency. Time of day, weather, and seasonal changes can alter shadows and color balance. If you need repeatable catalog images, artificial lighting usually gives you better control and less editing friction.
Do I need expensive gear to get professional-looking product images?
No. Professional-looking results come more from control than from price. A well-planned basic setup can outperform a costly kit used without diffusion or consistency. Spend where it improves repeatability, such as stable light output, modifiers, and background control. Upgrade only after you know what your current setup cannot handle.
Can AI fix bad lighting in product photos?
Sometimes partially, but not completely. AI tools can help with backgrounds, retouching, and resolution, and they may improve presentation. They usually cannot fully correct severe glare, muddy shadows, or inaccurate color caused by poor lighting. The better your original image, the more useful AI becomes as a time-saver rather than a rescue tool.
What background works best with product lighting?
White is a common choice for ecommerce because it looks clean and works well on marketplaces and category pages. Colored or textured backgrounds can work for brand storytelling and social ads. The best choice depends on where the image will be used. Your lighting should support the background, not fight it with spill, shadows, or uneven exposure.
How important is lighting for Shopify product pages?
It is very important because product images often carry more persuasive weight than short descriptions. Cleaner lighting can improve perceived quality, help shoppers inspect details, and make a store feel more credible. It will not guarantee higher conversion rates, but in many cases it supports a better buying experience and stronger visual trust.
Should I use filters for pictures on product photos?
Use them carefully. Strong filters can make products look stylish, but they can also distort color and texture. That is risky if customers expect the product to match what they saw online. For ecommerce, subtle correction is usually safer than heavy stylization. Keep your main product images accurate, then test more creative edits in ads or social campaigns.
What if I sell reflective or transparent products?
These products are harder because they reflect your lights, camera, room, and background. You will usually need larger diffusion, careful angles, and more patience. This is where planning matters more than buying brighter lights. If your products are unusually challenging, it may be worth testing a specialist setup before scaling your whole in-house process.
What lighting is best for pictures?
The best lighting is lighting you can control and repeat. For ecommerce product photos, that typically means soft, consistent light with a stable color temperature so your catalog looks uniform across days and seasons. Natural window light can look good, but it is harder to repeat. Continuous LED and flash strobes can both work well if you diffuse the light and keep your setup consistent.
What is the 3 lighting rule?
The 3 lighting rule usually refers to 3-point lighting: key light, fill light, and back light (or rim light). For product photography, the same concept helps you control shadows and create separation from the background. In many ecommerce setups, your “fill” can be a reflector, and your third light can be used to light the background for cleaner white backdrops.
What is the 20 60 20 rule in photography?
The 20 60 20 rule is a common way to describe a balanced lighting ratio: about 60% of your light comes from the key light, with roughly 20% fill on each side to reduce harsh shadows and keep the subject looking natural. It is not a technical requirement, but it is a useful mental model for ecommerce because it pushes you toward soft, even lighting that shows product detail without heavy contrast. You still need to adjust based on the product surface, especially for glossy packaging.
What do photographers use for lighting?
Photographers typically use either continuous lights (often LED) or flash strobes, plus modifiers like softboxes, umbrellas, diffusion panels, and reflectors to shape the light. For product photography, the modifier choice is often more important than the light type because it controls softness, reflections, and how clean your edges look against a backdrop.
Key Takeaways
Conclusion
Lighting is one of the highest-leverage improvements you can make to your product images because it affects clarity, color, editing time, and overall store presentation. For most ecommerce brands, the goal is not a perfect studio image every time. It is a dependable system that helps you create consistent visuals across product pages, ads, and campaigns without turning every shoot into a full production day.
If you want help narrowing your options, explore AcquireConvert’s specialized resources on product photo lighting, compare practical setup advice, and review buying-focused guides before you spend. Giles Thomas brings a valuable ecommerce perspective as a Shopify Partner and Google Expert, so the advice stays grounded in what actually helps store owners ship better images and make smarter decisions.
This content is editorial and provided for educational purposes. It is not a paid endorsement unless explicitly stated otherwise. Pricing, product availability, and features for third-party tools are subject to change, so verify details directly with the provider before making a purchase. Any performance or conversion outcomes mentioned are illustrative only and not guaranteed.

Hi, I'm Giles Thomas.
Founder of AcquireConvert, the place where ecommerce entrepreneurs & marketers go to learn growth. I'm also the founder of Shopify agency Whole Design Studios.