Photoshoot Lighting for Products (2026 Guide)

If your product photos look flat, too dark, or inconsistent across collections, your lighting is usually the first thing to fix. Good photoshoot lighting helps ecommerce store owners show texture, color, shape, and detail clearly, which may improve shopper trust and reduce hesitation before purchase. The good news is you do not need a huge studio to get there. You need a repeatable setup that matches your products, space, and workflow. In this guide, I’ll walk through the lighting choices that matter most for product images, from DIY tabletop setups to more controlled studio arrangements. If you want a related technique for shaping facial or detail-oriented shots, this guide to loop lighting photography is also worth reviewing.
Contents
What good photoshoot lighting really does
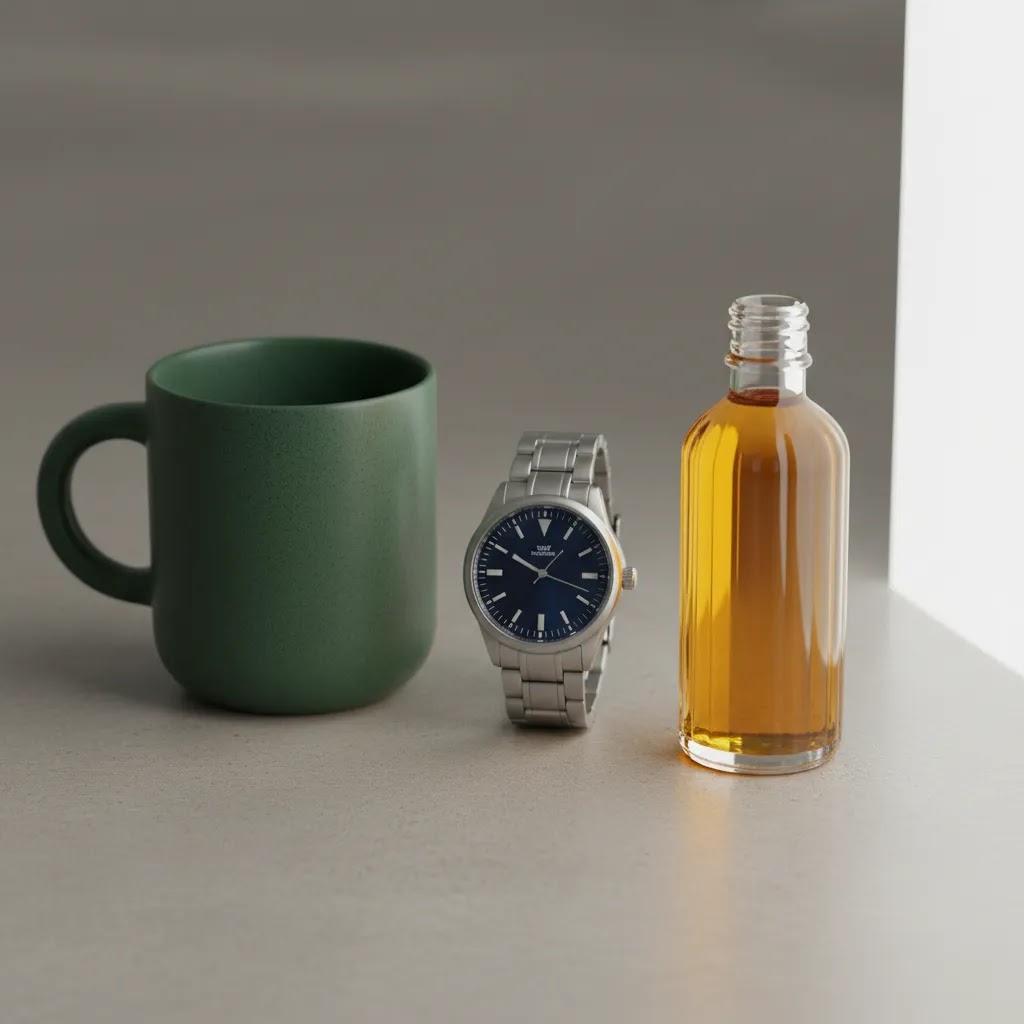
For ecommerce, lighting is not just about making a product visible. It is about making it believable. Shoppers cannot pick up your item, rotate it, or test materials in person. Your lighting has to do that work for you by showing edge definition, accurate colors, surface finish, and scale cues.
A strong product photography lighting setup usually aims for three things: consistency, control, and speed. Consistency matters because your catalog should feel cohesive from product page to collection page. Control matters because reflective products, dark packaging, and textured materials all react differently under light. Speed matters because if your setup takes 40 minutes to rebuild every time, it becomes hard to maintain across launches or seasonal campaigns.
For many Shopify merchants, the best setup is not the most advanced one. It is the one you can repeat every week without guessing. That might be a daylight-balanced continuous light with diffusion for small products, or a more complete tabletop arrangement with reflectors and background control. If you are still building your setup, our broader guides on product photography lighting and the full Product Photo Lighting category can help you compare approaches.
The lighting setup pieces that matter most
Before you buy more gear, it helps to understand which lighting variables actually change the final image.
1. Light size relative to the product
Larger light sources create softer transitions and gentler shadows. That is usually useful for skincare, jewelry packaging, food, and lifestyle accessories. Smaller light sources create harder shadows and stronger contrast, which may work better for dramatic branding or hero images.
2. Diffusion
Diffusion softens highlights and helps reduce harsh reflections. For white-background catalog work, this is often one of the biggest upgrades you can make. A diffuser, softbox, or even a scrim between light and product can make glossy packaging far easier to photograph cleanly.
3. Light direction
Front lighting reduces shadows but can make products look flat. Side lighting reveals texture, shape, and embossing. Backlighting can help glass, liquids, and translucent products stand out. For many product pages, a mix of diffused front fill and controlled side light works well.
4. Color temperature consistency
If you mix window light with warm household bulbs, your white balance can shift from shot to shot. That creates extra editing work and may make product colors look unreliable. Use one light type where possible and keep your setup stable.
5. Background separation
Many store owners focus only on the product and forget the background. A little distance between product and backdrop helps avoid muddy shadows and makes cutouts or white-background edits cleaner. If your setup feels cramped, improving spacing may help more than buying another light.
If you are evaluating gear before changing your setup, this guide to photography lighting equipment can help you think through modifiers, stands, and support tools. If your workflow includes dedicated catalog shots, it is also smart to plan your lighting around a repeatable product photography studio layout, even if that “studio” is just a corner table in your office.
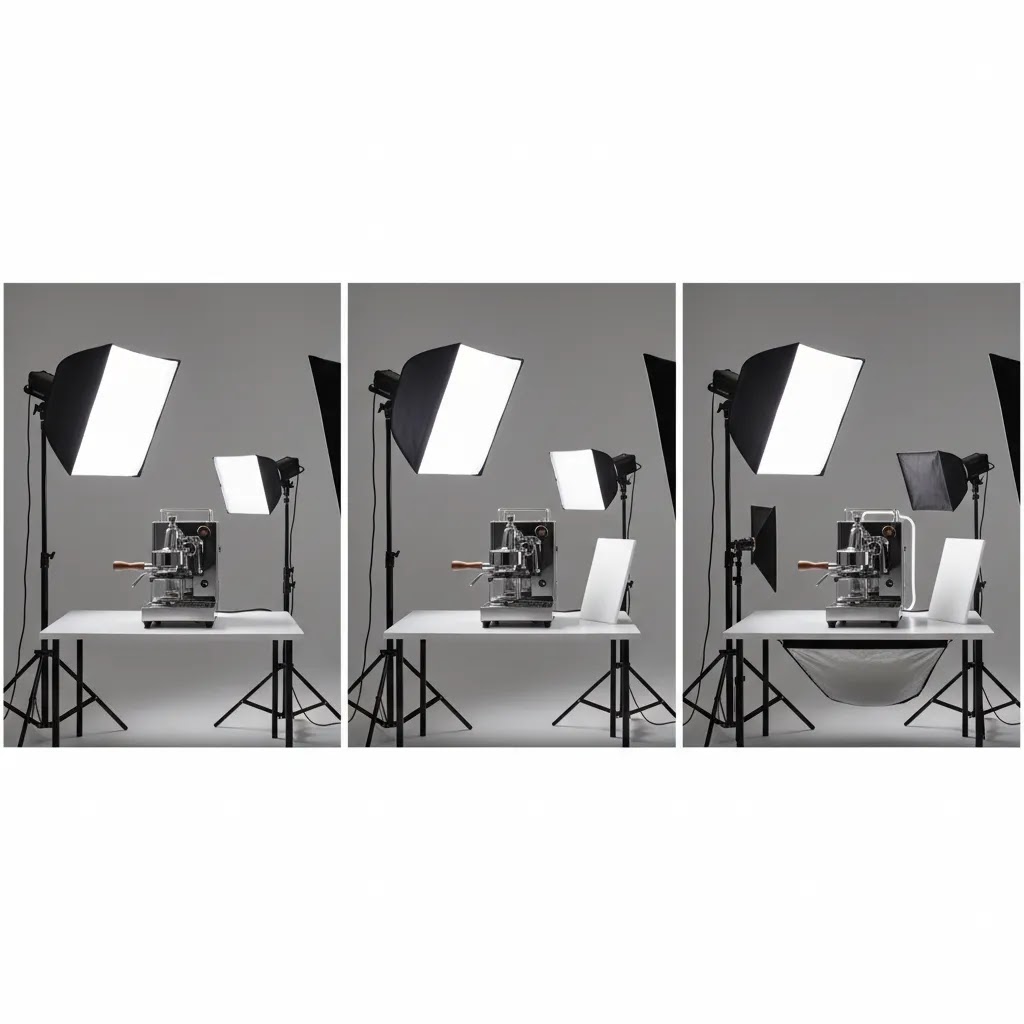
Photoshoot lighting setups you can copy (1-light, 2-light, 3-light)
Here’s the thing: most Shopify product catalogs do not need a complicated lighting diagram. They need a setup you can rebuild quickly, that gives clean highlights, readable shadows, and consistent color across SKUs.
A practical 1-light setup (the best place to start)
This is the “starter” setup I see work for the widest range of products, especially for clean catalog shots on a neutral or white sweep.
Use one diffused key light, then shape it with a reflector. Place your light about 45 degrees to the product (left or right), and slightly above it, angled down. That angle creates gentle shadowing that shows shape, without turning your product into a flat cutout.
Put diffusion between the light and product, like a softbox or a scrim, to enlarge the apparent light source. Then add a reflector on the opposite side of the key light, close to the product, to lift shadows. From a practical standpoint, moving the reflector closer or farther is often a simpler control than changing camera settings, especially if you are using continuous LEDs.
Why this works: it gives you one consistent direction for highlights, and one predictable shadow side you can manage. For most store owners, that is enough to get “clean and believable” product images that look consistent across a collection page.
A simple 2-light setup (when the second light is actually useful)
A second light helps most when you are fighting the background, not the product. Two common cases are white-background shots where you want cleaner separation, and darker products where the sweep keeps going gray.
The first option is key plus background light. Keep your main key light and reflector doing the product work. Then aim a second light at the backdrop, not at the product. This can help brighten the sweep more evenly, reduce muddy gradients, and speed up your editing because the background is closer to “done” in camera.
The second option is key plus fill light. In that version, the fill should be softer and weaker than the key. Place it on the shadow side, closer to the camera axis. The goal is not to remove every shadow, it is to control how deep the shadows get. If your fill is too strong, you can end up with a flat product that looks like it is floating.
A 3-light setup (3-point lighting adapted for products)
The classic 3-point lighting rule is key, fill, and back light. For products, you can adapt it like this: key light shapes the product, fill light controls shadow depth, and a back or rim light creates separation and edge definition.
Place the key as described in the 1-light setup. Add a soft fill on the opposite side, typically dimmer or farther away than the key. Then add a back or rim light behind the product, aimed so it skims the edge and creates a controlled highlight line. This is especially useful for dark bottles, matte black packaging, and products that tend to blend into a dark sweep.
What many store owners overlook is that three lights can ruin an image fast if everything is too even. If your fill matches your key, you lose depth. If your back light spills into the lens or hits the front of the product, you get flare and washed-out contrast. Keep each light’s job clear, then tweak one thing at a time.
Which lighting approach fits your store
The right lighting setup depends less on photography theory and more on your catalog type, shooting frequency, and production goals.
DIY continuous lighting is usually the best starting point for solo founders, small Shopify teams, and brands shooting 5 to 20 SKUs at a time. It gives you real-time feedback, which makes positioning easier when you do not have a dedicated photographer.
Soft, diffused tabletop setups are a strong fit for beauty, supplements, home goods, candles, stationery, and other small to mid-sized products. These setups tend to prioritize consistency and clean shadows over drama.
More directional studio lighting fits brands that need premium hero imagery, richer shadow depth, or more stylized campaigns. This often works well for luxury packaging, beverage brands, or products where texture is central to conversion.
Hybrid setups with editing support make sense if you shoot in-house but still want polished output for marketplaces, ads, or collection pages. In those cases, lighting should focus on clean source files first, then post-production can handle background refinement and minor enhancements.
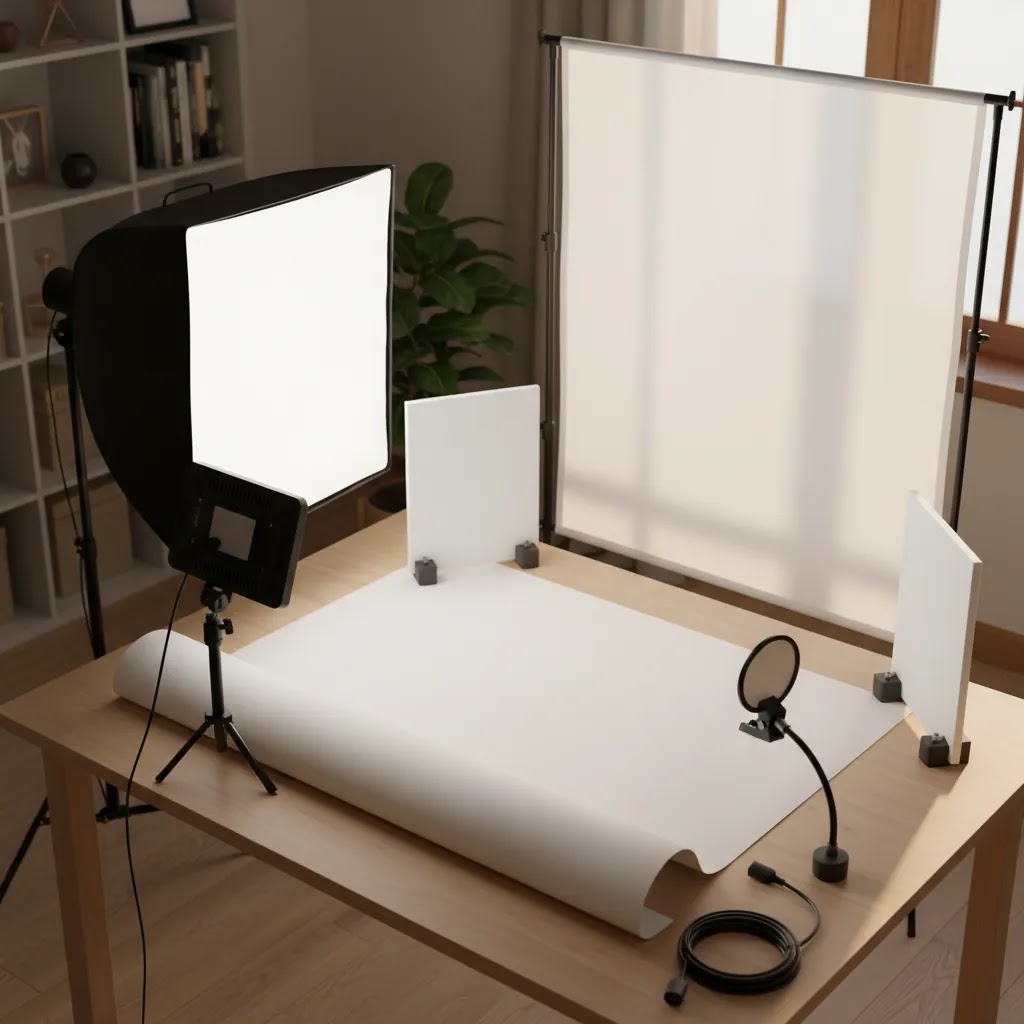
DIY home lighting kit checklist (what you actually need, and what to skip)
If you are building a “lighting for photography at home” setup, your goal is not owning a lot of equipment. It is creating a kit that is portable, repeatable, and quick to set up when you need to shoot a new SKU.
At a minimum, you typically need a main light, diffusion, something to mount it safely, something to control shadows, and a consistent background. That combination is what gets you consistency across Shopify collections and variant images.
Consider this checklist as your baseline:
The mistakes that tend to waste money are surprisingly consistent. Tiny hard lights create harsh highlights on packaging. Mixing bulb color temperatures makes color accuracy a headache. Weak stands sag, shift, and break your “repeatable setup” goal. Skipping diffusion usually leads to hours of cleanup in editing, especially on glossy products.
What to prioritize first: get one good, diffused key light working, then dial in reflector placement. Once you can repeat that result across five products in a row, upgrades make more sense.
A simple “beginner to upgraded” path usually looks like this:
For most Shopify store owners, a second light is not the first upgrade. Better diffusion, better placement, and better control of spill is often the improvement you feel immediately in your catalog images.
AcquireConvert’s practical recommendation
For most ecommerce teams, the smartest move is to start with a simple, controlled setup before adding complexity. Giles Thomas’s perspective as a Shopify Partner and Google Expert is especially useful here because product imagery is not just a visual issue. It affects product page trust, Shopping ad click quality, and overall conversion friction.
If you are still comparing approaches, start by reading our guide to best lighting for photography for a broader buying perspective. Then use the Product Photography Fundamentals category to tighten your process around framing, consistency, and workflow. For stores that want faster post-production after the shoot, tools like AI Background Generator, Free White Background Generator, and Increase Image Resolution may help refine images once your lighting is already solid. They are most useful as workflow support, not as a substitute for getting the source lighting right.
How to choose the right lighting setup
If you are choosing between DIY lighting for product photography and a more developed studio setup, use these criteria.
Match the light to the product surface
Matte products are more forgiving. Glossy products are not. If you sell bottles, metallic packaging, glass, or anything reflective, prioritize larger diffused light sources and better flagging control. Hard direct light may create reflections that are difficult to edit naturally.
Choose for workflow repeatability, not one perfect shoot
A setup that works once but is hard to rebuild will slow your content pipeline. Mark stand positions, camera height, and product placement so future shoots stay consistent. This matters for collection pages, variant images, and retargeting creatives where mismatched visuals can make a brand look less polished.
Think about your channel mix
If you need images for Shopify product pages, Google Shopping, Amazon, and social ads, your lighting should support multiple crops and background treatments. Clean, evenly lit source files usually give you more flexibility than highly stylized lighting if your team is small.
Do not overbuy too early
Many stores can get strong results with one main light, one reflector, diffusion, and controlled background distance. Buying multiple lights before you understand shadow behavior often creates more confusion, not better photos.
Plan for editing from the start
Even the best product photo lighting setup benefits from a clean editing workflow. If your goal is fast catalog production, think in terms of shoot-plus-edit, not just shoot. For example, a consistent white or neutral background can make tools like Background Swap Editor or Magic Photo Editor more practical later.
The best product photo lighting is the setup that lets you shoot reliably, maintain color accuracy, and create images that match how the product looks when customers receive it. For most ecommerce brands, that matters more than cinematic complexity.
Quick lighting ratios for product photos (including the 20-60-20 rule)
Lighting ratios sound technical, but you can use a simple mental model to keep product photos clean and consistent, especially if you are aiming for white backgrounds and readable detail.
What the 20-60-20 rule means for product photography
The 20-60-20 rule is a simple way to think about light distribution in the frame. Roughly speaking, you want the main subject to get the most useful light (the 60), the supporting areas to get enough fill to stay readable (the 20), and the background to be controlled so it stays clean without blowing out detail (the other 20).
Think of it this way: you are trying to keep the product as the visual priority, while keeping shadows and background under control. This approach can help you avoid the common ecommerce problem where a white sweep gets nuked so hard that edges disappear, labels lose contrast, and product shape gets harder to read.
How to apply ratios without relying on flash power
Many Shopify merchants use continuous LEDs, so “ratio” is less about changing power settings and more about controlling distance, diffusion, and bounce.
The reality is you can get a more “professional” look by adjusting placement and control tools than by stacking more lights into a small space.
A quick sanity-check workflow before you shoot the full catalog
Before you photograph an entire collection, take one test shot and check two things: highlight clipping and shadow detail. If whites on labels or glossy areas are blown out, increase diffusion or change the light angle. If shadows are too deep, bring in the reflector or add gentle fill. Adjust one variable at a time so you know what caused the improvement.
This is also where consistent camera settings help. Once your lighting is stable, lock in your exposure and white balance so your edits are faster and your Shopify product pages look cohesive.
Pros and Cons
Strengths
Considerations
Frequently Asked Questions
What is the best lighting for product photography at home?
For most home setups, a large diffused continuous light is the most practical place to start. It lets you see highlights and shadows in real time, which is helpful if you are shooting alone. Pair that with a reflector and neutral backdrop. Window light can work too, but it is less consistent across time of day and weather.
How many lights do I need for a basic product photo lighting setup?
One main light is often enough for many ecommerce products if you use diffusion and a reflector well. A second light can help with background separation or reducing deep shadows, but it is not always necessary. Start simple, then add complexity only when your products or creative direction require it.
What is the 3 lighting rule?
The 3 lighting rule usually refers to 3-point lighting: a key light (main light), a fill light (controls shadow depth), and a back or rim light (creates separation from the background). For product photography, it is often used to keep the product readable while adding edge definition, especially for darker or more reflective items.
What is the 20-60-20 rule in photography?
The 20-60-20 rule is a simple way to think about how light is distributed in the frame. In product photography, it can help you prioritize lighting the product clearly (the “60”), while keeping supporting fill and the background controlled (the “20” and “20”). It is not a strict measurement, it is a practical way to avoid blown-out whites and overly flat images.
How to do lighting for a photoshoot?
Start by picking one main light direction, then soften it with diffusion. Place the light around 45 degrees to the product and slightly above it, then use a reflector to lift shadows on the opposite side. Take a test shot, check for blown highlights and overly dark shadows, then adjust one thing at a time. Once it looks good, mark positions so you can repeat the setup for the next shoot.
What lights do I need for a photoshoot?
For many product shoots, you can start with one daylight-balanced continuous light, a diffuser or softbox, a reliable stand, and a reflector. If you need cleaner white backgrounds or faster separation, a second light aimed at the backdrop can help. A third light is usually optional and is most useful for rim or edge definition on dark products, as long as it is controlled to avoid flattening the image.
Is LED lighting good for product photography?
Yes, LED lighting can work very well for product photography, especially for Shopify merchants shooting in-house. Continuous LEDs make it easier to judge reflections, shadow falloff, and placement before taking the shot. The key is using a consistent color temperature and enough diffusion to avoid harsh highlights on glossy surfaces.
What is the difference between soft light and hard light for product shots?
Soft light creates smoother transitions and gentler shadows, which usually suits catalog images and clean ecommerce photography. Hard light produces sharper shadows and stronger contrast. That can look striking for brand campaigns, but it may make product details harder to read if overused. Most stores benefit from starting with soft light first.
Can I use natural light instead of studio lighting for product photography?
Yes, especially if you are testing products or working with a small catalog. Natural light can look excellent when it is indirect and controlled with diffusion. The trade-off is inconsistency. If you need repeatable results for product pages, ads, and new launches, studio lighting for product photography is usually more dependable.
How do I reduce reflections on packaging or glass products?
Increase diffusion, enlarge the apparent light source, and adjust the angle of the light rather than pointing it straight at the product. Moving the product farther from the background can also help. Black cards or flags may improve edge definition by shaping reflections rather than trying to eliminate them completely.
Should ecommerce brands invest in a full product photo studio lighting setup?
Not always. If you launch products frequently, run paid ads, and need a steady stream of catalog updates, a dedicated setup can save time. If you only shoot occasionally, a compact tabletop arrangement may be enough. The decision should come down to volume, product type, and how polished your brand visuals need to be.
How does lighting affect conversions on product pages?
Lighting does not guarantee conversion gains, but it can affect how trustworthy and clear a product looks. Better-lit images may help shoppers understand materials, color, and finish before buying. In many cases, that improves perceived quality and reduces uncertainty, which is valuable on Shopify product pages where visuals carry much of the selling job.
What if my current product images are usable but not great?
You do not need to rebuild everything at once. Start by improving the lighting setup for your best sellers and highest-margin products. Create a simple shooting standard, then refresh older images over time. That approach usually gives you faster commercial value than trying to re-photograph your full catalog in one pass.
Key Takeaways
Conclusion
Strong photoshoot lighting is one of the most practical upgrades an ecommerce brand can make because it affects how clearly shoppers see what you sell. The goal is not a complicated studio for its own sake. It is a reliable setup that produces accurate, consistent, conversion-friendly product images. For many store owners, that means starting small, controlling diffusion, and building a workflow you can repeat without friction. If you want more help choosing the right setup, explore AcquireConvert’s related guides on product photography lighting, gear selection, and studio planning. Giles Thomas brings a practical Shopify-focused perspective to these topics, helping merchants make smarter content and conversion decisions without overcomplicating the process.
This article is editorial content created for educational purposes and is not a paid endorsement unless explicitly stated otherwise. Pricing, features, and tool availability are subject to change, so verify current details directly with each provider. Any workflow or conversion impact discussed here is not guaranteed and will vary by product type, store setup, traffic quality, and execution.

Hi, I'm Giles Thomas.
Founder of AcquireConvert, the place where ecommerce entrepreneurs & marketers go to learn growth. I'm also the founder of Shopify agency Whole Design Studios.