Product Photography Kits: What's Inside? (2026)
If you are comparing product photography kits for an ecommerce brand, the main question is not which bundle looks most complete. It is which components will actually help you produce consistent, conversion-focused product images for your store. For most Shopify merchants, a practical kit should cover lighting, background control, camera support, and a workable shooting surface before you spend on extras. That matters whether you are handling product table photography in-house, testing remote product photography workflows, or deciding if an AI product photography app can reduce studio work later. At AcquireConvert, we assess visual commerce tools and workflows through the lens of store performance. Giles Thomas brings that perspective as a Shopify Partner and Google Expert. This guide explains what is usually inside a kit, what is worth paying for, and where smaller brands should hold back.
Contents
Overview
Product photography kits are not a single standardized product. They are usually bundled setups built around the core needs of ecommerce image production: controlled light, repeatable framing, and cleaner backgrounds. A strong kit can help a merchant create good product photography for PDPs, collection pages, marketplaces, and ads without renting a studio for every shoot.
Most kits include some mix of lights, softboxes or diffusers, backdrops, a shooting table or tent, clamps, and stands. Some are designed for close up product photography, while others are better for medium-size items like cosmetics, packaged food, accessories, or CBD product photography. If you shoot reflective items, glass, or metallic packaging, lighting control matters even more than the camera body itself.
For merchants building an in-house workflow, it helps to understand the difference between a starter bundle and a real studio setup. A simple tent kit may be enough for flat lays and small-packaged products. A broader setup, like a dedicated product photography studio, makes more sense if you need weekly shoots, lifestyle angles, and content for multiple sales channels. If you are still learning the basics of light shaping, this guide pairs well with our introduction to loop lighting photography, even though product lighting requires its own approach.
Product Photography Kit Types (And Which One You Actually Need)
Here’s the thing, most “kits” you see online are really one of a few common categories. Knowing the category makes it much easier to buy the right setup for your product table photography needs, instead of hoping a random bundle matches your catalog.
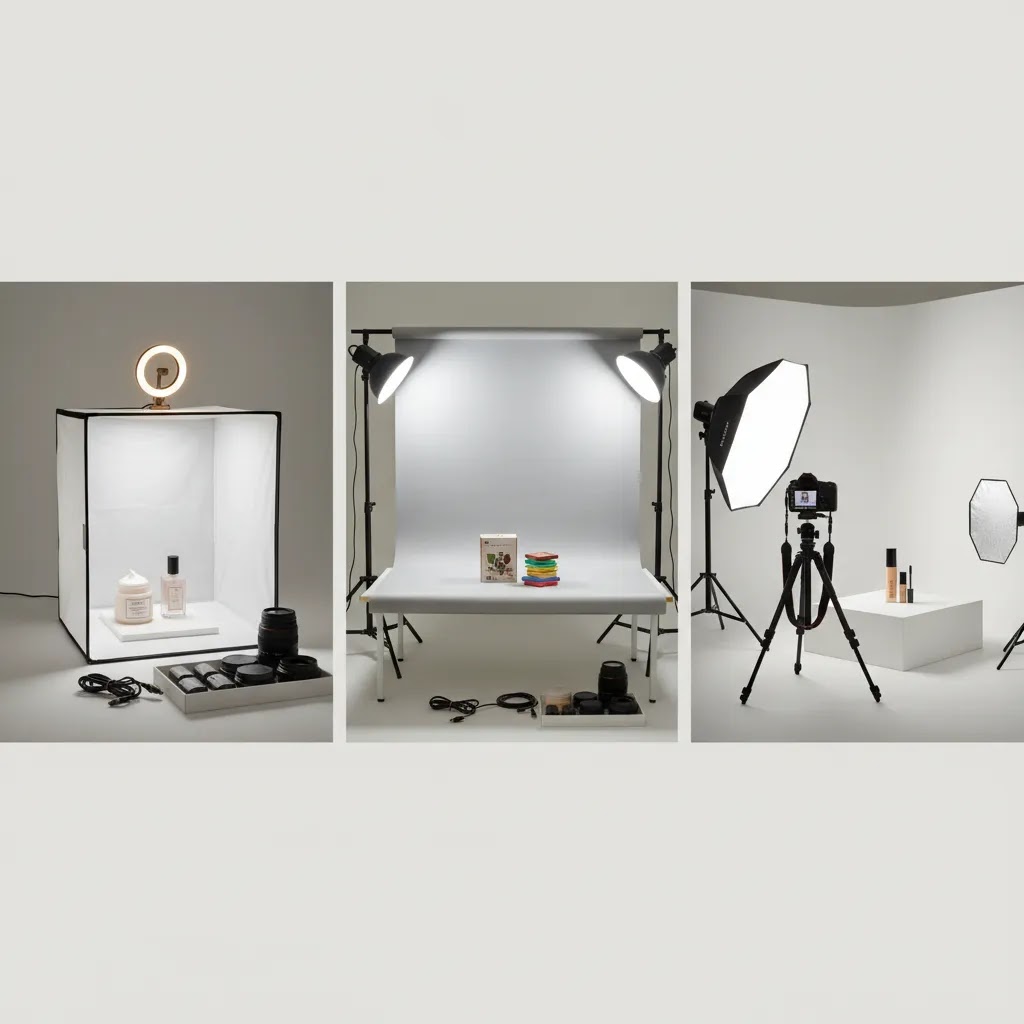
1) Product photography tent kits (light tents and light boxes)
These are the classic cube setups with diffusion on the sides and top, usually paired with small LED strips or compact lights. They tend to work best for small products where you want clean, low-shadow packshots, like skincare bottles, small boxes, jars, and simple accessories.
The limitation is control. A tent can make lighting flatter (which is sometimes good for marketplaces), but it can become restrictive when you want stronger shape, a more premium shadow, or a specific hero angle. If your packaging is glossy, metallic, or includes curved reflective surfaces, a tent may reduce harsh reflections, but it can also create dull highlights that make the product look less expensive than it is.
2) Tabletop shooting table kits (shooting tables with a sweep)
A tabletop shooting table is usually a small frame with a translucent surface and a curved “sweep” background. This style is built for repeatable catalog photography where you want consistent framing and a clean background across a lot of SKUs.
For many Shopify store owners, this is the first setup that feels like a real system. You can place lights above and to the sides, control shadow direction, and keep the same look across variants and collections. It is also less confining than a tent when you need angled hero shots or slightly wider compositions.
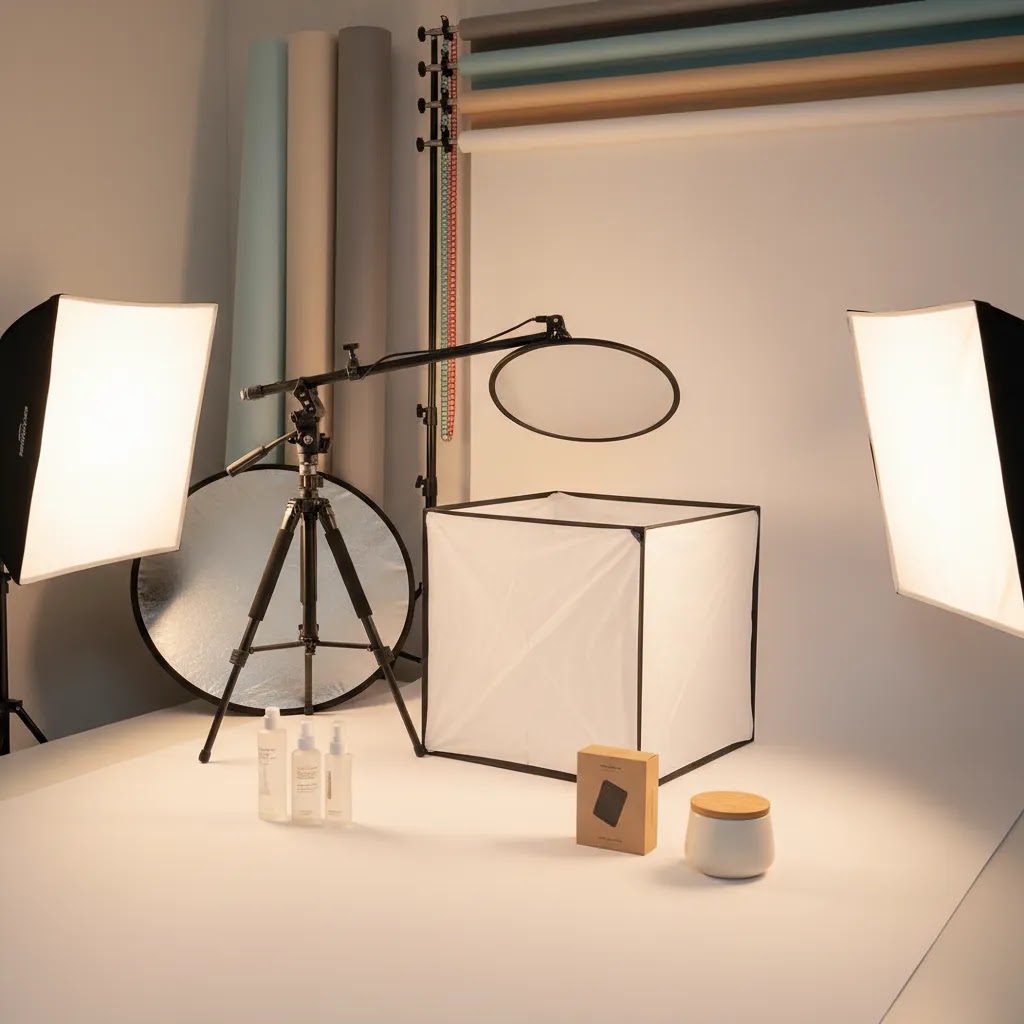
3) “Studio-in-a-box” continuous lighting kits
These kits focus on light stands plus softboxes or umbrellas, with a basic backdrop included. They are more flexible than tents because you can adjust light position, height, and modifier size. That flexibility matters if you sell products that need shaping, like textured packaging, apparel on a mannequin, or sets and bundles where you want separation between items.
They also take more space. If you are working in a spare room, you will need a plan for where the stands and backdrops live between shoots.
4) Mobile shooting kits (compact lights, small tripod, and backdrops)
Mobile kits are built for speed and limited space, often used by founders who shoot on a desk and pack everything away after. They can be a practical stepping stone if you are launching, testing products, or only shooting occasionally.
The tradeoff is consistency. Smaller lights and backdrops tend to make it harder to keep the same look from session to session, which can show up as mismatched white balance or inconsistent shadows across your Shopify product pages.
5) 360 and spin-focused kits (turntables and controlled lighting)
If your goal is spins or rotation assets, a kit typically centers around a turntable, locked camera position, and lighting that stays consistent across frames. This is where “good enough” lighting becomes obvious fast. Even small flicker or color shifts can create visible changes frame-to-frame, which makes the spin feel jumpy.
For stores thinking about advanced formats, it is worth separating “I need better product photos” from “I need 360 content.” They are related, but the kit requirements are not identical.
A simple way to choose the right kit type
From a practical standpoint, choose based on what you shoot most often, and what your product needs to look like on the PDP:
Trust and Credibility
This article is not reviewing a single bundled hardware brand because the live product data available for this piece is centered on AI-assisted image tools, including ProductAI resources such as AI Background Generator, Free White Background Generator, Increase Image Resolution, Remove Text From Images, Background Swap Editor, Place in Hands, Magic Photo Editor, and Creator Studio. No live hardware kit pricing was provided by the connected Products data, so this article avoids inventing model names, bundle specs, or price claims.
That matters for trust. Many product photography kit articles blur together hardware recommendations, studio theory, and AI editing claims without making clear what is verified. Here, the practical advice is grounded in documented ecommerce photography workflow needs, while any specific tool references are limited to the currently surfaced ProductAI tools and AcquireConvert category resources. That measured approach matters for store owners who need dependable guidance, not vague recommendations.
If you are evaluating the broader topic of photography lighting equipment, focus on repeatability first. Consistent images usually matter more for conversion than chasing highly stylized shots that are difficult to reproduce across your catalog.
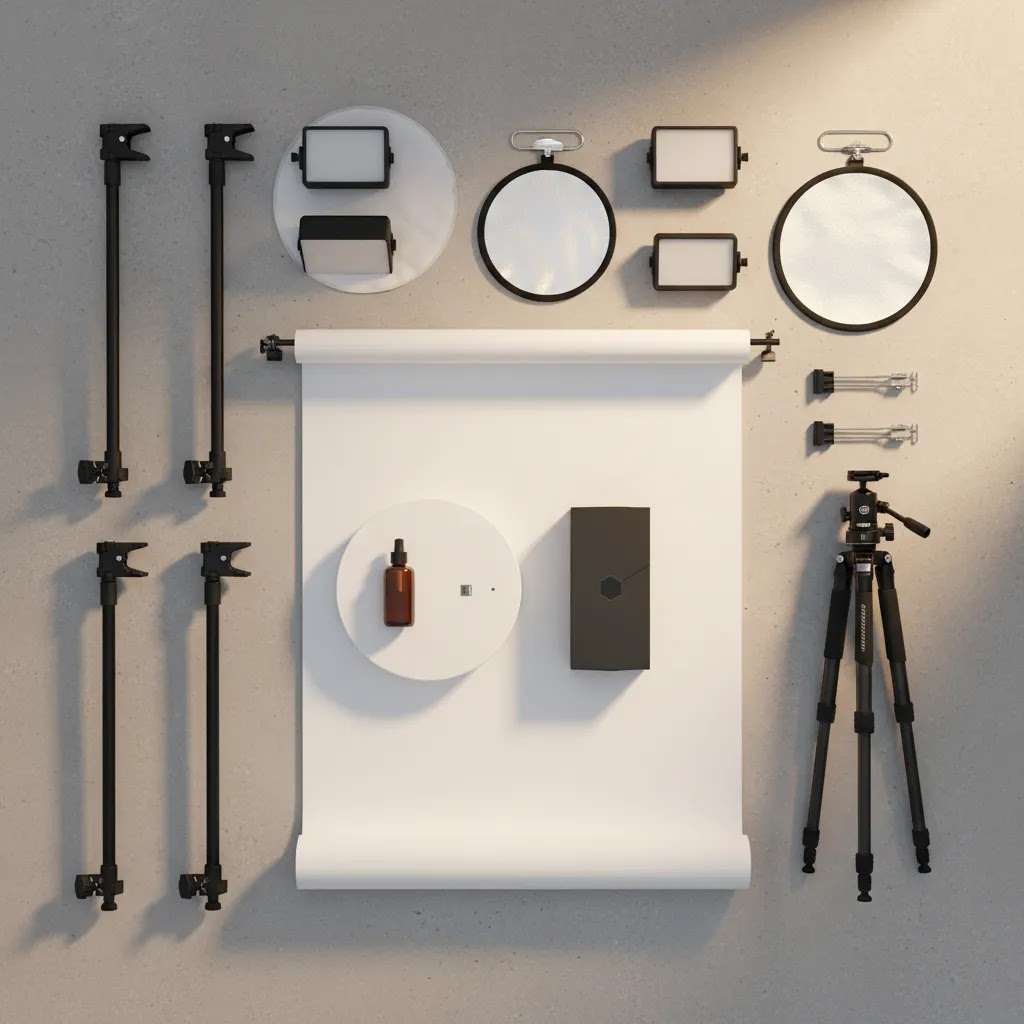
What a Product Photography Kit Should Include
1. Primary lightsAny useful kit should include at least two controllable light sources. Continuous LED lights are usually more practical for small teams because what you see is close to what you capture. For product detail work, even output and color consistency matter more than sheer brightness. If you are unsure what setup pattern to use, our guide to product photography lighting will help you map light positions to common ecommerce shot types.
2. Diffusion and light modifiersSoftboxes, diffusion cloths, reflectors, or a light tent help reduce harsh shadows and specular highlights. This is essential for beauty, supplements, jewelry, and glossy packaging. Product photography tent kits can work well for very small products, but they are restrictive once you need angled compositions or props.
3. Background systemA good kit should either include seamless backdrops or make it easy to use white, gray, or branded color sweeps. White remains the most flexible for marketplaces and clean PDPs. If you are editing later, AI tools such as the ProductAI Free White Background Generator or AI Background Generator may help extend what your physical kit can produce.
4. Stable shooting surfaceFor product table photography, a sturdy table or sweep surface is more important than many beginners expect. Wobble, reflections, and inconsistent height slow down every shoot. A proper surface also helps if you plan to shoot spin assets later and compare options against best lighting for photography setups.
5. Camera supportA tripod or overhead arm belongs in most kits. It improves repeatability for comparison shots, collection consistency, and batch editing. If you are shooting apparel details or cosmetics close-ups, this reduces alignment issues across variants.
6. Editing supportModern kits are no longer just physical. Many merchants now pair a simple hardware setup with software editing. ProductAI tools like Increase Image Resolution, Remove Text From Images, and Magic Photo Editor can support post-production if your in-house process is lean. That can be useful for stores that need more output without moving straight to a fully outsourced studio model.
Setup Checklist: What to Look for Before You Buy
Many kit listings make everything sound equivalent. In practice, a few specs and physical details will determine whether the kit helps you shoot faster, or forces you into extra editing work and reshoots.
Light output and dimming control
You want lights that can be adjusted, not just turned on or off. Dimming lets you control exposure without constantly changing your camera settings, and it makes it easier to keep your look consistent across products. Output numbers are not always comparable across brands, so focus on real-world usability: can you light your product evenly with diffusion, at the distance your space allows, without pushing your camera into noisy high ISO settings?
Color temperature consistency and color accuracy
Look for lights that keep a stable color as you dim them and as they warm up. Mixed or shifting color temperature is one of the fastest ways to create a catalog that looks inconsistent on Shopify collection pages. If one product looks slightly green and the next looks slightly magenta, your store feels less polished even if each individual photo is “fine.” High CRI or TLCI specs can be a helpful indicator, but the real goal is consistency session-to-session.
Modifier and diffuser size
Tiny softboxes often produce harder light than people expect, especially on reflective packaging. The larger the light source relative to the product, the softer and more controllable the highlights tend to be. If you shoot glass, metallic finishes, glossy labels, or foil pouches, diffuser size matters as much as the light itself.
Stand stability and positioning range
Flimsy stands are not just annoying, they slow your workflow and can be a safety problem in a small studio corner. You want stands that lock firmly, stay level, and can reach the height you need for top-down or slightly overhead lighting. If your setup shifts between products, your shadows shift too, and that is what makes a catalog feel patchy.
Backdrop width and sweep depth
Backdrops are often the hidden bottleneck. If your sweep is too narrow, you end up cropping tight to hide edges, which limits your ability to create consistent framing across collections. Think about the widest product you sell, then add space around it for a clean crop. This matters for Shopify because you typically want a repeatable crop and composition across variants and product types, not a different framing “solution” every time.
Table or shooting surface weight capacity
If you use a shooting table, check that it can support your heaviest products without sagging or wobbling. A sagging surface changes your background curve and makes shadows harder to match across batches.
What to avoid in bundle listings
Consider this when you compare bundles: a long accessory list can hide weak core components. Watch for kits padded with “filler” items you will not use, tiny modifiers that do not meaningfully soften light, clamps that slip, and lights that create inconsistent color. Those issues typically turn into extra retouching time, and that is a real cost when you are trying to keep PDPs cohesive across a growing catalog.
Pricing and Costs
There is no live hardware pricing for product photography kits in the connected Products data, so this article does not assign estimated dollar ranges to stands, tents, LEDs, or backdrop bundles. That is intentional. Hardware costs vary widely by product size, output quality, and whether you need only table shots or a more complete content system.
What you should budget for, in practical terms, is the full workflow rather than the kit box alone. The real cost often includes replacement bulbs or upgraded LEDs, tabletop surfaces, backdrops, clamps, storage, and editing time. If you are comparing do-it-yourself against outsourcing, also factor in labor. A solo founder spending six hours per week on image cleanup is paying a real operational cost, even if the gear looks affordable upfront.
For some merchants, hybrid spending makes more sense. Use a basic physical setup for standard catalog shots, then rely on AI-assisted tools for cleanup, background changes, or creative variants. The currently surfaced ProductAI options include Creator Studio, Background Swap Editor, Place in Hands, and Magic Photo Editor, but no live pricing details were returned in the product data provided here, so no pricing claims are made. If your goal is marketplace-ready photos plus occasional lifestyle images, that blended model may be more cost-effective than overbuilding your first studio.
You can also browse AcquireConvert's Product Photo Lighting and Catalog Photography resources to compare setup approaches before buying equipment.
Pros and Cons
Strengths
Considerations
Who It's Best For
Product photography kits are best for ecommerce brands that need consistent catalog imagery and have enough SKU volume to justify an in-house workflow. They are especially suitable for Shopify merchants selling smaller physical products that can be shot on a table, such as skincare, supplements, accessories, stationery, candles, or packaged foods.
They are less suitable for merchants selling large furniture, highly reflective luxury goods, or products that rely heavily on styled lifestyle scenes. In those cases, a hybrid approach often works better: keep standard packshot production in-house and outsource campaign images to a product photography professional. If your team is lean and wants more volume without full studio overhead, AI-assisted cleanup can also fill part of the gap.
How to Get Started
Start with your catalog needs, not the kit listing. Count how many SKUs you need to shoot each month, what image types you need, and where those images will appear. A Shopify store usually needs at minimum a consistent hero image, several angle shots, and occasional detail crops.
Next, build around the smallest complete setup that can deliver those images reliably. For many merchants, that means two lights, diffusion, a white sweep, a stable table, and a tripod. Test that setup on five representative products before you add more gear.
After capture, decide what editing belongs in-house. If your team needs faster white-background outputs or variant scenes, tools like ProductAI's Free White Background Generator or Background Swap Editor may help. If you need broader workflow guidance, reviewing your lighting setup against a more structured list of photography lighting equipment is a sensible next step.
Finally, create a repeatable shot list and naming convention. That single operational step usually has more impact than buying extra accessories, because it keeps your catalog organized as image volume grows.
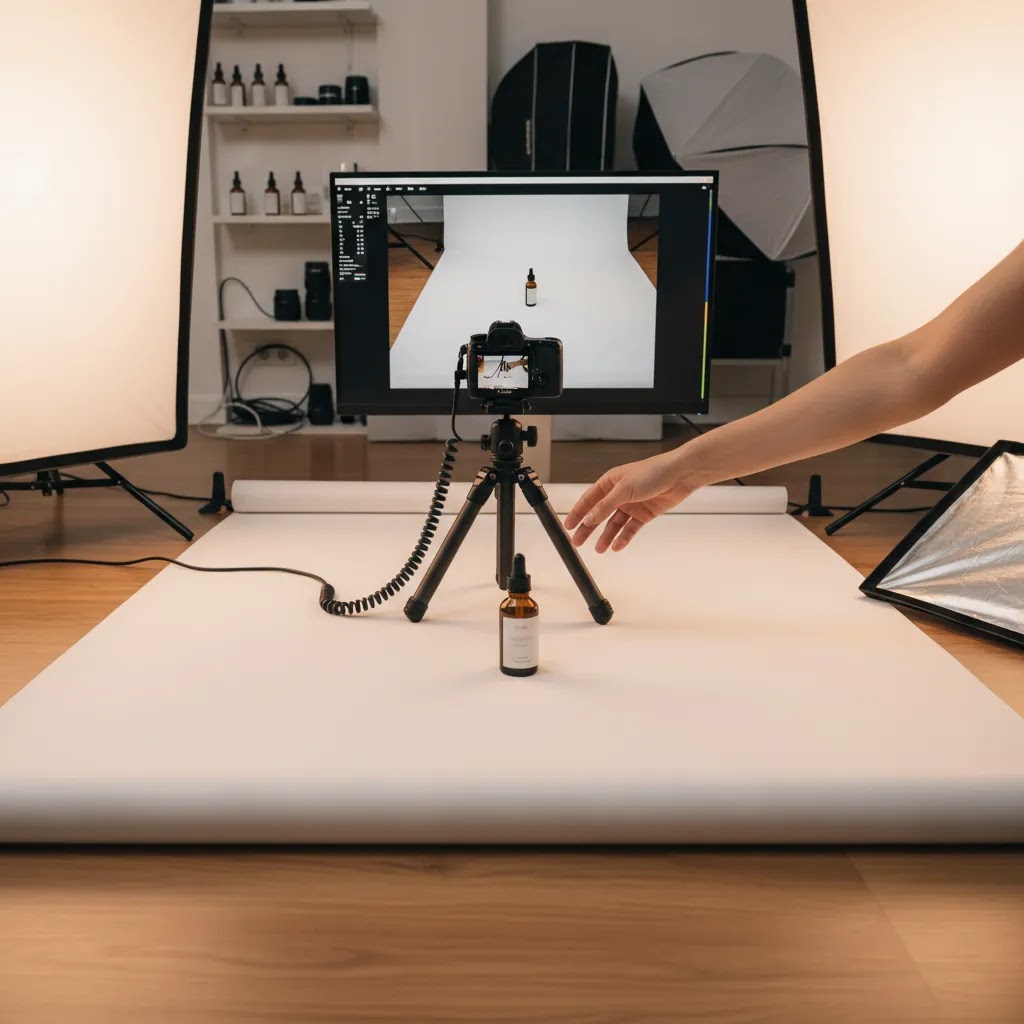
A Practical Tabletop Workflow: How to Shoot Faster With a Kit
What many store owners overlook is that speed comes from process, not more gear. A simple kit can produce strong ecommerce images if you make your setup repeatable and remove decisions from the shoot.
1) Prep products before the camera comes out
Batch your prep like you would batch fulfillment: unbox, inspect, wipe fingerprints, remove dust, and make sure labels are straight. For reflective packaging, small smudges show up fast once lights are diffused and close. If you have multiple sizes or variants, group by physical size so you are not constantly adjusting light height and camera distance.
2) Lock your camera settings and white balance
Use a tripod and lock your framing. Then keep your exposure settings stable so images match across a whole collection. White balance consistency matters for Shopify because customers scroll quickly between products and variants, and color shifts can make the catalog feel inconsistent. If you are using a phone, use a manual or pro mode if available, and avoid auto settings that change shot-to-shot.
3) Standardize your shot list
Decide your angles once, then repeat them for every SKU. A common approach is a consistent hero angle, then a set of supporting angles, then detail crops. The goal is not creativity for every product, it is comparability for the shopper. This is one of the simplest ways to make product pages feel cohesive without redesigning anything.
4) Batch by setup to reduce resets
The way this works in practice is simple: shoot all products that fit the same framing and lighting in one run. Then change the setup once for larger items or different packaging types. If you do the opposite and switch between sizes every few shots, your session slows down and your results become harder to edit consistently.
5) File handling that supports ecommerce
Use a naming convention tied to SKU and variant so you can upload and replace images without confusion later. If your hero image angle is always the first image in the sequence, keep that true in your filenames too. It saves time when you are updating products in Shopify, and it reduces mistakes when you hand off tasks to a teammate.
It is also smart to capture a couple of “insurance shots,” like a close-up of a batch code, a label detail, or packaging condition. Those images can be useful for marketplace requirements, customer support issues, or damage claims. You may never need them, but when you do, you will be glad they exist.
6) Where AI editing fits without creating problems
AI tools can be genuinely helpful for cleanup tasks, especially background cleanup, resizing, and creating consistent white-background outputs. ProductAI tools like Free White Background Generator, AI Background Generator, and Magic Photo Editor can support that part of the workflow.
The reality is you still need a human QA step before uploading to Shopify. Check edges around transparent packaging, hairline product contours, labels, and fine text. Also check brand color accuracy, because small shifts in color can lead to returns, customer complaints, or inconsistent creative across ads and PDPs.
Frequently Asked Questions
What is usually included in product photography kits?
Most kits include lights, stands, diffusers or softboxes, a backdrop or tent, and basic support accessories. Better setups may also include reflectors, clamps, or a shooting table. The exact bundle varies a lot, so you should check whether the kit solves your actual product size and lighting needs rather than assuming more items means better results.
Are product photography tent kits good enough for ecommerce?
They can be good enough for small, simple items where you want clean, repeatable white-background shots. They are less effective for products that need angled framing, dramatic shadows, props, or brand storytelling. For many Shopify stores, a tent is a starting point, not a complete long-term content setup.
Do I need professional camera gear for good product photography?
No, not always. Lighting, stabilization, and consistency usually matter more than owning an expensive camera body. A modest camera or even a newer phone can produce usable ecommerce images if your light is controlled well. The stronger your process, the less you rely on high-end gear to fix avoidable problems.
Can AI replace a physical product photography kit?
Not fully in most cases. AI tools can help with background cleanup, resizing, retouching, and scene variation, but you still need a solid base image. For many merchants, the best approach is hybrid: capture clean originals with a basic kit, then use AI for selective post-production where it saves time.
How do I know if I should build a studio or outsource?
If you have regular product launches, many SKUs, and straightforward packshot needs, in-house production often makes sense. If you need high-concept campaign imagery, model work, or large products, outsourcing may be the better fit. Consider your time, staffing, storage, and editing capacity before deciding.
Are product photography kits suitable for Shopify stores?
Yes, especially for Shopify merchants who need consistent product page images and want more control over upload speed and brand presentation. The key is choosing a setup that matches your catalog. Stores with simple products often benefit quickly, while more complex categories may need a mixed production model.
What is the best lighting setup for product photography?
In many cases, the best starting point is two continuous lights with diffusion, placed to create soft, controlled highlights and a repeatable shadow direction. The exact placement depends on whether you want a clean, low-shadow packshot or a more dimensional hero image. What matters most is consistency: same light positions, same modifier size, and stable color so your Shopify catalog looks cohesive across sessions.
How much does a product photography kit cost?
Pricing varies widely based on light output, modifier size, stand quality, and whether the kit includes a shooting table, tent, or backdrop system. This article does not include dollar ranges because no verified hardware pricing was provided in the connected product data. If you want a practical benchmark, think in terms of total workflow cost, not just the box, including replacement parts, storage, and the time you spend editing and managing files.
What should I look for in a beginner product photography kit?
Look for a kit that helps you produce repeatable results: two controllable lights, decent diffusion, a clean background solution, a stable surface, and solid camera support. Avoid bundles that pad the item count with low-impact accessories while underdelivering on light quality, stability, and backdrop size. For a beginner, a consistent catalog look usually beats an overly complex setup.
Are product photography kits worth it?
They can be worth it if you have enough SKUs and refreshes that consistent in-house images save you time and help you publish faster. The biggest payoff is usually operational: fewer reshoots, faster launches, and a more cohesive Shopify catalog. If you only shoot occasionally, or your products require high-end lifestyle creative, a smaller kit plus selective outsourcing and careful AI-assisted cleanup may be a better fit.
Key Takeaways
Conclusion
For most ecommerce brands, the right product photography kit is the one that helps you produce repeatable, store-ready images without creating unnecessary complexity. That usually means prioritizing lighting control and workflow discipline over oversized bundles packed with low-impact accessories. If you are a Shopify merchant managing a growing catalog, an in-house setup can be a strong investment when your products are small to medium-sized and your image needs are frequent. If your brand depends on premium lifestyle scenes or advanced formats, you may want a hybrid of studio shooting, outsourced creative work, and selective AI editing. The practical next step is simple: audit your current image needs, test a minimum viable setup, and expand only after you know where your bottlenecks actually are.
Disclosure: AcquireConvert may receive affiliate compensation from some third-party links mentioned in its content. This article is for informational purposes and does not guarantee specific business outcomes. Results will vary based on your store, product type, traffic, visual standards, and how you implement your photography workflow and editing tools.

Hi, I'm Giles Thomas.
Founder of AcquireConvert, the place where ecommerce entrepreneurs & marketers go to learn growth. I'm also the founder of Shopify agency Whole Design Studios.