DIY Light Box for Product Photography (2026 Guide)
If you sell online, your product photos do a lot of selling before your copy ever gets read. A diy light box for product photography can be a practical starting point if you want cleaner images, more consistent shadows, and a simple setup you can use at home or in a small office. It is especially useful for newer Shopify merchants testing products, improving PDP images, or trying to avoid the uneven lighting that often comes from kitchen-table photography. If you are still building your visual workflow, it helps to understand where a homemade setup fits within the wider product photography process. This guide covers what a DIY light box does well, where it falls short, how to build one step by step, and when it makes sense to move to a more advanced setup.
Contents
What a DIY Light Box Is Good For
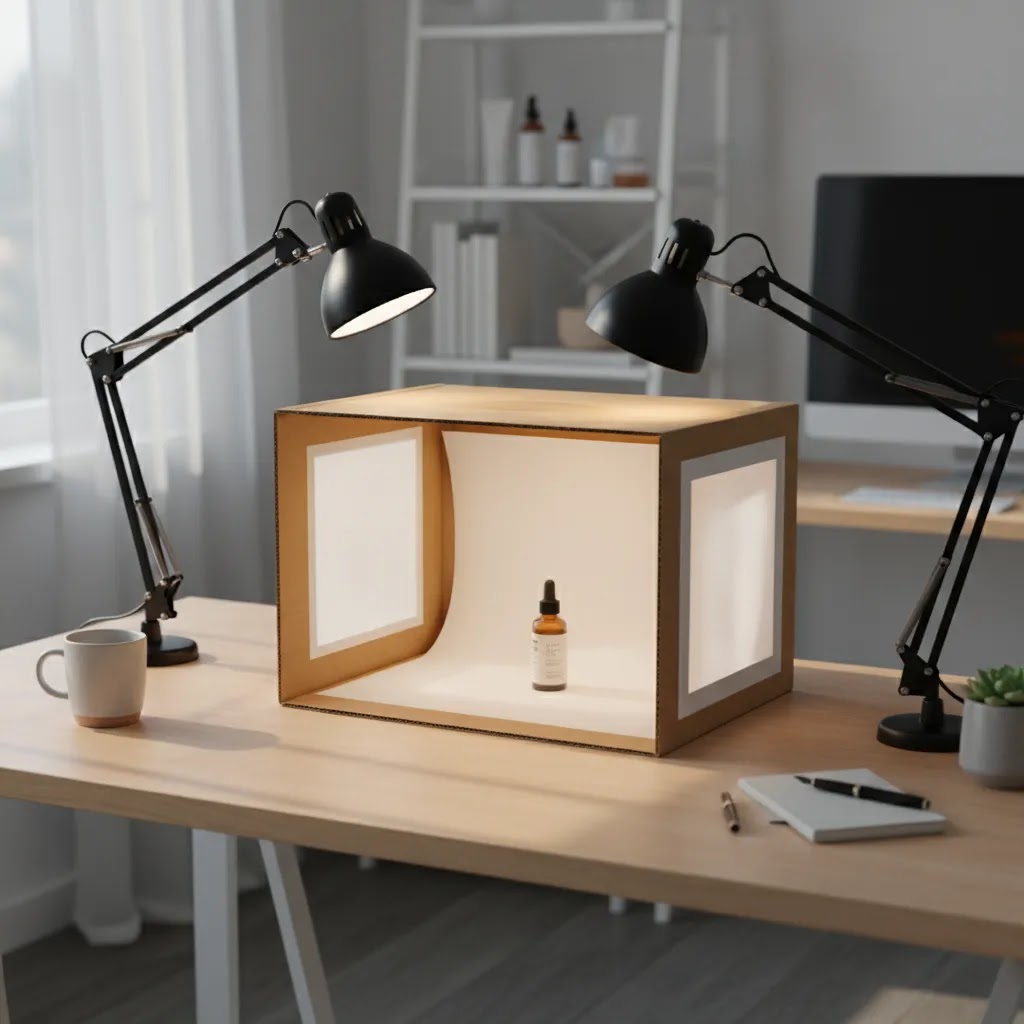
A DIY light box is a small enclosed shooting space designed to soften light around a product. Most store owners make one from a cardboard box, white poster board, tissue paper or fabric diffusion panels, and a few clamp or LED lights. The goal is simple: reduce harsh shadows, create a cleaner background, and make products look more consistent across your catalog.
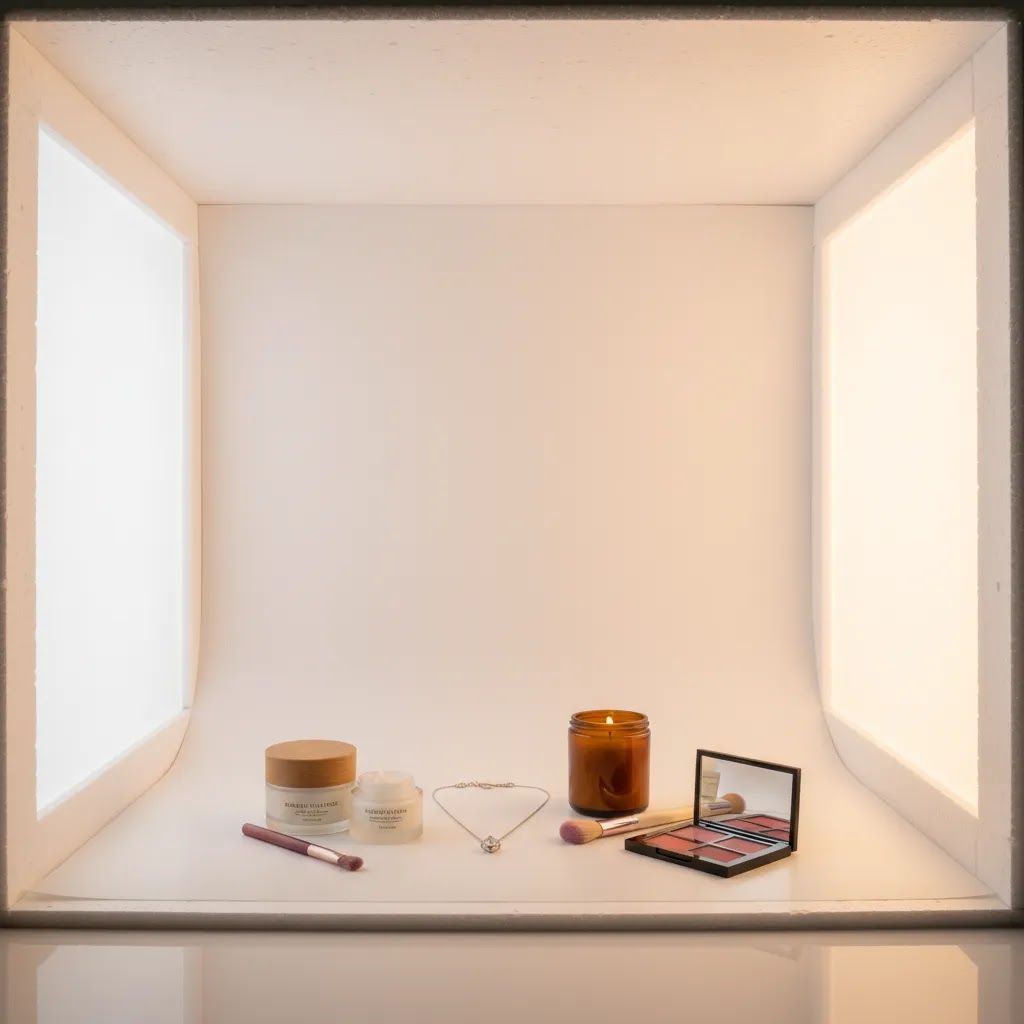
For ecommerce, that consistency matters. If your collection page shows ten products shot in ten different lighting conditions, the store can feel less polished. A homemade light box can help fix that without a large upfront spend. It tends to work best for smaller items such as cosmetics, jewelry, candles, packaged goods, accessories, and home decor pieces that fit comfortably inside the box.
It is not a perfect answer for every catalog. Apparel, reflective products, oversized items, and products needing lifestyle context usually need a different approach. In those cases, techniques such as flat lay photography or a dedicated product photography studio setup may be more effective.
How to Build a DIY Light Box
You do not need a long gear list to create a usable product photography light box diy setup. What matters more is controlling light spill and keeping your angles repeatable.
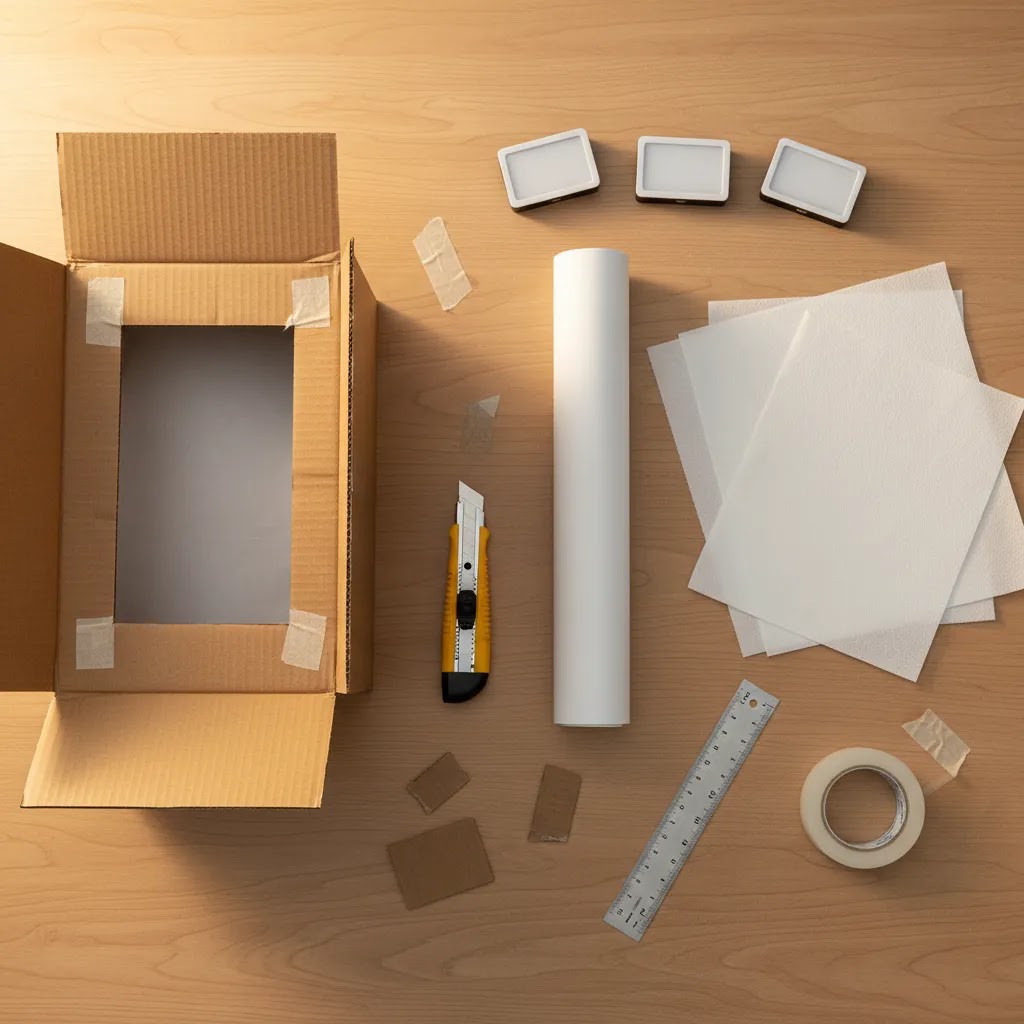
Materials you will need
Build steps
If your results still look dull or yellow, the issue is often lighting consistency rather than the box itself. Matching bulbs and basic diy photography lighting principles usually improve results more than adding extra materials.
Key Features That Matter Most
Not every diy photography light box is worth the time. A few details make a real difference to image quality and editing efficiency.
1. Even light diffusion
The whole point of a light box is softer, more even light. If the side panels are too thin, too dark, or unevenly placed, you can end up with hotspots on glossy packaging or deep shadows under the product. For ecommerce thumbnails and product page galleries, even lighting usually matters more than dramatic styling.
2. A smooth sweep background
A curved white insert helps avoid the line where the wall meets the floor. This matters if you want cleaner cutouts, white-background product images, or a more polished marketplace look. If white-background consistency is your priority, AcquireConvert’s White Background Photography resources are a useful next step.
3. Repeatable positioning
Consistency is the real ecommerce advantage. A DIY box works best when you can place each product in the same spot, keep lights fixed, and use the same camera height. That helps your category pages look more cohesive and may reduce editing time later.
4. Size fit for your catalog
A homemade box is only practical if your products fit comfortably with some space around them. If items touch the sides, your diffusion will be less effective and framing gets harder. For larger objects, a tabletop setup or room-based lighting arrangement is usually better.
5. Editing support after the shoot
Even with a decent setup, most stores still need minor cleanup. If you want to refine backgrounds or fix small visual issues after shooting, tools like Free White Background Generator, AI Background Generator, and Increase Image Resolution may help streamline post-production for ecommerce images.
Common Light Box Problems (and How to Fix Them)
Here’s the thing: most “DIY light box failed” stories are not really about the box. They come down to light placement, mixed color temperatures, and surfaces that behave like mirrors. If you fix those basics, a simple setup can produce surprisingly usable images for Shopify product pages.
Hot spots, harsh shadows, and flat-looking products
If you are seeing bright blowouts on one side and a deep shadow on the other, your lights are usually too close, too direct, or not diffused evenly. The fastest fix is to move the lights back a little and make your diffusion more consistent across both sides. Even a small distance change can reduce hot spots because the light hits the diffusion panel more evenly.
If your product looks “flat” and dead, the problem is often the opposite: you have removed all directional shadow. A light box can soften everything so much that your product loses shape. In practice, adding a little direction back helps. Try turning down or moving one side light slightly farther away so you get a gentle shadow edge. You are not trying to create dramatic lighting, you are trying to make the product feel three-dimensional in a thumbnail.
Shadows under the product are usually a placement issue. If the product is too close to the back sweep or the floor is too dark, you will get a heavy shadow patch. Raise the product slightly on a small white stand or a clean box covered in white paper. Keep it simple, you just want light to wrap underneath a bit more.
Color casts and inconsistent whites
If your background keeps turning yellow or blue, mixed light sources are usually to blame. One bulb might be warm and another might be daylight, or you might be picking up room light from a nearby lamp or window. For consistent product photography in a light box, use matching bulbs and eliminate other light sources as much as possible. Turn off overhead room lights and close blinds if daylight is shifting during the shoot.
From a practical standpoint, you also need a repeatable white balance workflow. If you are shooting on a phone, tap and hold to lock exposure and focus, then avoid changing framing and angle for every product. If your camera app supports it, set a fixed white balance rather than auto. For cameras, use a preset like Daylight if your bulbs are daylight balanced, or set a custom white balance using a white card inside the box. The goal is not perfection on every shot, it is consistency across the set so your Shopify collection pages do not look like ten different photo sessions.
Reflections on glass, metal, and glossy packaging
Reflective products are where DIY light boxes get frustrating. Glass, polished metal, and glossy labels will reflect whatever they “see,” including the bright diffusion panels and even your phone. If you are getting mirror-like glare, start by changing the angle. Rotate the product slightly or raise your camera angle so the reflection bounces away from the lens.
What many store owners overlook is that you can shape reflections with simple “flags.” Place a piece of black card just outside the diffusion panel to create a darker strip reflection, this often adds definition and reduces the blown-out look. You can also tighten your sweep so the product is not reflecting a big bright white curve directly into the camera. Small positioning changes matter more here than adding more light.
If you still cannot control reflections, it is a sign you may need a different approach than a fully enclosed box, especially for high-shine products where controlled highlights are part of making the item look premium.
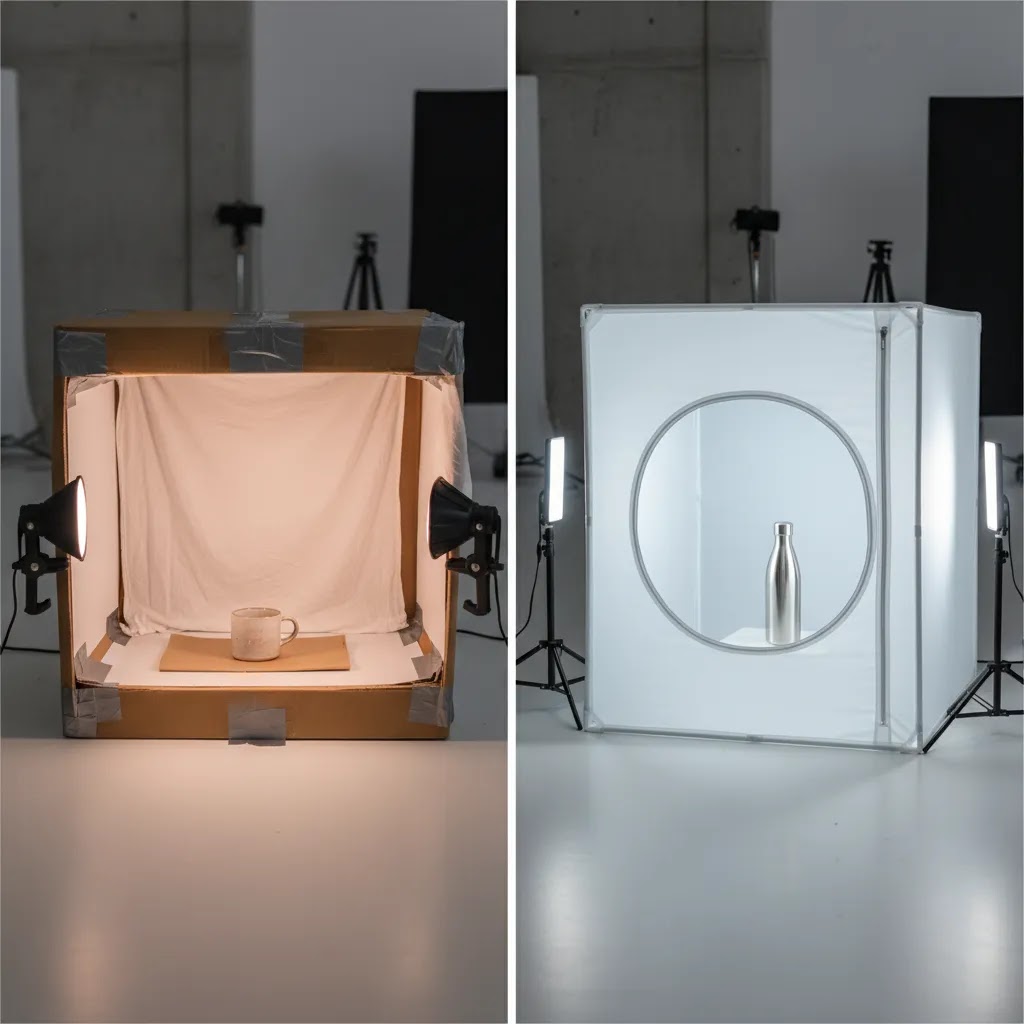
DIY Light Box Variations: Cardboard vs PVC, LED Strip Builds, and Going Bigger
A cardboard light tent is the classic DIY approach, but it is not the only option. Consider this: the “best” build is the one you can use repeatedly without it warping, tearing, or changing color on you mid-catalog.
When cardboard is enough
Cardboard is a great choice if you are early-stage, testing products, or only shooting occasionally. It is quick to cut, easy to tape, and cheap to rebuild when the white interior starts to scuff. For many Shopify store owners photographing small items, that is enough to get consistent core images while you refine product pages and launch ads.
The downside is durability. Cardboard can bow, the cut edges can fray, and your diffusion panels may wrinkle over time. That shows up as inconsistent lighting and inconsistent whites, which means more editing later.
When a PVC frame is the better move
If you are shooting every week, reshooting for new packaging, or building out a larger catalog, a simple PVC frame can be more stable. The way this works in practice is straightforward: you build a cube frame from PVC pipe and fittings, then attach diffusion fabric to the sides with clips. You can swap backgrounds and diffusion panels without rebuilding the whole structure, and the frame tends to keep its shape better than a box.
PVC builds also make it easier to keep consistent camera and light positions because you can mark reference points on the table and leave the frame assembled. If your goal is repeatable product photography for Shopify, stability is not a luxury, it is the difference between a one-off shoot and a workflow.
LED strip light box builds (and what to watch for)
Some DIY builds use LED strips instead of external lamps. The appeal is obvious: fewer stands and a more self-contained setup. You can mount LED strips inside the frame or outside shining through diffusion. In many cases, outside mounting gives you softer light because the diffusion does more work before the light hits the product.
Now, when it comes to LED strips, consistency matters more than brightness. Cheap strips can vary in color temperature along the length of the strip, which can create uneven background tones that are annoying to fix later. Heat is usually less of an issue with LEDs than older bulbs, but poor-quality strips can still flicker or shift color. If your phone or camera shows banding, that is often flicker interacting with shutter speed. You may need to change your shutter settings, or choose a more stable light source.
Even with strips, matching light sources still matters. Mixing one strip with a random desk lamp often brings back the same yellow and blue cast problems you were trying to eliminate.
How to scale up for larger products
If your products are slightly too big for a standard box, you can scale the same idea up. Use a bigger frame, larger diffusion panels, and a wider sweep. The key is leaving enough space between the product and the diffusion so light can wrap around the item instead of creating harsh falloff at the edges.
For larger items, shooting through a “wall” of diffusion can be more practical than enclosing the entire product. Think of it this way: instead of building a full tent, you create a big diffused light source between your lights and the product, then use a sweep behind it. This can work well for medium-sized home goods and larger packaging.
There are limits, though. Once you are dealing with oversized products, highly reflective surfaces, or lifestyle angles that need depth and environment, a light box becomes less efficient than a tabletop or room setup.
Pros and Cons
Strengths
Considerations
Who This Setup Is For
This setup is best for store owners who need a practical way to improve small-product photography without committing to a full studio workflow. It suits early-stage and growth-stage ecommerce brands selling compact items such as skincare, supplements, candles, stationery, tech accessories, and handmade goods.
It is also a sensible choice if you are validating products, updating old PDP images, or creating cleaner images for marketplaces and social shops. If your store is already scaling and image production is becoming a bottleneck, a homemade setup may only be a temporary solution. At that point, your next investment might be better spent on workflow improvements, upgraded gear, or reviewing the best camera for product photography for your volume and catalog type.
AcquireConvert Recommendation
A DIY light box is worth trying if your main goal is cleaner catalog images for small products and you need a setup you can build this week. For many Shopify merchants, that is enough to improve image consistency while keeping production in-house. The key is treating it as a repeatable workflow, not a one-off craft project.
AcquireConvert approaches this from a practical store-owner perspective. Giles Thomas’s background as a Shopify Partner and Google Expert is useful here because product imagery affects more than aesthetics. It shapes click-through rates, product page trust, feed quality, and how polished your brand feels across sales channels. If you want to build stronger fundamentals around shooting, staging, and visual consistency, start with AcquireConvert’s Product Photography Fundamentals hub and then compare your DIY setup against the demands of your current catalog.
How to Decide if DIY Is the Right Choice
If you are weighing a diy box for product photography against buying equipment or hiring help, use these criteria.
Catalog size and product dimensions
If most of your products are small, similarly shaped, and sold on standard PDP layouts, a light box can be a practical fit. If your catalog includes apparel, furniture, oversized home goods, or bundles with multiple dimensions, you will outgrow it quickly.
Image style requirements
A light box is best for clean catalog images, not storytelling. If your brand depends on mood, texture, lifestyle context, or premium editorial visuals, a DIY box may feel limiting. Many stores use light box shots for core product images and add styled images separately.
Operational repeatability
The biggest question is not whether you can build it. It is whether you can use it consistently. Can you leave it assembled? Can you keep lighting fixed? Can someone on your team repeat the same setup next month? If not, your visual consistency may still drift.
Editing workload
A homemade setup does not remove the need for post-processing. You may still need background cleanup, color correction, cropping, and resizing. If you are spending too much time fixing images, the savings from DIY can disappear fast.
Stage of business
For new stores, a diy product photography light box can be a sensible bridge between improvised phone shots and a more mature content system. For established brands with frequent launches, wholesale line sheets, or ad creative needs, you may eventually need a more scalable shooting environment than product photography in a light box can offer.
What to Use Instead of a Light Box (and When to Upgrade)
The reality is a light box is a tool, not a requirement. If you are struggling to make a DIY box work, or your products simply do not look right inside one, you have other options that can be just as practical for Shopify content.
Window light plus diffusion (simple and often better than a box)
If you have access to a large window with indirect daylight, you can often get nicer depth than a fully enclosed light box. Place your product on a small table near the window, then soften the window light using a thin white curtain or a piece of diffusion material. Use a white foam board or white card opposite the window to bounce light back in and reduce shadows.
This approach can beat a box when you want a slightly more natural look, or when your product needs some shadow and shape to feel real. The trade-off is consistency. Daylight shifts over the day and across seasons, so it is harder to reshoot SKUs months later and match the look exactly.
Tabletop sweep plus two lights (more scalable for growing catalogs)
For most Shopify store owners who are shooting regularly, a tabletop sweep with two matching lights is an upgrade that stays manageable. You use a roll of white paper as a sweep, place lights on both sides through diffusion, and keep the camera on a tripod. You are still controlling the background and the shadows, but you are not constrained by a small box.
It also handles reflective products better because you have more room to place flags and adjust angles. If you are photographing jars, glossy packaging, or metallic components, that extra space makes troubleshooting far easier.
A practical upgrade path based on shooting volume
For many stores, the best setup evolves as your catalog and launch cadence grows. A reasonable progression looks like this:
This is not about “pro” versus “DIY.” It is about building a workflow you can actually maintain while running a store.
Decide based on image needs, not just cost
If your main requirement is clean white-background consistency for core PDP images, a light box or tabletop sweep can make sense. If you need lifestyle context, scale, fabric drape, or a premium editorial feel, a box can become a limitation quickly. Many brands do both: consistent catalog shots for the first images, then context images that sell the story.
One more practical point: if you are spending hours trying to “fix it in editing,” that is usually the signal to change the shooting setup. Editing is part of ecommerce photography, but it is not where you want to solve basic lighting problems.
Frequently Asked Questions
What is the best material for a diy light box for product photography?
Cardboard works well for the frame because it is easy to cut and replace. For the background, white poster board is usually the most practical choice because it creates a smooth sweep. For diffusion panels, tissue paper, tracing paper, or thin white fabric can all work. Test a few options because light softness changes based on bulb brightness and product surface.
Does a DIY light box work with a smartphone?
Yes, in many cases it does. A smartphone can produce usable ecommerce images if the light is even and the phone is stabilized on a tripod or stand. Clean the lens, use exposure lock if available, and keep your framing consistent. Good lighting usually matters more than expensive camera gear for basic small-product shots.
What products photograph best in a light box?
Small items with simple shapes usually work best. Think cosmetics, candles, jars, supplements, jewelry, packaged goods, and accessories. These products benefit from controlled light and a clean background. Larger products or products that need scale, fabric drape, or lifestyle storytelling are generally better photographed in other setups.
Can I use natural light instead of lamps?
You can, but it is harder to keep consistent from one shoot to the next. Natural light changes by hour, weather, and season. For stores that need repeatable product images, fixed artificial light is often the better choice. If you do use daylight, shoot at the same time of day and avoid mixing it with warm indoor bulbs.
How many lights do I need for a diy product photography box?
Two matching side lights are often enough for a basic setup. A third top light can help if your products still look too dark or if you want better control over shadows. The key is using bulbs with the same color temperature so your white balance stays consistent across images.
Is a homemade light box good enough for Shopify product pages?
For many smaller stores, yes. If your products fit the box and your lighting is stable, the results can be strong enough for Shopify PDPs, collection pages, and some marketplace use. The bigger issue is consistency across the whole catalog. If only a few SKUs look polished, the store may still feel uneven overall.
What are the main limitations of product photography in a light box?
The main limits are size, styling flexibility, and surface reflections. A light box can also flatten products visually if the lighting is too soft from every angle. That makes it less suitable for premium branding, apparel, and products where texture or dimensionality is part of the selling appeal.
Should I build a DIY light box or buy one?
If you are still testing products or learning the basics, building one is a reasonable first step. It helps you understand how light direction, diffusion, and background control affect results. If you are shooting regularly and need durability or faster workflow, a purchased setup may save time and produce more consistent outcomes.
Do I need a white background for every product image?
No, but it is often useful for main product images because it keeps the product clear and distraction-free. Many ecommerce stores use white-background shots first, then add detail and lifestyle images afterward. That balance supports both clarity and brand storytelling, especially on Shopify product pages.
What can I use instead of a lightbox?
Common alternatives include window light softened with a thin curtain, or a tabletop sweep with two matching lights and diffusion. These setups can be easier to scale for larger products and can give you more control over reflections. The right choice depends on whether you need strict white-background consistency or a more natural look with depth.
Can I use a light box for product photography?
Yes. A light box is designed for product photography, especially small items where you want even light and a clean background. It is typically most effective for core catalog images on Shopify product pages, but it can feel limiting for lifestyle images or products that need a sense of scale and environment.
What are the common problems with lightboxes?
The most common issues are hot spots from lights being too close, harsh shadows from uneven lighting, flat-looking products from over-softening, color casts from mixing bulb types, and uncontrolled reflections on glossy, glass, or metallic surfaces. Most of these can be improved with better diffusion, matching lights, small angle changes, and simple black or white cards to shape reflections.
Key Takeaways
Conclusion
A homemade light box can be a smart starting point if you want more control over your product images without building a full studio from day one. For small ecommerce catalogs, it often delivers the biggest benefit where it matters most: cleaner, more consistent photos that make your store look more trustworthy. The trade-off is flexibility. As your catalog expands, your image needs usually do too. If you are refining your visual workflow, AcquireConvert is a useful place to keep learning. Explore related guides on lighting, staging, and camera choices, and use Giles Thomas’s practical ecommerce perspective to decide when DIY is enough and when your store is ready for a more advanced setup.
This article is editorial content for educational purposes and is not a paid endorsement unless explicitly stated otherwise. Pricing, product features, and third-party tool availability are subject to change, so verify current details directly with the provider. Any outcomes from photography workflow changes will vary by catalog, niche, execution quality, and store context. No specific results are guaranteed.

Hi, I'm Giles Thomas.
Founder of AcquireConvert, the place where ecommerce entrepreneurs & marketers go to learn growth. I'm also the founder of Shopify agency Whole Design Studios.