DIY Photography Lighting for Products (2026)
DIY photography lighting is often the fastest way for ecommerce store owners to improve product images without paying for a full studio setup. If your product photos look dull, inconsistent, or too dark, the issue is usually lighting before it is camera quality. For most Shopify merchants, a simple two-light or window-light setup can produce cleaner catalog images, better shadows, and a more trustworthy storefront. This article gives you a practical review-style breakdown of what a DIY setup should include, what it can realistically achieve, where it falls short, and when you should move beyond homemade gear. If you sell physical products and need a repeatable workflow for product pages, collection pages, or social creatives, this is a sensible place to start.
Contents
Overview
For ecommerce brands, DIY photography lighting is not a single product. It is a practical setup built from affordable lights, reflectors, diffusion material, foam boards, clamps, and a shooting surface. The goal is consistency. You want product photos that show accurate color, clear edges, controlled shadows, and enough detail to support conversion.
For many merchants, this is the next step after learning basic product photography. It is especially useful for founders shooting new SKUs themselves, testing products before committing to a studio, or refreshing PDP images on a tight operating budget.
A good DIY setup works best for smaller products, tabletop scenes, and repeatable angles. It can also support flat lay photography and simple packshots. If your brand needs a more permanent shooting environment, you may also want to review how a product photography studio is structured so you know what to replicate at home.
At AcquireConvert, the practical lens matters. Giles Thomas is a Shopify Partner and Google Expert, so the question is not whether a setup looks impressive. It is whether it helps store owners publish more persuasive visuals, faster, with fewer reshoots.
Trust and Credibility
Lighting advice online is often written for hobby photographers, not merchants trying to run a store. That distinction matters. Ecommerce photography needs a repeatable process that fits inventory updates, seasonal launches, and lean team workflows.
AcquireConvert evaluates visual workflows based on ecommerce usefulness, not camera-forum preferences. For Shopify stores, the practical concerns are simple: can you get consistent white backgrounds, can your product color stay accurate, and can you shoot enough variation for product pages, ads, and social channels without constant editing?
That is why DIY lighting should be judged on reliability more than technical perfection. A lower-cost setup can still be credible if it gives you stable exposure, softer shadows, and predictable results across multiple products. If it saves time on editing and avoids uneven product presentation, it is already creating operational value.
For readers comparing educational resources, AcquireConvert also organizes related guidance under Product Photography Fundamentals and Product Photo Lighting so you can build skills in a logical order.
Key Features of a Good DIY Setup
The strongest DIY photography lighting setups share a few practical characteristics.
Continuous light is usually the best starting point. With continuous lighting, you can see highlights and shadows in real time. That makes positioning easier for non-photographers. For product pages, this usually means fewer mistakes than jumping straight to flash.
Diffusion matters more than brightness alone. Many low-cost lights are too harsh by default. Softboxes, diffusion cloth, tracing paper placed safely away from heat, or even a thin white shower curtain can soften shadows and reduce distracting glare on glossy packaging, glass, and metal.
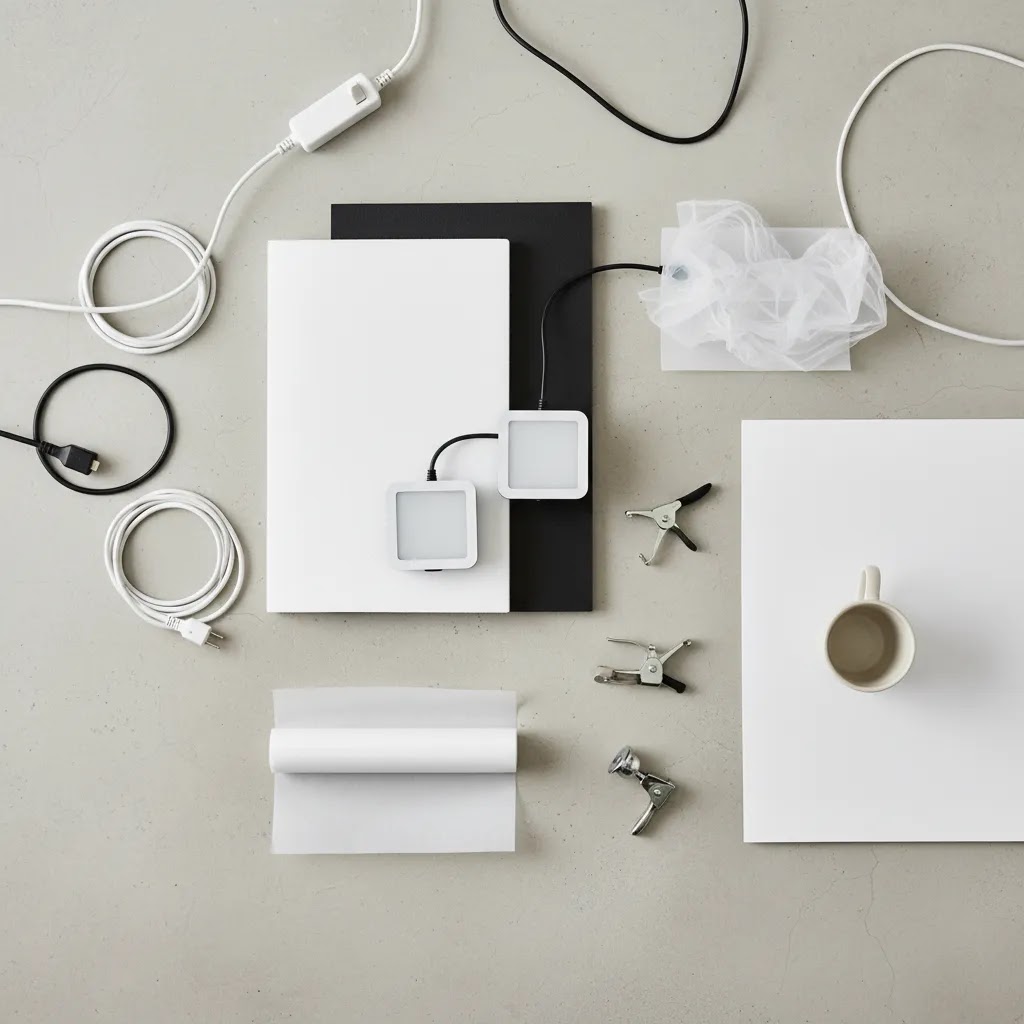
Reflectors improve fill without adding another light. White foam board is one of the most useful DIY tools you can buy. It bounces light back onto the product and helps open up dark sides. For solo founders, this is often more practical than buying extra fixtures too early.
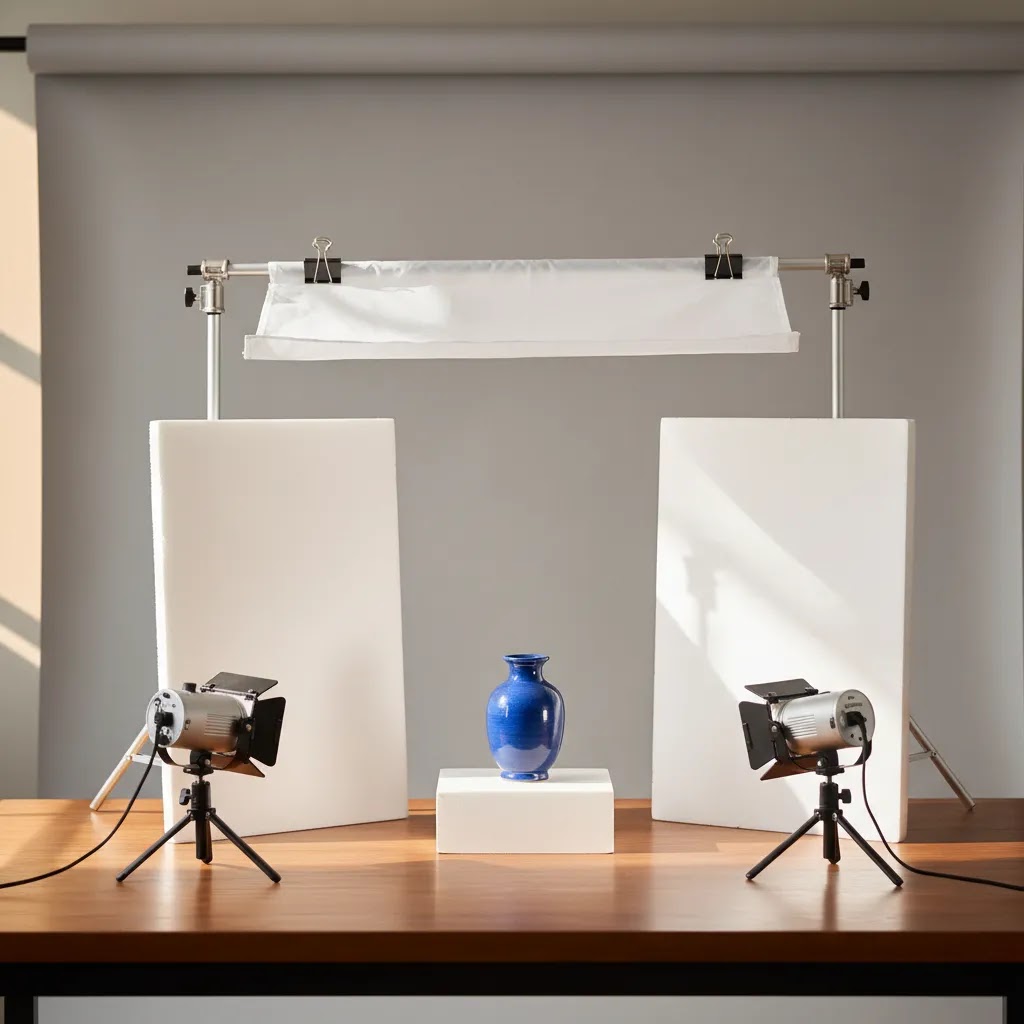
Stable positioning is essential. Cheap lighting photography becomes expensive when every session requires guesswork. Use clamps, tape markers, and a fixed tabletop so you can repeat the same setup for future SKUs. A dedicated diy product photography table can make a major difference here.
Background control is part of lighting. Clean white, neutral, or lightly textured backgrounds reduce post-production time. If your setup cannot separate the product from the background, your editing workload increases quickly.
Camera choice still plays a role. Lighting usually matters more, but there is a point where your device becomes a constraint. If you are regularly shooting reflective, detailed, or color-sensitive items, compare your options in this guide to the best camera for product photography.
DIY Studio Lighting With Household Items (What Actually Works)
Here's the thing, you can solve a lot of product-photo lighting problems with materials you already have. Not because it is trendy, but because product photography is mostly about controlling three things: softness, direction, and fill. Household items can cover those jobs surprisingly well if you use them with intention.
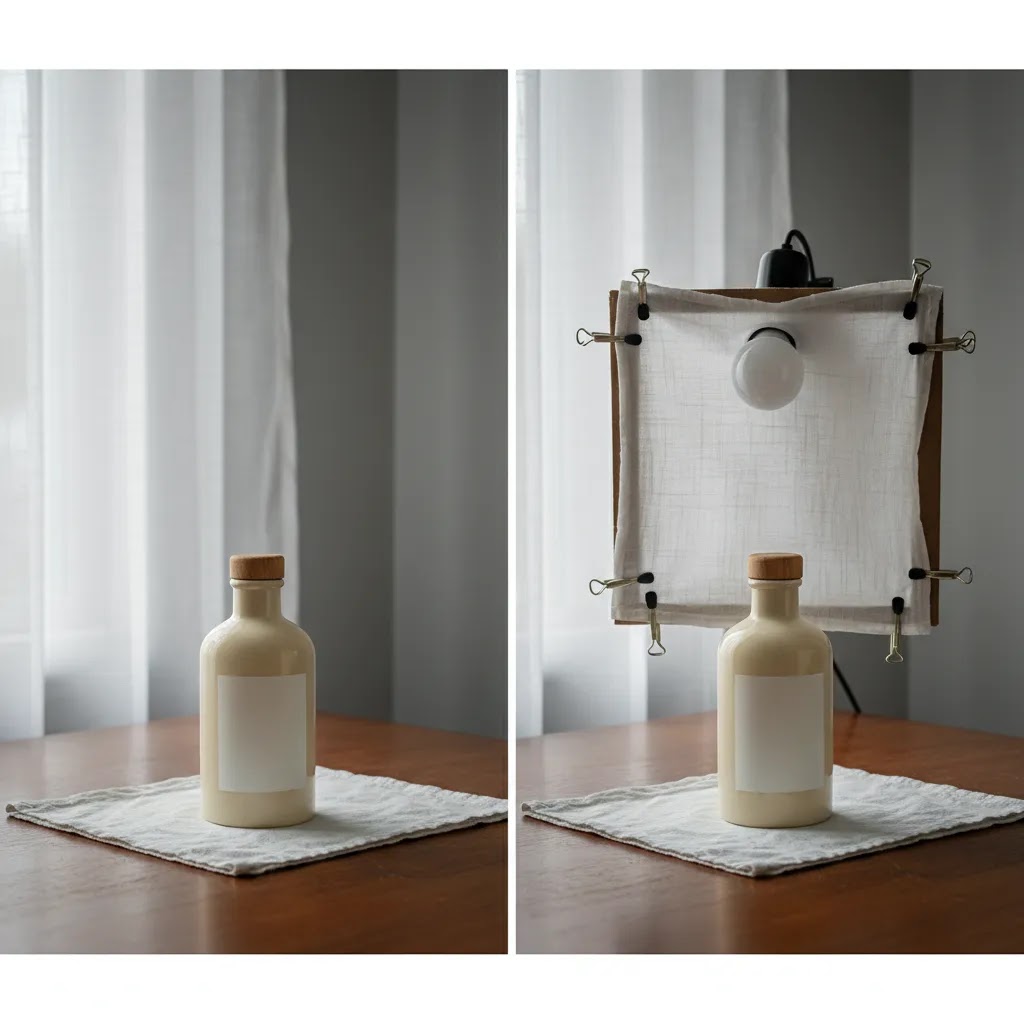
Shower curtain as diffusion. A thin white shower curtain can work like a large diffusion sheet. Hang it between your light source and the product to soften shadows and reduce glare. It is often more useful than small diffusion panels because size matters. A bigger diffuser usually creates softer light for the same product.
White poster board or foam board as bounce. If one side of your product is going dark, you do not always need a second light. Put white board on the shadow side, close to the product, to bounce light back in. Foam board tends to hold its shape better, but poster board can still work if you clip it to something stable.
Parchment paper or tracing paper for small diffusion. These can soften light for small packshots, label photos, or macro-ish detail shots. The key is distance and safety. Keep diffusion material away from hot bulbs, and avoid draping anything directly on a light fixture.
Aluminum foil for a punchier bounce. If you need more intensity than white board provides, foil can act as a stronger reflector. Use it carefully. It can create specular highlights that look harsh on glossy packaging or metallic caps. Crumpling it slightly before flattening it can help spread reflections and reduce sharp hot spots.
Clothespins, binder clips, and clamps for rigging. The unglamorous tools are often the most valuable. Clips let you hang diffusion, hold bounce cards upright, and keep background paper from shifting. They also help you keep your setup repeatable, which matters for Shopify catalogs where your collection grid punishes inconsistency.
What many store owners overlook is the safety and quality side of DIY materials. If you are using any light that runs hot, keep paper and fabric well away from the bulb and housing. From a quality standpoint, avoid mixed light sources. For example, daylight from a window plus a warm indoor bulb can create strange color shifts that are time-consuming to correct. Also watch your room. Colored walls and ceilings can bounce color back onto white products, especially near a corner. If your whites look slightly green, blue, or yellow, the room may be part of the problem, not your editing skills.
Consider this simple mapping so you pick the right stand-in for the problem you see:
The reality is that household items are not about being cheap. They are about letting you test lighting control before you invest in more gear. Once you know what your product actually needs, buying the right modifier becomes a lot easier.
DIY Softbox and Diffusion Options (Tents vs. Softboxes vs. Window Diffusion)
Now, when it comes to diffusion, you have three common paths in DIY product photography: a softbox-style diffuser, a light tent or light box, and window diffusion. They all aim to soften light, but they behave differently, especially with reflective products.
DIY softbox-style diffusion
Think of this as creating a larger, softer light source in a specific direction. You can do it by placing a diffusion sheet in front of your light and controlling spill with whatever you have, such as black fabric, cardboard, or flags. The benefit is control. You can shape where the light is coming from, keep edges defined, and avoid that overly flat look that can happen when light comes from every direction.
This is typically the most practical option for Shopify catalog work when you want consistent shadows and clear product shape, especially for packaging, bottles, and boxed products. It also scales well. If you shoot larger products, you can just use a larger diffusion sheet and move it to keep the same look.
Light tent or light box diffusion
A light tent wraps the product in diffusion. That can be helpful for small, highly reflective items because it reduces harsh reflections and makes light more even. The tradeoff is that it can remove shape if you are not careful. Products can start to look like they are floating, which may be fine for marketplaces, but can look less premium on a branded Shopify product page.
If you use a tent, you will usually get better results by adding direction back in. For example, treat one side as the key light and use the other sides more like fill. Also consider leaving a controlled shadow under the product so it feels grounded.
Window diffusion
Window light can look excellent, especially for natural-feeling brand photography. Diffusing the window with a thin white curtain or a white shower curtain can make it more predictable and reduce harsh contrast. The limitation is repeatability. The light changes with time of day and weather, so it can be harder to maintain a consistent look across a growing catalog unless you shoot at the same times and keep your setup fixed.
From a practical standpoint, the best way to choose is to look at your products and the reflections they create:
The way this works in practice is simple: the size of the diffuser relative to the product matters more than the wattage of the light. If your diffuser is small compared to the product, highlights will look harsh. If your diffuser is large and close, light will wrap and shadows will soften.
What does good enough look like for ecommerce? You should see even highlight gradients on reflective surfaces, readable label texture without blown-out glare, and controlled shadows that do not distract. If you can shoot five products in a row and they look like they belong together on a Shopify collection page, you are already in a strong place.
Pricing and Costs
There is no single price because DIY photography lighting is assembled rather than purchased as one platform or app. That said, costs usually break into tiers.
A minimal setup often includes one window, white foam boards, clamps, and a clean shooting surface. This is the lowest-cost option and works best for smaller products if you can shoot at consistent times of day.
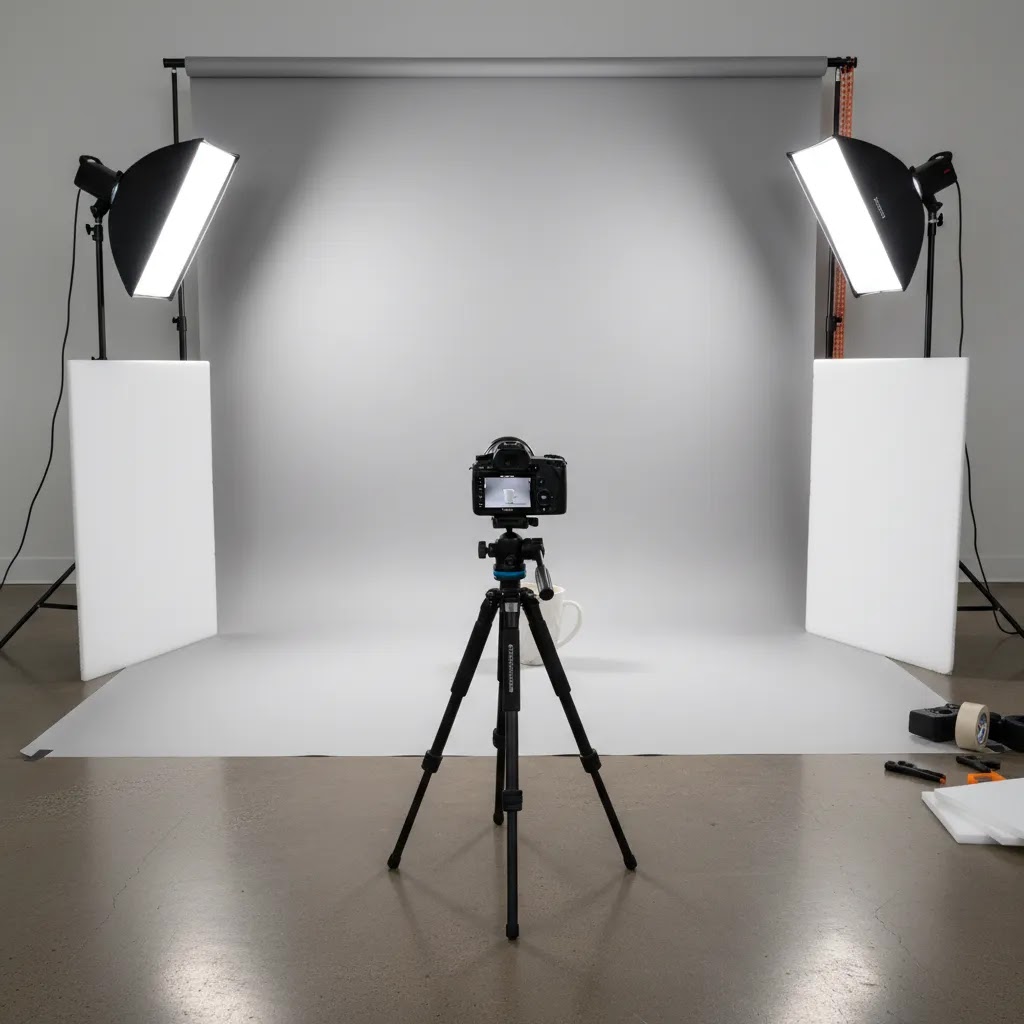
A more practical ecommerce setup usually adds two continuous lights, simple diffusion, background material, and a tripod. This tends to be the sweet spot for merchants who need repeatability for catalog work. It costs more upfront than pure window light, but it may reduce editing time and reshoots.
A higher-end DIY setup can include stronger continuous lights, better stands, overhead support, light tents, and more durable modifiers. At that point, the question becomes whether you are still building a DIY environment or approaching the cost of a small commercial setup.
The honest takeaway is that DIY is best judged by total workflow cost, not just gear price. If a lower-cost arrangement leads to inconsistent color, longer editing sessions, and weak product pages, it may not be the better value. For many Shopify stores, spending a bit more on stable lighting is more worthwhile than overspending on camera gear.
Pros and Cons
Strengths
Considerations
Who It's Best For
DIY photography lighting is best for solo founders, lean ecommerce teams, and early-stage Shopify stores that need better images now, but are not ready for a dedicated studio or recurring photography service. It suits merchants selling beauty products, home goods, accessories, packaged foods, candles, supplements, and other small-to-medium products that can be shot on a table.
It is less suitable for fashion brands shooting models, furniture sellers, or stores with heavy reflective materials unless someone on the team has stronger photography skills. If your visual standards are climbing and your catalog is expanding, DIY can still be a useful stepping stone, but not always the long-term answer.
How to Get Started
Start with one product, not your whole catalog. Choose an item with moderate detail and a non-reflective surface so you can learn lighting basics without fighting glare.
Set up a stable surface near a controllable light source. If you use daylight, be consistent with timing. If you use continuous lights, place one key light at about 45 degrees and use foam board on the opposite side to bounce light back.
Add diffusion before buying more power. Softer light is usually the fastest quality upgrade for ecommerce photography. Then test a few angles and compare shadows, edge definition, and color accuracy.
Lock in your positions with tape marks. This simple step makes future shoots much easier. If you want more practical ideas for background, height, and shooting stability, build around a proper diy product photography table.
Finally, review your images inside your actual Shopify theme, not just on your camera roll. Product images need to work on collection grids, mobile PDPs, and zoom views. That is the standard that matters.
DIY Lighting Setup Examples by Shot Type
For most Shopify store owners, general lighting advice is only useful once you can copy a setup, run a full session, and get consistent results. These example recipes are designed to be repeatable. Pick one and stick with it for a full shoot day before you change everything.
Example 1: Window-light tabletop packshot (fastest lean setup)
Put your table near a window with indirect light. Direct sun is usually too harsh and will create hard shadows and blown highlights.
Place the product about 1 to 3 feet from the window. Put your diffusion, such as a thin white curtain or shower curtain, over the window if the light feels too contrasty. Use white foam board on the side opposite the window to fill the shadows. If the product is still dark on the back edge, move the foam board closer before you move the product.
To keep this consistent, mark your product position and foam board position with tape. Also mark where your tripod goes, and keep your camera height fixed. This is how you avoid a collection page where every SKU looks like it was shot in a different year.
Example 2: Two continuous lights for catalog consistency (most repeatable)
Set your key light at about 45 degrees to the product and slightly above it, aimed down. Add diffusion in front of that light so it becomes a larger source. Put your second light on the opposite side at lower power or farther away to act as fill, or skip the second light and use foam board if you want to keep it simple.
If you see harsh shadow edges, bring the diffuser closer to the product or use a larger diffusion surface. If you see glare hot spots on glossy labels, rotate the product slightly and adjust the angle of the key light. Small changes can make a big difference on reflective packaging.
For repeatability, keep distance consistent. Measure the distance from light to product once and reuse it. Even rough consistency, like the length of your forearm, can prevent the slow drift that ruins catalog uniformity over time.
Example 3: Overhead flat lay for tops of products and kits
If you shoot flat lays, stability matters as much as light. Use an overhead support if you have it. If not, prioritize a tripod position that does not move, and keep the camera centered.
Use one large diffused light from the side for shape, and a white board on the opposite side for fill. If your flat lays look muddy, it is often because light is too flat or too far away. Move the light closer, keep it diffused, and let the product have a gentle shadow so edges read clearly on mobile.
Quick troubleshooting based on what you see:
Frequently Asked Questions
Is DIY photography lighting good enough for a Shopify store?
Yes, in many cases it can be. For smaller products and straightforward catalog photography, a well-planned DIY setup may produce images that are more than acceptable for Shopify product pages. The key is consistency. If your lighting changes between sessions, your storefront can start to look uneven, which hurts trust more than most merchants realize.
What is the best light type for diy continuous lighting product photography?
Continuous lighting is usually the best option for beginners because you can see how the light falls before taking the shot. That makes setup faster and easier to repeat. It is especially helpful for solo store owners who are handling styling, shooting, and editing themselves and need a simple workflow.
Can I use window light instead of buying lights?
Yes, but it works best if your shooting conditions stay consistent. Window light can look excellent for product photography diy setups, especially with diffusion and reflectors. The limitation is timing. Weather and time of day can change the look of your images, which makes it harder to maintain a uniform catalog over time.
Do I need flash, or can I skip diy photography flash?
You can skip flash at the beginning. Flash can offer more control and power, but it adds complexity that most merchants do not need right away. Continuous lights are usually more practical for learning. If you later shoot reflective items or need sharper control, flash may become worth exploring.
What products are hardest to shoot with a DIY setup?
Reflective metals, glass, glossy packaging, and transparent products are the hardest. These surfaces reveal every bad light angle and often require more careful diffusion and scene control. If your store mostly sells these products, a DIY approach can still work, but the learning curve is steeper and editing may take longer.
Should I improve lighting or buy a better camera first?
Lighting usually has a bigger impact than camera upgrades, especially for early-stage stores. If your images are dim, flat, or uneven, a new camera will not fix the core issue. Improve lighting first, then assess whether your current device still limits detail, color accuracy, or lens flexibility.
How do you make DIY studio lights at home for product photography?
Most of the time you do not need to build a light from scratch, you need to control the light you already have. Start with a basic continuous lamp or LED light, then add diffusion in front of it and bounce fill back with white foam board. Use clips or clamps to hold diffusion in place, keep everything stable, and mark positions with tape so you can repeat the setup for future product launches.
How do you make a DIY softbox for product photography?
A practical DIY softbox is any setup that makes the light source larger and softer, while keeping it directional. One simple approach is to place a diffusion material, like a white shower curtain or tracing paper, in front of your light and use a frame or clips to keep it flat. Add side flags using dark fabric or cardboard if you need to stop light from spilling everywhere. The goal is a big, even light surface that creates smooth highlights and softer shadows.
What household items can I use for studio lighting and reflectors?
Common stand-ins include a white shower curtain for diffusion, white poster board or foam board for bounce fill, parchment paper or tracing paper for small diffusion, and aluminum foil for stronger reflection. Binder clips, clothespins, and clamps help you rig and repeat your setup. Just be careful with heat and keep paper or fabric away from hot bulbs.
Are LED bulbs good for DIY continuous lighting (and what color temperature should I use)?
LED bulbs can work well for DIY continuous lighting as long as color is stable. Use the same bulb type and color temperature across your lights, and avoid mixing with daylight unless you are intentionally shooting with window light. Many store owners aim for a daylight-balanced look around 5000K to 5600K for product work, but what matters most is consistency and accurate color in your final images. If your product color is critical, you may need to test and adjust your camera white balance and your editing workflow to match what customers see on a typical screen.
How do I know when to stop doing it myself?
If you are spending too much time reshooting, struggling with consistency, or need images for larger campaigns, it may be time to move beyond DIY. This often happens as your SKU count grows or your brand presentation becomes more demanding. At that stage, more structured studio processes become easier to justify.
Key Takeaways
Conclusion
DIY photography lighting is worth considering if you run a lean ecommerce operation and need a repeatable way to create cleaner product images. It is not a magic fix, and it will not replace professional production for every brand. Still, for many Shopify merchants, it can close the gap between poor product photos and images that feel credible enough to support conversion. The best approach is to keep it simple, control your variables, and build a setup you can repeat week after week. If you are still refining your workflow, pair this guide with AcquireConvert resources on product photography foundations, shooting surfaces, and camera selection so your setup improves as your store grows.
Disclosure: AcquireConvert may receive affiliate compensation from some third-party links, where applicable. This article is for educational purposes and reflects practical ecommerce guidance, not guaranteed outcomes. Results will vary depending on your products, lighting conditions, skill level, editing process, and how your images are implemented across your store.

Hi, I'm Giles Thomas.
Founder of AcquireConvert, the place where ecommerce entrepreneurs & marketers go to learn growth. I'm also the founder of Shopify agency Whole Design Studios.