Flat Lay Lighting Setup for Shopify Stores (2026)
If your top-down product shots look dull, patchy, or full of harsh edge shadows, the problem is usually not your camera. It is your lighting. A good flat lay lighting setup helps you show texture, color, shape, and product details more clearly, which matters when shoppers cannot touch the item in person. For Shopify merchants, that can affect how polished your collection pages, PDPs, and ads feel. Whether you are shooting apparel, beauty products, food, or small accessories, the goal is simple: even light, controlled contrast, and consistent results you can repeat. If you need the broader foundations first, start with this guide to product photography before refining your top-down setup.
Contents
What a strong flat lay lighting setup actually needs
A flat lay photography setup is often described as simple: place the product on a surface and shoot from above. In practice, lighting is where most store owners run into trouble. Overhead shadows appear when the light source is too small, too direct, too high-contrast, or positioned in a way that blocks itself with the camera rig.
The best flat lay photography lighting setup usually has three traits. First, the light is diffused enough to wrap around the product. Second, the light direction is controlled so it creates shape without ugly dark pockets. Third, the setup is repeatable, which is essential if you need dozens of SKUs to look consistent across a Shopify catalog.
For most ecommerce teams, that means choosing between a daylight-based setup near a window, a continuous artificial light setup, or a hybrid. If you are still planning your styling and composition approach, this guide to flat lay photography will help you pair lighting choices with better product arrangement.
You do not need the most expensive gear to get cleaner results. You do need enough surface space, diffusion, fill control, and camera clearance to avoid shadows from your hands, tripod, or phone.
Key setup elements that reduce overhead shadows
When evaluating lighting for flat lay photography, focus on control rather than complexity. These are the core elements that usually make the biggest difference for ecommerce product shots.
1. A large, soft key light
The main light should be broader than the product area you are shooting. A large window with sheer diffusion, a softbox, or a diffused LED panel usually works better than a bare bulb or direct flash. Bigger light sources create softer transitions between highlights and shadows, which is especially helpful in flat lay clothing photography lighting where folds can cast uneven dark lines.
2. Fill from the opposite side
If one side of the frame looks too dark, add white foam board, a reflector, or a second lower-powered light opposite the key light. This is one of the most reliable ways to improve a flat lay product photography setup without making the image look flat and lifeless.
3. Distance between light and product
Moving the light farther away can increase evenness across the whole scene, but it may also reduce softness unless the source remains large. Moving it closer increases softness, but coverage can become less uniform. You will usually need to test both, especially for wider scenes like a clothing flat lay photography setup.
4. Camera placement that does not block light
Top-down shooting often causes the camera or tripod arm to interrupt the light path. If that creates a hard shadow in the center, adjust the light angle, raise the rig, or place lights slightly off-axis. Store owners building a home setup often solve this with side-positioned soft light plus fill, rather than trying to light directly from above.
5. Surface and background control
Bright white boards bounce more light back into the product, while dark or textured surfaces absorb it. That can change the exposure and mood of your frame. If you want a cleaner commercial look, review the broader product photo lighting category for setups that balance white backgrounds, reflections, and shadow control.
6. Editing support for cleanup
Even with a solid lighting setup, some cleanup is normal. For example, you might want to replace a distracting backdrop with the AI Background Generator, create cleaner marketplace-style images with the Free White Background Generator, or polish small visual issues in the Magic Photo Editor. These tools can help streamline post-production, though they work best when the original lighting is already strong.
Flat lay lighting setups you can actually use (5 practical options)
Here is the thing. Most store owners do not need twenty lighting concepts. They need a few reliable setups they can repeat for weekly product drops, new colorways, and seasonal refreshes.
These are five flat lay photography lighting setups that tend to work well for Shopify product photos, along with what each one is best at and what usually goes wrong.
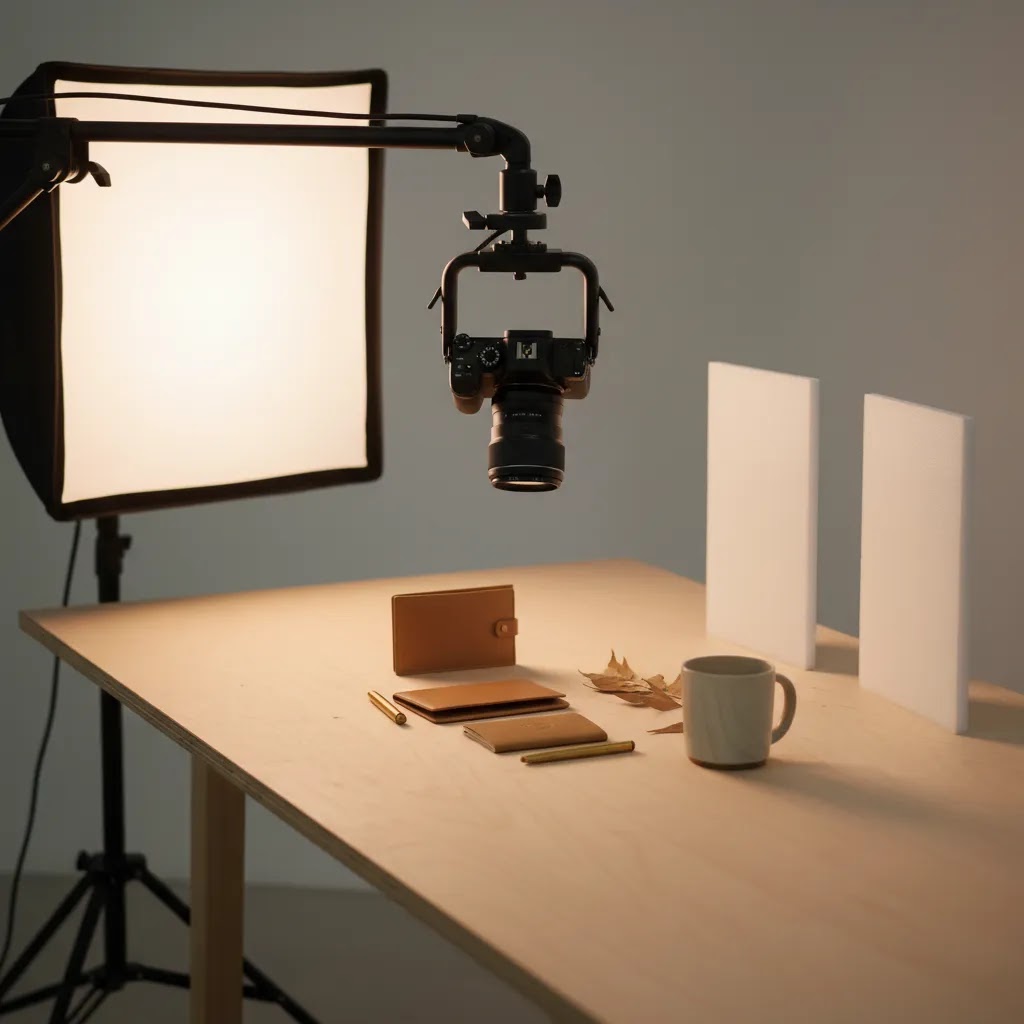
1. Window light plus diffusion (the simplest ecommerce setup)
This is the classic starter setup: a large window as your key light, with a sheer curtain, shower curtain, or diffusion panel to soften it. Place your table or shooting surface next to the window, then position the product so the window light comes from the side, not from directly behind your camera.
To control contrast, put a white foam board on the opposite side as fill. If the image still looks too shadowy, bring the fill closer. If it looks too flat, move the fill farther away.
The camera shadow problem shows up when you stand between the window and the product. The fix is to rotate the entire setup so the window is at roughly a 45 degree angle to the camera position, then shoot from above while staying out of the light path.
Best for: handmade products, stationery, beauty products, flat lay clothing photography where you want soft texture without harsh shadows.
Tradeoffs: light shifts by time and weather, mixed color temperature can happen if room lights are on, and large layouts may get uneven falloff across the frame.
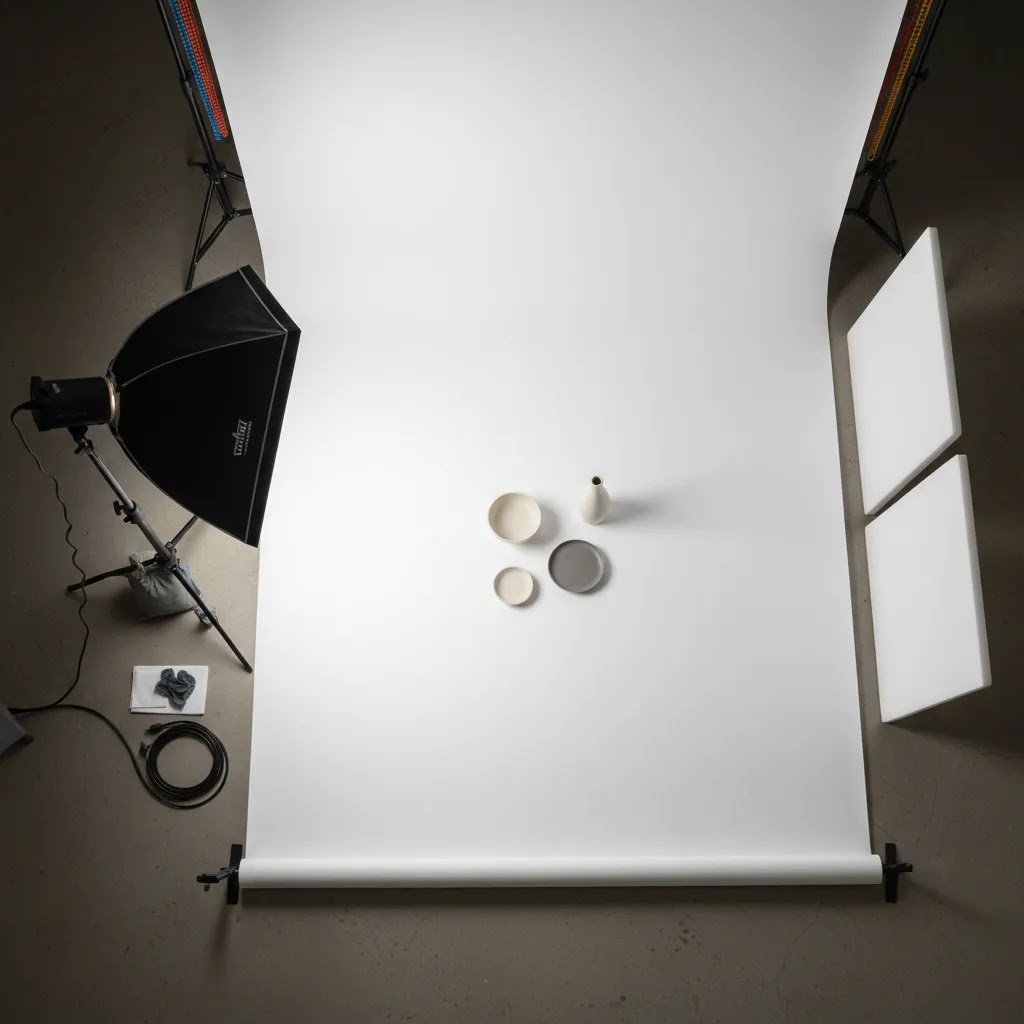
2. One continuous softbox at 45 degrees (repeatable catalog lighting)
If you need consistency, one softbox or diffused LED light at a 45 degree angle is often the fastest path to repeatable results. Place the light slightly to one side of the table and angle it down across the product. Use a white reflector or foam board opposite it to lift shadows.
If you are shooting a batch, mark where the light stand sits on the floor with tape and do the same for your table position. That way, the lighting stays consistent from SKU to SKU.
Best for: Shopify catalog images where you want the same look for every product, packaged goods, accessories, and apparel basics.
Tradeoffs: you need a bit of space to get the light far enough back for even coverage, and shiny packaging can show specular highlights if your diffusion is too small.
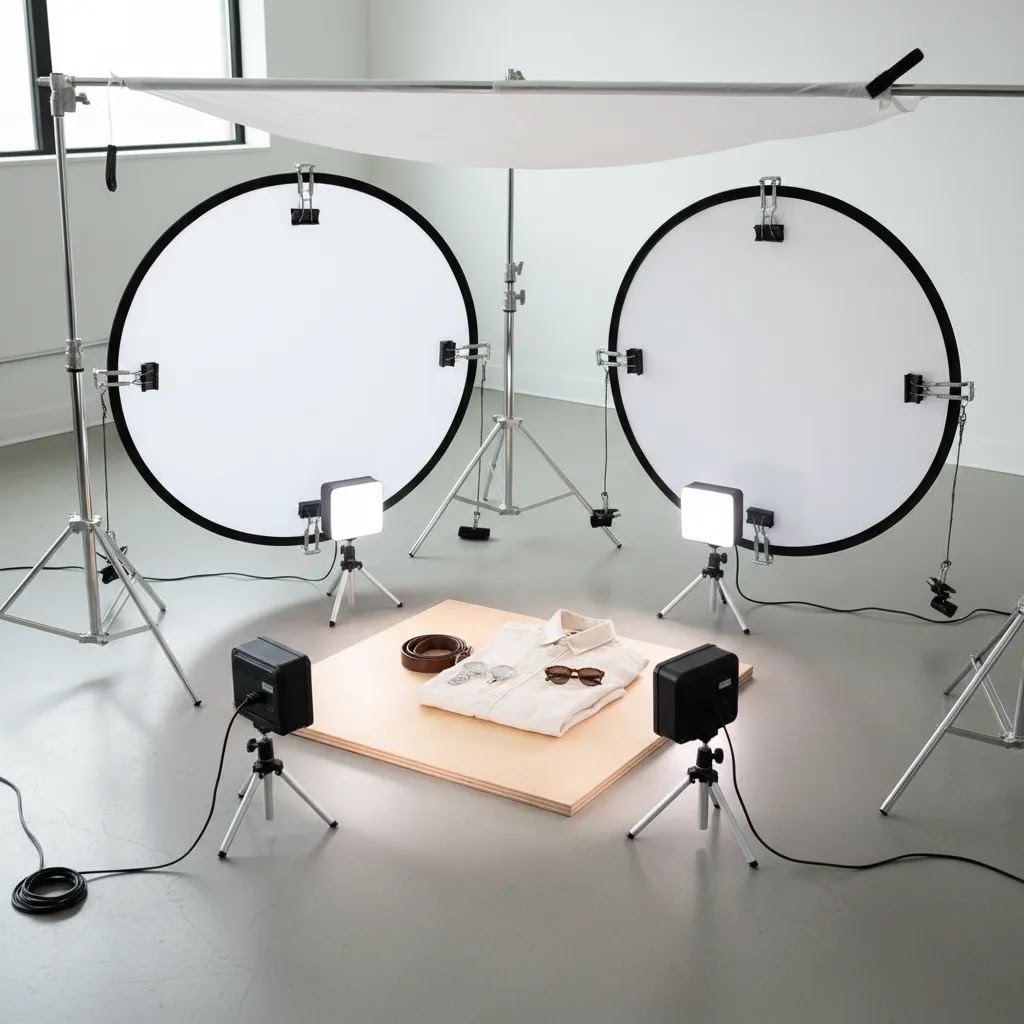
3. Two-light cross lighting (control shadows without over-flattening)
Cross lighting is two diffused lights placed on opposite sides of the table, usually at similar angles and height. Think of one as your key and one as your fill, even if they look symmetrical. In practice, you typically set one slightly brighter than the other so the product keeps shape.
This setup can reduce harsh side shadows on products with height, like bottles, jars, and boxed kits. It can also help clothing flat lays where folds create darker pockets, because the second light lifts shadows without needing the reflector placed right next to the item.
Best for: kits and bundles, products with height, clothing sets, and batch shoots where you want fewer surprises.
Tradeoffs: it can look too flat if both lights are equal, and if one light is a different color temperature your whites can drift. Keep both lights matched and set a consistent white balance.
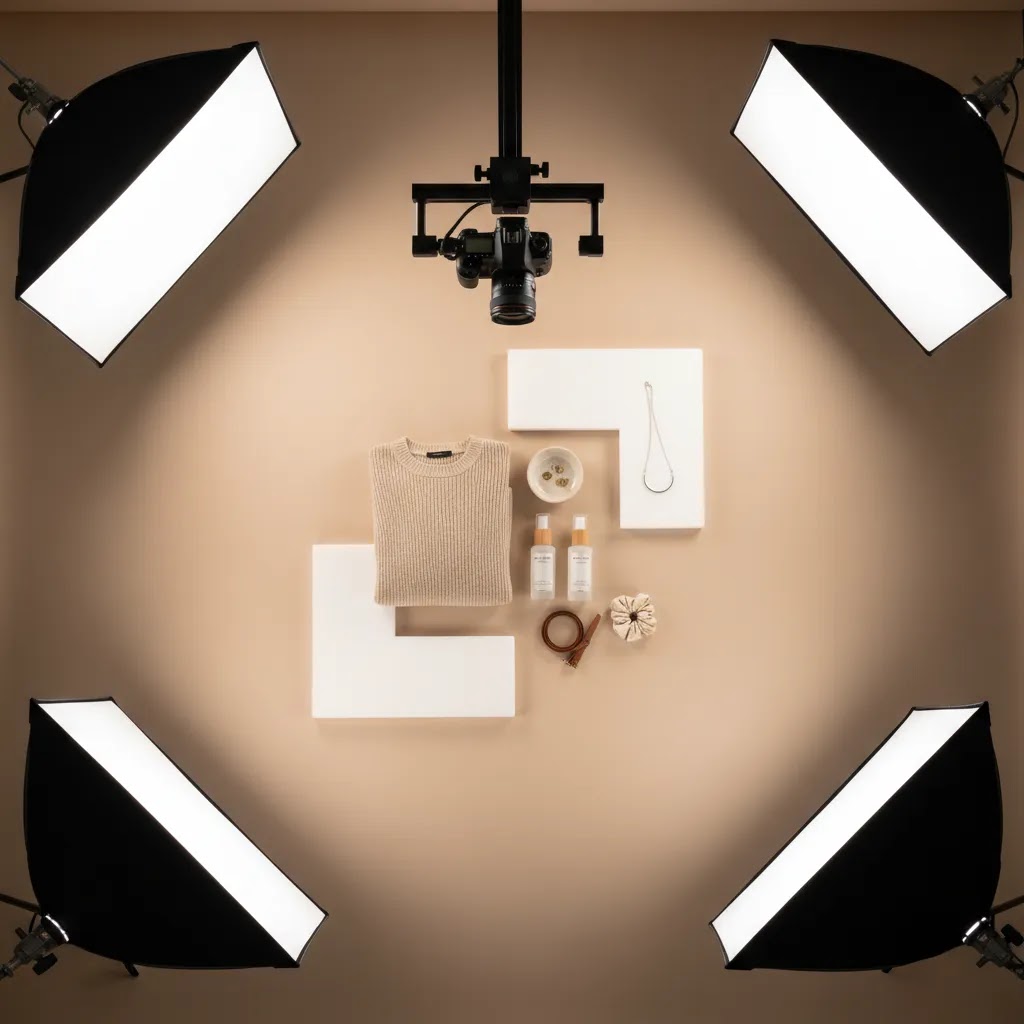
4. Overhead boom with diffusion (closest to a true top-down studio look)
If you have the space and want that evenly lit, top-down commercial look, an overhead boom arm with a large diffused source can work well. The key is diffusion size. An overhead light that is too small will make crisp shadows under edges and folds, which usually reads as harsh in ecommerce.
To avoid the camera shadow, do not place the overhead key directly between the camera and product. Offset the light slightly so the brightest part of the diffusion is not blocked by your camera rig. Then use side fill from foam boards or a reflector to keep contrast under control.
Best for: larger flat lays (jackets, bedding, multi-item layouts), consistent brand look across campaigns, and teams that shoot often in a dedicated corner.
Tradeoffs: more setup time, more gear clearance overhead, and it can be slower to adjust quickly if you are not used to boom positioning.
5. Bounce-only setup (one light, two reflectors, clean and simple)
If direct light feels harsh even with diffusion, consider bouncing your light. Aim a continuous light into a large white wall, ceiling, or a foam board so the product is lit by reflected light, not the lamp itself. Then use a second foam board as fill where needed.
This can create very soft shadows with minimal specular highlights, which is helpful for glossy labels and reflective packaging. You can also use negative fill, meaning a black card or black fabric, to add shape if everything feels too washed out.
Best for: shiny products, skincare and cosmetics packaging, tech accessories, and brands that want a soft, premium look.
Tradeoffs: you lose power, so you may need higher ISO or slower shutter, and bounce surfaces can add color casts if the wall is not neutral.
Consider this. If your goal is consistent Shopify product photography, prioritize the setup that you can recreate every time. Editorial and social content can handle variation. A catalog usually cannot.
Pros and Cons
Strengths
Considerations
Common flat lay lighting mistakes (and how to fix them fast)
What many store owners overlook is that inconsistency is usually not a talent issue. It is a setup issue. A few small mistakes can make your batch look like it was shot on different days, even if you are working on the same table.
Mistake 1: Mixed lighting (window light plus warm room bulbs)
If your whites look slightly blue in one image and slightly yellow in the next, you are probably mixing color temperatures. The most common version is using window light while ceiling lights are still on.
Fix: turn off room lights and commit to one source type. If you are using artificial lights, block the window or shoot at night so the ambient daylight is not shifting your colors.
Mistake 2: Lights too close, causing hot spots and uneven falloff
When a light is very close to the product, you can get a bright patch near the light and a darker edge on the far side. This is especially obvious on white backgrounds and large clothing layouts.
Fix: move the light farther back to even out coverage, then increase output if needed. If you cannot move it back, increase diffusion size so the apparent light source is larger relative to the scene.
Mistake 3: Diffusion that is too small for the scene
A small diffuser in front of a bright LED panel can still behave like a small light. That is how you get crisp shadows under product edges and harsh highlight lines on glossy packaging.
Fix: use a larger diffusion panel, or move the diffuser closer to the product so it becomes the dominant light source. The goal is for the product to "see" a big, soft surface, not a point source.
Mistake 4: Shadows from your tripod, phone mount, or overhead arm
This is the classic top-down problem. Your rig is literally between the light and the product, so you get a dark bar or blob in the center of the frame.
Fix: move the key light off-axis so it does not have to pass through the camera position. You can also raise the camera, or switch to side lighting plus fill rather than trying to light directly from above.
Mistake 5: Backgrounds that bounce unwanted color casts
Bright surfaces are not always neutral. A colored poster board, a wooden table with a warm finish, or a glossy surface can reflect color back into the product, especially on white packaging and light fabrics.
Fix: use a neutral background for your core catalog shots and avoid shiny surfaces unless you are deliberately styling for editorial. If you see a color cast, swap the surface first before you spend time trying to correct it in editing.
Mistake 6: Wrinkled fabrics that exaggerate shadows
Wrinkles create micro-shadows. Under flat lay lighting, those shadows can look messy fast, particularly on lighter colors and tight weaves.
Fix: steam or press before the shoot and use styling clips to keep edges tidy. Softer light helps, but it cannot fully hide heavy wrinkling.
A simple pre-shoot routine for batch consistency
From a practical standpoint, you want a quick routine that stops surprises after you have already shot 30 SKUs.
For many Shopify stores, this is the difference between a catalog that looks cohesive and one that looks patched together across months.
Who this approach is for
This setup is a strong fit for Shopify merchants who want cleaner, more consistent top-down product images without outsourcing every shoot. It is especially useful for apparel brands, beauty stores, gift shops, handmade product sellers, and food businesses creating social content alongside product page images.
If you are shooting content in-house, a controlled flat lay photography lighting setup can help you move faster while keeping your visual merchandising consistent. If your catalog is large or you need campaign-level production quality, you may still benefit from a more complete product photography studio workflow.
AcquireConvert recommendation
For most store owners, the smart move is to build a simple setup you can repeat week after week rather than chasing a complicated gear list. Start with one large diffused light, add foam board or reflector fill, and test your camera height before buying more equipment. That usually gets you closer to ecommerce-ready results than stacking multiple harsh lights overhead.
At AcquireConvert, the guidance is shaped by Giles Thomas's experience as a Shopify Partner and Google Expert, with a practical focus on what independent merchants can actually implement. If your product content also feeds ads, shopping campaigns, and landing pages, image consistency matters beyond aesthetics. Explore the Product Photography Fundamentals category for the full workflow, and if you are also evaluating gear, this guide to the best camera for product photography is a useful next step.
How to choose the right lighting approach
If you are deciding between window light, continuous LEDs, or a more advanced studio arrangement, use these criteria.
Choose based on your product size
Small cosmetics, jewelry trays, or stationery can often be lit with one soft source and basic fill. Clothing flat lays usually need broader light coverage because sleeves, folds, and fabric texture create more shadow points. The larger the layout, the larger and softer your light generally needs to be.
Match the setup to your shooting volume
If you only shoot occasional social images, a window-based flat lay product photography lighting setup may be enough. If you photograph inventory every week, artificial lighting is usually more reliable because it gives you repeatability regardless of time or weather. That consistency helps when updating Shopify collections over time.
Think about your editing workflow
A strong original image saves time later. If your team already uses light editing tools, then keeping shadows soft and backgrounds clean in-camera may be enough. If you need faster cleanup or alternate scene creation, tools like the Creator Studio or Background Swap Editor may help support volume workflows. Still, those tools should support a good shoot, not compensate for poor lighting fundamentals.
Prioritize consistency over dramatic styling for product pages
For ecommerce PDPs and collection pages, consistent lighting usually outperforms dramatic lighting. Moody shadows can work for editorial campaigns, but shoppers also need clarity on color, finish, and proportions. If your store sells basics, bundles, or variants, consistency often matters more than artistic contrast.
Plan for your space constraints
A home office setup may require wall-mounted solutions, compact stands, or a portable table surface. A warehouse corner may allow a larger overhead arm and more permanent placement. If you are improvising with household gear, this guide to diy photography lighting is a practical companion.
The best lighting for flat lay photography is the setup you can reproduce consistently. For ecommerce, repeatable quality usually matters more than occasional perfection.
The basic lighting rules that matter for flat lays (3-lighting rule and 20/60/20 explained)
Lighting rules are only useful if they help you make decisions quickly. For ecommerce flat lays, you are usually balancing two things that fight each other: you want soft light for clean shadows, but you still need enough direction to show shape and texture.
What is the 3 lighting rule in flat lay photography?
In a flat lay context, the 3 lighting rule is a mental model: key, fill, and optional separation. You do not need three separate lights to use it.
The key light is your main light source, like a window or softbox. The fill is whatever lifts the shadows, often a reflector, foam board, or a second dimmer light. Separation is optional. It is the subtle extra control that helps the product stand out from the background, such as a slightly brighter background area, a gentle rim highlight, or negative fill that adds edge definition.
Think of it this way. One diffused light plus one white foam board already gives you key and fill. Add a black card on one side and you have separation control too, because you are shaping contrast rather than just adding brightness.
What is the 20/60/20 rule, and how do you use it without a light meter?
The 20/60/20 rule is another way to think about balance. The idea is that most of your image should be driven by your key and fill, with a smaller influence from ambient or background spill. The exact numbers are not magic. It is a practical ratio concept that keeps your lighting controlled, especially when you are mixing sources.
For flat lays, a useful interpretation is: keep your key light doing most of the work, keep fill present but clearly weaker than the key, and keep ambient influence low. That helps your batch stay consistent.
You can approximate this without a light meter by using simple controls:
When you check your test shot, watch for two warning signs. If shadows go completely gray with no shape, your fill is too strong. If shadows look heavy and noisy, your fill is too weak or your key is too small and direct.
When to ignore the rules for ecommerce consistency
The reality is that Shopify catalog photography often rewards uniformity over perfection. If your "perfect" lighting creates a different mood for different products, it is not perfect for ecommerce. In many cases you should simplify.
For example, if you are tempted to add a separation light or dramatic edge shadow for certain SKUs, ask whether it makes the collection page feel inconsistent. For most stores, keeping the same key direction, softness, and background exposure across the catalog is the safer move, even if it is less dramatic.
Frequently Asked Questions
What is the best lighting for flat lay photography?
The best option is usually a large, diffused light source that covers the full shooting area evenly. That could be window light with sheer diffusion or a softbox-style continuous light. For ecommerce, consistency matters a lot, so many store owners eventually move toward artificial light for a more repeatable flat lay lighting setup.
How do I stop overhead shadows in a flat lay photography setup?
Use a softer light source, position it slightly off-axis rather than directly overhead, and add fill with white boards or a reflector. Also check whether your phone, camera, tripod arm, or body is interrupting the light. In many cases, the shadow is caused by the shooting rig, not by the product itself.
Is natural light good for flat lay product photography lighting?
Yes, natural light can work very well, especially near a large window with soft indirect daylight. It is often a good starting point for newer store owners. The trade-off is inconsistency. Light quality can shift by hour, weather, and season, which can make batch photography harder if you need uniform product images.
What flat lay clothing photography setup works best for apparel?
Apparel usually benefits from a larger shooting surface, a broader soft light, and reflectors on at least one side. Shirts, dresses, and layered outfits create folds that catch shadows quickly. Keep the camera high enough for full coverage and use styling clips or steaming beforehand so lighting enhances texture rather than emphasizing wrinkles.
Do I need two lights for a flat lay photography lighting setup?
Not always. One large soft key light plus white foam board for fill is often enough for many products. A second light becomes useful when your products are larger, your shooting space is darker, or you need more control over consistency. Start simple, then add complexity only if the results call for it.
What color background works best with flat lay photography lighting?
White or light neutral backgrounds are the safest choice for ecommerce because they reflect light and keep the frame clean. Darker backgrounds can look strong for editorial content, but they often require more careful exposure control. If you sell on multiple channels, lighter backgrounds are usually easier to standardize and edit.
How high should the camera be in a flat lay product photography setup?
High enough to fit the full composition without wide-angle distortion and without casting a visible shadow into the scene. The exact distance depends on your lens or phone camera and the size of the layout. Test several heights and check edge distortion before shooting a full batch of products.
Can AI tools replace good flat lay photography lighting?
No. AI editing tools can help with background cleanup, resizing, or scene variations, but they work best when the original photo already has good light, accurate color, and visible detail. Poorly lit source images limit what editing can realistically improve, especially for texture-heavy products like clothing or food.
Is this lighting approach good for flat lay food photography lighting too?
Yes, but food often needs slightly more directional light than apparel or packaged products because texture and freshness cues matter. You still want soft light, but a little shadow can help show depth. The key is keeping those shadows controlled rather than harsh, especially around bowls, glasses, and garnishes.
How to set up lighting for flat lay?
Start with one large diffused key light, like window light through a sheer curtain or a softbox-style continuous light placed at about a 45 degree angle to your setup. Add fill on the opposite side using a white foam board or reflector. Then do a test shot and adjust light distance for even coverage, since lighting that looks good for one SKU can fall apart when you shoot a wider layout like apparel.
What are common flat lay mistakes?
The most common issues are mixed lighting (daylight plus warm room bulbs), lights placed too close causing hot spots, diffusion that is too small, shadows from your tripod or phone mount, reflective backgrounds that introduce color casts, and wrinkled fabrics that create harsh shadow lines. The fastest fixes are usually turning off ambient room lights, increasing diffusion size, moving the light back for evenness, and controlling reflections with white and black cards.
What is the 3 lighting rule?
It is a simple model: key light, fill, and optional separation. In flat lay photography, your key is the main light source, fill lifts shadows (often a reflector), and separation is any extra control that helps the product stand out, such as subtle rim definition or negative fill. You can apply the rule with one light and a couple of foam boards.
What is the 20 60 20 rule in photography?
It is a ratio concept for keeping lighting balanced, usually interpreted as most of the look coming from your key and fill, with a smaller influence from ambient or background spill. For flat lays, it is a practical reminder to keep your key doing most of the work, keep fill present but weaker, and keep uncontrolled ambient light low. You can approximate it by using distance, dimmers, and reflector placement rather than measuring exact output.
Key Takeaways
Conclusion
A good flat lay lighting setup is less about owning a long list of gear and more about controlling light direction, softness, and consistency. If you sell online, that matters because your images do a large part of the selling. Start with one dependable soft light, add simple fill, and test until you can reproduce the same result across multiple SKUs. That approach is practical, scalable, and realistic for most in-house ecommerce teams.
If you want to keep improving your workflow, AcquireConvert is a strong place to continue. Giles Thomas brings a Shopify Partner and Google Expert perspective to the advice, with a focus on what actually helps store owners publish better-performing visuals. Explore more on Product Photography Fundamentals and related setup guides to sharpen the rest of your product content process.
This article is editorial content created for educational purposes and is not a paid endorsement unless explicitly stated otherwise. Pricing, features, and tool availability are subject to change, so verify current details directly with the provider. Any performance outcomes discussed are not guaranteed and depend on your products, workflow, store setup, and implementation quality.

Hi, I'm Giles Thomas.
Founder of AcquireConvert, the place where ecommerce entrepreneurs & marketers go to learn growth. I'm also the founder of Shopify agency Whole Design Studios.