Flat Lay Pants Photography (2026 Guide)
Flat lay pants photography is one of the most practical ways to create clean, consistent apparel images for an ecommerce store. If you sell jeans, chinos, trousers, joggers, or tailored pants, a strong flat lay setup helps shoppers see fit, fabric, color, and key details without the cost of a full studio shoot. It also works well for collection pages, product thumbnails, ads, and marketplaces where consistency matters. If you are still building your image workflow, start with this broader guide to product photography so your pants shots fit into a reliable ecommerce process. In this guide, you will learn how to fold, style, light, shoot, and edit flat lays for pants in a way that looks polished and practical for online retail.
Contents
Why flat lay pants photography works for ecommerce
For many apparel stores, flat lay pants photography sits in the sweet spot between speed, clarity, and cost control. It is simpler than model photography, often more informative than a stylized lifestyle shot, and easier to keep consistent across a large catalog.
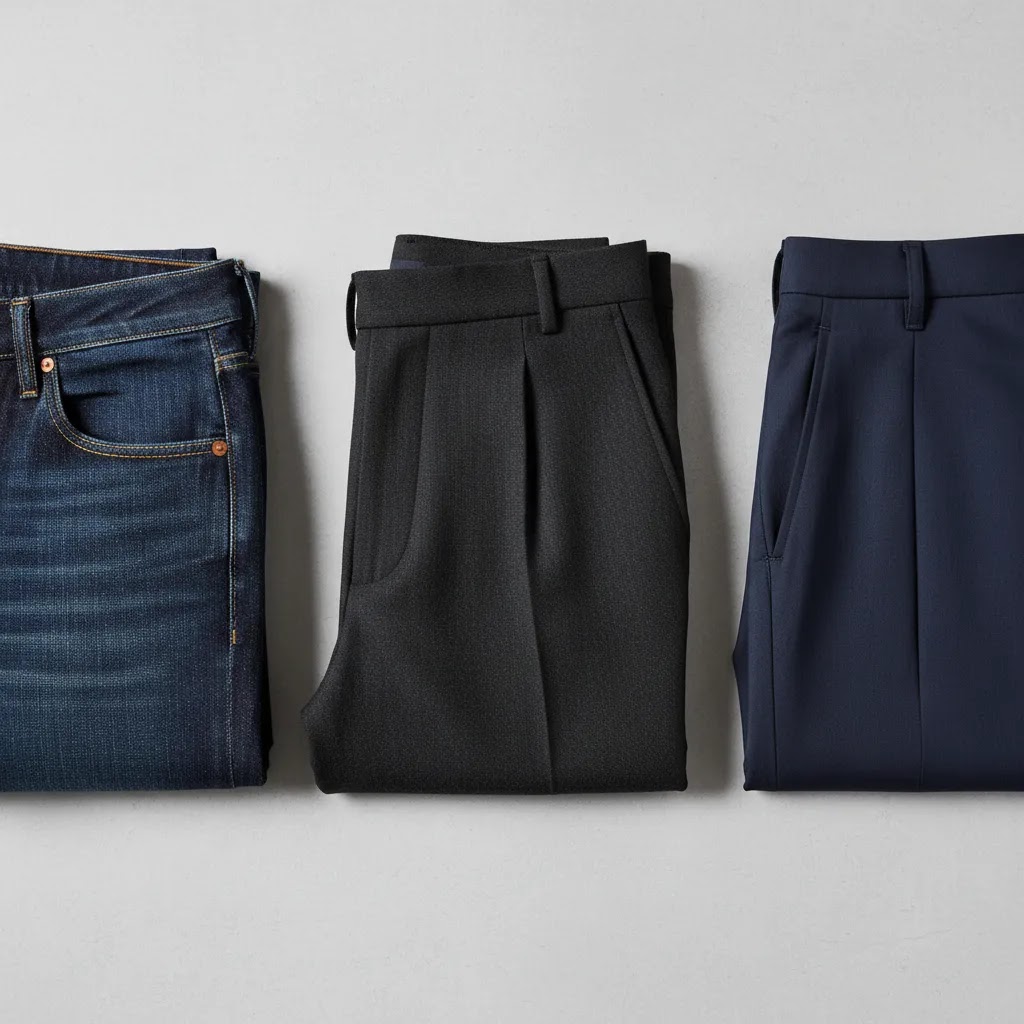
Pants are especially well suited to the flat lay format because buyers usually want clear visual answers to practical questions. They want to see the waistband, rise, leg shape, hems, pockets, seams, and fabric texture. A carefully arranged lay flat photography setup makes those details easier to read.
This format also helps if you are managing product launches in-house. A Shopify merchant adding new SKUs every week can build a repeatable workflow with the same surface, lighting, framing, and editing approach. That consistency tends to improve how collection pages look and can make the store feel more trustworthy.
If you want broader inspiration for composition and layout, this guide to flat lay photography is a useful companion. For a more structured learning path, AcquireConvert’s Product Photography Fundamentals section is worth bookmarking. Giles Thomas’s work on ecommerce visuals is especially helpful for merchants who need practical systems, not just creative ideas.
How to fold, style, and set up the shot
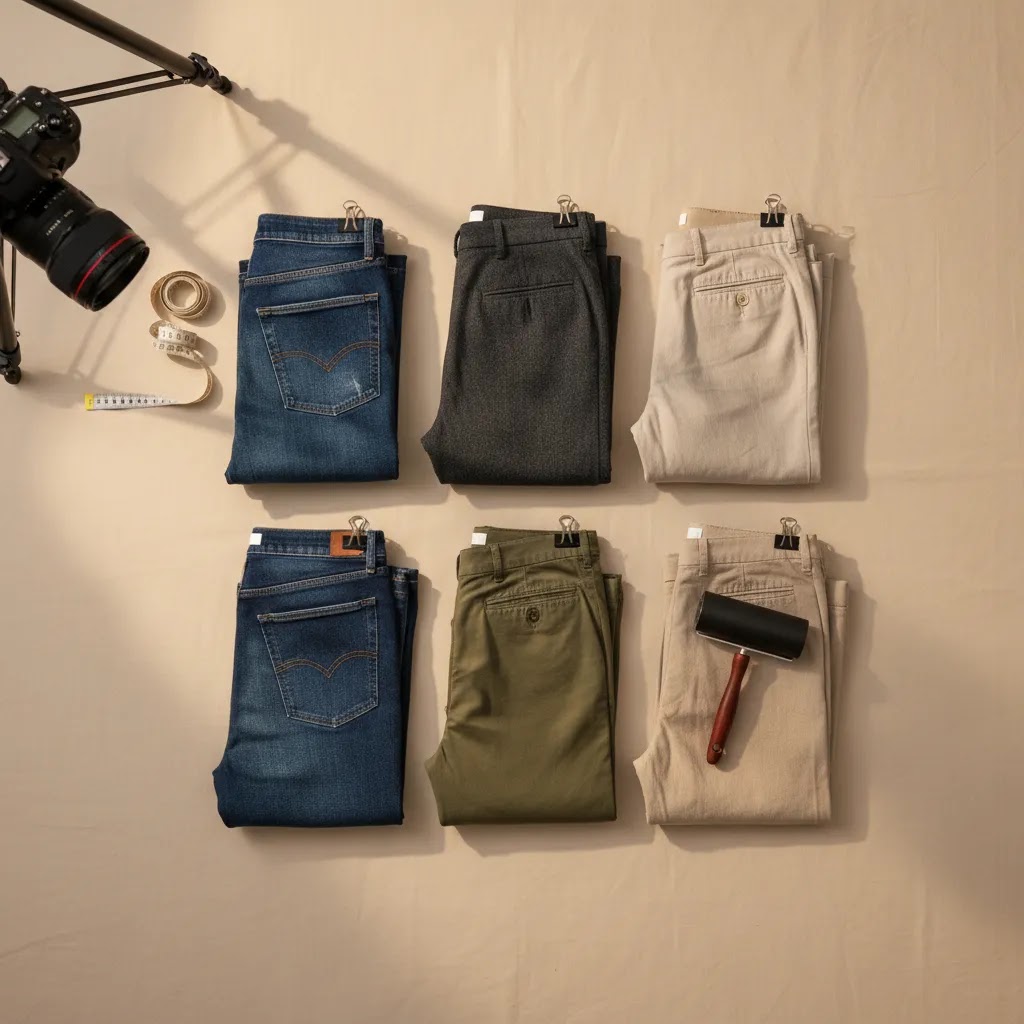
The biggest mistake in flat lay clothing photography is treating pants like a pile of fabric instead of a product with shape. Your job is to make the garment look neat, intentional, and true to the real item.
Start with prep. Steam or iron the pants before they go anywhere near your shooting surface. Lint roll dark fabrics. Check for twisted side seams, uneven hems, and pocket bulges. Those small issues become more obvious in product images than they do in person.
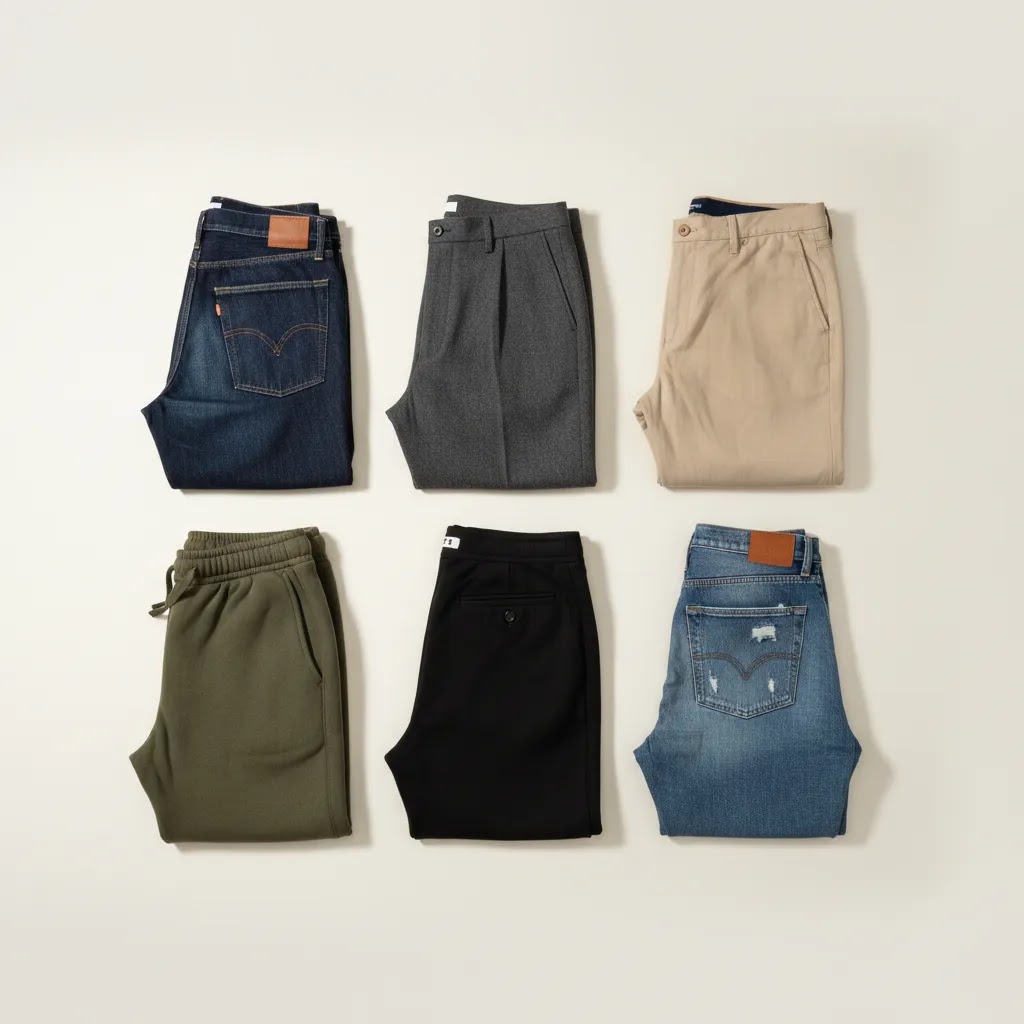
For most ecommerce stores, there are three dependable ways to arrange pants:
Keep the waistband symmetrical. Align the fly. Match the leg width on both sides unless the cut is intentionally tapered or flared. If the pants have standout details such as cargo pockets, drawstrings, pleats, or contrast stitching, create a second composition that prioritizes those features.
Props should be used carefully. In most flat lay product photography for ecommerce, props are best saved for campaign images or social content. Your main PDP image usually needs the pants to be the clear focus. If you do add styling elements, keep them relevant to the buyer and not so strong that they confuse the product itself.
For brands building an in-house setup, a simple surface near a window can work. If you want more control, this tutorial on diy photography lighting can help you create a repeatable arrangement without overcomplicating the process.
Flat lay pants photography setup: surface, rig, and spacing (so your shots stay consistent)
Here’s the thing, most flat lay problems are really setup problems. If your camera height changes, your background shifts, or the pants sit in a slightly different spot each time, your catalog starts to look messy even if each individual image is “good.” Consistency is what makes flat lays feel professional on Shopify collection pages.
Start with the surface. A sturdy table is usually easier than the floor because it is faster to work at waist height and you can keep your lighting in the same place. The floor can work if you need more space for long pants and you have a clean area, but it is typically harder to keep your camera perfectly overhead unless you have a proper rig.
For the background, you have two common options:
Now, when it comes to keeping “same distance, same framing,” treat your overhead height like a fixed setting, not something you eyeball. If you shoot at one height for jeans and another height for chinos, the scale difference shows up on collection pages and thumbnails. Pick a camera height that fits your longest pants with a little breathing room, then lock it in.
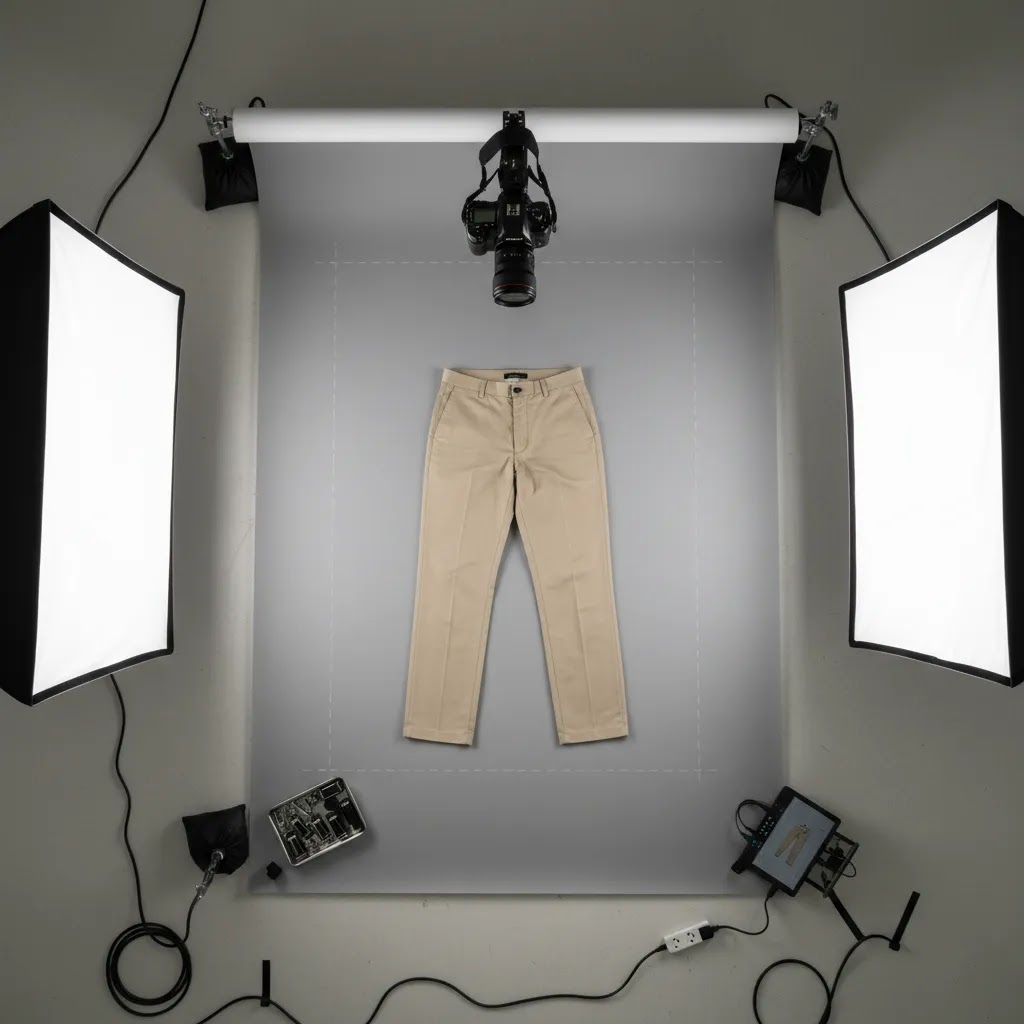
To shoot truly overhead without distortion, you need the lens parallel to the surface. The way this works in practice is using a mount that holds the camera directly above the center of the pants, not angled from the side.
A quick leveling check saves a lot of editing time. Use your camera’s grid lines, or a phone’s built-in level if available, and confirm that the waistband line is horizontal and both pant legs look the same width. If one leg consistently looks wider, your camera is probably not square to the surface.
Finally, standardize spacing and cropping with ecommerce in mind. Leave safe margins around the pants so your thumbnails do not chop off hems or waistbands. Keep the waistband at a consistent height in the frame across the category, and use a simple positioning template so your team can move fast. Tape marks on the background for the waistband corners and hem endpoints are a low-tech trick that makes a big difference when you are shooting 30 to 300 SKUs.
How to light and shoot pants flat lays
Lighting makes or breaks photography flat lay results. Pants often include dark fabric, texture shifts, and long vertical areas that can show uneven exposure very quickly. Good light should reveal material and construction without creating harsh hotspots or muddy shadows.
Natural light can work well if it is diffused and consistent. Place your setup next to a large window and soften direct light with a sheer curtain or diffusion cloth. If you shoot often, artificial lighting is usually more dependable because it gives you control throughout the day and across product batches.
Use a camera or phone directly above the garment. The lens should be parallel to the surface so the waistband and hems stay proportional. Angled shots can distort the cut and make trousers look wider or shorter than they really are. If your store is upgrading equipment, check this guide to the best camera for product photography for practical buying criteria.
Here is a reliable shooting checklist:
If you are producing a high volume of apparel content, think beyond the single image. Collection pages need consistency. Product detail pages need clarity. Ads may need looser crops. Social posts may need a more styled look. A simple shot list before the session will save time later.
For merchants scaling beyond a home setup, a dedicated product photography studio may be worth considering, especially if you are handling large seasonal drops or wholesale catalogs. You can also browse AcquireConvert’s Catalog Photography resources if you are standardizing images across many SKUs.
Lighting pants correctly: show texture without glare (denim, black, and shiny fabrics)
What many store owners overlook is that pants are basically a lighting stress test. You have long legs that show gradients, seam lines that can cast tiny shadows, and fabrics that either swallow detail (black) or reflect light aggressively (coated and satin-like materials).
Common problems you will see:
A reliable lighting recipe for ecommerce flat lays is simple: diffuse your key light, add controlled fill, and use negative fill when the garment looks too flat.
Quick fixes by fabric type usually come down to exposure and angle:
The reality is that pants lighting is mostly about repetition. Once you find a setup that shows seams, texture, and color correctly, take a quick reference photo and keep your light positions consistent so the next batch matches the last one.
Editing tools and workflow options
Editing is where flat-lay photography becomes ecommerce-ready. The goal is not to make the pants look artificial. It is to remove distractions, correct exposure, and present the item as accurately as possible.
A typical editing workflow includes:
If you need help with cleanup, ProductAI offers several tools that may fit apparel workflows. AI Background Generator can help create styled scenes for secondary content. Free White Background Generator is more relevant for simple ecommerce catalog images. Increase Image Resolution may help when source files are too small for certain placements, while Background Swap Editor can be useful if you want alternate creatives without reshooting.
There are trade-offs. AI editing can save time, especially for secondary assets, but it still needs human review. Fabric edges, hems, belt loops, and subtle texture transitions can look off if the output is not checked carefully. For primary product images on Shopify, accuracy should win over speed every time.
If your brand relies on white or transparent cutouts, AcquireConvert’s category resources on White Background Photography and transparent background workflows can help shape a more reliable editing process.
Post-production checklist for ecommerce flat lays (color accuracy + batch workflow)
From a practical standpoint, editing pants for ecommerce is mostly a batching problem. You are rarely editing one image. You are editing 20, 80, or 300 images, and they need to look like they belong together on Shopify collection pages.
A simple batch workflow looks like this:
Color accuracy is where a lot of apparel brands get burned. Shoppers may forgive a slightly wrinkled flat lay, but they are much less forgiving when the color looks different from what arrives. Keep your white balance consistent across the shoot, avoid pushing saturation too far, and sanity-check your edited image against the real garment in similar lighting before you publish it.
Be careful with texture. Pants rely on fabric feel to sell, especially denim, twill, and wool blends. Over-smoothing to hide wrinkles can remove the natural weave and make the product look cheap or plasticky. Light cleanup is usually enough.
Retouching boundaries matter for ecommerce trust. It is usually fine to remove lint, dust, stray threads, and tiny background marks. It is also normal to reduce a distracting wrinkle if it is clearly a photography artifact and not how the pants normally look. What you want to avoid is anything that changes the product in a meaningful way, like altering color, reshaping the legs, hiding wear patterns, or changing the fabric texture. If a shopper feels misled, you often pay for it in returns.
Pros and Cons
Strengths
Considerations
Who this approach is best for
Flat lay pants photography is a strong fit for Shopify and ecommerce operators who need clean catalog images without the cost of a full apparel production setup. It is especially useful for stores selling basics, denim, trousers, kidswear, workwear, or private label collections where product consistency matters more than editorial drama.
It also suits growth-stage brands building internal systems. If you are adding products regularly and want a process your team can repeat, flat lay photography gives you a manageable standard. For premium fashion brands, it usually works best as part of a mixed image set that also includes model, close-up, and lifestyle photography.
How to choose the right flat lay workflow
If you are deciding how far to invest in lay flat photography for pants, focus on what supports your catalog, your team, and your store economics.
1. Match the image style to the product type
Structured trousers, denim, and uniforms usually perform well with a neat, symmetrical flat lay. Soft lounge pants or premium fashion pieces may need a more styled composition plus model shots. Choose the format that answers buyer questions fastest.
2. Build for consistency before creativity
Many store owners start with one great image and then struggle to repeat it across 80 SKUs. Standardize your background, camera height, garment placement, and export dimensions first. Once that is stable, add more stylized shots for marketing channels.
3. Decide what should be handled in camera versus in editing
Good prep usually saves more time than aggressive editing. Straight seams, smooth waistbands, and lint-free fabric are better fixed before you shoot. Editing should support the product, not rescue poor setup.
4. Use AI carefully for secondary assets
Flat lay photography ai tools can help create alternate backgrounds, resize images, or speed up cleanup. That can be useful for social campaigns, email banners, or creative testing. For main ecommerce product images, review every output carefully so the garment still looks true to the real item.
5. Scale the setup based on catalog volume
If you launch a few products per month, a home setup may be enough. If you shoot large collections or need marketplace-ready consistency across many categories, a more formal process or studio arrangement may be worth it. The right answer depends on volume, team time, and the visual expectations of your niche.
AcquireConvert is a helpful resource here because the advice is grounded in what ecommerce operators actually need to produce and publish. Giles Thomas brings a practical store-owner perspective as a Shopify Partner and Google Expert, which is useful when you are judging images not only by how they look, but by how they support merchandising, ad creative, and conversion paths.
Frequently Asked Questions
What is flat lay pants photography?
It is a product photography method where pants are arranged on a flat surface and shot from directly above. For ecommerce, it helps show shape, fabric, and construction clearly. It is commonly used for jeans, chinos, trousers, joggers, and kidswear because it is consistent, fast to repeat, and easier to standardize across a catalog.
Is flat lay better than on-model photography for pants?
Not always. Flat lay is better for consistency, speed, and detail visibility, while on-model photography is better for fit and drape. Many stores use both. A common setup is flat lay or ghost-mannequin style for the main catalog workflow, then on-model images for premium PDPs, social content, or higher-consideration apparel products.
How should I fold pants for a flat lay photo?
For most ecommerce uses, keep pants either fully extended or folded in a way that still shows the waistband, rise, and leg shape. Make sure seams are straight, hems are even, and the fly area is centered. Avoid folds that hide important construction details unless the image is meant to be a secondary styled shot.
What background works best for trousers flat lay pants photography?
A plain white, light gray, or neutral background usually works best for ecommerce because it keeps attention on the garment and is easier to standardize. Textured or colored backgrounds can work for social and campaign content, but for product page images, cleaner backgrounds are usually the safer option for clarity and consistency.
Do I need a professional camera for lay flat photography?
No, not necessarily. A modern smartphone can produce solid results if your lighting, styling, and framing are controlled. A dedicated camera may offer more control and higher-quality files, especially for larger catalogs or premium brands. The bigger factor is usually consistency in setup rather than camera cost alone.
Can AI help with flat lay photography editing?
Yes, AI can help with tasks like background cleanup, resizing, and alternate creative variations. It may speed up production for social assets or secondary product images. Still, it should not replace human review. Pants images often include edges, seams, and textures that need careful checking so the final result stays accurate.
What details should I capture besides the main flat lay image?
Include close-up images of pockets, waistbands, buttons, zippers, stitching, hems, lining, or fabric texture where relevant. These supporting frames help answer buyer questions and may reduce uncertainty. For Shopify product pages, detail images are especially helpful when the product has premium materials or functional construction worth highlighting.
How many pants flat lay photos should I use on a product page?
There is no fixed number, but many stores benefit from a main full-product shot, a back view, two or three detail shots, and at least one image that gives context for texture or styling. The right number depends on product complexity, price point, and how much explanation the item needs before purchase.
How to photograph pants flat lay?
Prep the pants first by steaming, lint rolling, and fixing seam twists. Lay them on a consistent background, align the waistband and fly, and shoot from directly overhead with the lens parallel to the surface. Use diffused light so you can see texture without harsh hotspots, then edit with consistent white balance and crop spacing so your Shopify catalog looks uniform.
What is flat lay clothing photography?
Flat lay clothing photography is shooting apparel arranged on a flat surface, typically from directly above. In ecommerce, it is used to show shape, details, and fabric clearly in a repeatable way across many SKUs. It is popular because it is easier to standardize than many lifestyle setups and can fit lean in-house workflows.
How do you take a flat lay in photography?
Use a flat, clean surface and position your camera directly above it. Keep the lens parallel to the surface to avoid distortion, and use the same height and framing each time for consistency. Style the product carefully, light it with a soft, diffused source, and leave enough margin in the frame so you can crop consistently for different placements.
What is the 20 60 20 rule in photography?
The “20 60 20” rule is a simple styling guideline some photographers use for flat lays: roughly 60 percent of the frame is the main subject, with about 20 percent supporting elements on each side to balance the composition. For ecommerce pants flat lays, the practical version is keeping the pants as the clear focus and leaving consistent negative space for cropping, while limiting props so they do not compete with the product.
Key Takeaways
Conclusion
Flat lay pants photography works best when you treat it as a repeatable ecommerce system, not just a creative exercise. The right fold, styling, lighting, and editing choices can make pants look cleaner, more consistent, and easier for shoppers to evaluate. For most stores, that is the real advantage. You are not trying to create the flashiest image possible. You are trying to present the product clearly enough that a shopper can make a confident decision. If you want to improve your apparel image workflow further, explore AcquireConvert’s photography guides and category resources. Giles Thomas’s practical approach is especially useful for Shopify merchants who need content systems they can actually run in-house and apply across a growing catalog.
This article is editorial content for educational purposes and is not a paid endorsement unless explicitly stated otherwise. Tool availability and features may change over time, so verify current details directly with each provider before use. Any results from photography, editing, or ecommerce optimization will vary by store, workflow, product type, and implementation quality.

Hi, I'm Giles Thomas.
Founder of AcquireConvert, the place where ecommerce entrepreneurs & marketers go to learn growth. I'm also the founder of Shopify agency Whole Design Studios.