How to Set Up a Packshot Studio (2026 Guide)

If you sell physical products online, your images do more than fill space on a product page. They shape trust, reduce hesitation, and help shoppers understand what they are buying. A well-planned packshot studio gives you repeatable, clean product images without needing a commercial agency setup every time. For many Shopify merchants, that means faster launches, more consistent listings, and better control over image quality across collections. This guide walks you through how to set up a packshot studio for ecommerce use, from room choice and lighting to camera position and editing workflow. If you are still getting your foundations in place, start with this guide to product photography so your studio decisions support the kind of images your store actually needs.
Contents
What a packshot studio needs to do
A packshot studio is not just a corner with a white backdrop. For ecommerce, it needs to produce consistent, accurate, repeatable images that work across product pages, collection pages, marketplaces, paid ads, and sometimes print. That means your setup should help you control lighting, shadows, framing, and color from one shoot to the next.
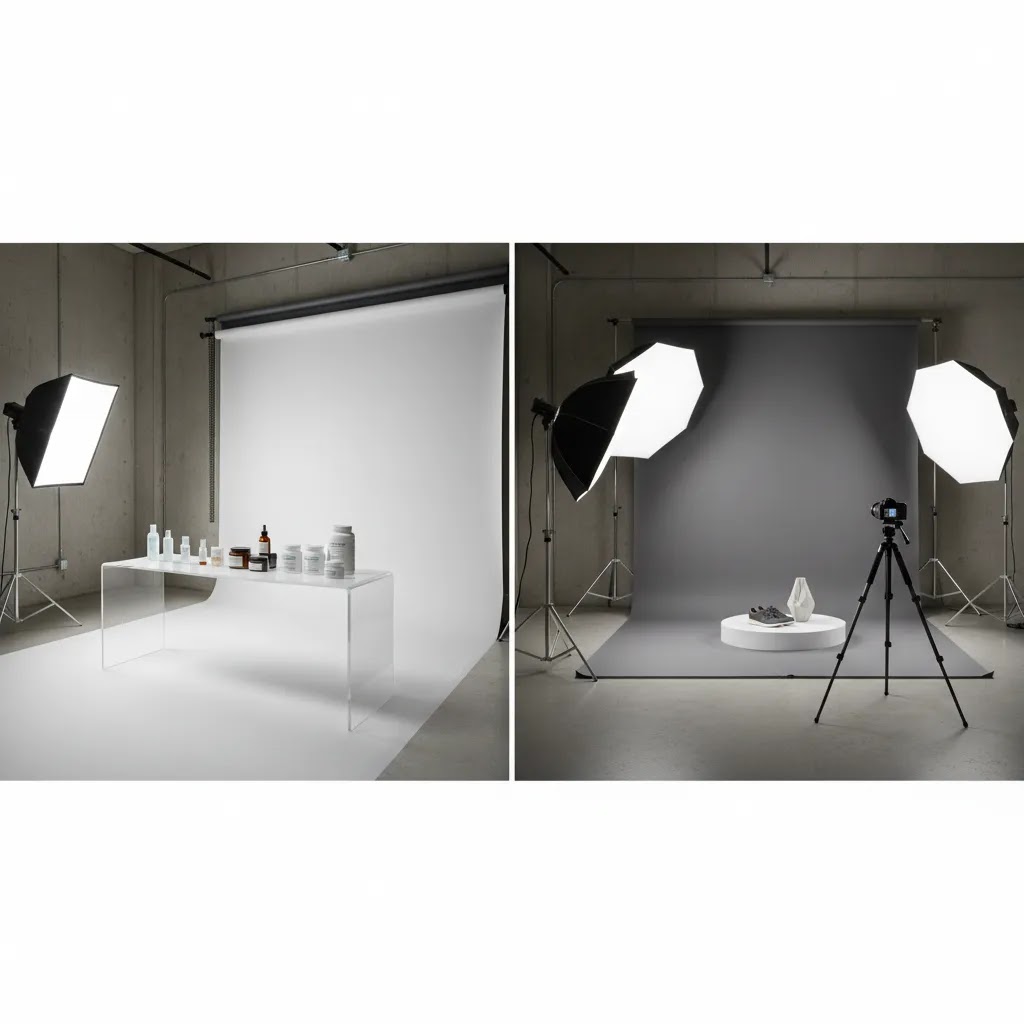
The exact setup depends on what you sell. Small cosmetics, jewelry, supplements, and packaged goods often work well on a tabletop station. Apparel, footwear, and larger home products may need more floor space, taller backdrops, and stronger lights. If your catalog includes both clean cutout images and more styled shots, you may need one area for packshots and another for more creative scenes like flat lay photography.
For most store owners, the goal is not to recreate a high-rent commercial packshot photography studio in London or Birmingham. It is to build a reliable in-house system that keeps image production moving. A good packshot studio helps you launch products faster, reduce dependence on one-off freelancers, and keep visual standards consistent as your catalog grows.
Packshot types you might need (and what each one requires)
One reason packshot studio planning gets confusing is that “packshot” gets used to describe several different deliverables. From a practical standpoint, the right setup depends less on the word “packshot” and more on the asset types your store and channels actually need.
Simple packshots (white or neutral background)
This is the classic product-on-white image used on Shopify product pages, collection grids, and many ad feeds. The setup is typically tabletop, a sweep backdrop, and soft, even light that keeps shadows controlled. The key here is repeatability: matching angle, crop, and brightness across your catalog.
Bottle packshots (glass, liquids, glossy labels)
Bottles and jars are where many in-house studios start to struggle. Glass and glossy labels show every reflection, and liquid products can look “flat” without careful edge lighting. Your physical setup usually needs larger diffusers, better reflection control (flags and foam boards), and more intentional light placement to define shape without hot spots.
Clothing packshots (apparel, footwear, soft goods)
Clothing can be shot as flat lays, on a mannequin, on a model, or as “ghost mannequin” (where the inside label area and shape are visible without the mannequin showing). Each approach changes your requirements. You may need more space, more height, and a more consistent steaming and pinning process than you expect. Footwear and bags often benefit from controlled shadows so they do not look like they are floating.
Luxury packshots (high-end finishes and close-up detail)
Luxury products often rely on material cues: texture, embossing, metallic foils, and fine edges. That typically means tighter control of highlights, more careful dust management, and more time spent on micro-adjustments. Many brands also need higher-resolution crops for detail views, not just a single hero image.
360 packshot photography (spin sets)
360 packshots are a sequence of images shot around the product, usually on a turntable, then stitched or displayed as an interactive spin on your product page. The physical requirement is consistency across frames: fixed camera position, locked exposure and white balance, and a turntable that rotates in consistent increments. The more reflective the product, the more obvious even tiny lighting shifts become across the rotation.
Packshot video (short clips for PDPs and ads)
Video packshots are often short, controlled clips, for example a slow turntable rotation, a close-up texture pass, or a quick “in-hand” scale shot. Video typically needs stronger, flicker-free lighting and a setup that can stay stable for longer takes. You also need to think about where the video will live: Shopify product media, paid social, and marketplaces can have different aspect ratios and duration expectations.
Think of it this way: your packshot studio is really an asset production station. If you know which outputs you need, you can build the simplest setup that reliably produces them, then expand later when your catalog and marketing channels justify it.
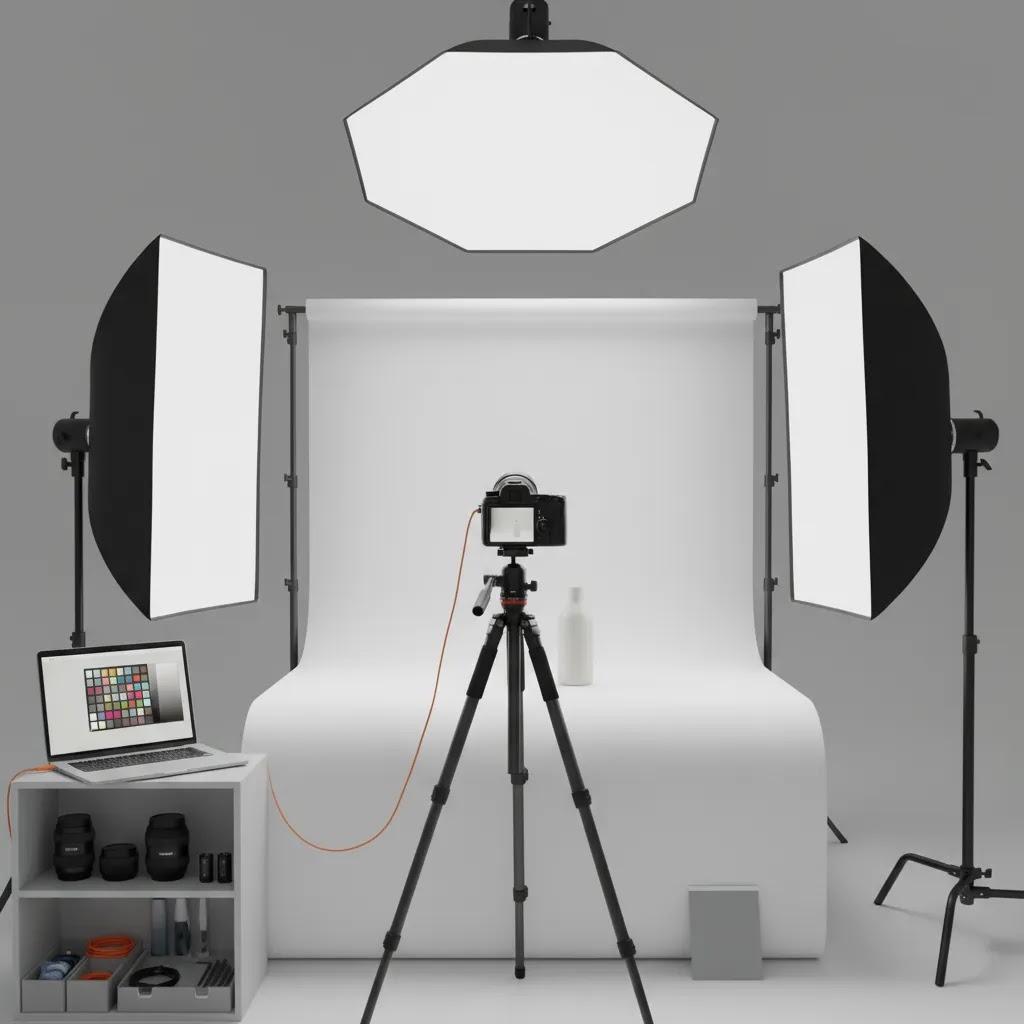
Core equipment and room setup
Your packshot studio should start with the room, not the camera. Pick a space where you can control outside light. Mixed daylight and artificial light often create inconsistent color and exposure, which slows editing and makes product pages look uneven.
Here is the basic setup most ecommerce brands need:
For reflective or transparent products, your room setup matters even more than the gear list. Glass, metal, and glossy labels pick up every stray reflection. In those cases, foam boards, diffusion material, and careful light placement often make a bigger difference than upgrading the camera body.
If you plan to shoot a wider mix of catalog images over time, it is worth reviewing broader product photography studio planning so your packshot area can scale with your store rather than needing a full rebuild later.
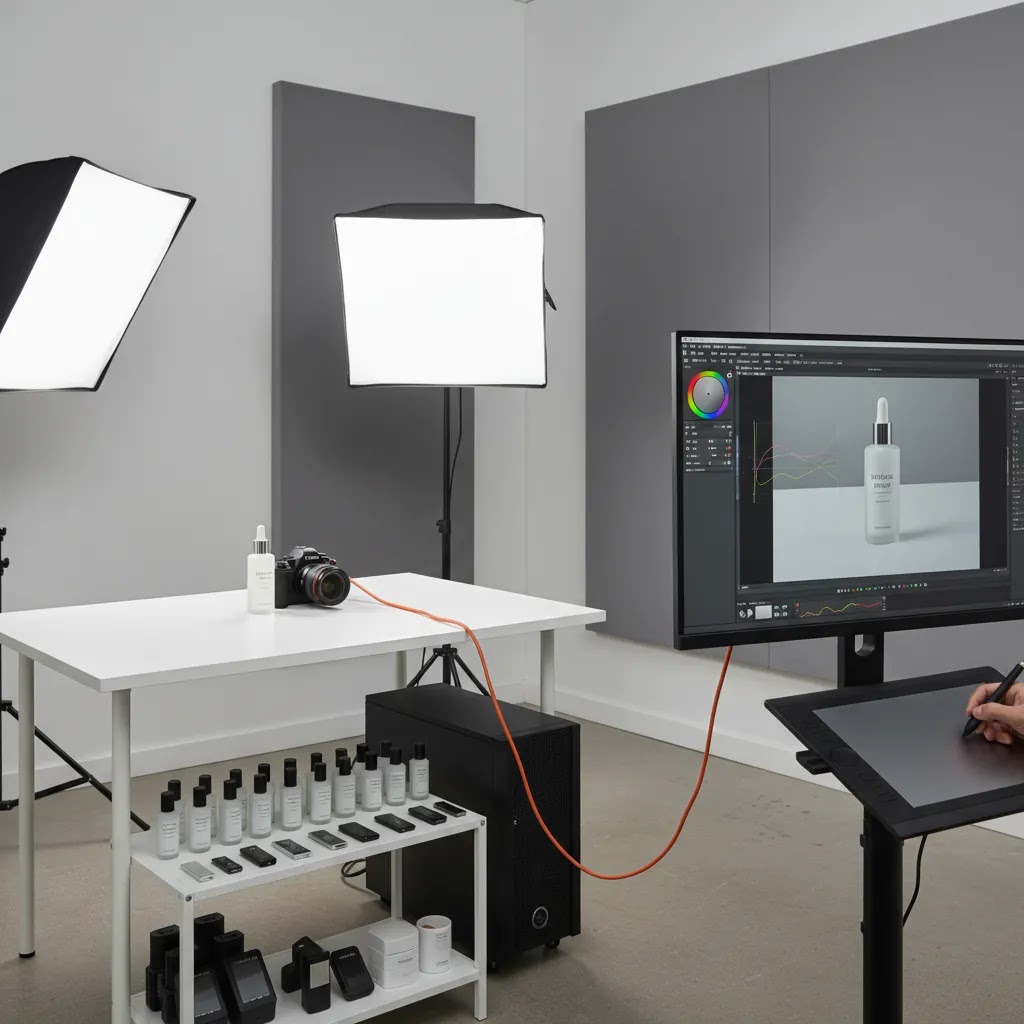
How to build a practical shooting workflow
The strongest packshot studio setups are built around workflow, not just equipment. A store owner with a modest setup and a clear process will usually produce better results than a cluttered studio full of underused gear.
Start by defining your standard shot list. For many ecommerce stores, that includes:
Next, document your camera height, focal length, light placement, and export settings. This is what makes product packshot photography repeatable. If one person shoots today and another reshoots next month, they should be able to match the existing catalog without guesswork.
For Shopify merchants, consistency matters because collection pages and product grids place images side by side. Even small differences in crop or brightness can make your store feel less polished. Standardizing aspect ratio, margins, shadow treatment, and background finish will usually improve how products look together.
You should also decide where editing fits in. Some brands want every image retouched manually. Others use AI-supported tools to handle repetitive cleanup. AcquireConvert’s photography sections on Product Photo Lighting and Product Photography Fundamentals are useful if you want to improve setup quality before spending more time in post-production.
From the available product data, tools such as Free White Background Generator, AI Background Generator, Background Swap Editor, and Increase Image Resolution may help with cleanup or alternate asset production. These tools can support workflow efficiency, but they do not replace getting lighting, styling, and capture quality right in the first place.
Pros and Cons
Strengths
Considerations
Packshot studio services vs in-house, what a professional studio typically offers
Here’s the thing: a professional packshot photo studio is not just “better gear.” It is usually a production system built for consistency at volume. If you are deciding whether to outsource, it helps to know what you are actually paying for beyond the photos.
What specialized studios often provide that is hard to replicate in-house
Many professional studios are set up for repeatable output across hundreds or thousands of SKUs. That can include controlled lighting rigs for specific product categories, calibrated color workflows, and dedicated retouching processes. In practice, you will often see a few capabilities that are difficult to match with a small in-house setup:
If you have ever tried to keep a DIY setup consistent across multiple shoot days while also running a store, you know why this matters. The studio is often selling you operational reliability, not just image aesthetics.
A practical “when to outsource” checklist
Outsourcing may make sense when your bottleneck is time, complexity, or quality requirements that your team cannot reliably hit. Consider outsourcing if one or more of these are true:
The reality is a hybrid approach is common for Shopify brands: routine packshots in-house, then outsourcing the difficult products or high-visibility launches where you want a more controlled finish.
How to work with a studio efficiently if you do outsource
When outsourcing goes badly, it is usually because the brief was vague, or because nobody agreed on what “done” means. You can avoid most issues with a simple operational process.
Start with a shot list and a spec sheet. Define angles, crop rules, background style, shadow treatment, and required exports. If you already have a catalog style, include a few reference images and call out what must match, like camera angle and product size within frame. For Shopify, also confirm aspect ratio so your product grids stay consistent.
Next, plan the logistics. Decide how products will be shipped, how items will be labeled, and whether you need the studio to steam apparel, assemble items, or remove stickers and protective films. Those “small” tasks are often what slows shoots down.
Finally, agree on turnaround expectations and revisions. Most studios will have a review step. Make sure you know how you will approve images, how many revision rounds are included, and what counts as a reshoot versus a retouch. Getting those details clear upfront helps you avoid a situation where small fixes drag on and delay your product launch.
Who should build an in-house packshot studio
This approach fits stores that add products regularly, manage a broad SKU count, or need ongoing control over catalog images. It is especially useful for brands selling cosmetics, packaged foods, supplements, accessories, homeware, and other products that benefit from clean, repeatable studio product photography.
If you only launch a few products each year, a professional packshot photography studio may still be the better option. The same applies if your products are unusually large, highly reflective, or need advanced retouching. Many growth-stage brands use a hybrid model: standard packshots in-house and campaign shoots outsourced.
Turnaround time, pricing expectations, and how to evaluate quality guarantees
When you are comparing in-house versus outsourcing, the decision often comes down to speed, predictability, and total effort, not just image quality. Competitor studios often advertise fast turnaround, transparent pricing, and satisfaction guarantees. Those can be helpful, but you should know what typically affects timelines and what to confirm before you commit.
How long packshot photography usually takes in practice
Turnaround time is rarely just “shooting time.” The way this works in practice is that the shoot can be quick, but product prep and post-production often drive the schedule. The biggest time sinks are usually:
If you are building in-house, plan your workflow assuming prep and editing will take at least as long as shooting, especially for your first few batches. If you are outsourcing, ask what the timeline includes: capture only, or capture plus retouching and export, and whether revisions extend the delivery date.
How to interpret “transparent pricing” and satisfaction guarantees
“Transparent pricing” usually means the studio has a menu, but you still need to verify what is included. Pricing can vary based on the number of angles, whether images require clipping paths, the level of retouching, and whether you need multiple formats for different channels.
Now, when it comes to quality guarantees like “satisfied or refunded,” treat them as a starting point, not a substitute for a clear scope. You want the details in writing, including:
Policies and terms can change, so it is worth checking the current wording before booking, especially if you are on a tight launch schedule.
A simple way to compare in-house vs outsourced cost over time
You do not need a complicated spreadsheet to make a good decision, but you do need to compare the right variables. For in-house, your ongoing “cost” includes team time, space, equipment depreciation, editing time, and the operational drag of stopping other work to shoot products.
For outsourcing, the cost drivers are usually your SKU count, complexity (materials and prep), how many deliverables per product, and the number of revisions you tend to need before assets are publish-ready.
Consider this: if your catalog changes constantly and reshoots are common, in-house can become more attractive because you can shoot on your schedule. If you do occasional big batches or sell products that are consistently difficult to light and retouch, outsourcing can be the more predictable path even if the per-SKU price looks higher at first glance.
AcquireConvert recommendation
If you run a Shopify store, the smartest packshot studio setup is usually the one that matches your catalog, your team size, and your publishing pace. Giles Thomas brings a practical operator’s perspective here as a Shopify Partner and Google Expert, which matters because product imagery affects more than aesthetics. It influences conversion confidence on product pages, feed quality for ads, and the overall consistency of your brand presentation.
At AcquireConvert, the goal is to help store owners make better decisions without overbuying equipment or relying on generic photography advice. Use this article alongside our guides on product photography, lighting, and camera selection to build a setup that fits how your store actually works. If you are comparing in-house production with editing support or AI-assisted post-production, review the wider category guidance before committing to a workflow that may be hard to scale later.
How to choose the right setup for your store
There is no single best packshot studio configuration for every ecommerce business. The right choice depends on five practical factors.
1. Product size and material
Small boxed products are much easier to shoot than glass bottles, chrome finishes, or soft apparel. Before buying gear, sort your SKUs by size and difficulty. This helps you decide whether a tabletop setup is enough or whether you need a larger commercial packshot photography studio approach with extra diffusion and floor space.
2. Catalog volume
If you list a few items each quarter, outsourcing may still make sense. If you add products weekly, you will usually benefit from an in-house station. Volume changes the economics because efficiency starts to matter more than perfection on a single hero image.
3. Channel requirements
Think about where images will be used. Shopify product pages, Google Shopping, marketplaces, wholesale sheets, and social ads may each need slightly different crops or backgrounds. A good packshot photo studio workflow starts with the strictest requirement and builds from there.
4. Staff time and skill
A simple setup that your team can use confidently is better than an advanced one nobody touches. If the founder, marketer, or operations lead will be shooting products, keep controls and processes straightforward. Use checklists for framing, lens choice, white balance, and export naming.
5. Editing workflow
Decide what should happen in camera and what should happen after the shoot. Clean capture usually saves time later. AI-supported tools can help with repetitive tasks like background cleanup or resolution improvement, but quality source images still matter. If you need exact color accuracy, fine edge detail, or luxury-level finishing, manual review remains important.
The best packshot studio is the one your business can use consistently. For most ecommerce brands, that means controlled light, stable framing, a documented shot list, and an editing process that does not create bottlenecks every time a new SKU arrives.
Frequently Asked Questions
What is a packshot studio?
A packshot studio is a controlled setup used to photograph products in a consistent, commercial style. It usually includes a backdrop, lighting, camera, tripod, and a defined workflow for repeatable results. In ecommerce, it is mainly used for clean product images on white or neutral backgrounds, especially for product pages, catalogs, and ad feeds.
Do I need a dedicated room for packshot photography?
No, but a dedicated room helps. The main goal is controlling light, reflections, and background consistency. A spare office, storage area, or quiet corner can work if you can block outside light and leave part of the setup in place. Rebuilding the studio before every shoot usually creates inconsistency and slows the process.
What lights work best for a packshot studio?
Soft, diffused lighting works best for most products because it reduces harsh shadows and helps maintain even exposure. Continuous lights are often easier for beginners because you can see the result live. Strobes can offer more power and control, but they may add complexity if you are still building your first in-house setup.
Can I use my phone instead of a camera?
You can for some products, especially if your images are mainly for web use and your phone allows manual control through an app. That said, a dedicated camera and lens typically give you more control over depth, sharpness, and repeatability. If you are comparing options, review your needs against this guide to the best camera for product photography first.
How big should a packshot studio be?
The answer depends on your largest product and your shooting style. A tabletop setup may be enough for cosmetics, accessories, and packaged goods. Larger items need more distance between the subject, lights, and backdrop. Always leave enough room to adjust light placement without introducing unwanted reflections or cramped angles.
Should I shoot on a white background?
For most ecommerce packshots, yes. White backgrounds create consistency, work well on product grids, and are often preferred for marketplaces and ads. Still, not every image in your store needs to be pure white. Many brands combine white-background packshots with contextual or lifestyle images to improve product understanding and brand feel.
Is it better to outsource packshot photography?
It depends on your volume, product complexity, and internal capacity. Outsourcing can make sense for occasional launches or technically difficult products. In-house production often becomes more attractive as SKU count grows and reshoots become common. Many brands use a mixed approach, keeping routine catalog work inside while outsourcing flagship campaigns.
Can AI tools replace a physical packshot studio?
Usually not fully. AI tools can help with background cleanup, resolution enhancement, and alternate asset creation, but they work best when the original capture is already strong. If your lighting, reflections, or product styling are poor, editing tools can only do so much. Think of AI as workflow support, not a substitute for good studio fundamentals.
What is the biggest mistake store owners make?
The most common mistake is treating packshot photography as a one-off creative task rather than a repeatable production system. Without documented framing, lighting, and export rules, image quality drifts over time. That inconsistency is especially visible on Shopify collection pages, where products sit side by side and visual differences become obvious.
What is a packshot in product photography (packshot photography meaning)?
A packshot is a clean, product-focused photo that clearly shows what you are selling, usually on a simple background like white, light gray, or a consistent branded color. The purpose is clarity and consistency, not storytelling. In ecommerce, packshots are commonly used as the main product images on Shopify product pages, collection thumbnails, and product feeds for ads and marketplaces.
What is included in professional packshot retouching?
It depends on the studio and the product, but professional retouching often includes dust and scratch removal, label straightening, cleaning up fingerprints, correcting minor imperfections, and making the background consistent. For some products it can also include more advanced work like clipping paths for clean cutouts, controlling reflections on glossy surfaces, and matching color across a full product range. Even with strong retouching, it still helps to send clean, well-prepped products, because heavy fixes can slow turnaround and may not look natural if pushed too far.
What is 360 packshot photography, and do I need a turntable?
360 packshot photography is a series of images captured as the product rotates, then displayed as an interactive spin. A turntable is the most common way to do this because it keeps rotation consistent and reduces the chance your product shifts between frames. Some simple setups can rotate the product manually, but consistency can be harder to maintain, especially for reflective items where lighting changes show up across the spin.
How long does packshot photography usually take (turnaround time)?
Turnaround depends on product complexity, shot count per SKU, and retouching requirements. A straightforward batch of boxed products is typically faster than glass, reflective metal, apparel that needs steaming, or luxury items that require detailed cleanup. Whether you shoot in-house or outsource, the timeline is often driven by prep and post-production as much as the shoot itself, and revisions can extend delivery if the original brief was not specific.
Key Takeaways
Conclusion
A good packshot studio does not need to look like a high-end commercial rental space. It needs to help you create clean, repeatable product images that fit your store, your catalog, and your team’s workflow. If you focus on controlled lighting, stable framing, and a documented process, you can build a setup that supports faster launches and a more consistent shopping experience. AcquireConvert is built for store owners who want practical ecommerce guidance, not vague photography theory. If you want to go further, explore our related guides on product photography, lighting, and camera selection to build a studio process that works for your Shopify store and scales with your catalog.
This article is editorial content for educational purposes and is not a paid endorsement unless explicitly stated otherwise. Pricing, features, and availability for any referenced tools or services are subject to change, so verify details directly with the provider. Any results from photography process changes, studio setup improvements, or editing tools will vary by product type, execution quality, and store context.

Hi, I'm Giles Thomas.
Founder of AcquireConvert, the place where ecommerce entrepreneurs & marketers go to learn growth. I'm also the founder of Shopify agency Whole Design Studios.